

面向对象进阶和模块
复习上节内容:
# 面向对象
# 类 实例化 对象/实例
# 什么是类? 拥有相同属性和方法的一类事物
# 什么是对象? 类的一个实际表现,给类中的属性填上具体的值,能够使用类中的方法
# 实例化的过程中做了那些事儿?
    # 对象 = 类名()
    # 首先要创造一个对象
    # 被创造出来的这个对象会作为参数传递给__init__方法中的第一个参数
    # 调用__init__方法,传递一些初始化参数 —— 初始化方法
    # 将初始化之后的对象返回给调用者
# 查看属性和调用方法
    # 类名 : 静态属性、类属性
    # 对象 : 调用方法(动态属性)、查看对象的属性
# 组合 : 两类事物之间的所有关系,什么有什么的关系
# 继承 :两个类之间的包含关系,什么是什么的关系
    # 钻石继承问题
        # 经典类 : 在一个子类中寻找方法的时候,从子类到父类先找到的名字会被执行。
                    # 深度优先就是在经典类中找类的顺序的一种算法
        # 新式类 : 广度优先
        # py2中,主动继承object类的都是新式类,它的子类也是新式类
        # py3中,所有的类都是新式类,都继承object
    # super :
        # 自己有父类也有的时候,在单继承中super就可以用父类的
        # 在多继承中 super遵循mro广度优先顺序
    # 派生 :
        # 属性
        # 方法
# 多态
        # python中不需要程序员自己实现多态
        # 在其他强数据类型舒颜的面向对象中,我要传递一个参数必须指定这个参数的数据类型
        # 但是,往往在这个地方需要传递的不止一种类型
        # 建立一个父类,让所有要传递的数据类型都继承这个父类,在参数指定数据类型的时候
        # 指定父类名就可以了

# def eat(Animal alex):pass


# 思维导图
    # python :基础数据类型 文件处理 函数 模块 面向对象
    # 函数
        # 函数的定义 :参数和返回值
        # 生成器函数
        # 递归函数
        # 内置函数
        # 匿名函数
    # 面向对象
        # 基础概念
        # 定义
        # 三大特性 : 封装
                    # 多态
                    # 继承

一、封装
# 广义上的封装 :把变量和函数都放在类中
# 狭义上的封装 :把一些变量 或者 方法 隐藏起来,不对外公开
    # 公有的 :
    # 私有的 : __名字(名字前面加两个双下划线,这个名字就私有了)

举例1:
class Person:
    __country = '中国'    # 私有的静态属性

print(Person.__country)   # AttributeError: type object 'Person' has no attribute '__country'
#执行后报错
# 私有的名字 只能在类的内部使用 不能在类的外部使用

举例2:
class Person:
    __country = '中国'    # 私有的静态属性

# print(Person.__country)   # AttributeError: type object 'Person' has no attribute '__country'
# 私有的名字 只能在类的内部使用 不能在类的外部使用
print(Person.__dict__)
执行结果:
{'__module__': '__main__', '_Person__country': '中国', '__dict__': <attribute '__dict__' of 'Person' objects>, '__weakref__': <attribute '__weakref__' of 'Person' objects>, '__doc__': None}
要想取到中国:
print(Person._Person__country) # 不能使用上面这种方式去调用私有的变量(虽然也能有结果)
# 如果非要在类的外部调用一个私有的名字,name必须是在私有的名字前面加 _类名__私有的名字
执行结果:中国

举例3:
class Person:
    __country = '中国'
Person.__name = 'XXX'
print(Person.__name)   # 在类的外部不能第一一个私有变量
print(Person.__dict__)

执行结果:
XXX
{'__module__': '__main__', '_Person__country': '中国', '__dict__': <attribute '__dict__' of 'Person' objects>, '__weakref__': <attribute '__weakref__' of 'Person' objects>, '__doc__': None, '__name': 'XXX'}
结论:
# 私有的变量 :
    # 在类的内部 如果使用__变量的形式会发生变形,python会自动的为你加上_类名
举例4:
class Person:
    __country='中国'
    def __init__(self,name,pwd):
        self.name=name
        self.__pwd=pwd
    def login(self):
        print(self.__dict__)
        if self.name=='alex' and self.__pwd=='alex3714':
            print('登录成功')


alex=Person('alex','alex3714')
alex.login()
print(alex.__dict__)
#print(alex.__pwd) 这个执行会报错 AttributeError: 'Person' object has no attribute '__pwd'
执行结果:
{'name': 'alex', '_Person__pwd': 'alex3714'}
登录成功
{'name': 'alex', '_Person__pwd': 'alex3714'}
举例5:
class Person:
    def __init__(self):pass
    def __制造密码转换(self,inp):
        print('eating')
    def 注册(self):
        inp = input('pwd>>>')
        加密之后的密码 = self.__制造密码转换(inp)

# alex3714 --->


总结:
# 静态属性 、 对象属性、 方法(动态属性) 前面加上双下划綫都会变成私有的
# 私有的特点就是只能在类的内部调用,不能在类的外部使用
举例6:(以下两个例子对比)
class Foo:
    def __init__(self):
        self.func()
    def func(self):
        print('in Foo')

class Son(Foo):
    def func(self):
        print('in son')

s = Son()
执行结果:
in son
class Foo:
    def __init__(self):
        self.__func()    # self._Foo__func
    def __func(self):
        print('in Foo')

class Son(Foo):
    def __func(self):    # _Son__func
        print('in son')

s = Son()
执行结果:
in Foo
print(Foo.__dict__)
print(Son.__dict__)
执行结果:
{'__module__': '__main__', '__init__': <function Foo.__init__ at 0x02193540>, '_Foo__func': <function Foo.__func at 0x021934F8>, '__dict__': <attribute '__dict__' of 'Foo' objects>, '__weakref__': <attribute '__weakref__' of 'Foo' objects>, '__doc__': None}
{'__module__': '__main__', '_Son__func': <function Son.__func at 0x021934B0>, '__doc__': None}
二、类中的装饰器函数
# classmethod staticmethod property
举例1:
from math import pi
class Circle:
    def __init__(self,r):
        self.r = r

    @property
    def area(self):
        return self.r ** 2 * pi

    @property
    def perimeter(self):
        return self.r * 2 * pi
# # 方法 动词 —— 动作或者技能
# # 名词 圆的面积 圆的周长 圆的班级
# # 将一个函数伪装成为属性 @property

c = Circle(3)
print(c.area)
print(c.perimeter)
执行结果:
28.274333882308138
18.84955592153876
举例2:苹果原来价,打折价,假如原价上调
#property __私有的名字

class Goods:
    def __init__(self,price,discount):
        self.__price = price
        self.discount = discount
    @property
    def price(self):
        return self.__price * self.discount
    @price.setter
    def price(self,newprice):
        self.__price = newprice
    @price.deleter
    def price(self):
        del self.__price
apple = Goods(8,0.7)
print(apple.price)
apple.price = 10
print(apple.price)
print(apple.__dict__)
执行结果:
5.6
7.0
{'_Goods__price': 10, 'discount': 0.7}
接着上面的继续写代码:
del apple.price
print(apple.__dict__)
执行结果:
{'discount': 0.7}

再接着
print(apple.price)
执行这个就报错
举例3:
class Person:
    Country = '中国人'
    @classmethod       #把func变成了一个类方法
    def func(cls):     # cls是指向类的内存空间
        print('当前的角色的国籍是%s'%cls.Country)

alex = Person()
alex.func()
Person.func()
# 如果某一个类中的方法 并没有用到这个类的实例中的具体属性
# 只是用到了类中的静态变量 就使用类方法

执行结果:
当前的角色的国籍是中国人
当前的角色的国籍是中国人
举例4:
# 如果 一个方法 既不会用到对象中的属性也不会用到类中的属性
# 就应该被定义为一个静态方法

class Person:
    Country = '中国人'
    @classmethod       #把func变成了一个类方法
    def func(cls):     # cls是指向类的内存空间
        print('当前的角色的国籍是%s'%cls.Country)
class Student:
    @staticmethod
    def login():
        name = input('name : ')
        pwd = input('pwd : ')
        if name =='' and pwd =='':
            print('实例化')

Student.login()
三、序列化
# 什么叫序列化呢?
    # { '10100011':{'name':,age: ,class:},}
    # 数据类型 —— 字符串的过程
# 什么时候要用序列化呢?
    # 数据从内存到文件
    # 数据在网络上传输  字节 - 字符串 - 字典
# python中的序列化模块都有哪些?
    # json   通用的 支持的数据类型 list tuple dict
    # pickle python中通用的 支持几乎所有python中的数据类型
    # shelve python中使用的便捷的序列化工具
# dumps loads
# dump load
举例1:
import json
dic = {"k":'v'}
print(type(dic))
json_dic = json.dumps(dic)   # 字典转字符串的过程 ——序列化
print(json_dic)
print(dic)
print(type(json_dic))
print(json.loads(json_dic)) # 字符串 转回其他数据类型 —— 反序列化
执行结果:
<class 'dict'>
{"k": "v"}
{'k': 'v'}
<class 'str'>
{'k': 'v'}
举例2:
with open('d','w') as f:
    json.dump(dic,f)       # dump是和文件交互的
    json.dump(dic,f)       # dump是和文件交互的

with open('d') as f:
    print(json.load(f))      # 从文件中反序列化
# 如果要dump多条数据
# 每一条数据线dumps一下 编程字符串 然后打开文件 write写进文件里 \n
# 读取的时候按照标志读取或者按行读
# 读出来之后 再使用loads
import json
dic = {"k":'v'}
print(type(dic))
json_dic = json.dumps(dic)
with open('aaa','w') as f:
    str_dic = json.dumps(dic)
    f.write(str_dic+'\n')
    f.write(str_dic+'\n')
    f.write(str_dic+'\n')
    f.write(str_dic+'\n')

with open('aaa') as f:
    for line in f:
        print(json.loads(line.strip()))
import pickle
class A:
    def __init__(self,name):
        self.name = name

alex = A('alex')
print(pickle.dumps(alex))
with open('bbb','wb') as f:
    pickle.dump(alex,f)
    pickle.dump(alex,f)
    pickle.dump(alex,f)
#
with open('bbb','rb') as f:
    while True:
        try:
            obj = pickle.load(f)
            print(obj.name)
        except EOFError:
            break

执行结果:
<class 'dict'>
{'k': 'v'}
{'k': 'v'}
{'k': 'v'}
{'k': 'v'}
b'\x80\x03c__main__\nA\nq\x00)\x81q\x01}q\x02X\x04\x00\x00\x00nameq\x03X\x04\x00\x00\x00alexq\x04sb.'
alex
alex
alex
# 3点
# 1.pickle支持更多的数据类型
# 2.pickle的结果是二进制
# 3.pickle在和文件交互的时候可以被多次load


四、hashlib模块
# 登录 —— hashilib
# 数据库泄露
# 存储用户密码的时候 : 不要存储明文
# 对用户输入的密码进行一种计算 计算之后 会得到一个新的 固定的 字符串

# hashlib模块  摘要算法  --->  单向不可逆
# 包含了多种算法
# 将一个字符串进行摘要运算 拿到不变的 固定长度的值
举例1:
import hashlib
md5obj = hashlib.md5()   # 实例化一个md5摘要算法的对象
md5obj.update('alex3714'.encode('utf-8')) # 使用md5算法的对象来操作字符串
ret = md5obj.hexdigest() # 获取算法的结果 hex+digest 16进制+消化
print(ret,type(ret),len(ret))

执行结果:
aee949757a2e698417463d47acac93df <class 'str'> 32

举例2:
# 注册 :alex3714  -摘要-> 文件里
# 登录 :alex3714  -摘要-> 和文件里比对
md5obj = hashlib.sha1()   # 实例化一个md5摘要算法的对象
md5obj.update('alex3714'.encode('utf-8')) # 使用md5算法的对象来操作字符串
ret = md5obj.hexdigest() # 获取算法的结果 hex+digest 16进制+消化
print(ret,type(ret),len(ret))
执行结果:
8a003668a9c990f15148f9e4046e1410781533b6 <class 'str'> 40

举例3:撞库
# 撞库
# 别人有一个庞大的库 :字符串 --> md5值的关系
# 加盐
import hashlib
md5obj = hashlib.md5('tesla'.encode('utf-8'))   # 实例化一个md5摘要算法的对象,加盐
md5obj.update('alex3714'.encode('utf-8')) # 使用md5算法的对象来操作字符串
ret = md5obj.hexdigest() # 获取算法的结果 hex+digest 16进制+消化
#aee949757a2e698417463d47acac93df
print(ret)
执行结果:7dafaec086d0ddae18b63e4fffafbf8e

举例4:动态加盐
# 动态加盐
# userinfo表
username = 'alex'
md5obj = hashlib.md5(username.encode('utf-8'))   # 实例化一个md5摘要算法的对象,加盐
md5obj.update('alex3714'.encode('utf-8')) # 使用md5算法的对象来操作字符串
ret = md5obj.hexdigest() # 获取算法的结果 hex+digest 16进制+消化
#aee949757a2e698417463d47acac93df
print(ret)
执行结果:
ee838c58e5bb3c9e687065edd0ec454f

举例5:检查文件一致性
# 校验文件一致性
# 自动化 —— python代码来做验证
import hashlib
md5obj = hashlib.md5()   # 实例化一个md5摘要算法的对象
md5obj.update('alex'.encode('utf-8')) # 使用md5算法的对象来操作字符串
md5obj.update('3714'.encode('utf-8')) # 使用md5算法的对象来操作字符串
print(md5obj.hexdigest())
执行结果:aee949757a2e698417463d47acac93df

# 写一个函数 接收两个文件的地址 返回T/F
五、配置文件模块configparser
有一个example.ini的文件前提:大概内容格式如下:
-----------------------------
[DEFAULT]
serveraliveinterval = 45
compression = yes
compressionlevel = 9
forwardx11 = yes
[topsecret.server.com]
host port = 50022
k1 = 11111
[yuan]
k2 = 22222
-----------------------------
举例1;
import configparser

config = configparser.ConfigParser()
config["DEFAULT"] = {'ServerAliveInterval': '45',
                      'Compression': 'yes',
                     'CompressionLevel': '9',
                     'ForwardX11':'yes'
                     }

config['bitbucket.org'] = {'User':'hg'}
config['topsecret.server.com'] = {'Host Port':'50022','ForwardX11':'no'}
with open('example.ini', 'w') as f:
   config.write(f)

import configparser
#
config = configparser.ConfigParser()
print(config.sections())
config.read('example.ini')
print(config.sections())        #   ['bitbucket.org', 'topsecret.server.com']  # DEFAULT --> 全局

print('bytebong.com' in config) # False
print('bitbucket.org' in config) # True
print(config['bitbucket.org']["user"])  # hg
print(config['DEFAULT']['Compression']) #yes
print(config['topsecret.server.com']['ForwardX11'])  #no
print(config['bitbucket.org'])          #<Section: bitbucket.org> 生成器
for key in config['bitbucket.org']:     # 注意,有default会默认default的键
    print(key)
print(config.options('bitbucket.org'))  # 同for循环,找到'bitbucket.org'下所有键
print(config.items('bitbucket.org'))    #找到'bitbucket.org'下所有键值对
print(config.get('bitbucket.org','compression')) # yes       get方法Section下的key对应的value
执行结果:
[]
['bitbucket.org', 'topsecret.server.com']
False
True
hg
yes
no
<Section: bitbucket.org>
user
serveraliveinterval
compression
compressionlevel
forwardx11
['user', 'serveraliveinterval', 'compression', 'compressionlevel', 'forwardx11']
[('serveraliveinterval', '45'), ('compression', 'yes'), ('compressionlevel', '9'), ('forwardx11', 'yes'), ('user', 'hg')]
yes
举例2:
import configparser
config = configparser.ConfigParser()
config.read('example.ini')
config.add_section('yuan')
config.remove_section('bitbucket.org')
config.remove_option('topsecret.server.com',"forwardx11")
config.set('topsecret.server.com','k1','11111')
config.set('yuan','k2','22222')

config.write(open('example.ini', "w"))
六、logging模块
# logging
# 日志
# 程序出错 -- 日志 对内看的
# 给用户看的 对外看的

举例1:控制台不输出,文件有内容
import logging
# 简单配置
logging.basicConfig(level=logging.DEBUG,
                    format='%(asctime)s %(filename)s[line:%(lineno)d] %(levelname)s %(message)s',
                    datefmt='%a, %d %b %Y %H:%M:%S',
                    filename='test.log',
                    filemode='w'
                    )
logging.debug('debug message')    # 非常细节的日志 —— 排查错误的时候使用
logging.info('info message')     # 正常的日志信息
logging.warning('warning message')  # 警告
logging.error('error message')    # 错误
logging.critical('critical message') # 严重错误

执行结果:控制台什么都没输出,但是test.log文件有内容,如下:
Sat, 26 May 2018 23:55:44 keshamn.py[line:13] DEBUG debug message
Sat, 26 May 2018 23:55:44 keshamn.py[line:14] INFO info message
Sat, 26 May 2018 23:55:44 keshamn.py[line:15] WARNING warning message
Sat, 26 May 2018 23:55:44 keshamn.py[line:16] ERROR error message
Sat, 26 May 2018 23:55:44 keshamn.py[line:17] CRITICAL critical message

举例2:控制台和文件都要输出
# logger对象的方式配置
logger = logging.getLogger()
# 吸星大法

# 先创造一个格式
formatter = logging.Formatter('%(asctime)s - %(name)s - %(levelname)s - %(message)s')
formatter1 = logging.Formatter('%(asctime)s - %(levelname)s - %(message)s')

# 往文件中输入
fh = logging.FileHandler('log.log',encoding='utf-8')   # 创造了一个能操作文件的对象fh
fh.setFormatter(formatter) # 高可定制化
logger.addHandler(fh)
logger.setLevel(logging.DEBUG)
sh = logging.StreamHandler()
sh.setFormatter(formatter1)
logger.addHandler(sh)

fh.setLevel(logging.ERROR)
sh.setLevel(logging.DEBUG)


logger.debug('logger debug message')
logger.info('logger info message')
logger.warning('logger warning message')
logger.error('程序出错了')
logger.critical('logger critical message')

执行结果:
2018-05-26 23:57:29,389 - DEBUG - logger debug message
2018-05-26 23:57:29,389 - INFO - logger info message
2018-05-26 23:57:29,389 - WARNING - logger warning message
2018-05-26 23:57:29,389 - ERROR - 程序出错了
2018-05-26 23:57:29,390 - CRITICAL - logger critical message
七、反射
# 什么叫反射
# 通过字符串数据类型的 变量名 来访问变量的值

# name = 'value'

# eval('')

# 类名 反射 静态属性
# 对象名 反射 对象属性 和 方法
# 模块 反射 模块中的名字
# 反射 自己所在文件中的名字

# x.y 这样的形式 都可以用反射

举例1:
print('aaa'.startswith)
print('aaa'.startswith('a'))
# 'startswith'
ret = getattr('aaa','startswith')
print(ret('a'))
class Person:
    role = 'Person'
    def __init__(self,name):
        self.name = name
    def eat(self):print('eating')
    def drink(self):print('drinking')
    def play(self):print('playing')
    def sleep(self):print('sleepping')

alex = Person('alex')
alex.name
print(getattr(alex,'name'))
print(getattr(Person,'role'))
执行结果:
<built-in method startswith of str object at 0x002AB480>
True
True
alex
Person
举例2:
class Person:
    role = 'Person'
    def __init__(self,name):
        self.name = name
    def eat(self):print('eating')
    def drink(self):print('drinking')
    def play(self):print('playing')
    def sleep(self):print('sleepping')

alex = Person('alex')
alex.name
print(getattr(alex,'name'))
print(getattr(Person,'role'))
while True:
    inp = input('>>>')
    if hasattr(alex,inp):
        getattr(alex,inp)()
执行结果:
alex
Person
>>>
# 首先 使用getattr取获取一个名字,如果在这个对象的命名空间中没有这个名字 会报错
# getattr的反射好伴侣 hasattr
# 如果使用getattr取获取一个方法,那么只能拿到这个方法的内存地址 加上括号就是执行,当然,括号里的参数可以照传不误
# 如果getattr获取一个属性,那么直接使用反射就可以获取到值

举例2:
import mymodule
import time

mymodule.func1()
time.sleep(0.5)
print(mymodule.money)
getattr(mymodule,'func1')()
print(getattr(mymodule,'money'))
getattr(time,'sleep')(1)

Manager = getattr(mymodule,'Manager')
a = Manager()
a.eat()

举例3:
value = '123'
import sys
print(sys.modules['__main__'])
print(getattr(sys.modules['__main__'],'value'))
class Manager:
    def __init__(self,name):
        self.name = name
    def create_course(self):
        pass
class Teacher:
    def __init__(self,name):
        self.name = name
    def list_student(self):
        pass
class Student:
    def __init__(self,name):
        self.name = name

a = Student('a')
a.age = 19
setattr(a,'age',25)
print(a.__dict__)
print(a.age)
执行结果:
<module '__main__' from 'H:/MyProject/student_management/keshamn.py'>
123
{'name': 'a', 'age': 25}
25
举例4:
import sys
#
# # login
# # name,pwd
#
id = 'Manager'
if hasattr(sys.modules['__main__'],id):
    obj = getattr(sys.modules['__main__'],id)()

执行结果:控制台五任何输出

举例5:
# __new__    构造方法 创建一个对象
# __init__   初始化方法

class Foo:
    def __new__(cls, *args, **kwargs):
        print('执行我啦')
        obj = object.__new__(cls)
        print(obj)
        return obj
    def __init__(self):
        print('222222222',self)

Foo()
执行结果:
执行我啦
<__main__.Foo object at 0x006C1350>
222222222 <__main__.Foo object at 0x006C1350>
举例6:
# 先执行new方法,object.new()
# 再执行init

# Foo()  --> python解释器接收到你的python代码
# python解释器替你去做了很多操作
# 包括 主动帮助你 调用 new方法 去创造一个对象 —— 开辟内存空间 —— python语言封装了开辟内存的工作
# object的new方法里 —— 帮你创造了对象
# 调用init用到的self参数 就是new帮你创造的对象

# 什么叫单例模式
# 单例模式 : 某一类 只有一个实例
class Person:
    __isinstance = None
    def __new__(cls, *args, **kwargs):
        if not cls.__isinstance :
            obj = object.__new__(cls)
            cls.__isinstance = obj
        return cls.__isinstance
    def __init__(self,name):
        self.name = name

alex = Person('alex')
alex.age = 18
egon = Person('egon')
print(egon.age)
print(id(alex))
print(id(egon))
print(alex.name)
print(egon.name)
执行结果:
18
41555600
41555600
egon
egon
举例7 :
# __new__生孩子
# 类 : 生一个小孩__new__ 给这个小孩穿衣服 __init__
# 单例模式下的类 : 只有一个小孩

class Person:
    def __init__(self,name):
        self.name = name
    def __str__(self):
        return 'a object of Person named %s'%self.name
    # def __hash__(self):
    #     return 1231212
    # def __len__(self):
    #     return 10
a = Person('alex')
b = Person('egon')
# print(len(a))
# print(hash(a))
print(a)
print(b)
执行结果:
a object of Person named alex
a object of Person named egon
# 类中的内置方法 很多都和 内置函数相关

l = list([1,2,3])   # 实例化
print(l)
执行结果:[1, 2, 3]

八、模块
# sys
# sys.path 列表里存储了所有模块导入的路径
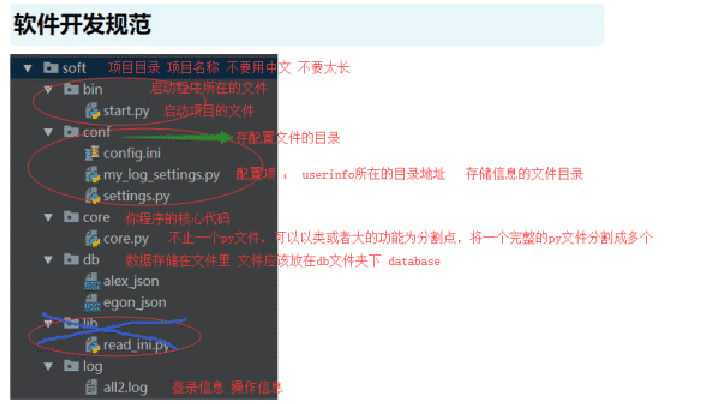
软件开发规范:
举例:
import sys
import os
# print(sys.path)
# print()
def hello():
print('函数start')
# import a
# a.kk()
#
# hello()
#
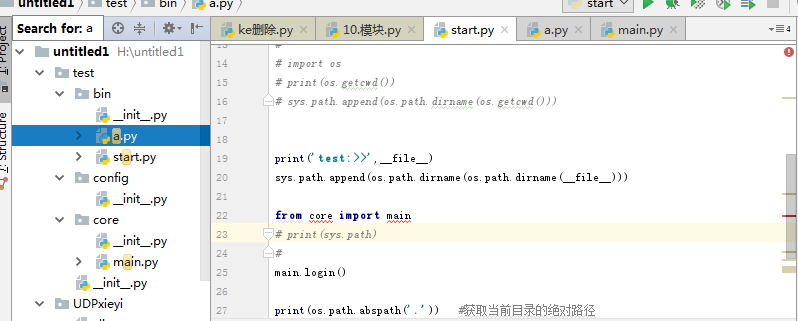
# import os
# print(os.getcwd()) #获取执行文件的当前路径 H:\untitled1\test\bin
# sys.path.append(os.path.dirname(os.getcwd())) #这种方法pycharm不报错,但是cmd执行的时候会报错
print('test:>>',__file__) #test:>> H:/untitled1/test/bin/start.py
sys.path.append(os.path.dirname(os.path.dirname(__file__))) 用这个方法在cmd执行的时候也不报错,pycharm可以,这块可以不考虑路径的斜杠是往哪个方向,因为python会自动识别
from core import main
# print(sys.path)
#
main.login() #main函数
#print(os.path.abspath('.')) #获取当前执行文件的绝对路径
print(__file__) #获取当前执行文件的绝对路径 #H:/untitled1/test/bin/start.py
执行结果:
H:\untitled1\test\bin
test:>> H:/untitled1/test/bin/start.py
main函数
H:\untitled1\test\bin
H:/untitled1/test/bin/start.py
举例2:
直接在上面的基础上,在a.py文件输入
print(__name__)   #__main__

假如在start文件中,直接import a,导入就直接执行a模块,这样的结果
print(__name__) 结果是a,就是模块名

总结:
当一个文件,被直接执行的时候,这个文件的__name__属性是__main__
当这个文件被当做模块的时候,这个文件的__name__属性是文件名
模块间的引用,不能成环
举例3:
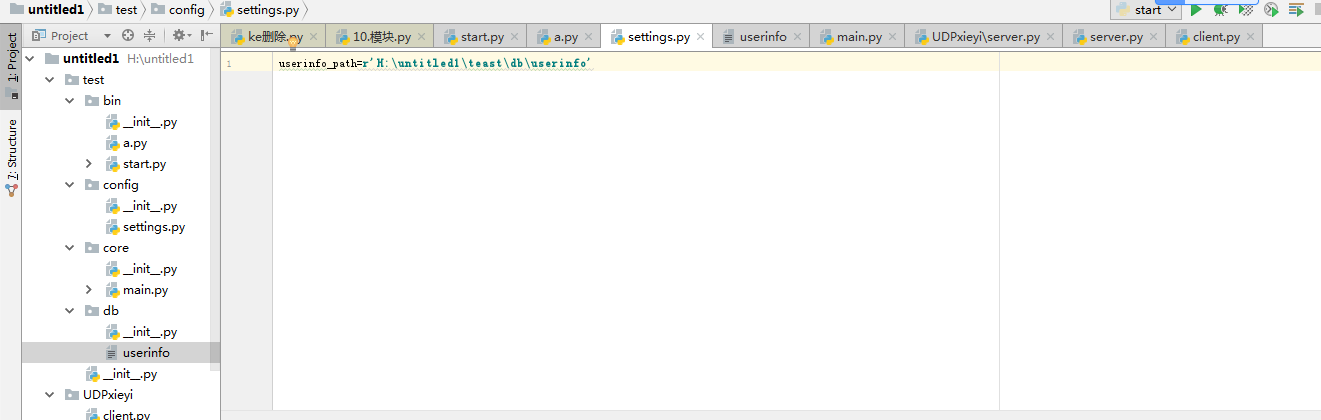
import sys
import os
sys.path.append(os.path.dirname(os.path.dirname(__file__)))
from core import main
from config import settings
# print(sys.path)
#
if __name__=='__main__':
main.main()
print(settings.userinfo_path) #这个不该写到这里
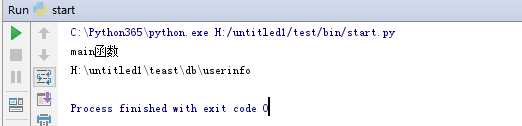
执行结果:
main函数
H:\untitled1\teast\db\userinfo
更改2:
start文件:
import sys
import os

sys.path.append(os.path.dirname(os.path.dirname(__file__)))

from core import main

# print(sys.path)
#
if __name__=='__main__':
    main.main()

执行结果:
main函数
H:\untitled1\teast\db\userinfo
main文件:
from config import settings

def login():
    print('main函数')

def main():
    login()
    print(settings.userinfo_path)

在start文件执行,执行结果是:

 浙公网安备 33010602011771号