


ES集群部署
1.环境准备
主机配置:
| 主机名 | IP地址 | CPU | 内存 | 硬盘 |
| gztxy-prd-es01 | 192.168.1.11 | 8 | 16 | 200 |
| gztxy-prd-es01 | 192.168.1.12 | 8 | 16 | 200 |
| gztxy-prd-es01 | 192.168.1.13 | 8 | 16 | 200 |
标准化:
| 配置项 | 值 |
| 当前版本 | 6.8.2 |
| 集群信息 | gztxy-behavior-prd-es |
| 节点类型 | master_node|data_node |
| 部署路径 | /usr/local/elasticsearch |
| 配置文件 | /usr/local/elasticsearch/config/elasticsearch.yml |
| 数据路径 | /data/es |
| 日志路径 | /data/logs/es |
| 备份路径 | /es_backup/bak |
| JVM配置 | vm内存的一半 |
| 集群配置 | 最小存活master节点数为(master节点数/2+1) |
| 主从配置 | 分布式集群 |
| 启停方式 | systemctl start/stop/restart elasticsearch 或通过supervisor方式启动 |
| 服务端口 | 9200 |
| 集群间通讯端口 | 9300 |
| 备注说明 | 条件允许下协调节点,主节点,数据节点最好分离 |
2.安装并配置
安装:
wget https://mirrors.huaweicloud.com/elasticsearch/6.8.2/elasticsearch-6.8.2.tar.gz
tar -xf elasticsearch-6.8.2.tar.gz -C /usr/local/
ln -s /usr/local/elasticsearch-6.8.2 /usr/local/elasticsearch
#安装分词插件
/usr/local/elasticsearch/bin/elasticsearch-plugin install https://github.com/medcl/elasticsearch-analysis-ik/releases/download/v6.8.2/elasticsearch-analysis-ik-6.8.2.zip
配置:
#配置JVM参数,系统内存的一半
sed -i "s#-Xms1g#-Xms8g#g" /usr/local/elasticsearch/config/jvm.options
sed -i "s#-Xmx1g#-Xmx8g#g" /usr/local/elasticsearch/config/jvm.options

#配置ES配置
mv /usr/local/elasticsearch/config/elasticsearch.yml /usr/local/elasticsearch/config/elasticsearch.yml-bak
cat >/usr/local/elasticsearch/config/elasticsearch.yml<<EOF
cluster.name: gztxy-prd-behavior
#每个节点node名称唯一
node.name: node-01
path.data: /data/es/data
path.logs: /data/es/logs
path.repo: ["/es_backup/bak"]
node.master: true
node.data: true
node.ingest: true
bootstrap.memory_lock: true
network.host: 0.0.0.0
http.port: 9200
transport.tcp.port: 9300
discovery.zen.ping.unicast.hosts: ["192.168.1.11:9300", "192.168.1.12:9300","192.168.1.13:9300"]
discovery.zen.minimum_master_nodes: 2
http.cors.enabled: true
http.cors.allow-origin: "*"
http.cors.allow-headers: "Authorization,X-Requested-With,Content-Length,Content-Type"
thread_pool:
  write:
    queue_size: 1000
  search:
    queue_size: 1000
EOF
创建数据目录并授权:
#创建数据目录及备份目录
mkdir -p /data/es/{data,logs,backup}
mkdir -p /es_backup/bak

#目录授权
id app > /dev/null 2>&1 || useradd app
chown -R app.app /data/es/ /usr/local/elasticsearch* /es_backup
添加启动脚本:
cat >/usr/local/elasticsearch/config/elasticsearch.service <<EOF
[Unit]
Description=Elasticsearch
Documentation=http://www.elastic.co
Wants=network-online.target
After=network-online.target

[Service]
RuntimeDirectory=elasticsearch
Environment=ES_HOME=/usr/local/elasticsearch
Environment=ES_PATH_CONF=/usr/local/elasticsearch/config
Environment=PID_DIR=/usr/local/elasticsearch
EnvironmentFile=-/etc/sysconfig/elasticsearch
WorkingDirectory=/usr/local/elasticsearch

LimitMEMLOCK=infinity

User=app
Group=app

ExecStart=/usr/local/elasticsearch/bin/elasticsearch -p ${PID_DIR}/elasticsearch.pid --quiet

# StandardOutput is configured to redirect to journalctl since
# some error messages may be logged in standard output before
# elasticsearch logging system is initialized. Elasticsearch
# stores its logs in /var/log/elasticsearch and does not use
# journalctl by default. If you also want to enable journalctl
# logging, you can simply remove the "quiet" option from ExecStart.
StandardOutput=journal
StandardError=inherit

# Specifies the maximum file descriptor number that can be opened by this process
LimitNOFILE=65536

# Specifies the maximum number of processes
LimitNPROC=4096

# Specifies the maximum size of virtual memory
LimitAS=infinity

# Specifies the maximum file size
LimitFSIZE=infinity

# Disable timeout logic and wait until process is stopped
TimeoutStopSec=0

# SIGTERM signal is used to stop the Java process
KillSignal=SIGTERM

# Send the signal only to the JVM rather than its control group
KillMode=process

# Java process is never killed
SendSIGKILL=no

# When a JVM receives a SIGTERM signal it exits with code 143
SuccessExitStatus=143

[Install]
WantedBy=multi-user.target

# Built for distribution-6.3.2 (distribution)
EOF
启动:
cp /usr/local/elasticsearch/config/elasticsearch.service /usr/lib/systemd/system
chmod +x /usr/lib/systemd/system/elasticsearch.service
systemctl daemon-reload
systemctl enable elasticsearch > /dev/null 2>&1
systemctl start elasticsearch
systemctl status elasticsearch
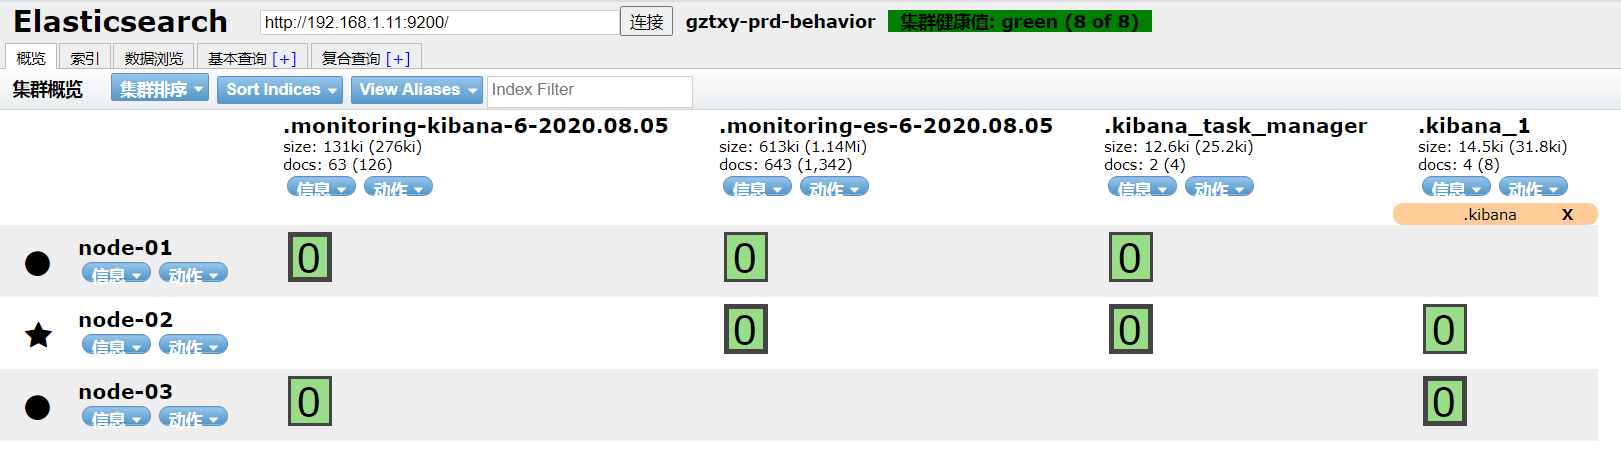
3.测试
#curl http://localhost:9200/_cat/health
1596599617 03:53:37 gztxy-prd-behavior green 2 2 8 4 0 0 0 0 - 100.0%
#curl http://localhost:9200/_cat/nodes
192.168.1.13  9 98 44 1.01 0.38 0.79 mdi - node-03
192.168.1.12 14 97  1 0.36 0.26 0.16 mdi * node-02
192.168.1.11 11 95  2 0.02 0.04 0.07 mdi - node-01
4.安装脚本
安装修改脚本参数:
esVersion=6.8.2
JVM=2
username=app
clustername=gztxy-prd-behavior
nodename=`hostname`
file_source=/usr/local/src/elasticsearch-${esVersion}.tar.gz
es_ver=elasticsearch-${esVersion}
/app/sh/es-cluster.sh
#!/bin/bash
#Elasticsearch安装配置

esVersion=6.8.2
JVM=2
username=app
clustername=gztxy-prd-behavior
nodename=`hostname`
file_source=/usr/local/src/elasticsearch-${esVersion}.tar.gz
es_ver=elasticsearch-${esVersion}

wget -P /usr/local/src/ https://mirrors.huaweicloud.com/elasticsearch/${esVersion}/elasticsearch-${esVersion}.tar.gz

if [ `whoami` != "root" ]; then
    echo "需使用root用户执行"
    exit 1
fi

#文件是否存在
[ -e $file_source ]
if [ $? -eq 0 ];then
  tar -xf $file_source -C /usr/local/
  ln -s /usr/local/$es_ver /usr/local/elasticsearch
else
  echo -e "\033[31m文件不存在\033[0m"
  exit 1
fi

#处理jvm环境
which java &> /dev/null
if [ $? -ne 0  ];then
  echo "未找到JDK"
  #install_jdk
  exit 1
else
  ln -s `which java` /usr/bin/java > /dev/null 2>&1
fi

#安装分词插件
/usr/local/elasticsearch/bin/elasticsearch-plugin install https://github.com/medcl/elasticsearch-analysis-ik/releases/download/v${esVersion}/elasticsearch-analysis-ik-${esVersion}.zip

#内核参数
if [ `grep vm.max_map_count=262144 /etc/sysctl.conf|wc -l` -eq 0 ];then
  echo vm.max_map_count=262144 >> /etc/sysctl.conf
  sysctl -p > /dev/null
fi

#配置
sed -i "s#-Xms1g#-Xms${JVM}g#g" /usr/local/elasticsearch/config/jvm.options
sed -i "s#-Xmx1g#-Xmx${JVM}g#g" /usr/local/elasticsearch/config/jvm.options

mv /usr/local/elasticsearch/config/elasticsearch.yml /usr/local/elasticsearch/config/elasticsearch.yml-bak
cat >/usr/local/elasticsearch/config/elasticsearch.yml<<EOF
cluster.name: cluster-name
node.name: node-name
path.data: /data/es/data
path.logs: /data/es/logs
path.repo: ["/es_backup/bak"]
node.master: true
node.data: true
node.ingest: true
bootstrap.memory_lock: true
network.host: 0.0.0.0
http.port: 9200
transport.tcp.port: 9300
discovery.zen.ping.unicast.hosts: ["192.168.1.11:9300", "192.168.1.12:9300","192.168.1.13:9300"]
discovery.zen.minimum_master_nodes: 2
http.cors.enabled: true
http.cors.allow-origin: "*"
http.cors.allow-headers: "Authorization,X-Requested-With,Content-Length,Content-Type"
thread_pool:
  write:
    queue_size: 1000
  search:
    queue_size: 1000
#node.attr.box_type: cold
EOF
sed -i "s#cluster.name: cluster-name#cluster.name: $clustername#g" /usr/local/elasticsearch/config/elasticsearch.yml
sed -i "s#node.name: node-name#node.name: $nodename#g" /usr/local/elasticsearch/config/elasticsearch.yml

echo -e "\033[32m===================完成配置=============================\033[0m"
sleep 2

#创建数据目录并授权
mkdir -p /data/es/{data,logs,backup}
mkdir -p /es_backup/bak
id $username > /dev/null 2>&1 || useradd $username
chown -R $username.$username /data/es/ /usr/local/elasticsearch* /es_backup

#添加启动脚本
cat >/usr/local/elasticsearch/config/elasticsearch.service <<EOF
[Unit]
Description=Elasticsearch
Documentation=http://www.elastic.co
Wants=network-online.target
After=network-online.target

[Service]
RuntimeDirectory=elasticsearch
Environment=ES_HOME=/usr/local/elasticsearch
Environment=ES_PATH_CONF=/usr/local/elasticsearch/config
Environment=PID_DIR=/usr/local/elasticsearch
EnvironmentFile=-/etc/sysconfig/elasticsearch
WorkingDirectory=/usr/local/elasticsearch

LimitMEMLOCK=infinity

User=app
Group=app

ExecStart=/usr/local/elasticsearch/bin/elasticsearch -p ${PID_DIR}/elasticsearch.pid --quiet

# StandardOutput is configured to redirect to journalctl since
# some error messages may be logged in standard output before
# elasticsearch logging system is initialized. Elasticsearch
# stores its logs in /var/log/elasticsearch and does not use
# journalctl by default. If you also want to enable journalctl
# logging, you can simply remove the "quiet" option from ExecStart.
StandardOutput=journal
StandardError=inherit

# Specifies the maximum file descriptor number that can be opened by this process
LimitNOFILE=65536

# Specifies the maximum number of processes
LimitNPROC=4096

# Specifies the maximum size of virtual memory
LimitAS=infinity

# Specifies the maximum file size
LimitFSIZE=infinity

# Disable timeout logic and wait until process is stopped
TimeoutStopSec=0

# SIGTERM signal is used to stop the Java process
KillSignal=SIGTERM

# Send the signal only to the JVM rather than its control group
KillMode=process

# Java process is never killed
SendSIGKILL=no

# When a JVM receives a SIGTERM signal it exits with code 143
SuccessExitStatus=143

[Install]
WantedBy=multi-user.target

# Built for distribution-6.3.2 (distribution)
EOF

#启动
sed -i "s#User=app#User=${username}#g" /usr/local/elasticsearch/config/elasticsearch.service

cp /usr/local/elasticsearch/config/elasticsearch.service /usr/lib/systemd/system
chmod +x /usr/lib/systemd/system/elasticsearch.service
systemctl daemon-reload
systemctl enable elasticsearch > /dev/null 2>&1
systemctl start elasticsearch
systemctl status elasticsearch
5.优化
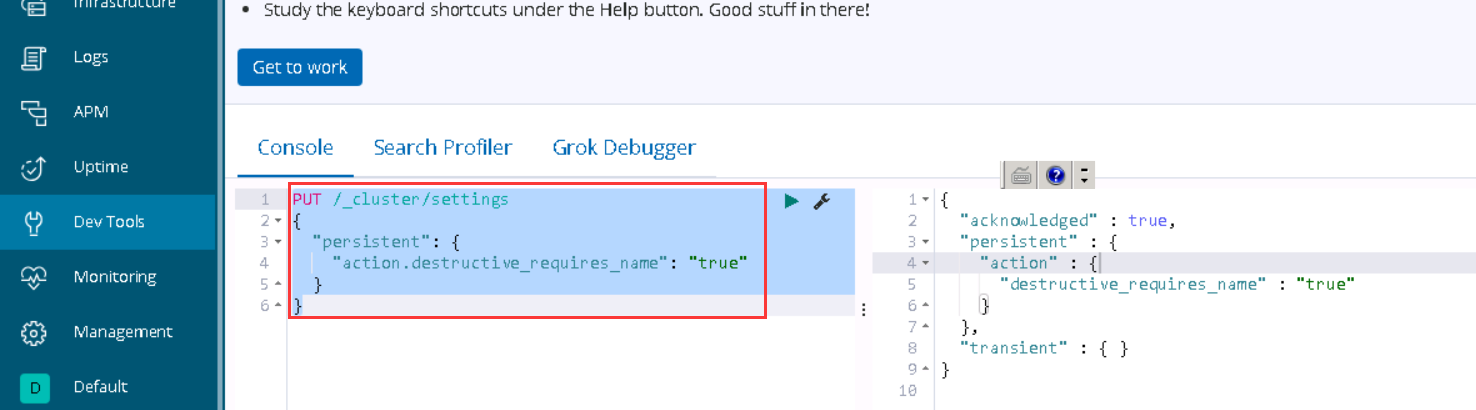
禁止批量删除ES数据:
PUT /_cluster/settings
{
  "persistent": {
    "action.destructive_requires_name": "true"
  }
}

 浙公网安备 33010602011771号