13【线程等待、线程状态、线程池、File类、递归】
13【线程等待、线程状态、线程池、File类、递归】
一、线程的等待与唤醒
1.1 线程的等待
在Java中,线程之间的通信可以通过线程等待与唤醒机制来实现。这种机制允许一个线程在满足某种条件之前暂停执行,并在满足条件时重新开始执行。
1.1.1 等待与随机唤醒
public final void wait():让当前线程进入等待状态,并且释放锁对象。public final native void wait(long timeout):让当前线程等待timeout毫秒,同样也会释放锁对象;等到timeout时间过后,将会自动醒来;
Tips:wait方法是锁对象来调用,调用wait()之后当前线程将释放当前锁,并且让当前锁对象对应的线程处于等待(Waiting)状态,如果没有其他线程来唤醒,那么被wait()方法等待的线程将会一直等待下去;
public final native void notify():随机唤醒锁对象对应线程中的一条(此线程必须是等待状态)
Tips:notify()方法也是锁对象来调用,并不是当前线程对象调用
因为wait需要释放锁,所以必须在synchronized中使用,没有锁时使用会抛出IllegalMonitorStateException(正在等待的对象没有锁)
案例:线程1执行一次"犯我中华者",线程2执行一次"虽远必诛",交替执行
package com.dfbz.demo01_线程的等待与唤醒;

/**
 * @author lscl
 * @version 1.0
 * @intro:
 */
public class Demo01_两条线程的通信 {
    public static void main(String[] args) {
        Shower shower = new Shower();

        new Thread(()->{
            try {
                shower.show1();
            } catch (InterruptedException e) {
                e.printStackTrace();
            }
        }).start();

        new Thread(()->{
            try {
                shower.show2();
            } catch (InterruptedException e) {
                e.printStackTrace();
            }
        }).start();
    }
}

class Shower {
    int count = 1;

    public void show1() throws InterruptedException {
        for (int i = 0; i < 100; i++) {
            synchronized (Object.class) {
                while (count == 1) {
                    Thread.sleep(10);
                    System.out.print("犯");
                    System.out.print("我");
                    System.out.print("中");
                    System.out.print("华");
                    System.out.print("者");
                    System.out.println();
                    count = 2;                      // count=1
                    Object.class.notify();
                }
                Object.class.wait();
            }
        }
    }

    public void show2() throws InterruptedException {
        for (int i = 0; i < 100; i++) {
            synchronized (Object.class) {
                while (count == 2) {
                    Thread.sleep(10);
                    System.out.print("虽");
                    System.out.print("远");
                    System.out.print("必");
                    System.out.print("诛");
                    System.out.println();
                    count = 1;
                    Object.class.notify();              // 随机唤醒一条当前锁的线程
                }
                Object.class.wait();
            }
        }
    }
}
wait()与notify()注意事项:
- 1)wait方法与notify方法必须要由同一个锁对象调用。因为:wait方法正是用来让当前锁对象对应的这条线程等待,notfiy方法正是用来唤醒某个锁对应的多条线程中的随机一条,wait方法和notify方法必须由同一个锁对象调用
- 2)wait方法与notify方法是属于Object类的方法的。因为:锁对象可以是任意对象,而任意对象的所属类都是继承了Object类的。
- 3)wait方法与notify方法必须要在同步代码块或者是同步函数中使用。因为:调用wait方法会释放锁,前提是当前线程要获取到锁,只有进入同步代码块或同步方法中才会获取到锁;
1.1.2 唤醒与全部唤醒
实现需求:线程1执行一次"我是中国人",线程2执行一次"犯我中华者",线程3执行一次"虽远必诛",交替执行
public final native void notify():唤醒在当前锁对象中随机的一条线程public final native void notifyAll():唤醒当前锁对象对应的所有线程(效率低)
示例代码:
package com.dfbz.demo01_线程的等待与唤醒;

/**
 * @author lscl
 * @version 1.0
 * @intro:
 */
public class Demo02_多条线程的通信 {
    public static void main(String[] args) {
        Printer printer = new Printer();

        new Thread(()->{
            try {
                printer.print1();
            } catch (InterruptedException e) {
                e.printStackTrace();
            }
        }).start();

        new Thread(()->{
            try {
                printer.print2();
            } catch (InterruptedException e) {
                e.printStackTrace();
            }
        }).start();


        new Thread(()->{
            try {
                printer.print3();
            } catch (InterruptedException e) {
                e.printStackTrace();
            }
        }).start();

    }
}

class Printer {
    int count = 1;

    public void print1() throws InterruptedException {
        for (int i = 0; i < 100; i++) {
            synchronized (Object.class) {
                while (count == 1) {
                    Thread.sleep(10);
                    System.out.print("犯");
                    System.out.print("我");
                    System.out.print("中");
                    System.out.print("华");
                    System.out.print("者");
                    System.out.println();
                    count = 2;                          // count=1
                    Object.class.notifyAll();           // 唤醒全部线程
                }
                Object.class.wait();
            }
        }
    }


    public void print2() throws InterruptedException {
        for (int i = 0; i < 100; i++) {
            synchronized (Object.class) {
                while (count == 2) {
                    Thread.sleep(10);
                    System.out.print("虽");
                    System.out.print("远");
                    System.out.print("必");
                    System.out.print("诛");
                    System.out.println();
                    count = 3;
                    Object.class.notifyAll();
                }
                Object.class.wait();
            }
        }
    }

    public void print3() throws InterruptedException {
        for (int i = 0; i < 100; i++) {
            synchronized (Object.class) {
                while (count == 3) {
                    Thread.sleep(10);
                    System.out.print("我");
                    System.out.print("是");
                    System.out.print("中");
                    System.out.print("国");
                    System.out.print("人");
                    System.out.println();
                    count = 1;
                    Object.class.notifyAll();              // 唤醒该锁对应的全部线程
                }
                Object.class.wait();
            }
        }
    }
}
1.1.3 wait计时等待
如果调用wait的无参方法,那么线程将会一直等待下去,直到期间有其他线程来将其唤醒(notify);但wait方法也支持自动苏醒,我们可以传递一个时间片,让其等待指定的时间后苏醒过来;
public final native void wait(long timeout):让当前线程等待timeout毫秒,同样也会释放锁对象;等到timeout时间过后,将会自动醒来;
package com.dfbz.demo01_线程的等待与唤醒;

/**
 * @author lscl
 * @version 1.0
 * @intro:
 */
public class Demo03_wait计时等待 {
    public static void main(String[] args) throws Exception {
        new Thread(()->{
            while (true) {
                synchronized (Object.class) {
                    System.out.println("线程1...before");
                    try {
                        // 等待2000ms后将自动醒来,同时也会释放锁
                        Object.class.wait(2000);
                    } catch (Exception e) {
                        e.printStackTrace();
                    }
                    System.out.println("线程1...after");
                }
            }
        }).start();

        new Thread(()->{
            while (true) {
                synchronized (Object.class) {
                    System.out.println("线程2...");
                    try {
                        Thread.sleep(500);
                    } catch (InterruptedException e) {
                        throw new RuntimeException(e);
                    }
                }
            }
        }).start();
    }
}
- 运行效果:

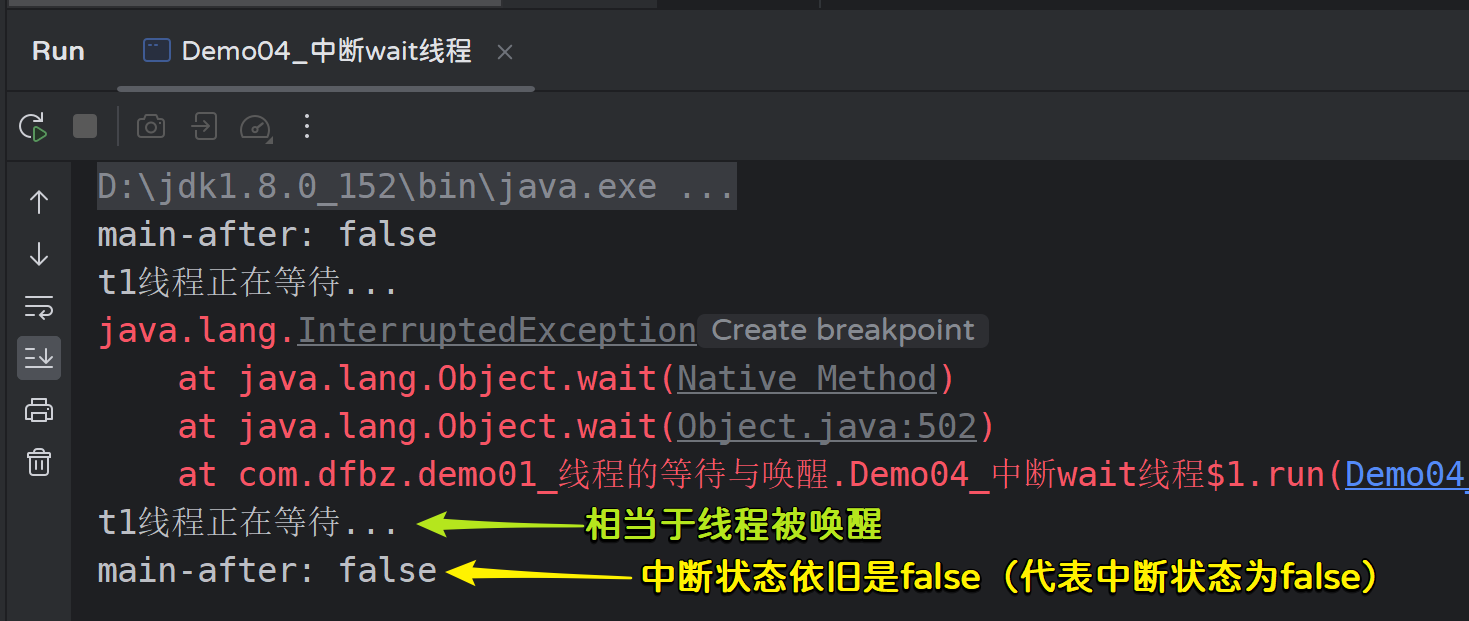
1.1.4 中断wait线程
通过线程对象的interrupt()方法可以将当前线程中断(中断状态设置为true),但如果当前线程处于wait状态,则中断线程触发异常,相当于中断失败,中断状态依旧为false。
1) 代码示例
【示例代码】
package com.dfbz.demo01_线程的等待与唤醒;

/**
 * @author lscl
 * @version 1.0
 * @intro:
 */
public class Demo04_中断wait线程 {
    public static void main(String[] args) throws Exception {
        Thread t1 = new Thread("t1") {
            @Override
            public void run() {
                while (true) {
                    synchronized (Object.class) {
                        try {
                            // ②让线程等待
                            System.out.println("t1线程正在等待...");
                            Object.class.wait();
                        } catch (InterruptedException e) {
                            e.printStackTrace();
                        }
                    }
                }
            }
        };
        // ①启动线程
        t1.start();
        System.out.println("main-after: " + t1.isInterrupted());         // false

        Thread.sleep(2000);         // 确保t1线程先执行,并先等待一段时间

        // ③中断线程
        t1.interrupt();                  // 此时t1线程处于wait状态

        // 让main线程睡眠一小会再去查看中断状态,否则有可能出现中断状态还未重新设置为false就被main线程抢先打印了中断状态
        Thread.sleep(10);
        System.out.println("main-after: " + t1.isInterrupted());         // false(中断失败)
    }
}
- 运行效果:
2) 注意事项-01
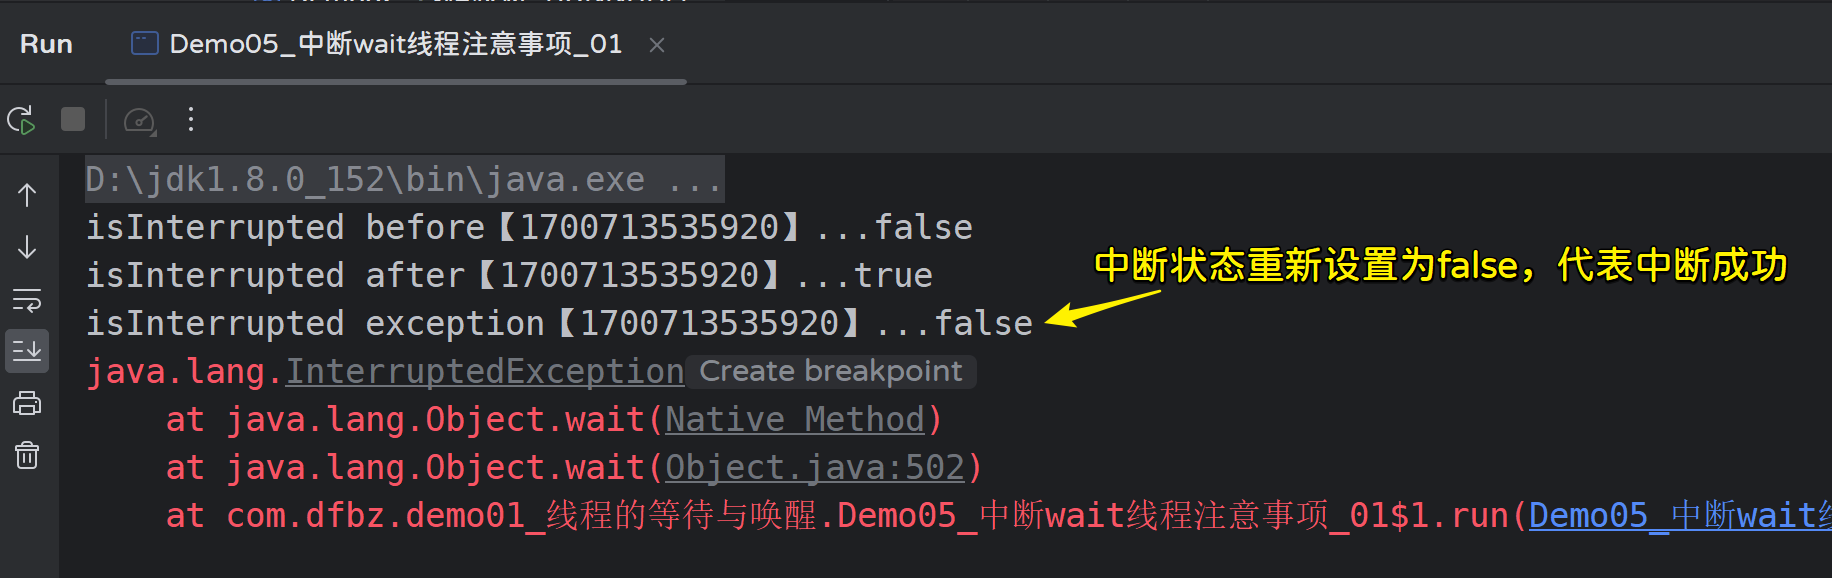
我们知道处于wait状态的线程被中断后会抛出InterruptedException异常,那如果是已经被中断的线程执行了wait方法呢?
注意:已经中断的线程执行sleep、wait、join等方法都会抛出**InterruptedException**异常,并且将中断状态设置为false(清空中断状态)
【代码示例】
package com.dfbz.demo01_线程的等待与唤醒;

/**
 * @author lscl
 * @version 1.0
 * @intro:
 */
public class Demo05_中断wait线程注意事项_01 {
    public static void main(String[] args) throws Exception {

        Thread t1 = new Thread("t1") {
            @Override
            public void run() {
                synchronized (Object.class) {
                    Thread currThread = Thread.currentThread();

                    // false
                    System.out.println("isInterrupted before【" + System.currentTimeMillis() + "】..." + currThread.isInterrupted());

                    // true
                    Thread.currentThread().interrupt();

                    // false
                    System.out.println("isInterrupted after【" + System.currentTimeMillis() + "】..." + currThread.isInterrupted());
                    try {
                        Object.class.wait();
                    } catch (InterruptedException e) {
                        // false
                        System.out.println("isInterrupted exception【" + System.currentTimeMillis() + "】..." + currThread.isInterrupted());
                        e.printStackTrace();
                    }
                }
            }
        };

        t1.start();
    }
}
运行效果:
3) 注意事项-02
中断处于wait状态的线程,触发InterruptedException异常,但线程此时已经不在是等待状态(变为了锁阻塞状态),相当于把线程唤醒;
【代码示例】
package com.dfbz.demo01_线程的等待与唤醒;
/**
* @author lscl
* @version 1.0
* @intro:
*/
public class Demo06_中断wait线程注意事项_02 {
public static void main(String[] args) throws InterruptedException {
Thread t1 = new Thread("t1") {
@Override
public void run() {
while (true) {
synchronized (Object.class) {
try {
// ②执行wait方法,让线程等待
Object.class.wait();
} catch (InterruptedException e) {
e.printStackTrace();
}
System.out.println("t1: " + Thread.currentThread().isInterrupted()); // false
}
}
}
};
Thread t2 = new Thread("t2") {
@Override
public void run() {
while (true) {
synchronized (Object.class) {
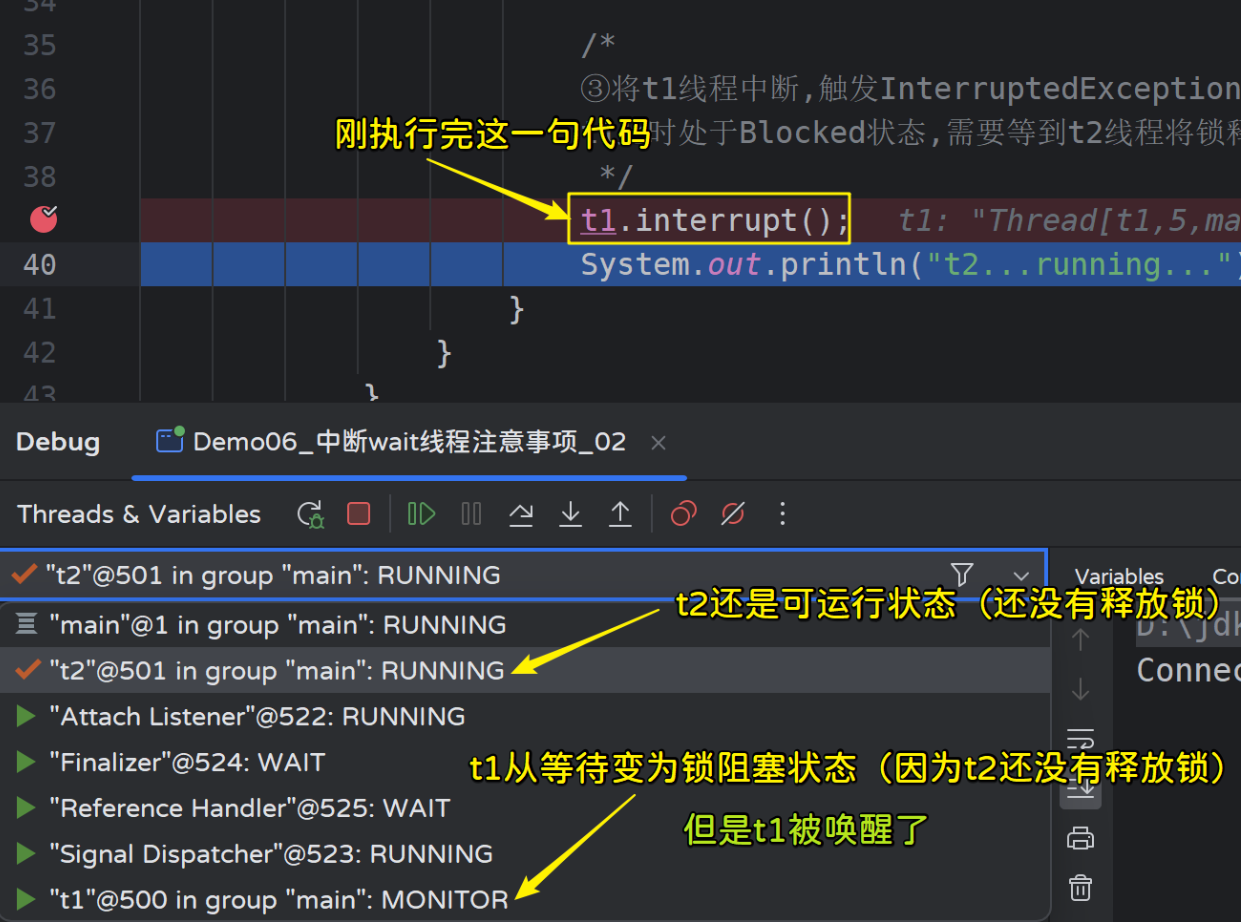
/*
③将t1线程中断,触发InterruptedException异常(相当于唤醒)
t1此时处于Blocked状态,需要等到t2线程将锁释放后并且t1竞争到锁资源后才会触发异常;
*/
t1.interrupt();
System.out.println("t2...running...");
}
}
}
};
// ①开启两个线程
t1.start();
t2.start();
}
}
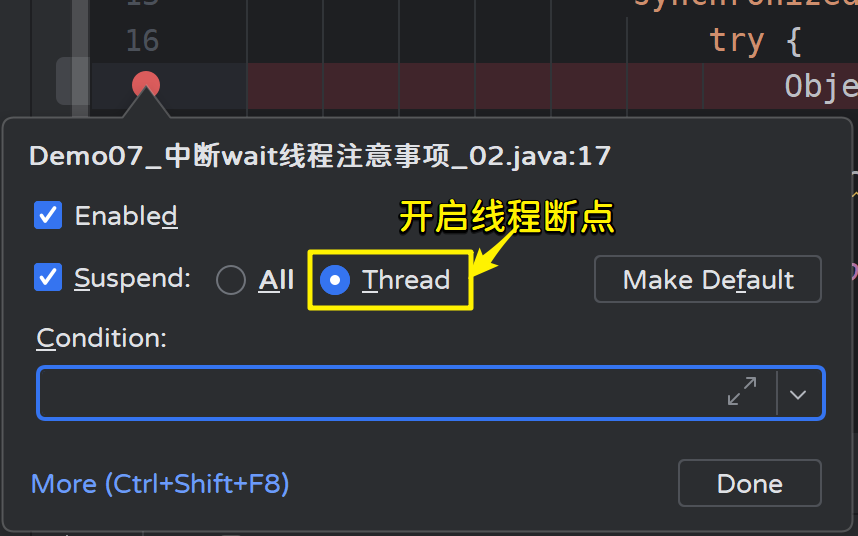
线程模式调试记得要开启线程断点:
运行效果:
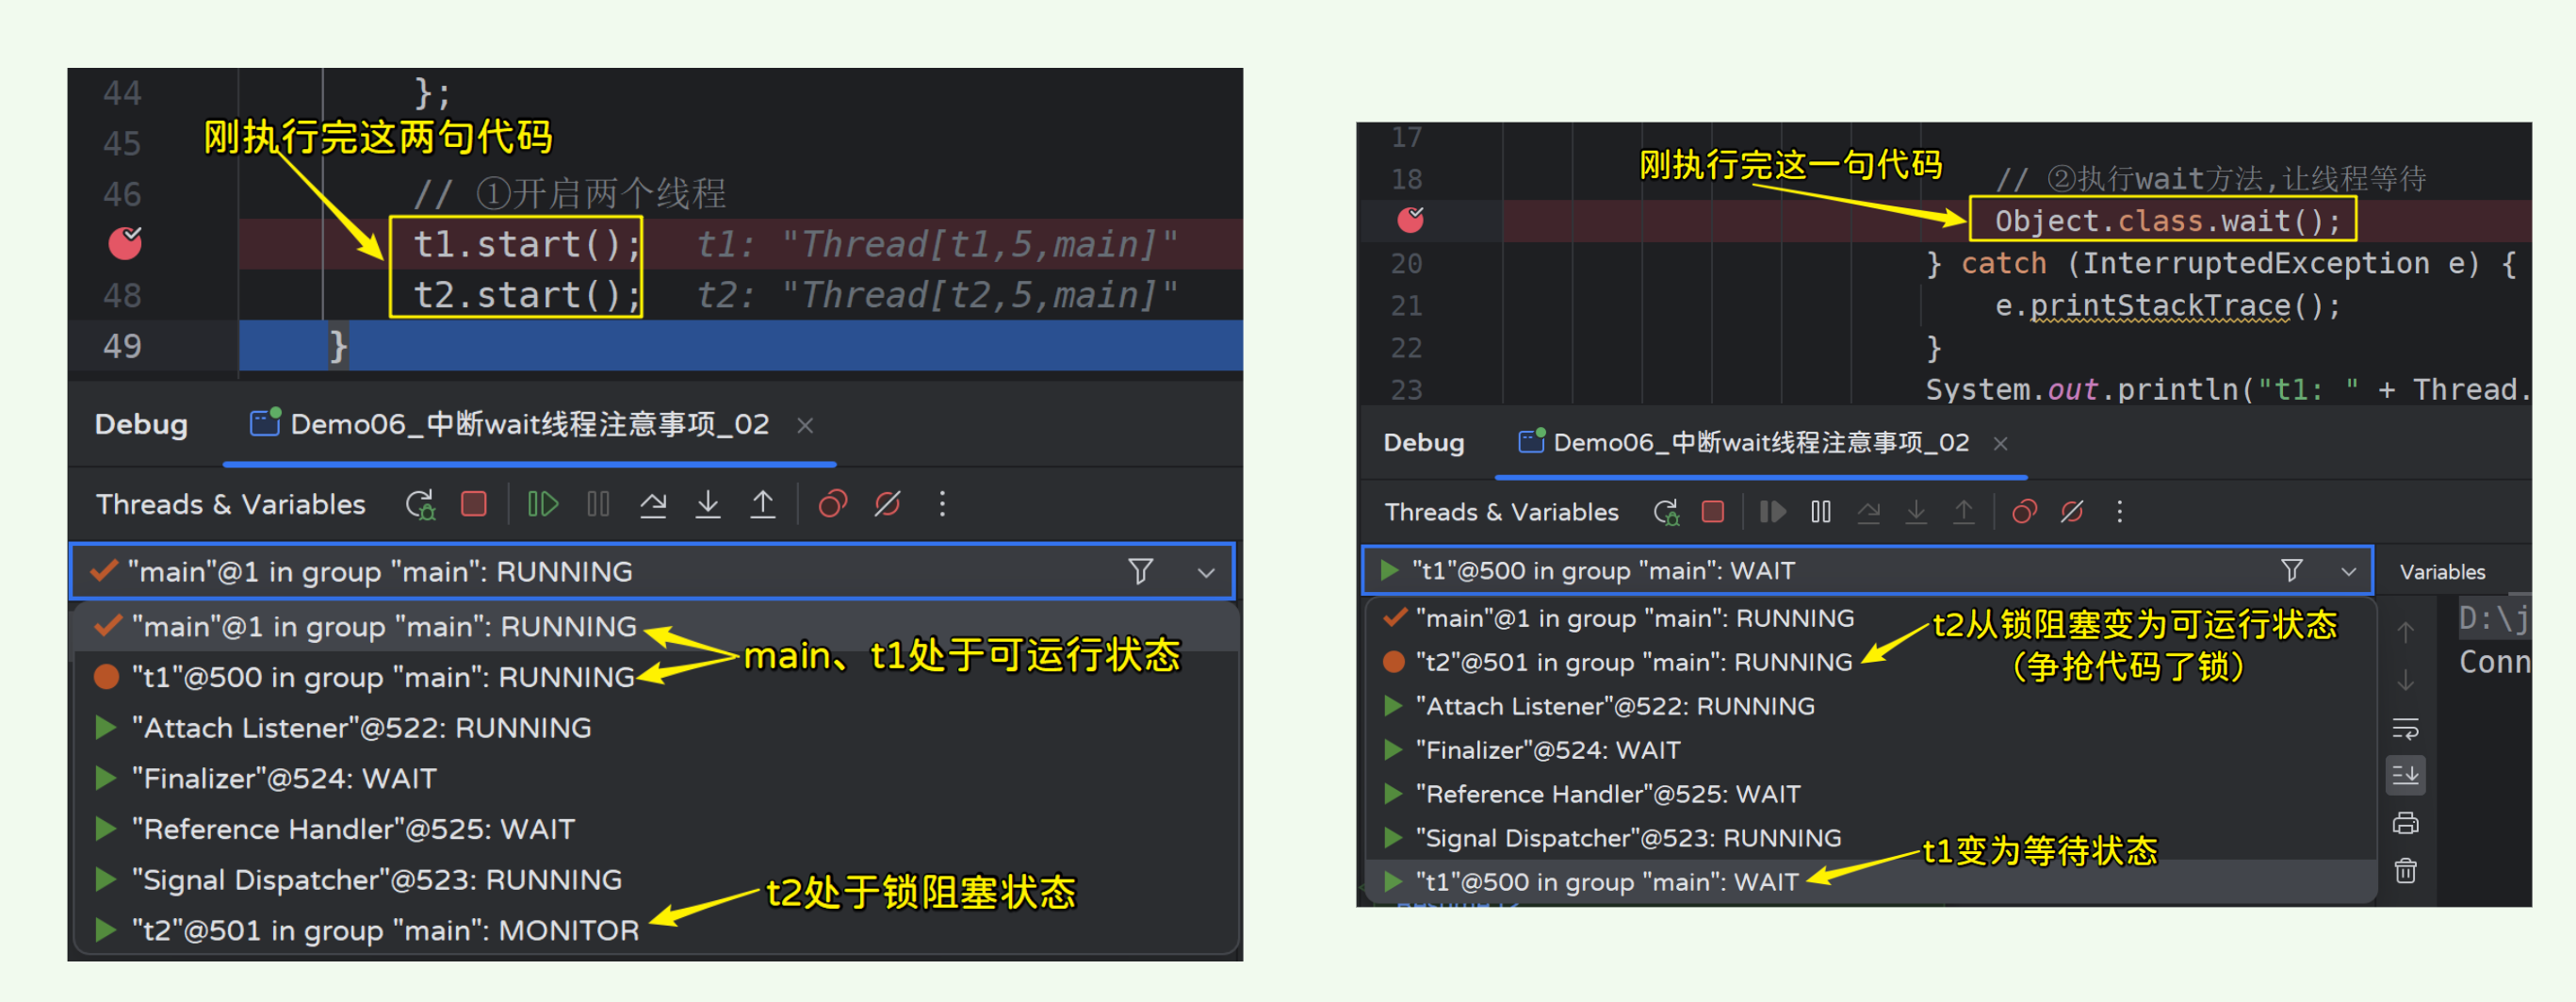
当t2线程执行完interrupt方法时,t1线程的状态由等待状态变为了锁阻塞状态(相当于唤醒了t1线程):
二、线程的操作
2.1 线程的调试
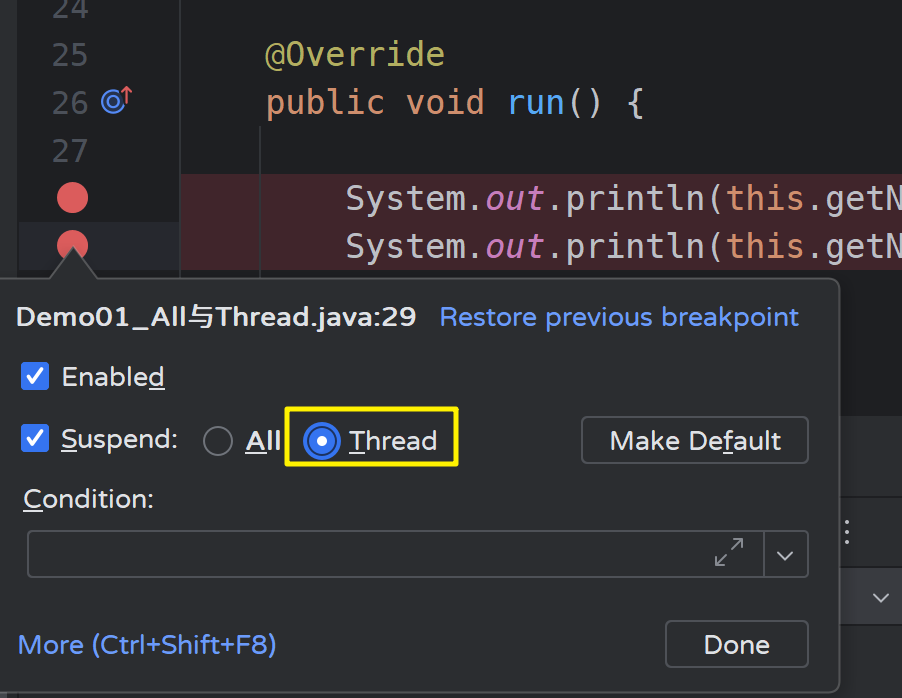
我们在断点处打开右键菜单,发现有两个选项,分别为All和Thread:
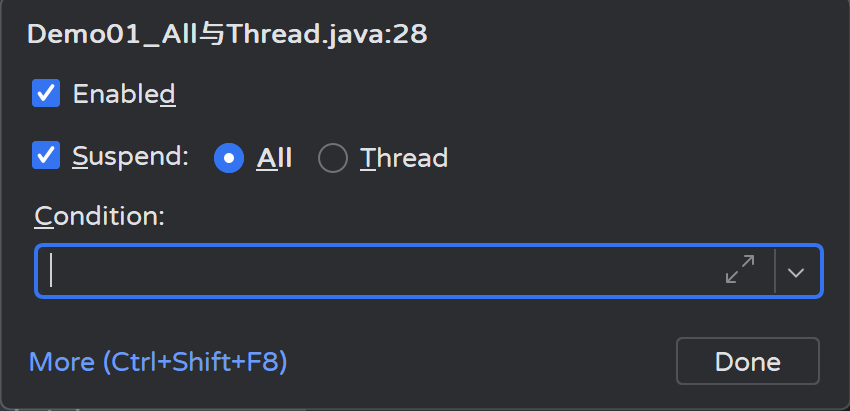
- All:在此模式下,所有的线程将集中在一起,我们可以选择一个线程进行调试,当选中的线程执行后,可以观察同一时刻其他线程的执行情况。
- Thread:在此模式下,可以单独调试某一条线程,当选中的线程执行后,其他线程并不会被影响,适用于分别调试不同的线程自己运行的状态,因为该模式下调试某条线程不会影响其他线程。
【示例代码】
package com.dfbz.demo01_线程的调试;

/**
 * @author lscl
 * @version 1.0
 * @intro:
 */
public class Demo01_All与Thread {
    public static void main(String[] args) {

        MyThreadTest t1 = new MyThreadTest("t1");
        MyThreadTest t2 = new MyThreadTest("t2");

        t1.start();
        t2.start();
    }
}

class MyThreadTest extends Thread {

    public MyThreadTest(String name) {
        super(name);
    }

    @Override
    public void run() {
        System.out.println(this.getName() + ": start...");
        System.out.println(this.getName() + ": end...");
    }
}
2.1.1 All模式
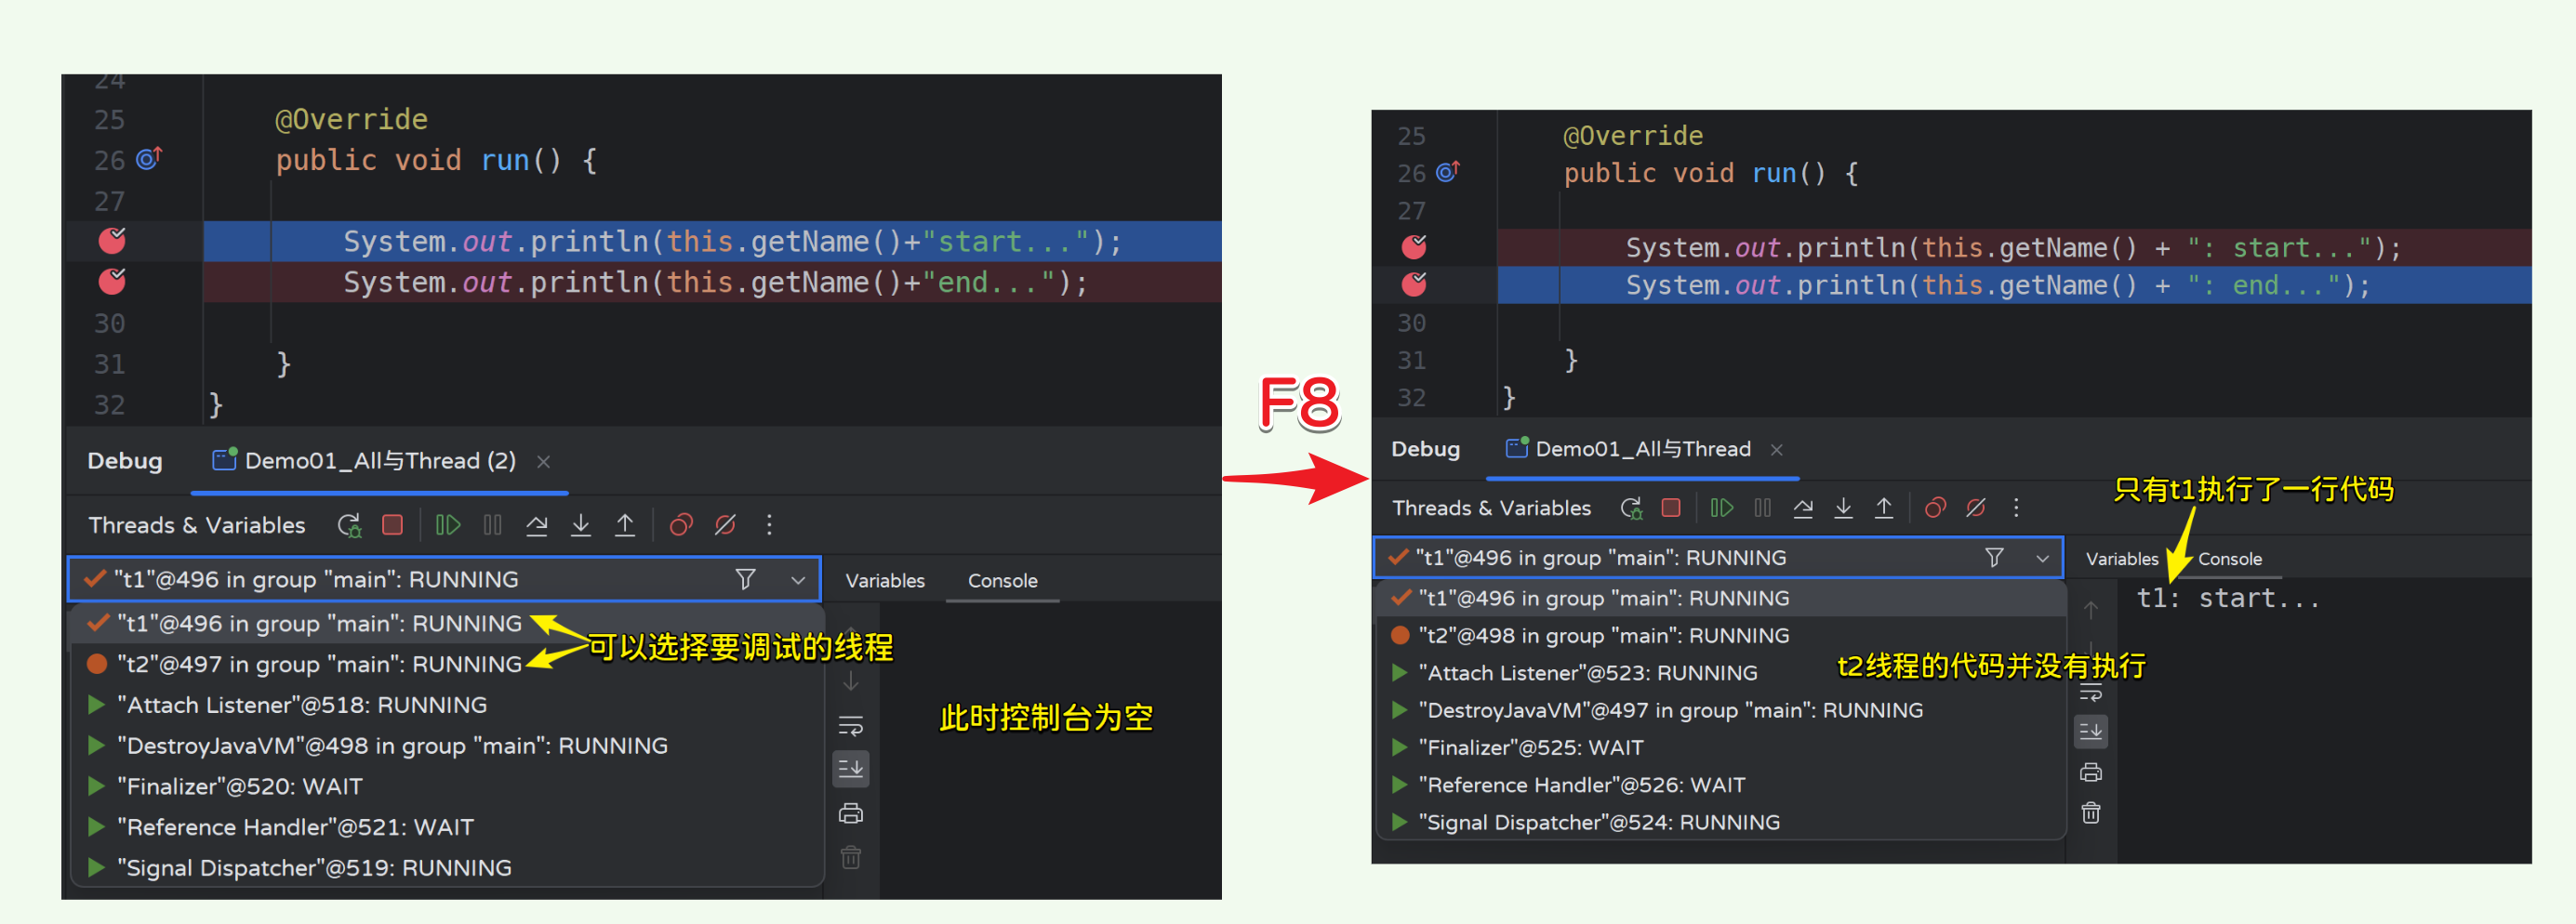
在输出的两个地方分别打上断点,并选择All模式:
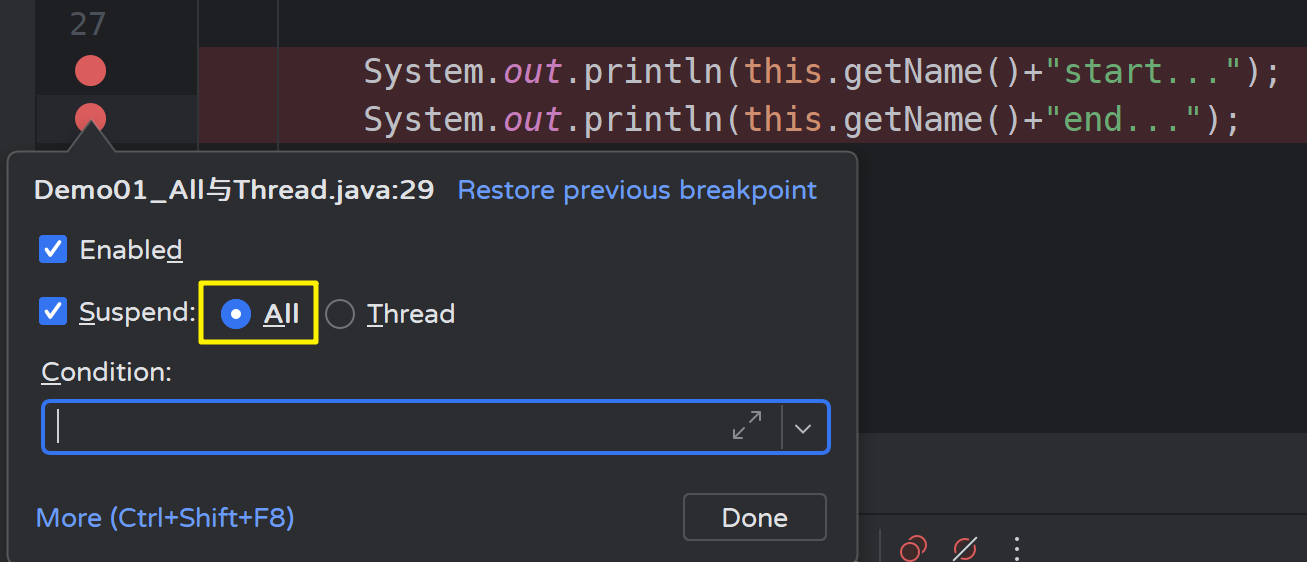
启动程序,观察:
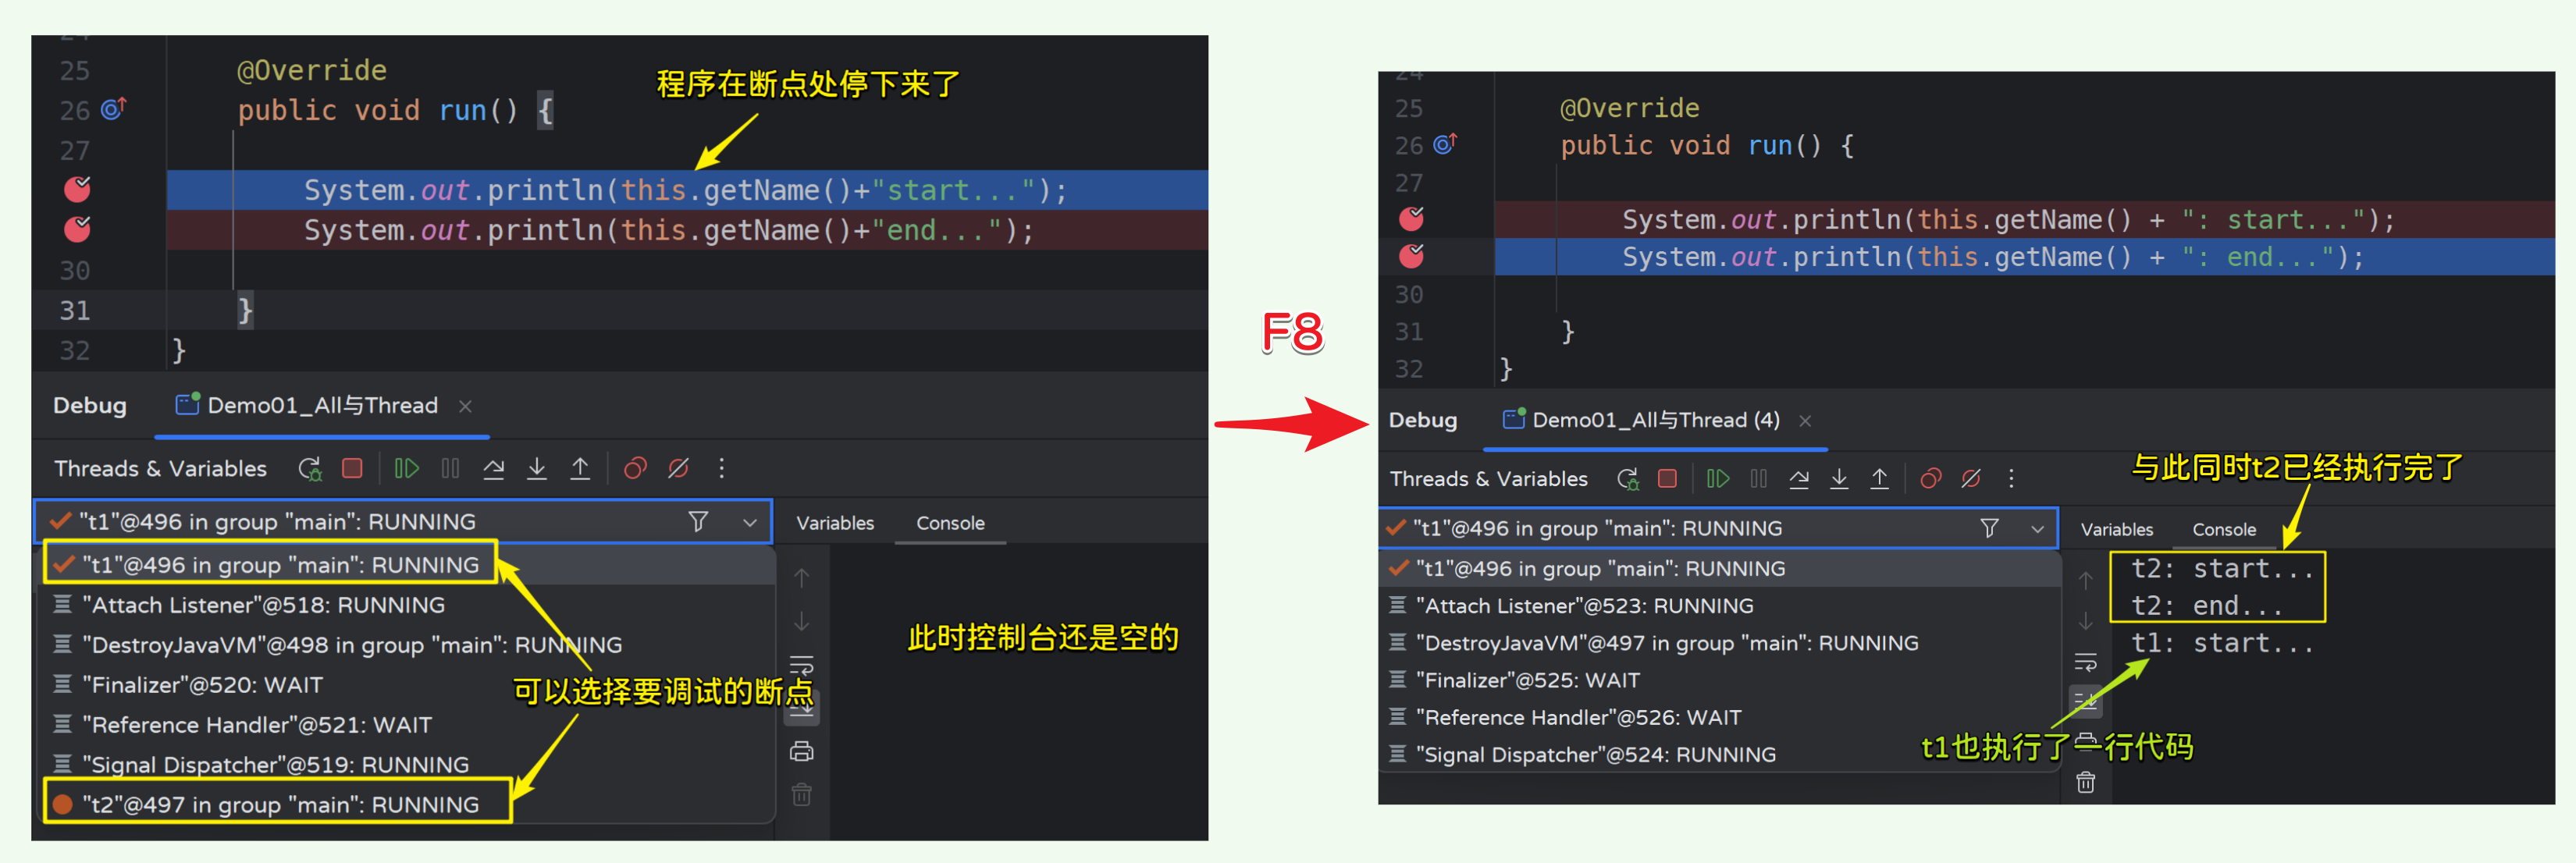
可以看到在All模式下,当正在调试的线程执行代码时,与此同时其他线程也在执行代码。如上述案例中正在调试t1线程,将t1线程的代码往下执行一行之后,与此同时t2线程都已经执行完了任务。
2.1.2 Thread模式
对于想看到某条线程独立执行的状态而又不影响其他线程,我们就可以使用Thread模式;
将两个断点更改为Thread模式:
启动程序,观察:
2.2 park与unpark
LockSupport类提供了一组用于挂起线程的操作,其中包括park和unpark两个方法。park会暂停当前线程,并将其放入等待队列中;而unpark会唤醒队列中的某个线程。
具体来说,park会将线程挂起,直到其他线程调用unpark。调用park方法时,它会尝试将当前线程添加到全局队列中,并等待其他线程调用unpark方法。
Tips:在调用park方法时,您需要确保线程已经获得了锁,以防止产生死锁等问题。
park与unpark方法是 LockSupport 类中的方法:
public static void park():暂停当前线程public static void unpark(Thread t):恢复线程t的执行
2.2.1 park线程的使用
【park与unpark的使用-示例代码】:
package com.dfbz.demo02_park与unpark操作;

import java.util.concurrent.locks.LockSupport;

/**
 * @author lscl
 * @version 1.0
 * @intro:
 */
public class Demo01_park_unpark的使用 {
    public static void main(String[] args) throws InterruptedException {
        Thread t1 = new Thread("t1") {
            @Override
            public void run() {
                System.out.println("running-before...");

                // 暂停当前线程
                LockSupport.park();

                System.out.println("running-after...");
            }
        };

        t1.start();

        Thread.sleep(1000);

        // 解除t1线程的暂停
        LockSupport.unpark(t1);
    }
}
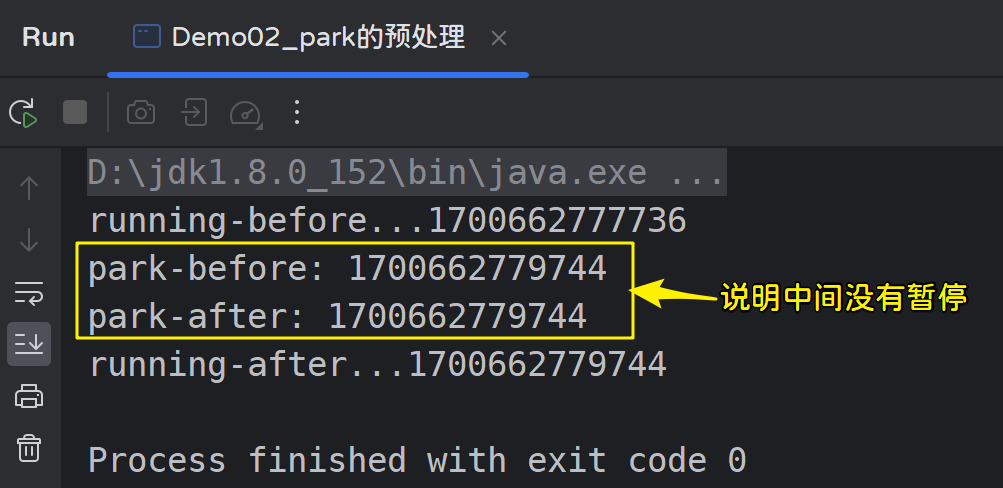
2.2.2 park线程的预处理
1) park预处理
在使用LockSupport对线程进行park与unpark时,LockSupport允许进行一次unpark的"预处理",即先调用unpark方法,等到线程下次进行park时将不会暂停,但需要注意的是,LockSupport只允许进行一次"预处理";
【park线程的注意事项】:
package com.dfbz.demo02_park与unpark操作;

import java.util.concurrent.locks.LockSupport;

/**
 * @author lscl
 * @version 1.0
 * @intro:
 */
public class Demo02_park的预处理 {
    public static void main(String[] args) throws Exception {
        Thread t1 = new Thread("t1") {
            @Override
            public void run() {
                System.out.println("running-before..." + System.currentTimeMillis());
                try {
                    // ②睡眠2s,线程执行权回到main线程
                    Thread.sleep(2000);
                } catch (InterruptedException e) {
                    e.printStackTrace();
                }
                System.out.println("park之前: " + System.currentTimeMillis());
                // ④暂停当前线程(无效,因为之前预处理过一次unpark)
                LockSupport.park();
                System.out.println("park之前: " + System.currentTimeMillis());
                System.out.println("running-after..." + System.currentTimeMillis());
            }
        };

        t1.start();

        // ①确保t1线程先执行
        Thread.sleep(10);

        // ③解除t1线程的暂停(相当于预处理一次unpark)
        LockSupport.unpark(t1);
    }
}
2)多次预处理
LockSupport只允许进行一次"预处理";多次调用unpark方法是无效的
【示例代码】
package com.dfbz.demo02_park与unpark操作;

import java.util.concurrent.locks.LockSupport;

/**
 * @author lscl
 * @version 1.0
 * @intro:
 */
public class Demo03_park的预处理_02 {

    public static void main(String[] args) throws Exception{
        Thread t1 = new Thread("t1") {
            @Override
            public void run() {
                try {
                    // ②睡眠2s,线程执行权回到main线程
                    Thread.sleep(2000);
                } catch (InterruptedException e) {
                    e.printStackTrace();
                }
                // ⑤暂停当前线程(无效,因为之前预处理过一次unpark)
                System.out.println("park-01-before: " + System.currentTimeMillis());
                LockSupport.park();
                System.out.println("park-01-after: " + System.currentTimeMillis());

                // ⑥这一次的park操作并不会被unpark唤醒,因为unpark的预处理只能进行一次
                System.out.println("park-02-before: " + System.currentTimeMillis());
                LockSupport.park();
                System.out.println("park-02-after: " + System.currentTimeMillis());
            }
        };

        t1.start();

        // ①确保t1线程先执行
        Thread.sleep(10);

        // ③解除t1线程的暂停(相当于预处理一次unpark)
        LockSupport.unpark(t1);

        // ④只允许进行一次unpark的预处理,这一次unpark操作无效
        LockSupport.unpark(t1);
    }
}

2.2.3 中断park线程
1) 中断park线程
被park方法暂停的线程一旦被中断后将会恢复运行(相当于唤醒park线程),并且不会出现任何异常,并且中断状态为true(中断成功);
Tips:中断park状态的线程与sleep、wait、join等不一样,中断park状态的线程不会出现任何异常,并且中断状态能够设置为true
【示例代码】:
package com.dfbz.demo02_park与unpark操作;

import java.util.concurrent.locks.LockSupport;

/**
 * @author lscl
 * @version 1.0
 * @intro:
 */
public class Demo04_中断park线程 {

    public static void main(String[] args) throws InterruptedException {
        Thread t1 = new Thread("t1") {
            @Override
            public void run() {
                System.out.println("park-before...");

                // ②t1线程暂停
                LockSupport.park();
                System.out.println("park-after...");
            }
        };

        t1.start();

        // ①让t1现场先执行50ms
        Thread.sleep(50);

        // ③查看t1线程的中断状态(false)
        System.out.println("main-after: " + t1.isInterrupted());         // false

        // ④中断t1线程
        t1.interrupt();

        // ③查看t1线程的中断状态(true)
        System.out.println("main-after: " + t1.isInterrupted());         // true
    }
}
运行效果:
park-before...
main-after: false
main-after: true	# 说明中断park线程能够将中断状态设置为true
park-after...		# 说明park线程被中断后能够被唤醒
2) 注意事项
需要注意的是,线程的中断状态一旦为true,则park无法暂停当前线程:
package com.dfbz.demo02_park与unpark操作;

import java.util.concurrent.locks.LockSupport;

/**
 * @author lscl
 * @version 1.0
 * @intro:
 */
public class Demo05_中断park线程的注意事项_01 {
    public static void main(String[] args) throws Exception {
        Thread t1 = new Thread("t1") {
            @Override
            public void run() {
                while (true) {

                    // ②t1线程已经被中断,输出true
                    System.out.println("t1-before..." + Thread.currentThread().isInterrupted());

                    // ③park不能暂停被中断的线程
                    LockSupport.park();
                    System.out.println("t1-after.." + Thread.currentThread().isInterrupted());
                }
            }
        };

        t1.start();
        // ①中断t1线程,将中断状态设置为true
        t1.interrupt();
    }
}
运行效果:
main-isInterrupted-before:false
main-isInterrupted-after:true
main线程能被暂停吗?					# 说明mian线程没有被暂停
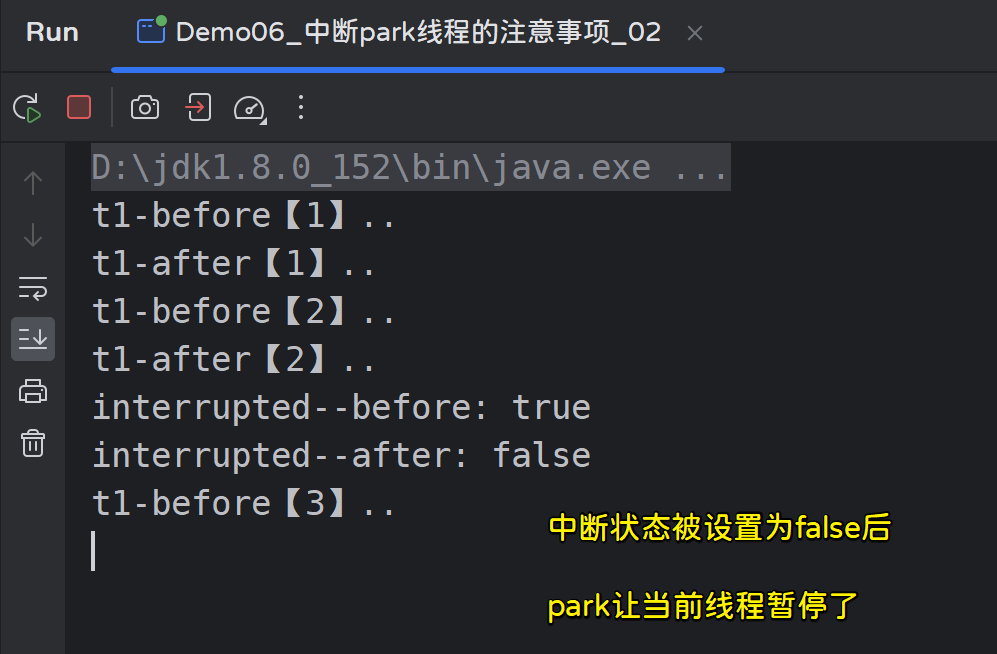
我们可以使用 Thread.interrupted() 清除中断状态,将中断状态重新设置为false:
public static void main(String[] args) throws InterruptedException {
    Thread t1 = new Thread("t1") {
        @Override
        public void run() {
            for (int i = 1; i <=5; i++) {
                System.out.println("t1-before【" + i + "】..");
                LockSupport.park();
                System.out.println("t1-after【" + i + "】..");

                if (i == 3) {
                    System.out.println("interrupted--before: " + Thread.currentThread().isInterrupted());
                    Thread.interrupted();
                    System.out.println("interrupted--after: " + Thread.currentThread().isInterrupted());
                }
            }
        }
    };

    t1.start();
    // 中断t1线程,将中断状态设置为true
    t1.interrupt();
}
运行效果:
2.2.4 park线程与wait的区别
- 1)wait,notify 和 notifyAll 必须配合锁对象一起使用,如果当前线程没有获取到锁对象,则不能调用wait/notifly方法;park与unpark方法可以在任意地方使用。
- 2)notilfy则只能随机唤醒某条线程,notiflyAll则是唤醒所有的线程;park与unpark可以精确的来指定恢复运行的线程。
- 3)调用wait方法之前不能先调用notifly方法;而调用park之前可以先调用unpark来预处理一下。
- 4)wait方法被调用后释放锁;park方法会让当前线程处于等待状态,但不会释放锁,调用unpark方法之后,线程依旧不会释放锁;
- 5)中断wait线程会出现InteruptException异常,并且会中断失败(中断状态false);中断park线程不会出现异常,并且能够中断成功(中断状态true)。
【示例代码】
package com.dfbz.demo02_park与unpark操作;
import java.util.concurrent.locks.LockSupport;
/**
* @author lscl
* @version 1.0
* @intro:
*/
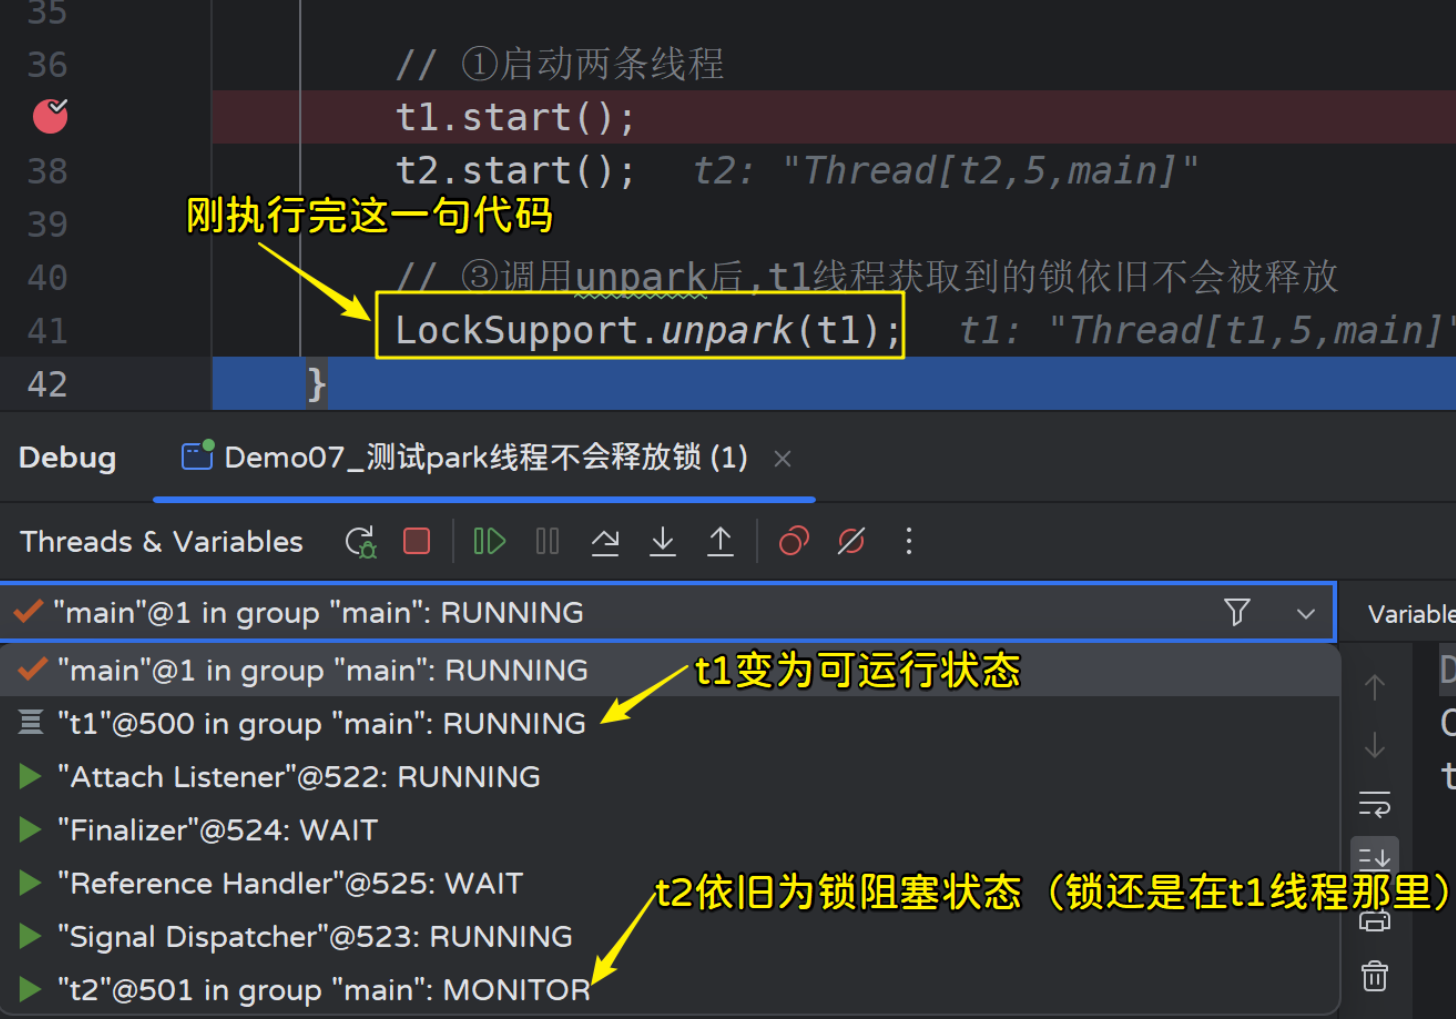
public class Demo07_测试park线程不会释放锁 {
public static void main(String[] args) throws InterruptedException {
Thread t1 = new Thread("t1") {
@Override
public void run() {
while (true) {
synchronized (Object.class) {
System.out.println("t1-before...");
// ②调用park方法后,线程处于等待状态,但是并不会释放锁
LockSupport.park();
System.out.println("t1-after...");
}
}
}
};
Thread t2 = new Thread("t2") {
@Override
public void run() {
while (true) {
synchronized (Object.class) {
System.out.println("t2...");
}
}
}
};
// ①启动两条线程
t1.start();
t2.start();
// ③调用unpark后,t1线程获取到的锁依旧不会被释放
LockSupport.unpark(t1);
}
}
运行效果:

t1线程等待后,没有其他线程使用unpark将其唤醒,然后就抱着锁一直等待下去,t2线程也由于没有锁,处于锁阻塞状态;
当使用unpark唤醒t1线程后,t1线程又重新变为可运行状态了,t2依旧是锁阻塞状态
2.4 退出线程的方式
在多线程竞争时,如果当前线程没有获取到锁资源,那么将会被阻挡在synchronized代码块外面,此时当前线程的状态为锁阻塞状态),并不是睡眠状态,一旦锁被其他线程释放了,那么当前线程会立即参与锁的竞争;
public final void stop():退出当前线程,当前线程所获取到的锁资源将会释放;public final void suspend():暂停当前线程,当前线程的锁将不会释放;public final void resume():恢复被暂停的线程;public void interrupt():中断当前线程(将中断状态设置为true);
2.4.1 使用stop方法退出线程
【示例代码】:
package com.dfbz.demo03_退出线程的方式;

/**
 * @author lscl
 * @version 1.0
 * @intro:
 */
public class Demo01_使用stop方法退出线程 {
    public static void main(String[] args) throws InterruptedException {
        Thread t1 = new Thread("t1") {
            @Override
            public void run() {
                synchronized (Object.class) {
                    // 获得到了锁之后就一直执行
                    while (true) {
                        try {
                            Thread.sleep(500);
                        } catch (InterruptedException e) {
                            e.printStackTrace();
                        }
                        System.out.println("t1..."+Thread.currentThread().isInterrupted());
                    }
                }
            }
        };

        Thread t2 = new Thread("t2") {
            @Override
            public void run() {
                while (true) {
                    // 每一次的执行都要拿到锁才行
                    synchronized (Object.class) {
                        System.out.println("t2...");
                    }
                }
            }
        };

        t1.start();

        // 让主线程睡眠10ms,确保t1线程先执行
        Thread.sleep(10);
        t2.start();

/*
        Thread.sleep(3000);
        System.out.println("t1线程被退出...");
        t1.stop();            // 退出当前线程,t1线程的锁将会被释放
*/

        // 让t1线程执行3s
/*
        Thread.sleep(3000);
        t1.suspend();                // 暂停当前线程,锁不会被释放
        System.out.println("t1线程已经暂停...");
        Thread.sleep(3000);     // 暂停t1线程3s
        t1.resume();                 // 恢复线程
        System.out.println("t1线程已经恢复...");
*/

        // 中断当前线程,只是将中断标记设置为true,仅此而已,t1线程依旧会一直运行
        t1.interrupt();
    }
}
2.4.2 使用interrupt方法退出线程
stop()方法会释放对象锁, 强行把执行到一半的线程终止。比如t1线程执行到一半的时候调用stop()方法的话,则会将该线程强行终止并且释放锁,让其他线程执行,这样问题就来了,t1线程剩下的一半业务还没执行完,若该业务很主要,则会出现很严重的问题。
因此一般终止线程的时候,都尽量用interrupt来终止线程:通过interrupt中断机制不会直接终止另一个线程,而需要被中断的线程自己处理。被中断的线程拥有完全的自主权,它既可以选择立即停止,也可以选择一段时间后停止,也可以选择不停止。这样就可以保证线程安全。
更加优雅的退出线程:
package com.dfbz.demo03_退出线程的方式;

/**
 * @author lscl
 * @version 1.0
 * @intro:
 */
public class Demo02_使用interrupt方法退出线程 {
    public static void main(String[] args) throws InterruptedException {
        Thread t1 = new Thread("t1") {
            @Override
            public void run() {
                synchronized (Object.class) {
                    while (true) {
                        if (Thread.currentThread().isInterrupted()) {
                            // 代表线程被中断了
                            System.out.println("线程中断状态: ");
                            System.out.println("释放资源...");
                            System.out.println("退出线程..");
                            break;
                        }

                        System.out.println("执行线程任务....");
                    }
                }
            }
        };

        t1.start();
        Thread.sleep(2000);     // 让t1线程执行2秒
        // 中断当前线程,只是将中断标记设置为true,仅此而已
        t1.interrupt();
    }
}
二、线程状态
2.1 线程状态
当线程被创建并启动以后,它既不是一启动就进入了执行状态,也不是一直处于执行状态。在线程的生命周期中,有几种状态呢?在API中java.lang.Thread.State这个枚举中给出了六种线程状态:
这里先列出各个线程状态发生的条件,下面将会对每种状态进行详细解析;
| 线程状态 | 导致状态发生条件 |
|---|---|
| New(新建) | 线程刚被创建,但是并未启动。还没调用start方法。 |
| Runnable(可运行) | 线程可以在java虚拟机中运行的状态,可能正在运行自己代码,也可能没有,这取决于操作系统处理器。 |
| Blocked(锁阻塞) | 当一个线程试图获取一个对象锁,而该对象锁被其他的线程持有,则该线程进入Blocked状态;当该线程持有锁时,该线程将变成Runnable状态。 |
| Waiting(无限等待) | 一个线程在等待另一个线程执行一个(唤醒)动作时,该线程进入Waiting状态。进入这个状态后是不能自动唤醒的,必须等待另一个线程调用notify或者notifyAll方法才能够唤醒。 |
| Timed Waiting(计时等待) | 同waiting状态,有几个方法有超时参数,调用他们将进入Timed Waiting状态。这一状态将一直保持到超时期满或者接收到唤醒通知。带有超时参数的常用方法有Thread.sleep 、Object.wait。 |
| Teminated(被终止) | 因为run方法正常退出而死亡,或者因为没有捕获的异常终止了run方法而死亡。 |
2.1.1 New
- New:新建状态
表示线程被创建但尚未启动的状态:当我们用 new Thread() 新建一个线程时,如果线程没有开始运行 start() 方法,那么线程也就没有开始执行 run() 方法里面的代码,那么此时它的状态就是 New。而一旦线程调用了 start(),它的状态就会从 New 变成 Runnable
【示例代码】
package com.dfbz.demo01_线程的状态;

/**
 * @author lscl
 * @version 1.0
 * @intro:
 */
public class Demo01_线程状态_NEW {
    public static void main(String[] args) {
        Thread t1 = new Thread(){
            @Override
            public void run() {

            }
        };

        // 线程未启动之前的状态都是NEW
        System.out.println(t1.getState());          // NEW
    }
}
2.1.2 Runnable
- Runnable:可运行状态
一旦线程调用start()方法,线程就处于可运行状态(Runnable)。
一个可运行的线程能正在运行也可能没有运行。有些教科书上讲可运行状态分为了就绪状态和运行状态,即线程开启后进入就绪状态,当线程抢到CPU执行权后进入运行状态(Java规范没有将正在运行作为一个单独的状态,一个正在运行的线程仍然处于可运行状态)
【示例代码】
package com.dfbz.demo01_线程的状态;

/**
 * @author lscl
 * @version 1.0
 * @intro:
 */
public class Demo02_线程状态_RUNNABLE {
    public static void main(String[] args) {
        Thread t1 = new Thread(){
            @Override
            public void run() {
                while (true){

                }
            }
        };

        Thread t2 = new Thread(){
            @Override
            public void run() {
                while (true){

                }
            }
        };

        t1.start();
        t2.start();

        // 线程只要开启之后不管是否处于运行状态
        System.out.println(t1.getState());          // RUNNABLE
        System.out.println(t2.getState());          // RUNNABLE
    }
}
2.1.3 Blocked
- Blocked:锁阻塞状态(在IDEA断点显示的MONITOR状态)
Blocked从 Runnable 状态进入到 Blocked 状态只有一种途径,那么就是当进入到 synchronized 代码块中时未能获得相应的锁,当有线程从 Blocked 状态指向了 Runnable ,也只有一种情况,那么就是当线程获得锁,此时线程就会进入 Runnable 状体中参与 CPU 资源的抢夺
【示例代码】
package com.dfbz.demo01_线程的状态;

/**
 * @author lscl
 * @version 1.0
 * @intro:
 */
public class Demo03_线程状态_BLOCKED {
    public static void main(String[] args) throws Exception {
        Thread t1 = new Thread() {
            @Override
            public void run() {
                synchronized (Object.class) {
                    while (true) {

                    }
                }
            }
        };

        Thread t2 = new Thread() {
            @Override
            public void run() {

                // t2线程获取不到锁,被锁阻塞在外面
                synchronized (Object.class) {

                }
            }
        };

        t1.start();

        // 过一会再开启线程2(确保线程1必定先获取CPU执行权)
        Thread.sleep(10);

        t2.start();
        System.out.println(t1.getState());          // RUNNABLE
        System.out.println(t2.getState());          // BLOCKED
    }
}
2.1.4 Timed Waiting
Timed Waiting 状态,它与 Waiting 状态非常相似,其中的区别只在于是否有时间的限制,在 Timed Waiting 状态时会等待超时,之后由系统唤醒
在以下情况会让线程进入 Timed Waiting 状态。
- 线程执行了设置了时间参数的 Thread.sleep(long millis) 方法;
- 线程执行了设置了时间参数的 Object.wait(long timeout) 方法;
- 线程执行了设置了时间参数的 Thread.join(long millis) 方法;
通过这个我们可以进一步看到它与 waiting 状态的相同
【示例代码1-sleep】:
package com.dfbz.demo01_线程的状态;

/**
 * @author lscl
 * @version 1.0
 * @intro:
 */
public class Demo04_线程状态_TIMED_WAITING_01_sleep {
    public static void main(String[] args) throws Exception {
        Thread t1 = new Thread() {
            @Override
            public void run() {
                try {
                    Thread.sleep(10000);
                } catch (InterruptedException e) {
                    e.printStackTrace();
                }

            }
        };

        t1.start();

        // 让main线程睡眠一段时间(确保t1线程能够执行)
        Thread.sleep(100);
        System.out.println(t1.getState());          // TIMED_WAITING
    }
}
【示例代码2-wait】
package com.dfbz.demo01_线程的状态;

/**
 * @author lscl
 * @version 1.0
 * @intro:
 */
public class Demo05_线程状态_TIMED_WAITING_02_wait {
    public static void main(String[] args) throws Exception {
        Thread t1 = new Thread() {
            @Override
            public void run() {
                synchronized (Object.class) {
                    while (true) {
                        try {
                            Object.class.wait(1000);
                        } catch (InterruptedException e) {
                            e.printStackTrace();
                        }
                    }
                }
            }
        };


        t1.start();
        // 让main线程睡眠一段时间(确保t1线程能够执行)
        Thread.sleep(100);
        System.out.println(t1.getState());          // TIMED_WAITING
    }
}
【示例代码3-join】
package com.dfbz.demo01_线程的状态;

/**
 * @author lscl
 * @version 1.0
 * @intro:
 */
public class Demo06_线程状态_TIMED_WAITING_03_join {

    public static void main(String[] args) throws Exception {
        Thread t1 = new Thread() {
            @Override
            public void run() {
                while (true) {
                }

            }
        };

        Thread t2 = new Thread() {
            @Override
            public void run() {
                while (true) {
                    try {
                        // 让t1线程先执行10s,t2将处于TIMED_WAITING状态
                        t1.join(10000);
                    } catch (InterruptedException e) {
                        e.printStackTrace();
                    }
                }

            }
        };
        t1.start();
        t2.start();

        // 让main线程睡眠1s,保证t1线程能执行join方法
        Thread.sleep(1000);

        System.out.println(t1.getState());          // RUNNABLE
        System.out.println(t2.getState());          // TIMED_WAITING
    }
}
2.1.5 Waiting
对于 Waiting 状态的进入有3种情况,分别为:
- 1)当线程中调用了没有设置 Timeout 参数的 Object.wait() 方法
- 2)当线程调用了没有设置 Timeout 参数的 Thread.join() 方法
- 3)当线程调用了 LockSupport.park() 方法
【示例代码1-wait】:
package com.dfbz.demo01_线程的状态;

/**
 * @author lscl
 * @version 1.0
 * @intro:
 */
public class Demo07_线程状态_WAITING_01_wait {

    public static void main(String[] args) throws Exception {
        Thread t1 = new Thread() {
            @Override
            public void run() {
                synchronized (Object.class) {
                    try {
                        Object.class.wait();
                    } catch (InterruptedException e) {
                        e.printStackTrace();
                    }
                }
            }
        };

        t1.start();

        // 让当前线程睡眠0.1s,确保t1线程能够执行wait
        Thread.sleep(100);
        System.out.println(t1.getState());          // WAITING
    }
}
【示例代码2-join】:
package com.dfbz.demo01_线程的状态;

/**
 * @author lscl
 * @version 1.0
 * @intro:
 */
public class Demo08_线程状态_WAITING_02_join {

    public static void main(String[] args) throws Exception {
        Thread t1 = new Thread() {
            @Override
            public void run() {
                while (true){

                }
            }
        };

        Thread t2 = new Thread() {
            @Override
            public void run() {
                try {
                    t1.join();
                } catch (InterruptedException e) {
                    e.printStackTrace();
                }
            }
        };

        t1.start();
        t2.start();

        // 让当前线程睡眠0.1s,确保t1线程能够执行join
        Thread.sleep(100);

        System.out.println(t1.getState());          // RUNNABLE
        System.out.println(t2.getState());          // WAITING
    }
}
【示例代码3-park】:
package com.dfbz.demo01_线程的状态;

import java.util.concurrent.locks.LockSupport;

/**
 * @author lscl
 * @version 1.0
 * @intro:
 */
public class Demo09_线程状态_WAITING_03_park {

    public static void main(String[] args) throws Exception {
        Thread t1 = new Thread() {
            @Override
            public void run() {
                while (true){
                    LockSupport.park();
                }
            }
        };

        t1.start();

        // 让当前线程睡眠0.1s,确保t1线程能够执行park
        Thread.sleep(100);

        System.out.println(t1.getState());          // WAITING
    }
}
Blocked与Waiting的区别:
- Blocked 是在等待其他线程释放锁
- Waiting 则是在等待某个条件,比如 join 的线程执行完毕,或者是 notify()/notifyAll() 。
2.1.6 Terminated
Terminated:终止状态,要想进入Terminated 状态有两种可能。
- 1)run() 方法执行完毕,线程正常退出。
- 2)出现一个没有捕获的异常,终止了 run() 方法,最终导致意外终止。
【示例代码】:
package com.dfbz.demo01_线程的状态;

/**
 * @author lscl
 * @version 1.0
 * @intro:
 */
public class Demo10_线程状态_TERMINATED {

    public static void main(String[] args) throws Exception {
        Thread t1 = new Thread() {
            @Override
            public void run() {
                System.out.println("t1 running...");
            }
        };

        t1.start();

        // 让当前线程睡眠10毫秒,确保t1线程任务执行完毕
        Thread.sleep(10);

        System.out.println(t1.getState());          // TERMINATED
    }
}
2.2 线程状态变化
线程流程图:
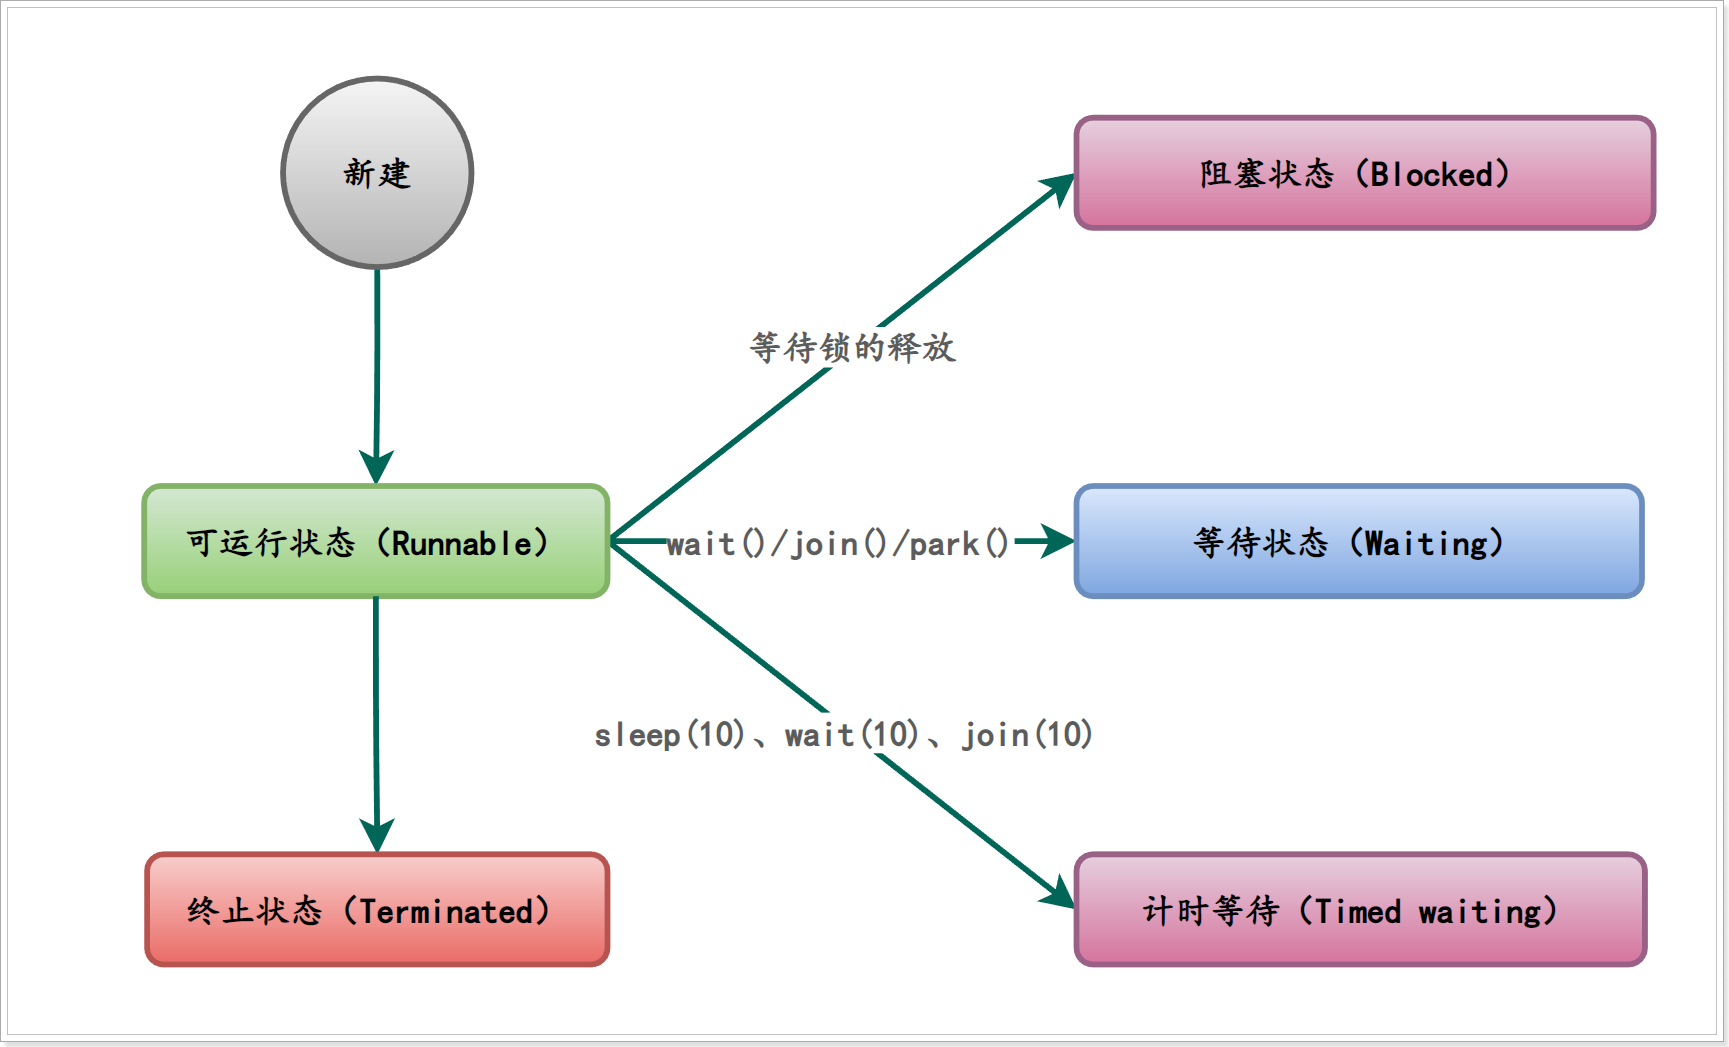
接下来我们将来分析各自状态之间的转换,其实主要就是 Blocked、waiting、Timed Waiting 三种状态的转换 ,以及他们是如何进入下一状态最终进入 Runnable
2.2.1 Runnable与Blocked状态转换
- 1)Runnable状态进入Blocked状态:当前线程竞争锁对象失败时:
Runnable-->Blocked - 2)Blocked状态进入Runnable状态:当之前的线程释放了锁对象时,新的线程竞争到了锁对象时:
Blocked-->Runnable
【示例代码】:
package com.dfbz.demo02_线程状态的改变;

/**
 * @author lscl
 * @version 1.0
 * @intro:
 */
public class Demo01_Runnable进入Blocked状态 {
    public static void main(String[] args) throws InterruptedException {
        Object obj = new Object();
        Thread t1 = new Thread(() -> {

            while (true) {
                synchronized (obj) {
                    System.out.println("t1");
                }
            }
        }, "t1");

        Thread t2 = new Thread(() -> {

            while (true) {
                synchronized (obj) {
                    System.out.println("t2");
                }
            }
        }, "t2");
        t1.start();
        t2.start();
    }
}
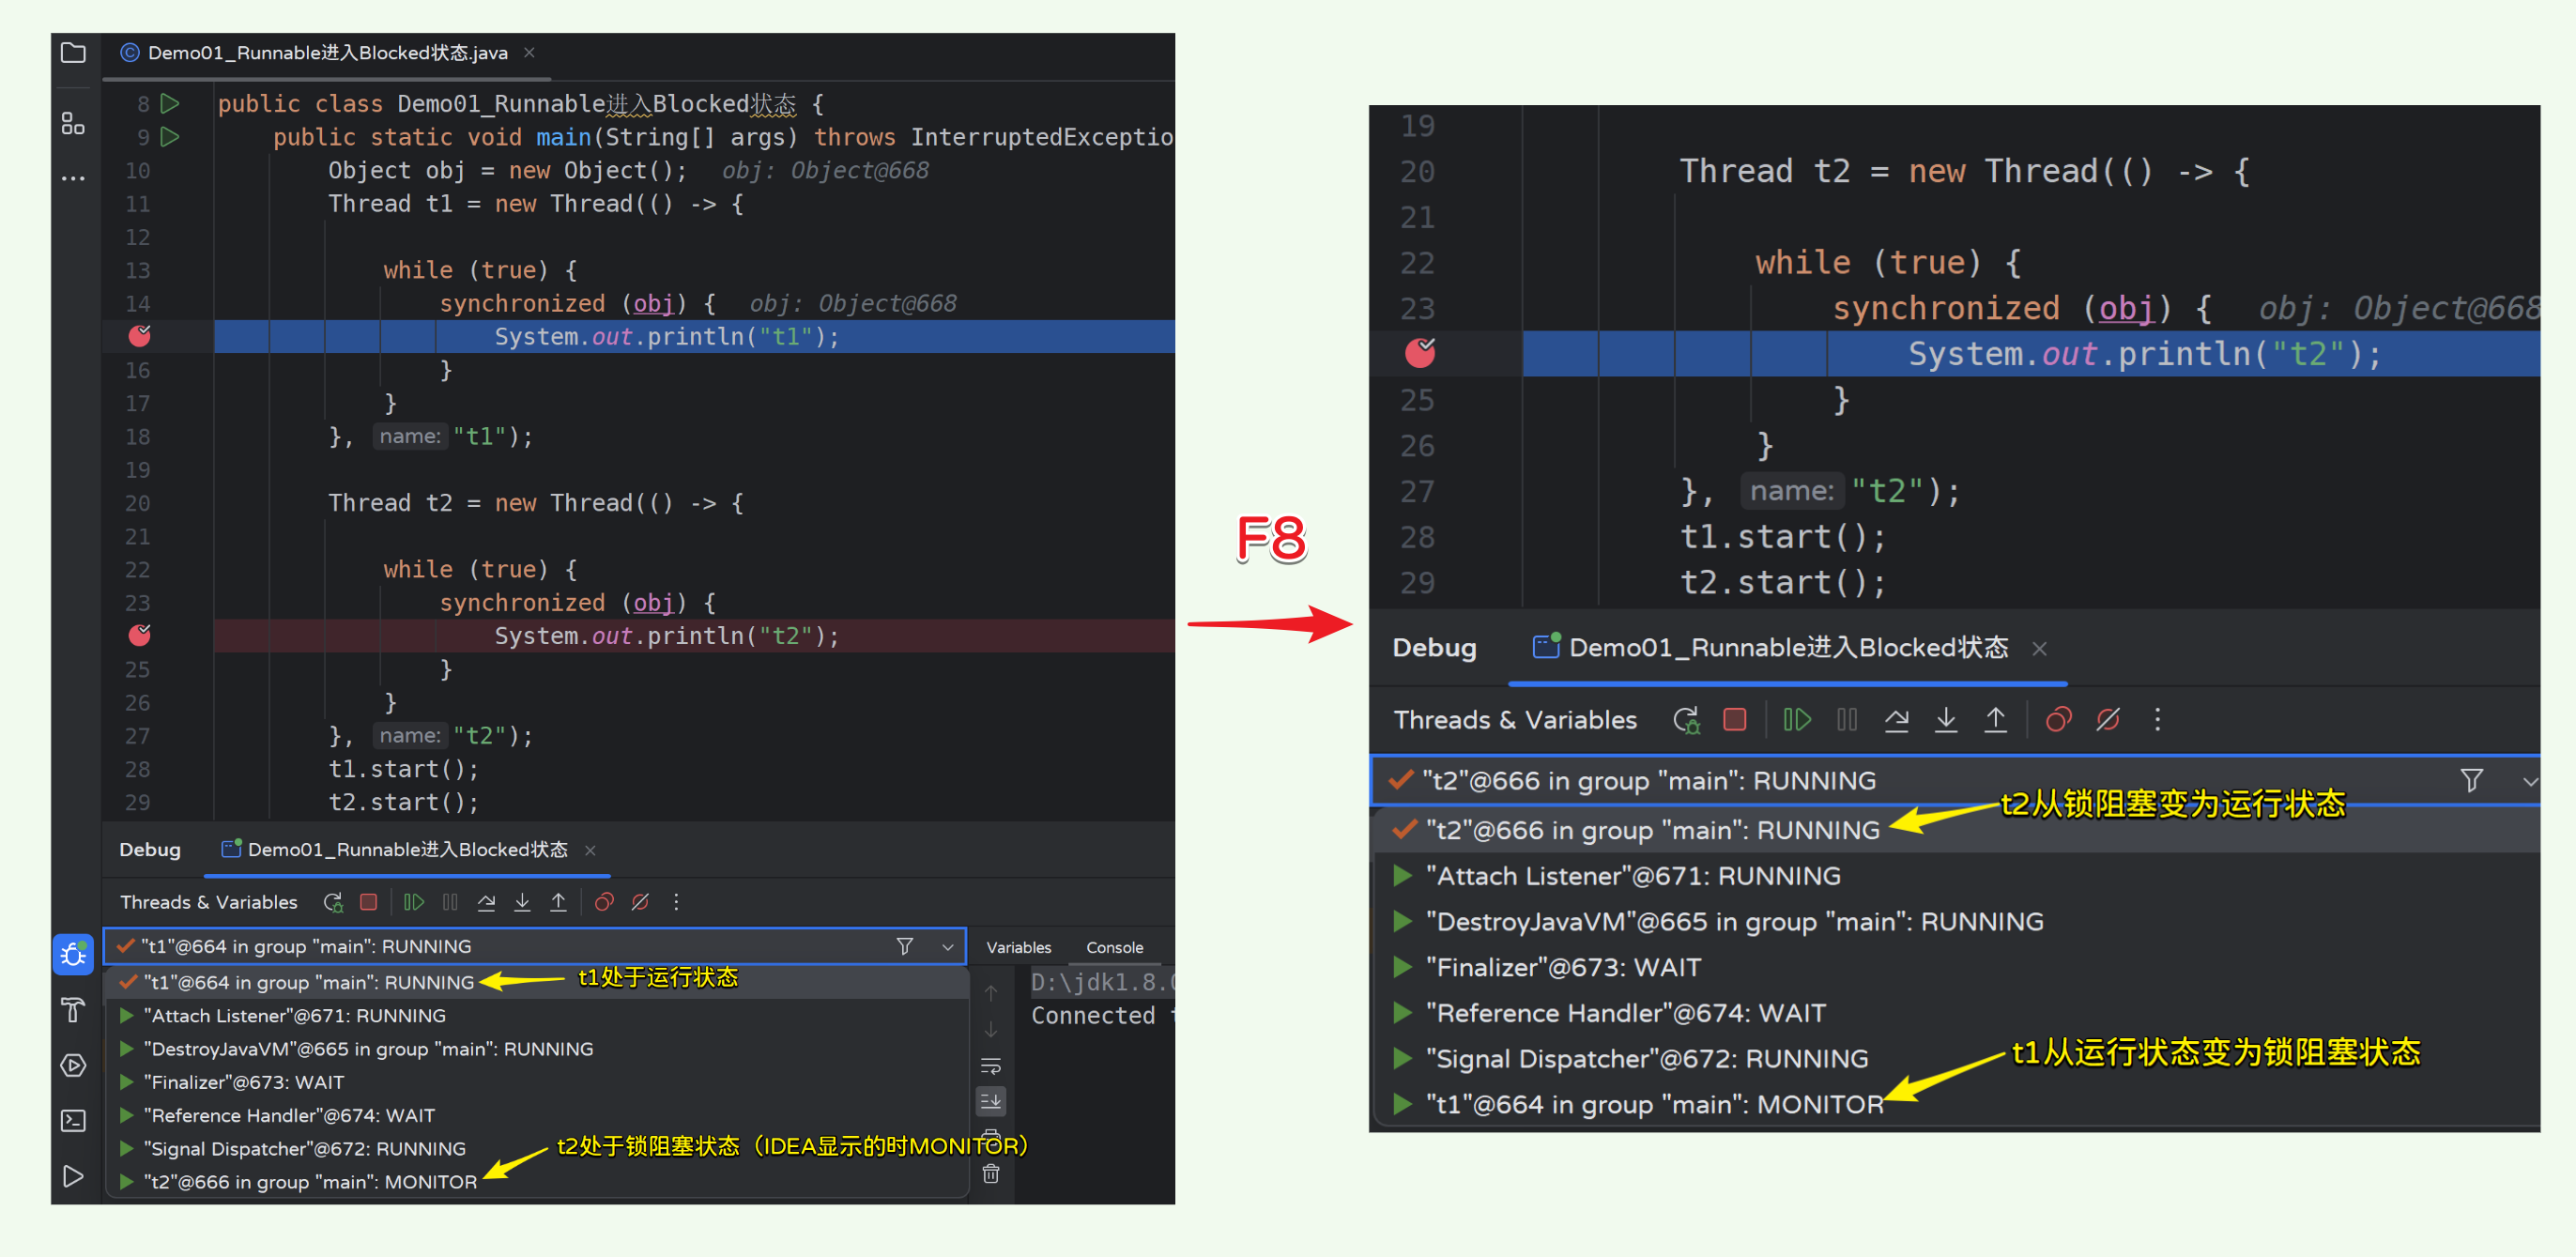
Tips:断点记得使用Thread模式;
2.2.2 Runnable与Waiting状态转换
Runnable状态与Waiting状态有三种情况,分别为wait、join、park;
1) Runnable转Waiting
Runnable状态进入Waiting状态:
- 1)调用wait方法
- 2)调用join方法
- 3)调用park方法
【示例代码-01-wait】
package com.dfbz.demo02_线程状态的改变;
/**
* @author lscl
* @version 1.0
* @intro:
*/
public class Demo02_Runnable进入Waiting状态_01_wait {
public static void main(String[] args) throws InterruptedException {
Object obj = new Object();
Thread t1 = new Thread(() -> {
synchronized (obj) {
System.out.println("t1-before..");
try {
obj.wait();
} catch (InterruptedException e) {
e.printStackTrace();
}
System.out.println("t1-after..");
}
}, "t1");
t1.start();
// 确保t1线程先执行
Thread.sleep(10);
new Thread(() -> {
synchronized (obj) {
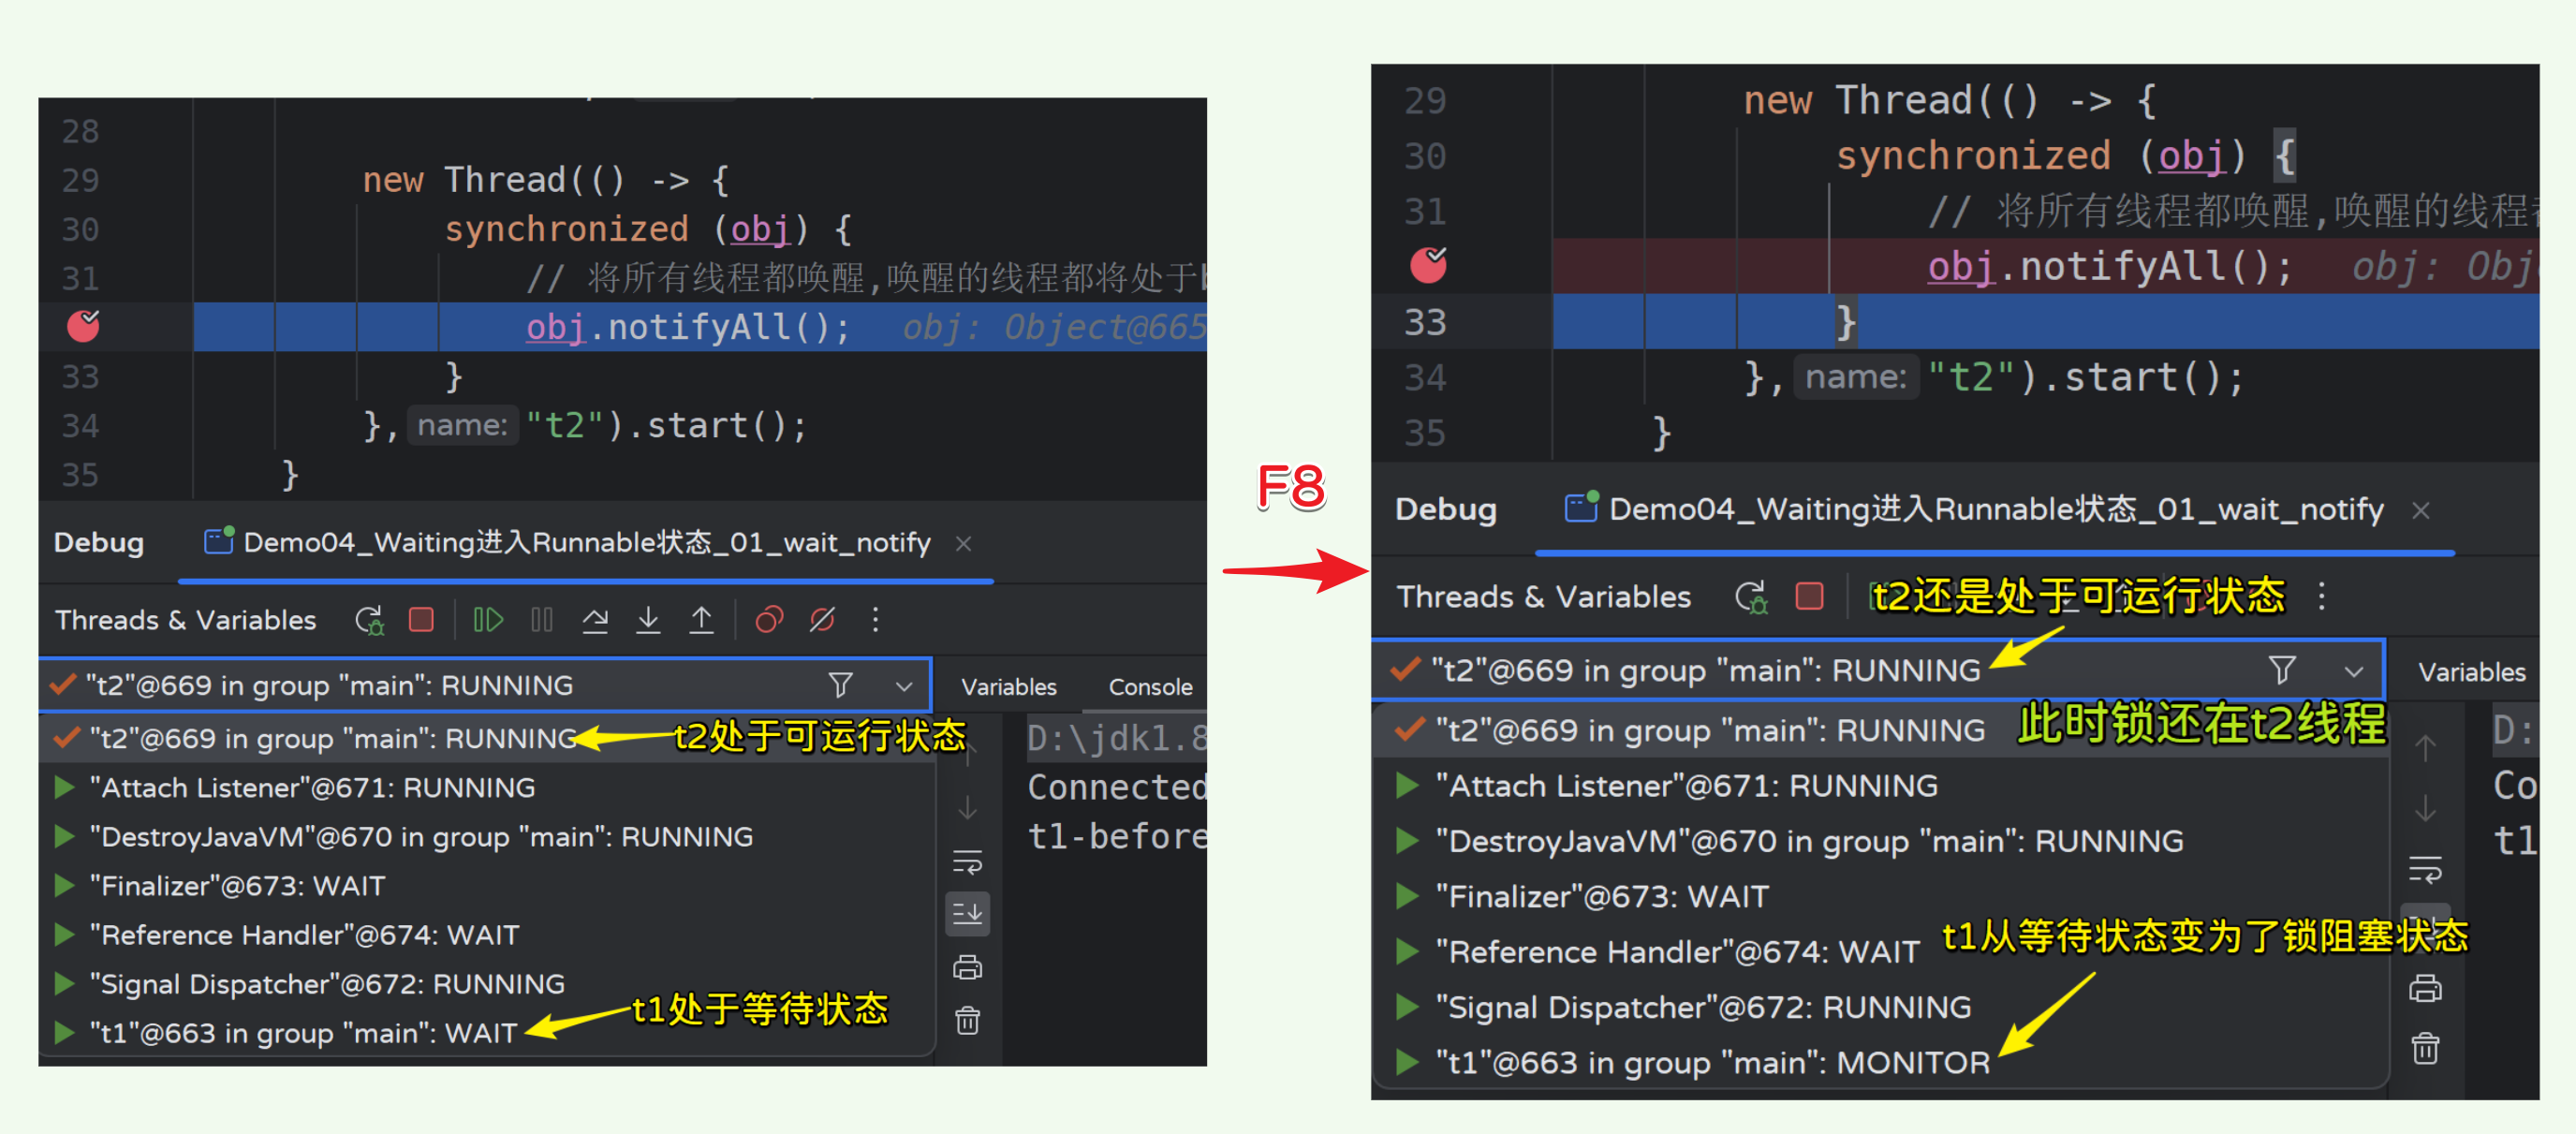
// 将所有线程都唤醒,唤醒的线程都将处于blocked状态,因为要等当前线程释放锁对象
obj.notifyAll();
}
},"t2").start();
}
}
分析:
【示例代码-02-join】
package com.dfbz.demo02_线程状态的改变;

/**
 * @author lscl
 * @version 1.0
 * @intro:
 */
public class Demo02_Runnable进入Waiting状态_02_join {
    public static void main(String[] args) throws InterruptedException {
        Thread t1 = new Thread("t1") {
            @Override
            public void run() {
                while (true){

                }
            }
        };

        Thread t2 = new Thread("t2") {
            @Override
            public void run() {
                System.out.println("t2-before...");
                try {
                    t1.join();
                } catch (InterruptedException e) {
                    e.printStackTrace();
                }
                System.out.println("t2-after...");
            }
        };

        t1.start();
        t2.start();

        // 让当前线程睡眠10ms,确保t1线程能够执行join
        Thread.sleep(10);

        System.out.println(t1.getState());          // RUNNABLE
        System.out.println(t2.getState());          // WAITING
    }
}
【示例代码-03-park】
package com.dfbz.demo02_线程状态的改变;

import java.util.concurrent.locks.LockSupport;

/**
 * @author lscl
 * @version 1.0
 * @intro:
 */
public class Demo03_Runnable进入Waiting状态_03_park {
    public static void main(String[] args) throws InterruptedException {
        Thread t1 = new Thread("t1") {
            @Override
            public void run() {
                while (true){
                    System.out.println("t1-before");
                    System.out.println(Thread.currentThread().getState());
                    LockSupport.park();
                    System.out.println(Thread.currentThread().getState());
                    System.out.println("t1-after");
                }
            }
        };

        t1.start();

        // 确保t1线程先执行
        Thread.sleep(10);
        System.out.println(t1.getState());          // 使用断点让park方法先执行,此时线程状态为Waiting
    }
}
2) Waiting转Runnable
Waiting状态进入Runnable状态:
- 1)wait:
- 1)notifly或notifyAll方法(需要注意的是先进入Blocked再进入Runnable)进入Runnable状态
- 2)使用interrupt()中断线程(中断状态为false)
- 2)join:
- 1)等待join线程执行完毕
- 2)使用interrupt()中断线程(中断状态为false)
- 3)park:
- 1)调用unpark方法
- 2)使用interrupt()中断线程(并不会出现InterruptException,而且中断状态为true,相当于直接唤醒)
【示例代码Waiting转Runnable-01-wait-notify】
需要注意的是:如果一个线程处于 Waiting 状态,其他线程调用 notify() 或 notifyAll()来唤醒它,则它会直接进入 **Blocked** 状态,这里可能会有疑问,不是应该直接进入 Runnable 吗?
这里需要注意一点 ,如果调用 notify() 或 notifyAll(),要求该现场必须首先持有该锁,锁已经被该线程获取了,被唤醒的线程自然就获取不到锁,处于Blocked状态;直到执行了 notify()/notifyAll() 的线程执行完毕并释放锁,被唤醒的线程才可能轮到它去抢夺这把锁,如果它能抢到,就会从 Blocked 状态回到 Runnable 状态。
package com.dfbz.demo02_线程状态的改变;

/**
 * @author lscl
 * @version 1.0
 * @intro:
 */
public class Demo04_Waiting进入Runnable状态_01_wait_notify {
    public static void main(String[] args) throws InterruptedException {
        Object obj = new Object();

        Thread t1 = new Thread(() -> {
            synchronized (obj) {
                System.out.println("t1-before..");
                try {
                    obj.wait();
                } catch (InterruptedException e) {
                    e.printStackTrace();
                }
                System.out.println("t1-after..");
            }
        }, "t1");

        t1.start();

        // 确保t1线程先执行
        Thread.sleep(10);

        new Thread(() -> {
            synchronized (obj) {
                // 将所有线程都唤醒,唤醒的线程都将处于blocked状态,因为要等当前线程释放锁对象
                obj.notifyAll();
            }
        },"t2").start();
    }
}
当我们通过 notify 唤醒线程时,被唤醒的线程是先进入锁阻塞状态的 ,再等抢夺到锁后才会进入 Runnable 状态
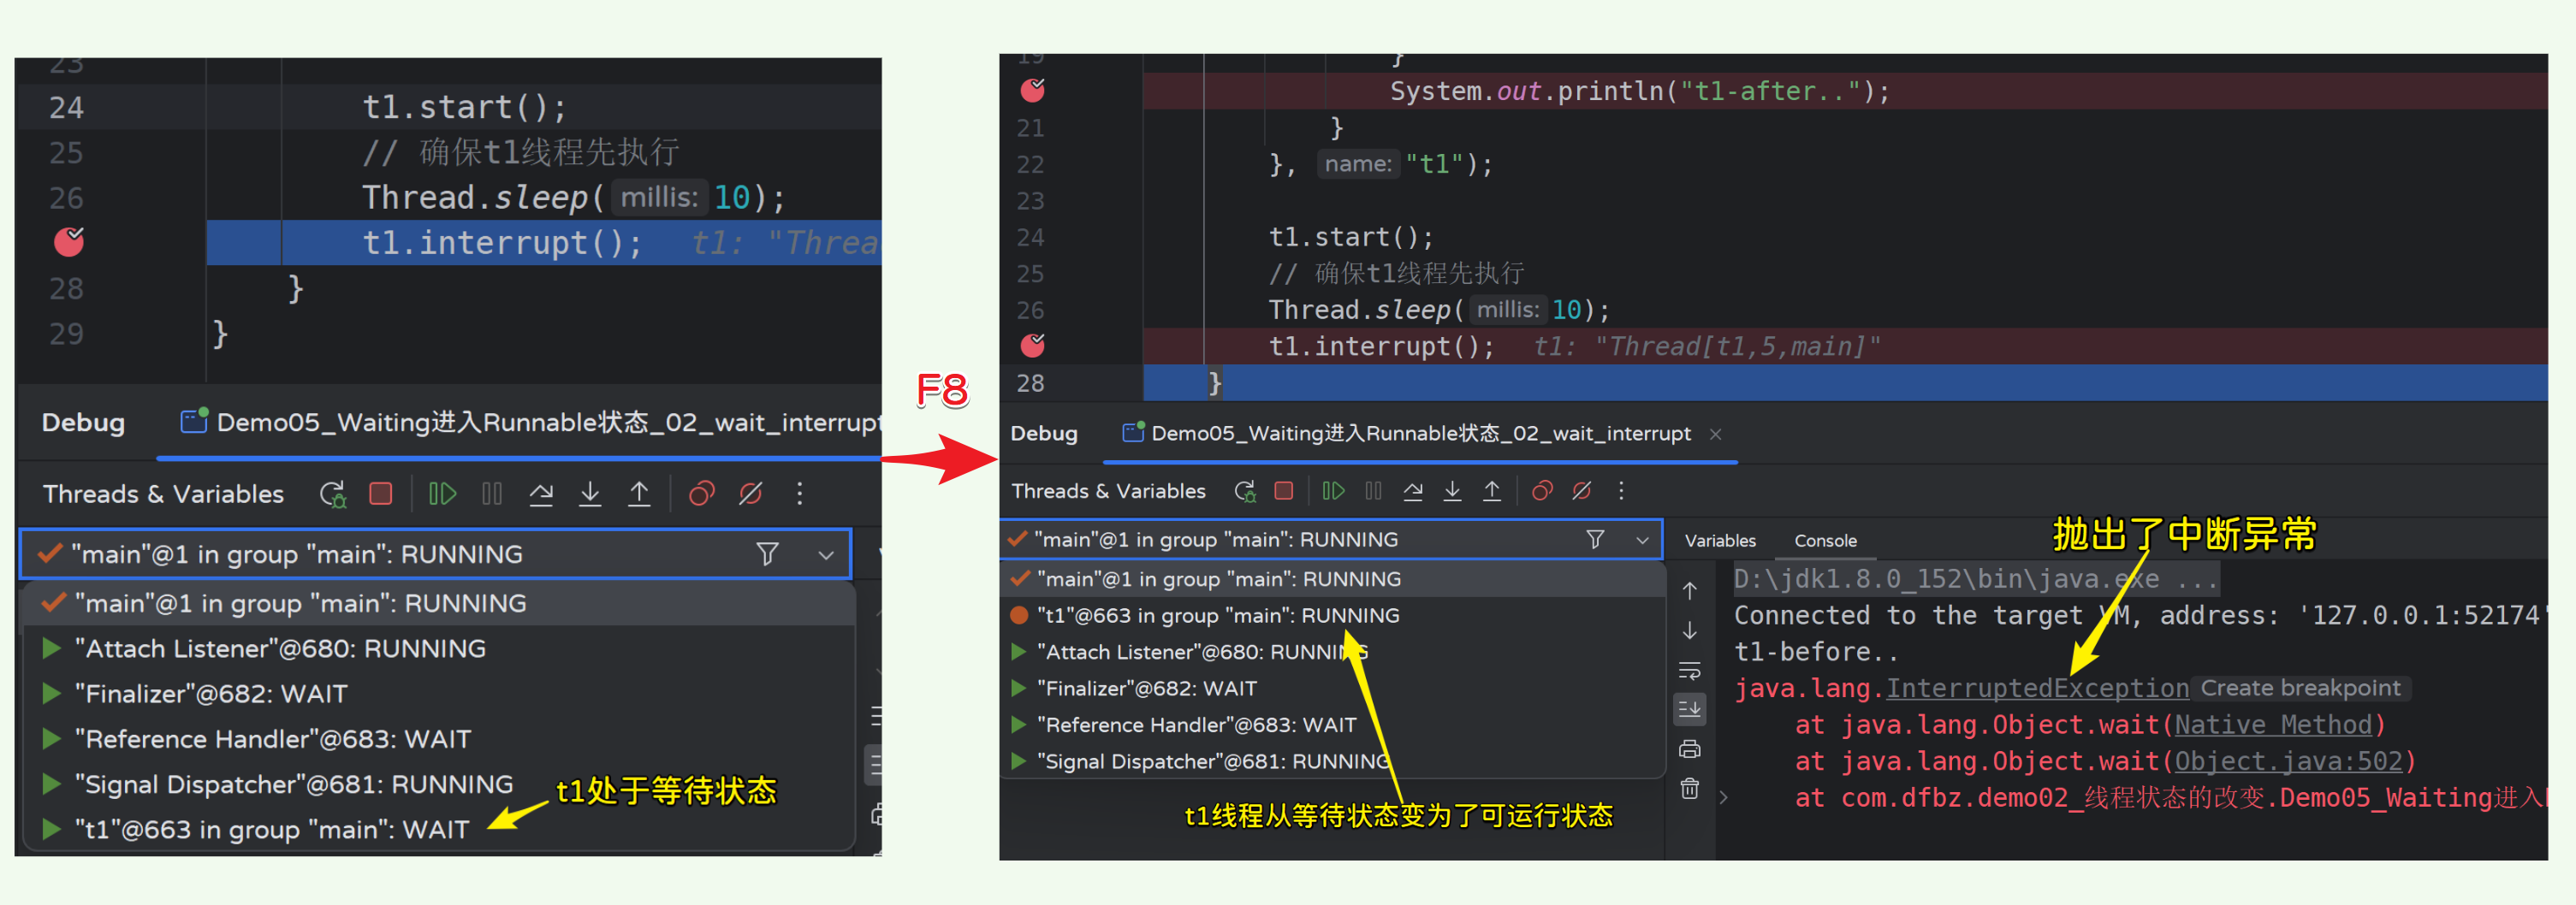
【示例代码Waiting转Runnable-02-wait-interrupt】
package com.dfbz.demo02_线程状态的改变;

/**
 * @author lscl
 * @version 1.0
 * @intro:
 */
public class Demo05_Waiting进入Runnable状态_02_wait_interrupt {
    public static void main(String[] args) throws InterruptedException {
        Object obj = new Object();

        Thread t1 = new Thread(() -> {
            synchronized (obj) {
                System.out.println("t1-before..");
                try {
                    obj.wait();
                } catch (InterruptedException e) {
                    e.printStackTrace();
                }
                System.out.println("t1-after..");
            }
        }, "t1");

        t1.start();
        // 确保t1线程先执行
        Thread.sleep(10);
        t1.interrupt();
    }
}
【示例代码Waiting转Runnable-03-join-join任务执行结束】
package com.dfbz.demo02_线程状态的改变;
/**
* @author lscl
* @version 1.0
* @intro:
*/
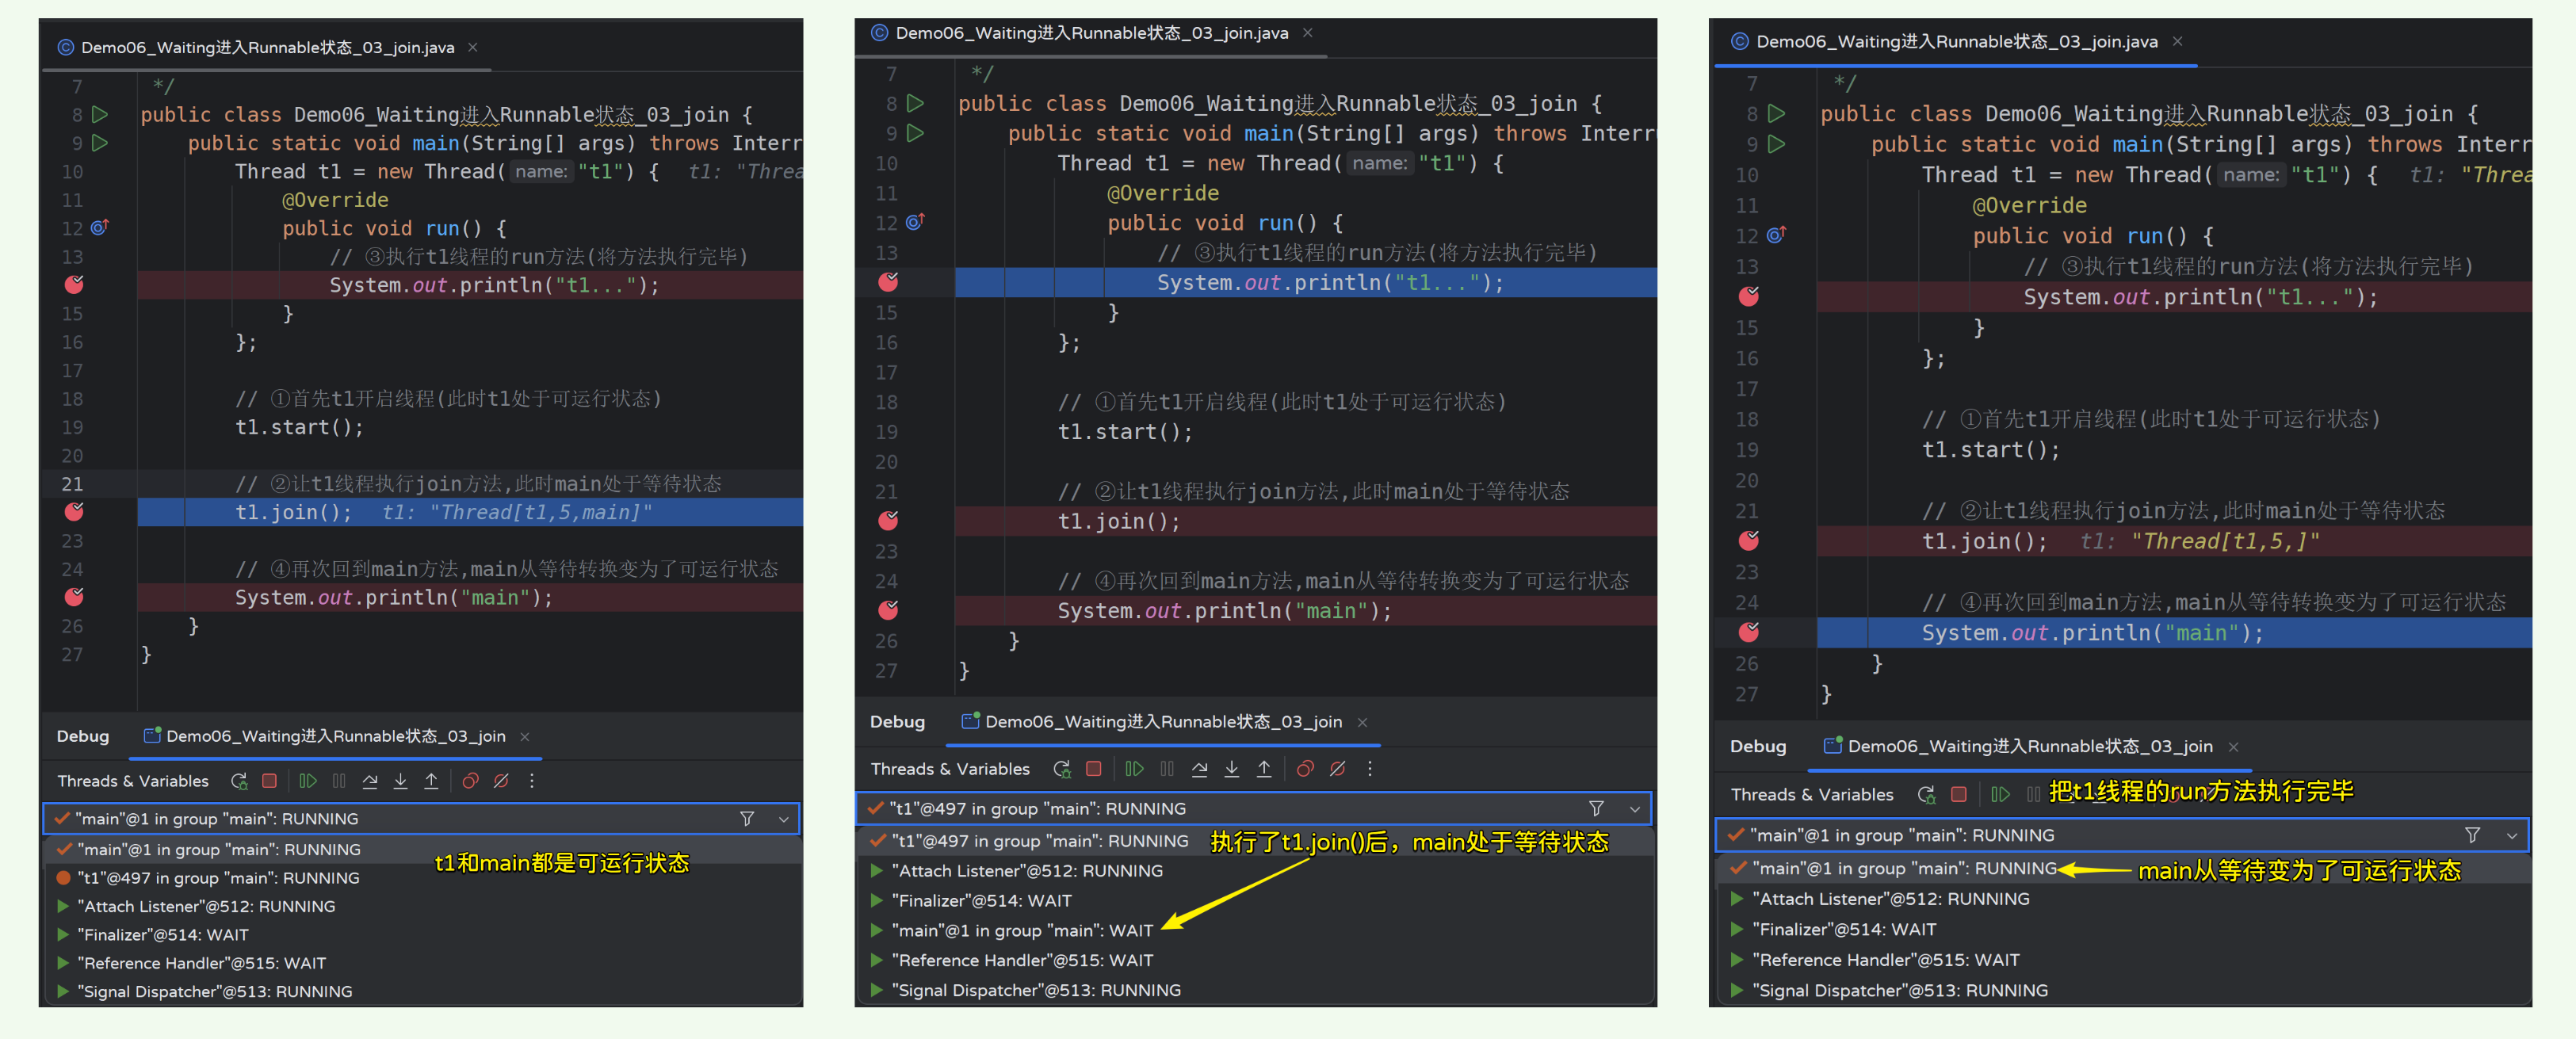
public class Demo06_Waiting进入Runnable状态_03_join {
public static void main(String[] args) throws InterruptedException {
Thread t1 = new Thread("t1") {
@Override
public void run() {
// ③执行t1线程的run方法(将方法执行完毕)
System.out.println("t1...");
}
};
// ①首先t1开启线程(此时t1处于可运行状态)
t1.start();
// ②让t1线程执行join方法,此时main处于等待状态
t1.join();
// ④再次回到main方法,main从等待转换变为了可运行状态
System.out.println("main");
}
}
【示例代码Waiting转Runnable-04-join-interrupt】
package com.dfbz.demo02_线程状态的改变;
/**
* @author lscl
* @version 1.0
* @intro:
*/
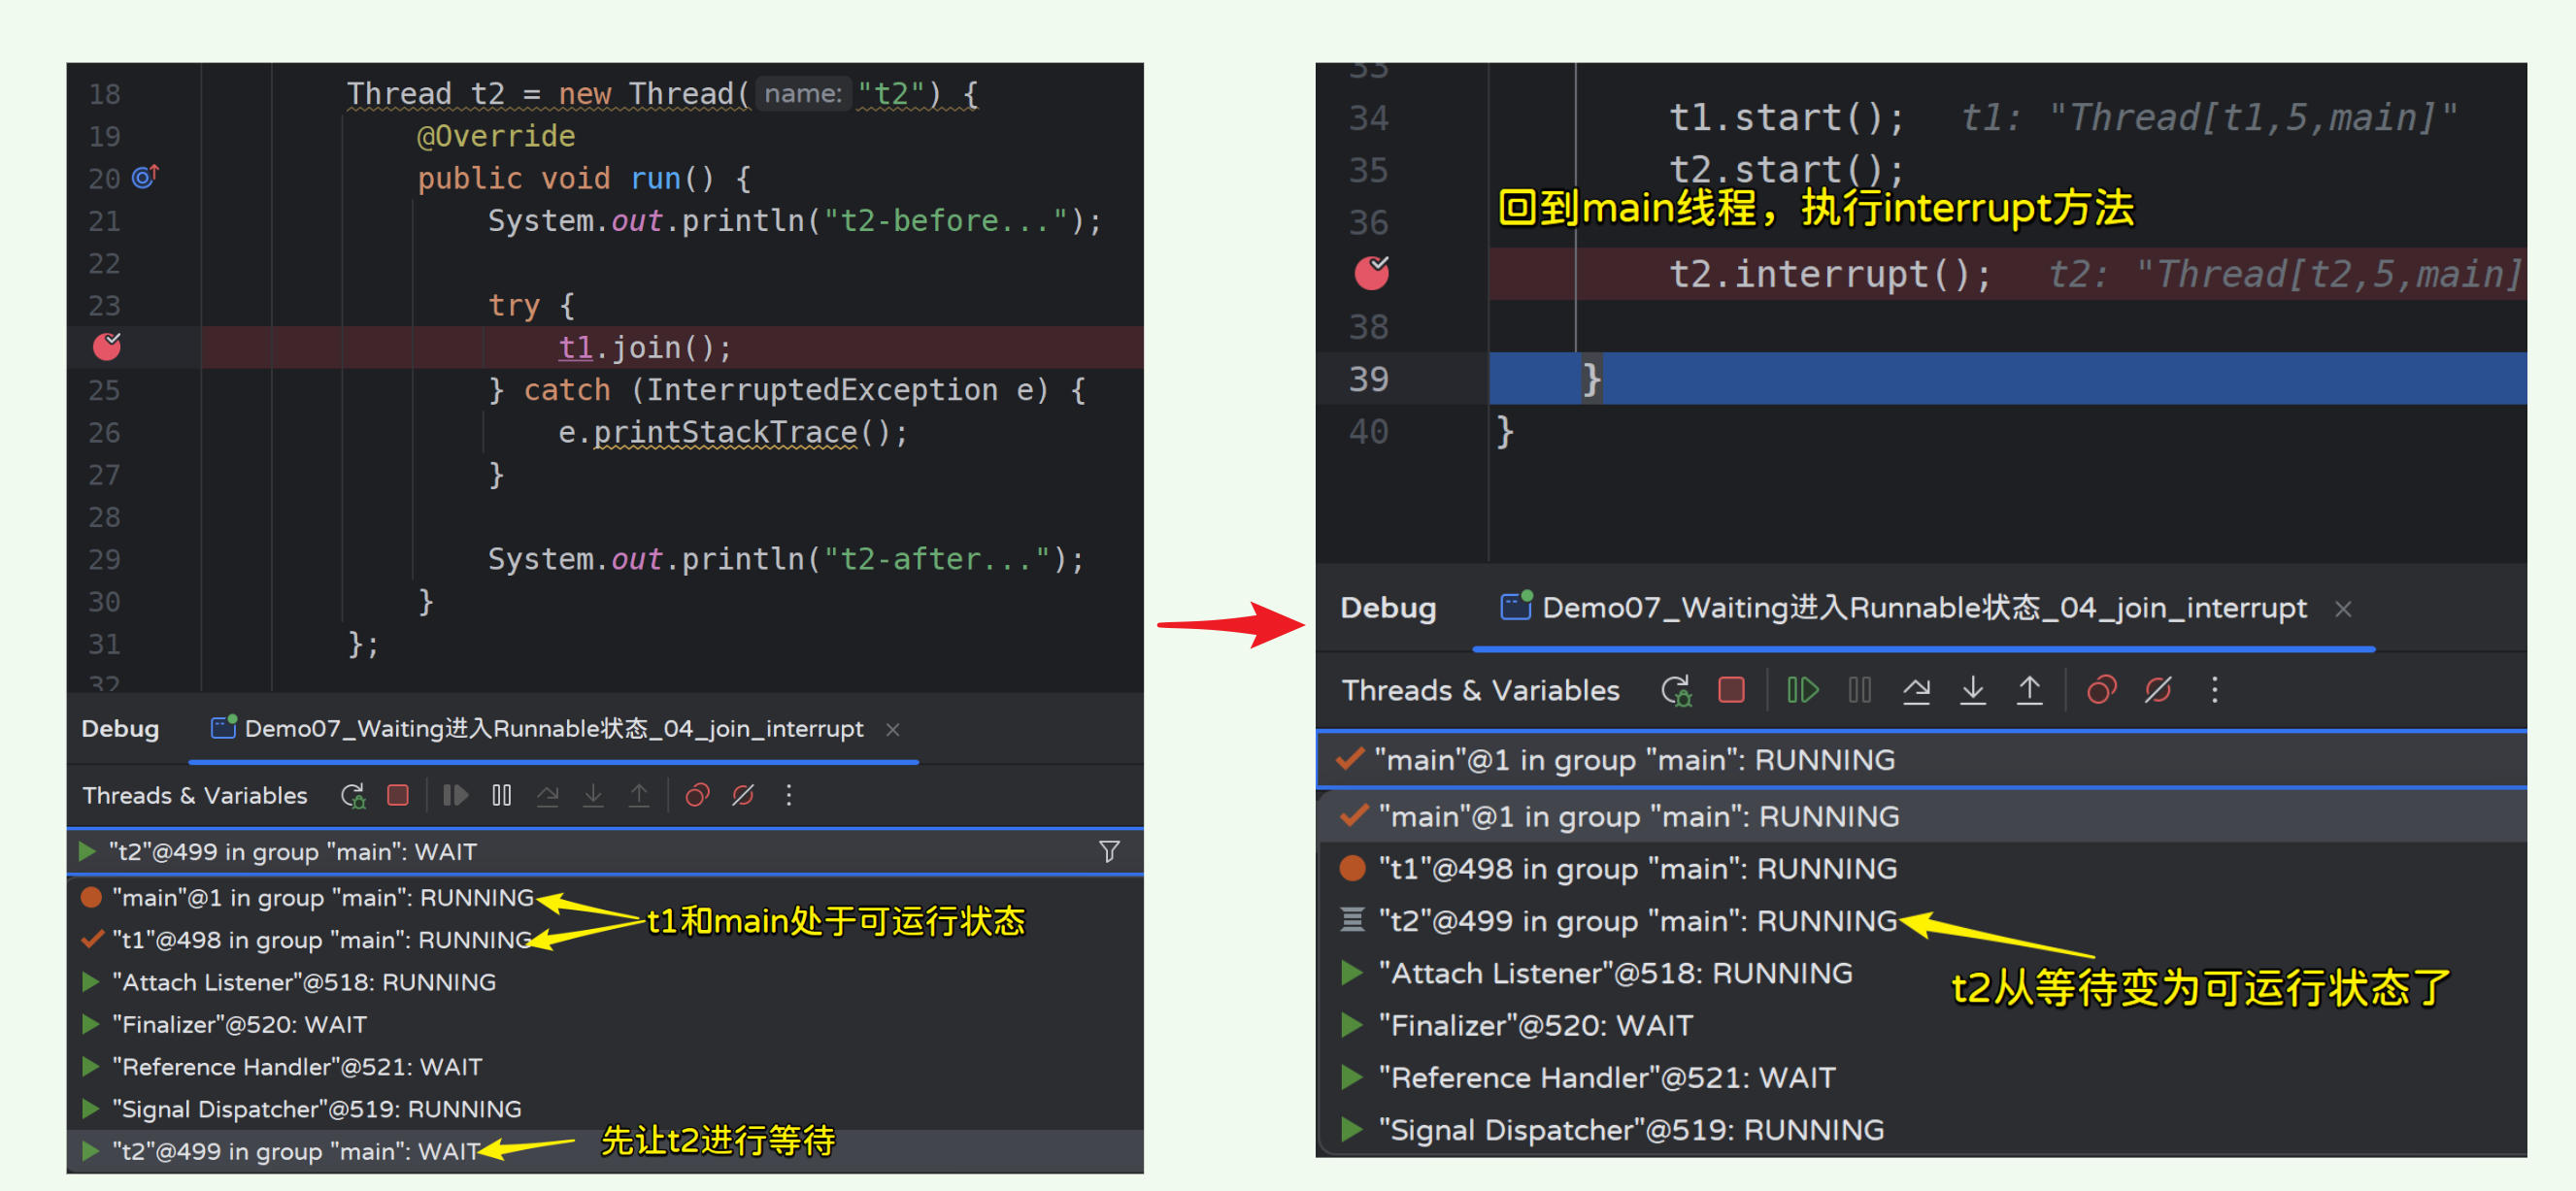
public class Demo07_Waiting进入Runnable状态_04_join_interrupt {
public static void main(String[] args) throws InterruptedException {
Thread t1 = new Thread("t1") {
@Override
public void run() {
System.out.println("t1...");
}
};
Thread t2 = new Thread("t2") {
@Override
public void run() {
System.out.println("t2-before...");
try {
// ②让t1执行join方法,此时t2处于等待状态
t1.join();
} catch (InterruptedException e) {
e.printStackTrace();
}
System.out.println("t2-after...");
}
};
// ①首先开启两个线程
t1.start();
t2.start();
// ③t2执行interrupt方法,t2从等待状态变为可运行状态
t2.interrupt();
}
}
【示例代码Waiting转Runnable-05-wait-notify】
package com.dfbz.demo02_线程状态的改变;

import java.util.concurrent.locks.LockSupport;

/**
 * @author lscl
 * @version 1.0
 * @intro:
 */
public class Demo08_Waiting进入Runnable状态_05_park_unpark {
    public static void main(String[] args) throws InterruptedException {
        Thread t1 = new Thread("t1") {
            @Override
            public void run() {
                while (true){
                    System.out.println("t1-before");

                    // ②让t1线程执行park(此时处于等待状态)
                    LockSupport.park();
                    System.out.println("t1-after");
                }
            }
        };

        // ①启动t1线程
        t1.start();

        // ③执行unpark方法,此时t1处于可运行状态
        LockSupport.unpark(t1);

        System.out.println("main end...");
    }
}
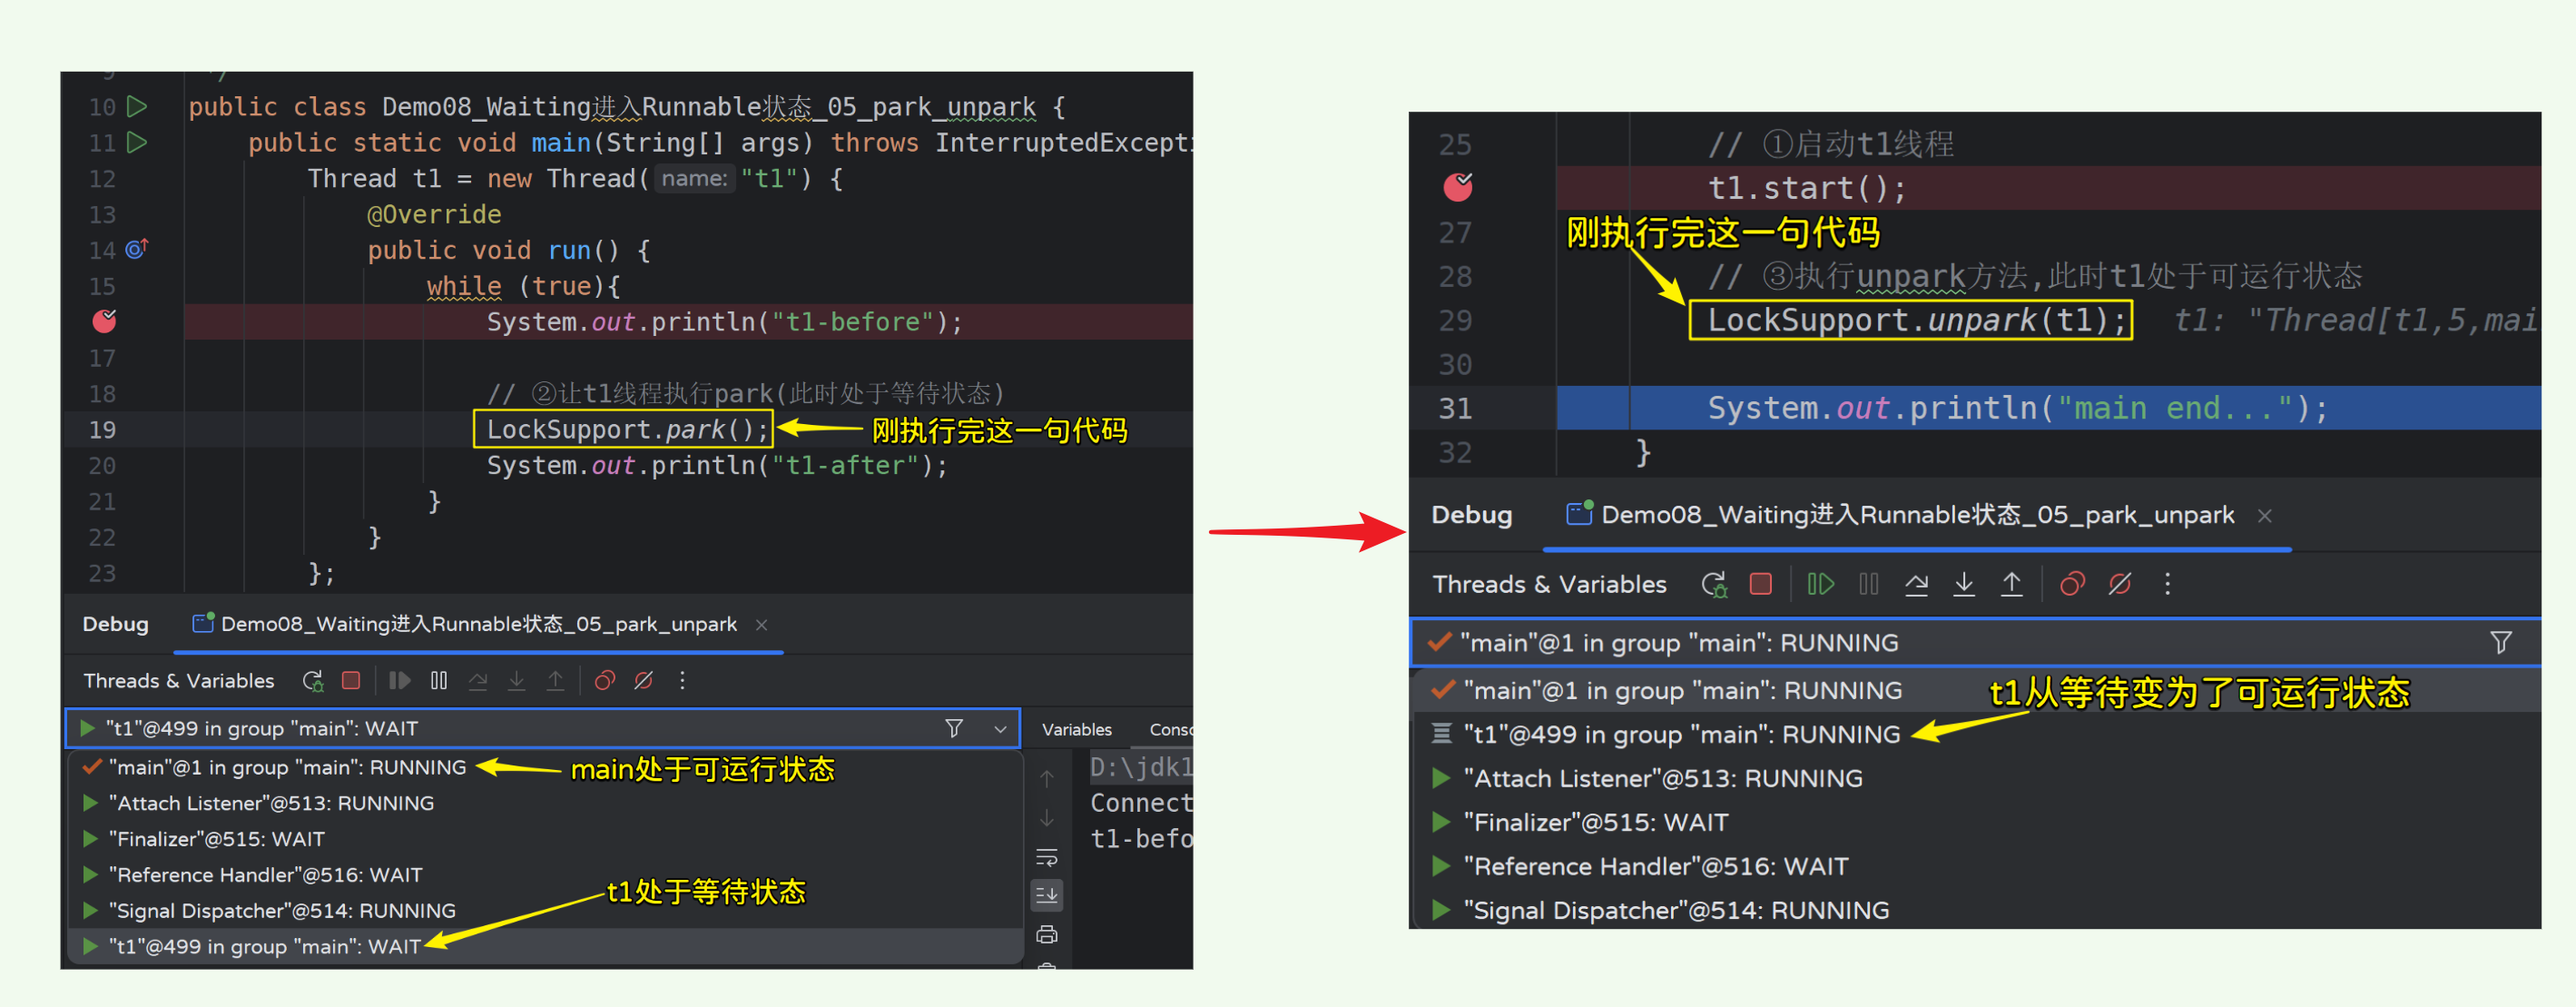
【示例代码Waiting转Runnable-06-wait-notify】
package com.dfbz.demo02_线程状态的改变;
import java.util.concurrent.locks.LockSupport;
/**
* @author lscl
* @version 1.0
* @intro:
*/
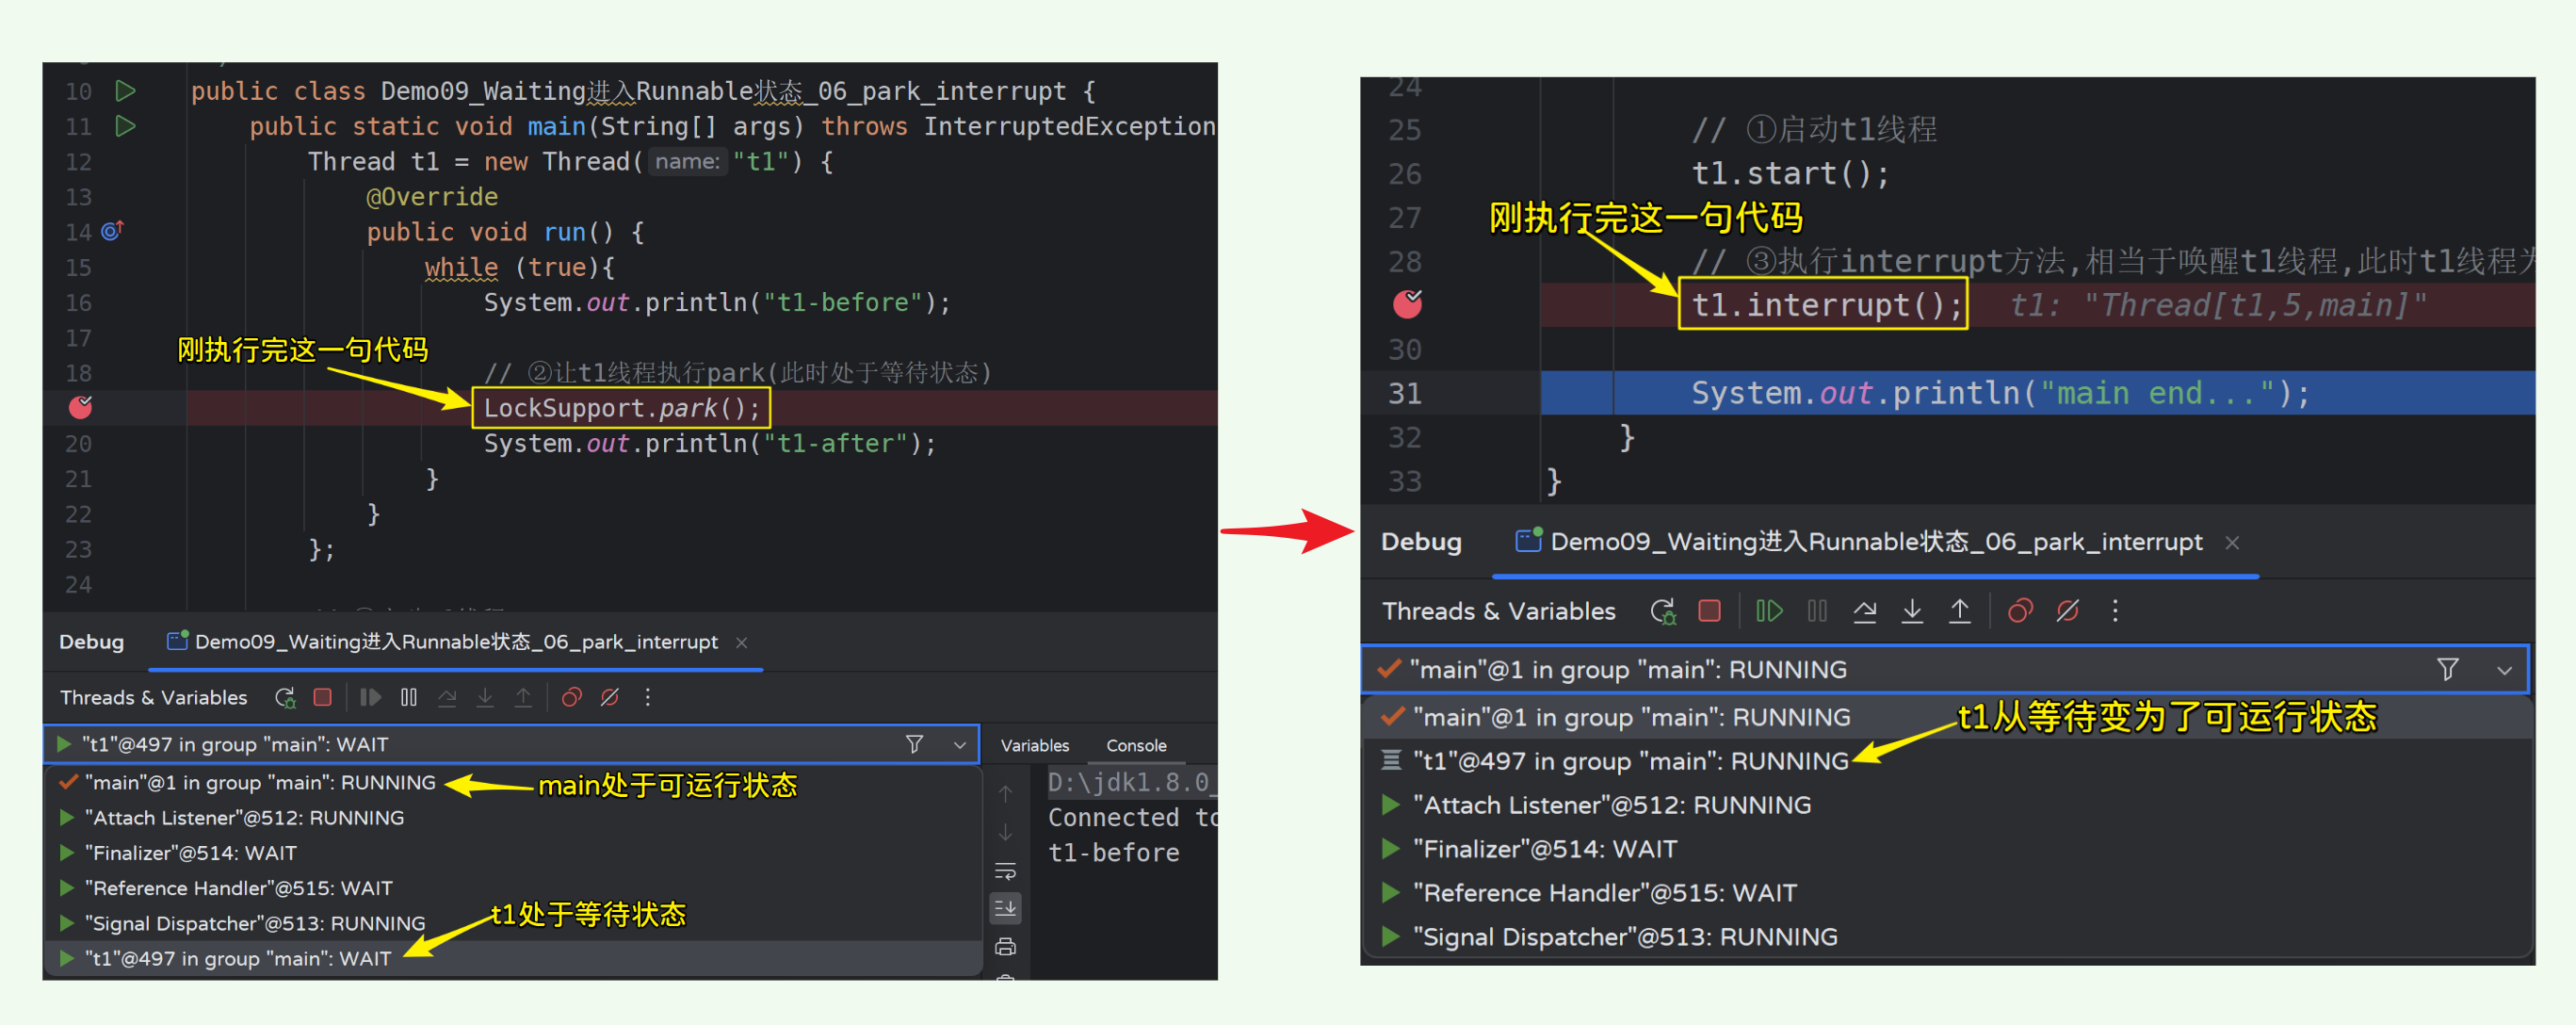
public class Demo09_Waiting进入Runnable状态_06_park_interrupt {
public static void main(String[] args) throws InterruptedException {
Thread t1 = new Thread("t1") {
@Override
public void run() {
while (true){
System.out.println("t1-before");
// ②让t1线程执行park(此时处于等待状态)
LockSupport.park();
System.out.println("t1-after");
}
}
};
// ①启动t1线程
t1.start();
// ③执行interrupt方法,相当于唤醒t1线程,此时t1线程为可运行状态
t1.interrupt();
System.out.println("main end...");
}
}
2.2.3 Runnable与Timed Waiting状态转换
1) Runnable转Timed Waiting
Runnable进入Timed Waiting:
- 1)线程执行了设置了时间参数的 Thread.sleep(long millis) 方法;
- 2)线程执行了设置了时间参数的 Object.wait(long timeout) 方法;
- 3)线程执行了设置了时间参数的 Thread.join(long millis) 方法;
2) Timed Waiting转Runnable
- 1)Thread.sleep(long millis) :
- 1)等到millis时间到达
- 2)使用interrupt中断线程(中断状态还是false)
- 2)Object.wait(long timeout):
- 1)等到timeout时间到达
- 2)使用interrupt中断线程(中断状态还是false)
- 3)使用notifly或notiflyAll唤醒(首先进入Blocked状态,竞争到锁之后再进入Runnable状态)
- 3)Thread.join(long millis):
- 1)等到timeout时间到达
- 2)使用interrupt中断线程(中断状态还是false)
- 3)使用notifly或notiflyAll唤醒(首先进入Blocked状态,竞争到锁之后再进入Runnable状态)
Tips:notifly和notiflyAll只能唤醒使用wait方法进行等待的线程;
【示例代码1】:
1)测试sleep方法时间到达后线程状态从Timed Waiting变为Runnable
2)测试调用interrupt()方法将线程状态从Timed Waiting变为Runnable
package com.dfbz.demo02_线程状态的改变;
/**
* @author lscl
* @version 1.0
* @intro:
*/
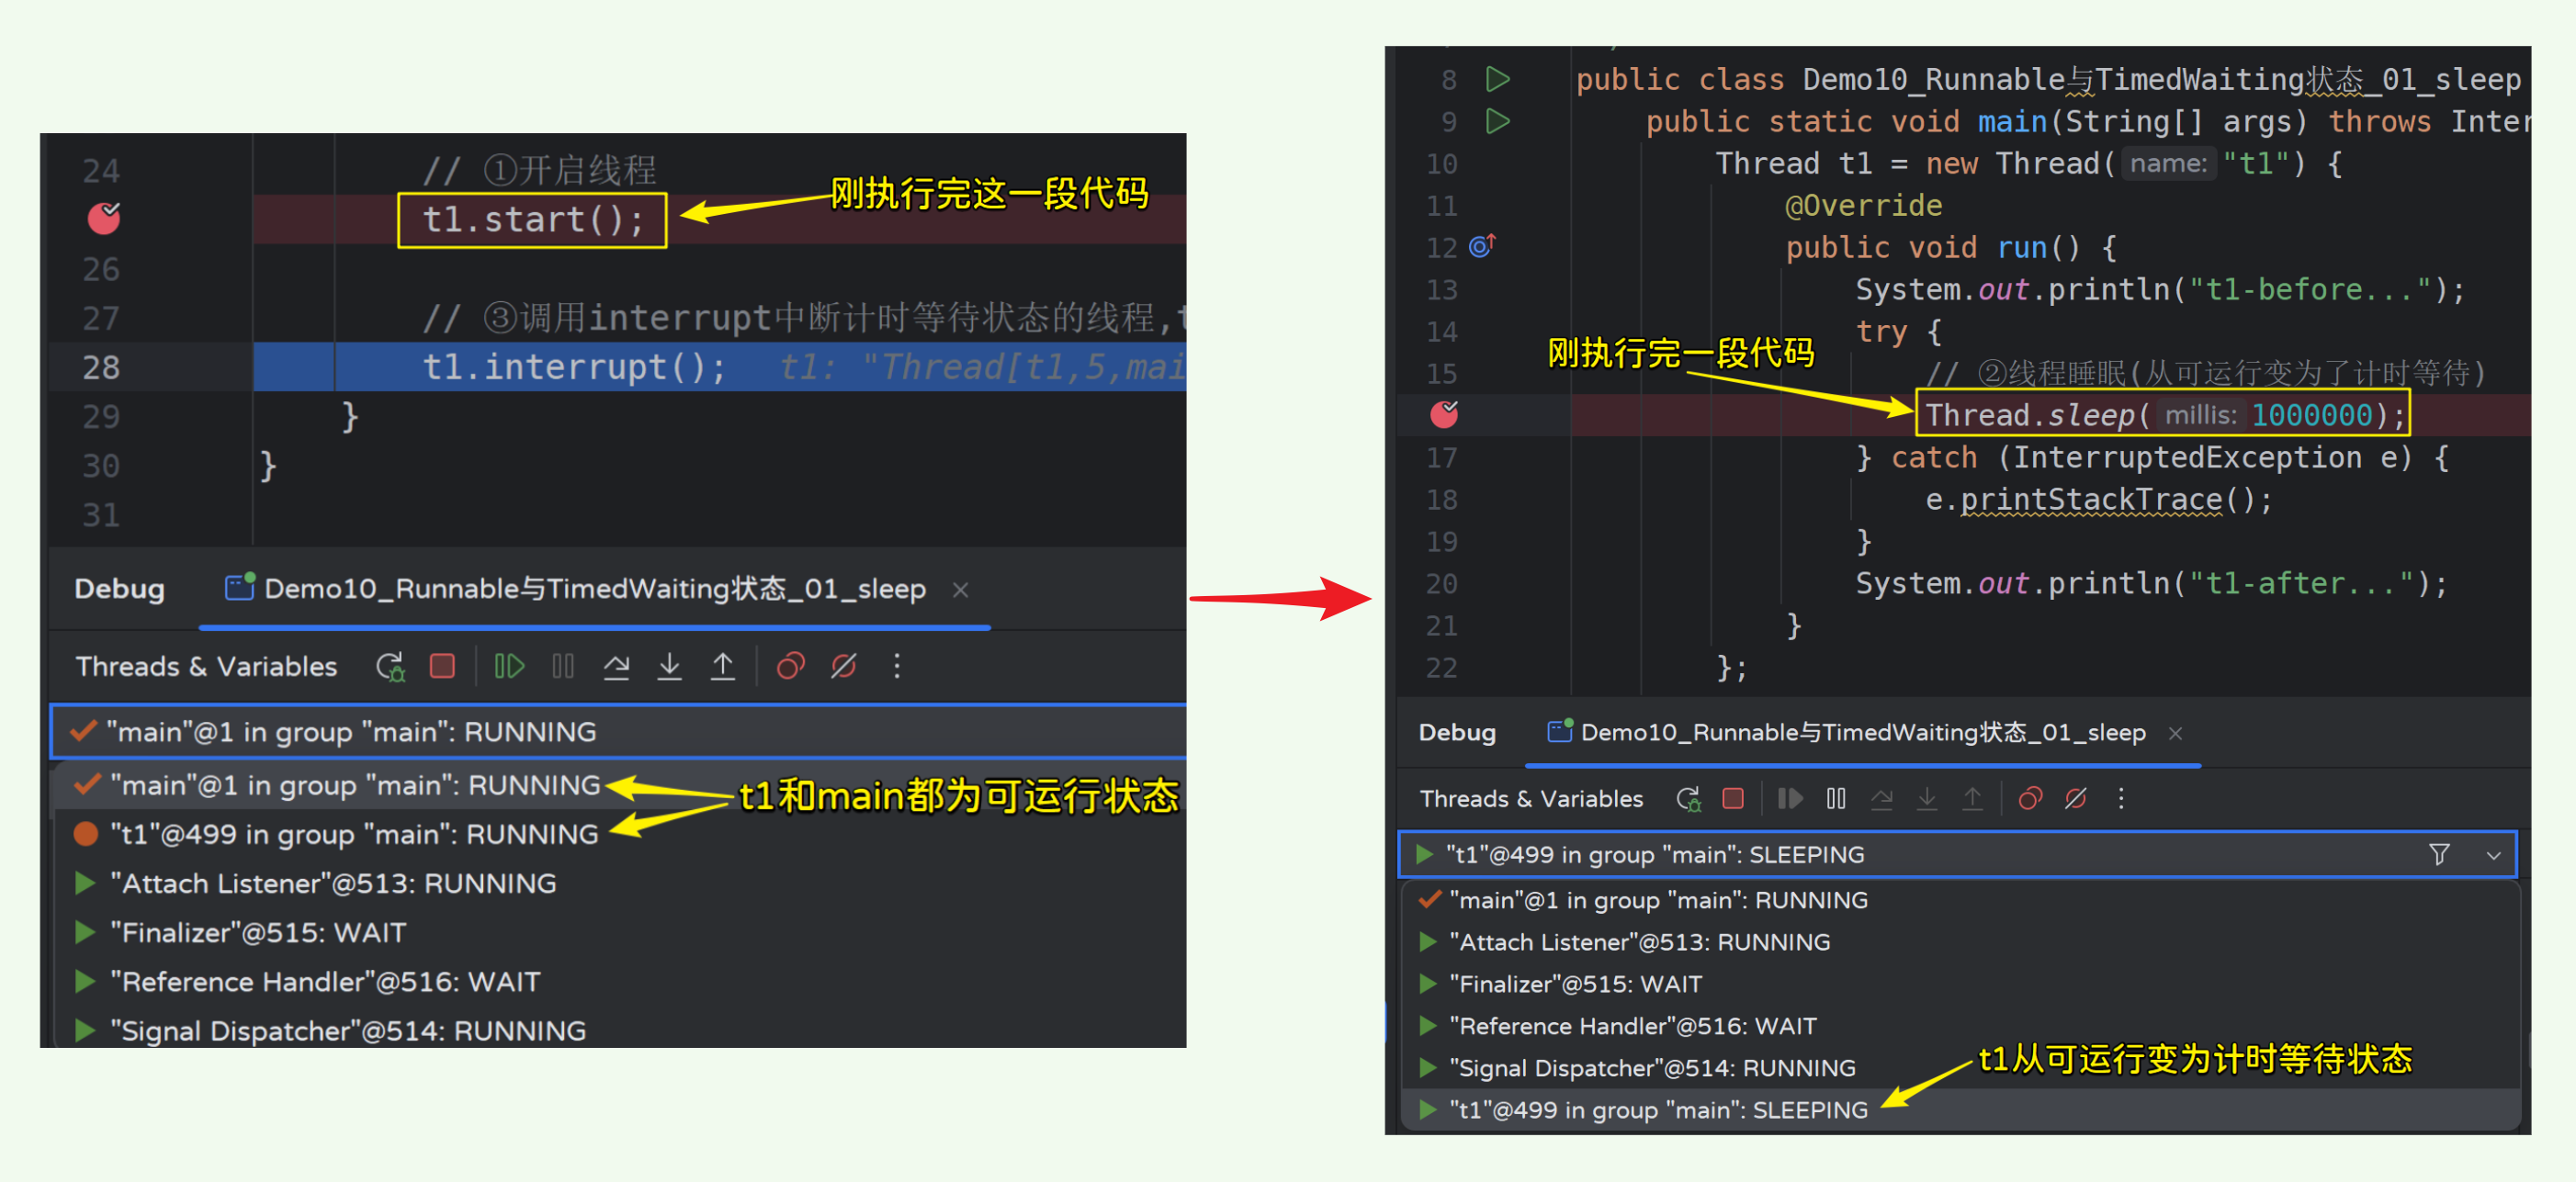
public class Demo10_Runnable与TimedWaiting状态_01_sleep {
public static void main(String[] args) throws InterruptedException {
Thread t1 = new Thread("t1") {
@Override
public void run() {
System.out.println("t1-before...");
try {
// ②线程睡眠(从可运行变为了计时等待),当睡眠时间结束后自动从计时等待变为可运行状态
Thread.sleep(1000000);
} catch (InterruptedException e) {
e.printStackTrace();
}
System.out.println("t1-after...");
}
};
// ①开启线程
t1.start();
// ③调用interrupt中断计时等待状态的线程,t1从计时等待变为了可运行状态
t1.interrupt();
}
}
分析:
【示例代码2-1】:
1)测试wait方法时间到达后线程状态从Timed Waiting变为Runnable
2)测试调用interrupt()方法将线程状态从Timed Waiting变为Runnable
package com.dfbz.demo02_线程状态的改变;

/**
 * @author lscl
 * @version 1.0
 * @intro:
 */
public class Demo03_Runnable与TimedWaiting状态_02_wait方法 {
    public static void main(String[] args) throws InterruptedException {
        Thread t1 = new Thread("t1") {
            @Override
            public void run() {
                synchronized (Object.class){
                    System.out.println("t1-before...");
                    try {
                        // 等到wait的时间到达之后线程自动从Timed Waiting状态变为Runnable状态
                        Object.class.wait(30000000);
                    } catch (InterruptedException e) {
                        e.printStackTrace();
                    }
                    System.out.println("t1-after...");
                }
            }
        };

        t1.start();
        // 确保t1线程先执行
        Thread.sleep(10);
        // 中断之前t1的状态为Timed Waiting,中断之后t1的状态为Runnable
        t1.interrupt();
    }
}
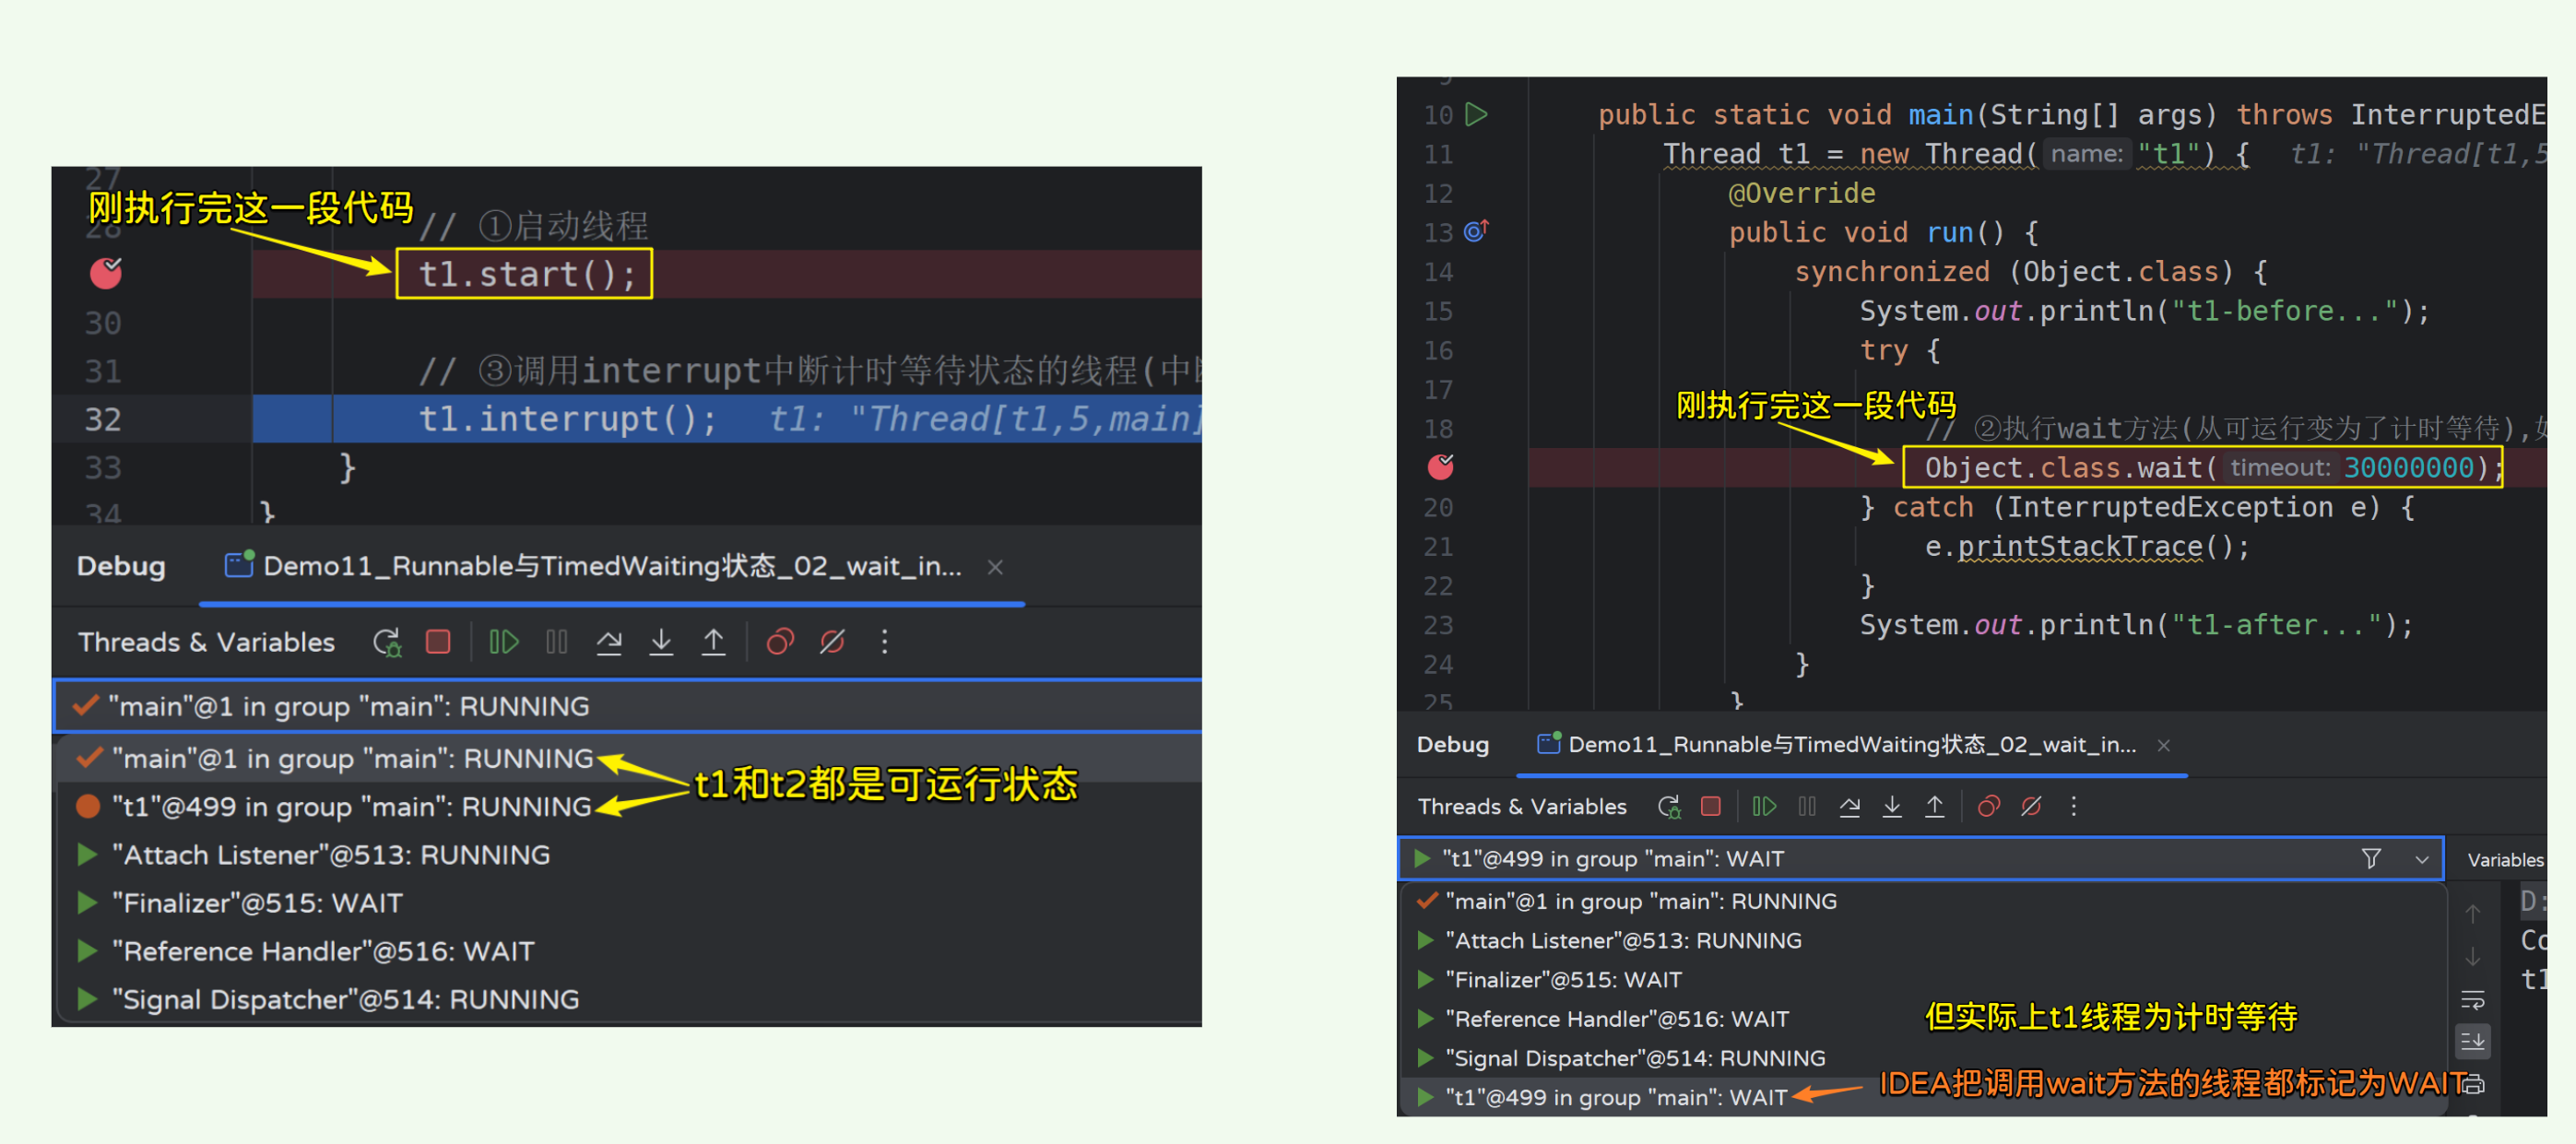
需要注意的是,在IDEA中,只要调用wait方法,那么IDEA在调试窗口中就会线程该线程为WAIT,但此时这个线程是计时等待状态,我们可以通过右键菜单--->Evaluate Expression...,查看t1的状态:
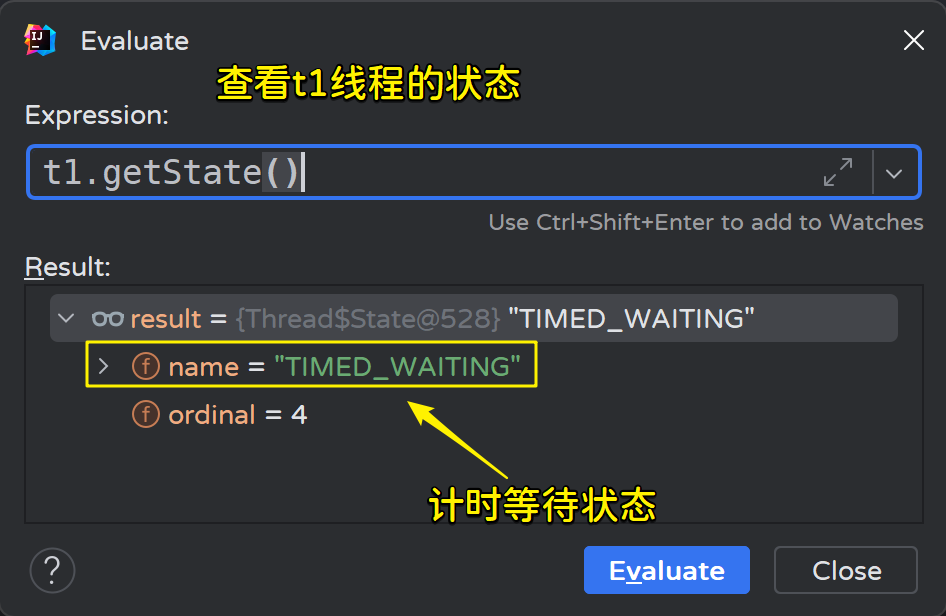
【示例代码2-2】:使用notify/notiflyAll将线程状态从Timed Waiting变为Runnable(Blocked)
package com.dfbz.demo02_线程状态的改变;
/**
* @author lscl
* @version 1.0
* @intro:
*/
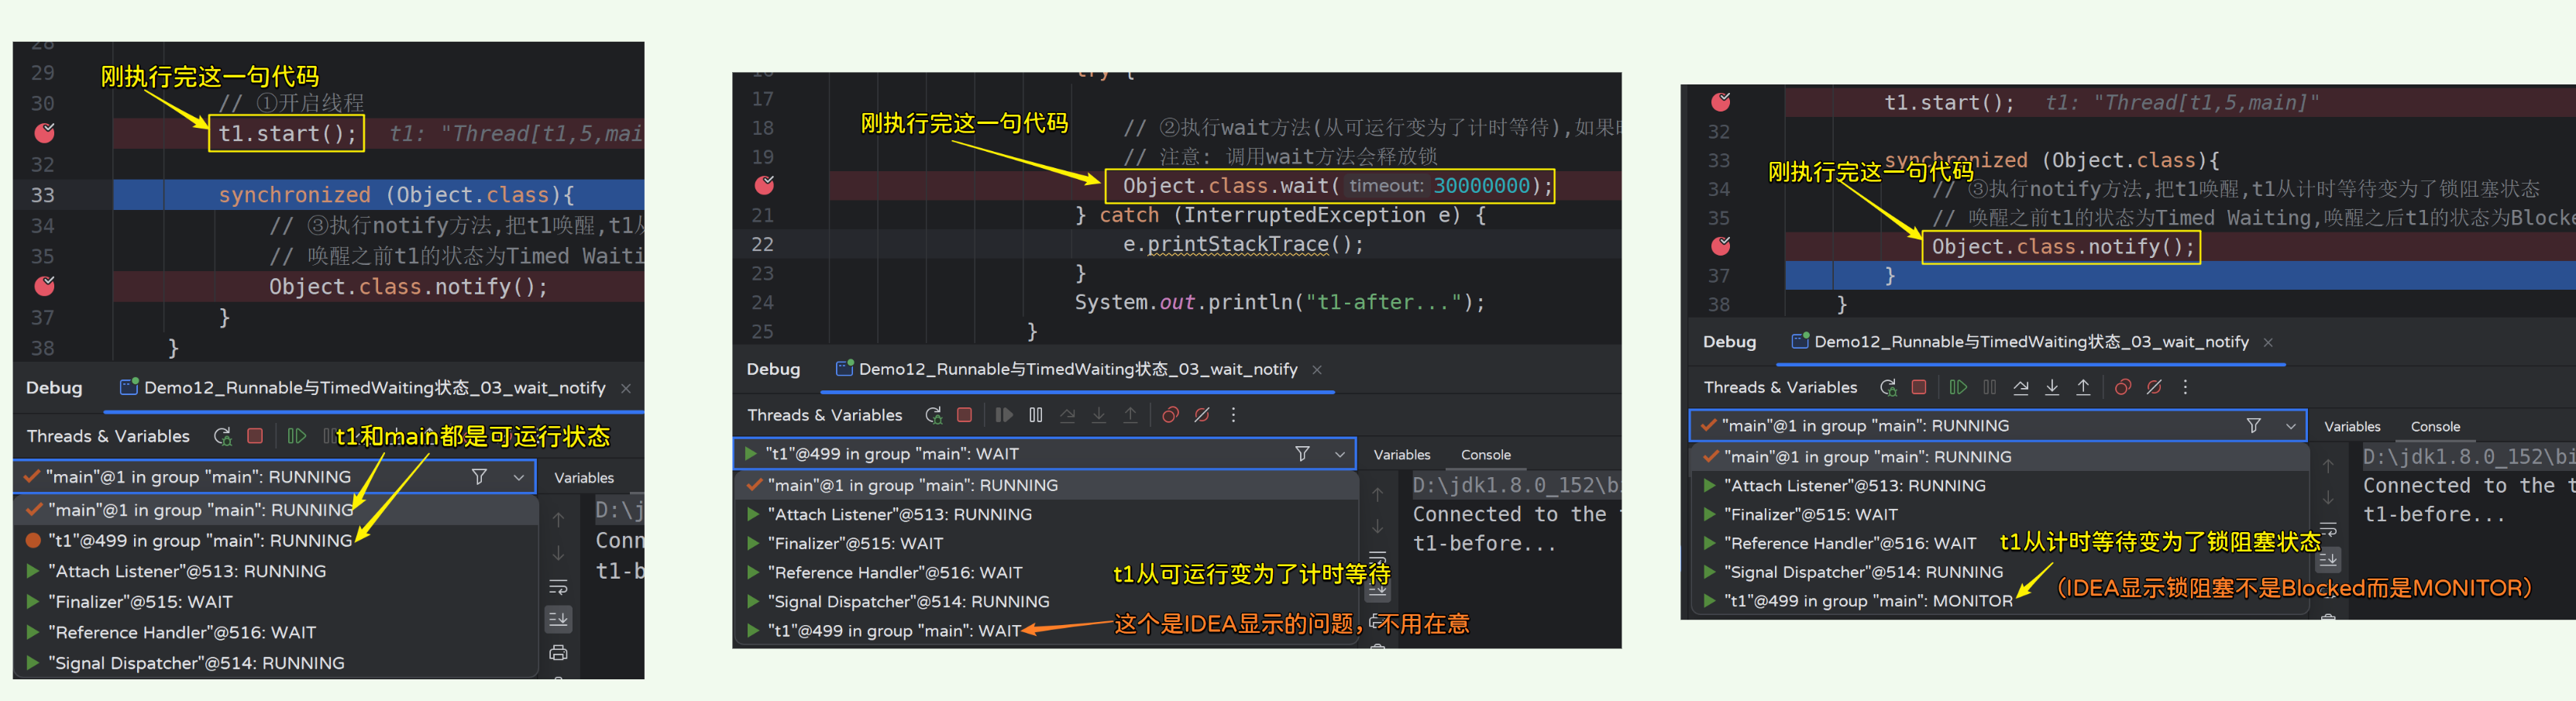
public class Demo12_Runnable与TimedWaiting状态_03_wait_notify {
public static void main(String[] args) throws InterruptedException {
Thread t1 = new Thread("t1") {
@Override
public void run() {
synchronized (Object.class){
System.out.println("t1-before...");
try {
// ②执行wait方法(从可运行变为了计时等待),如果时间结束,那么线程自动进入可运行状态
// 注意: 调用wait方法会释放锁
Object.class.wait(30000000);
} catch (InterruptedException e) {
e.printStackTrace();
}
System.out.println("t1-after...");
}
}
};
// ①开启线程
t1.start();
synchronized (Object.class){
// ③执行notify方法,把t1唤醒,t1从计时等待变为了锁阻塞状态
// 唤醒之前t1的状态为Timed Waiting,唤醒之后t1的状态为Blocked,等到t1线程获取到锁之后状态为Runnable
Object.class.notify();
}
}
}
【示例代码3】:
1)测试join方法时间到达后线程状态从Timed Waiting变为Runnable
2)测试调用interrupt()方法将线程状态从Timed Waiting变为Runnable
package com.dfbz.demo02_线程状态的改变;
/**
* @author lscl
* @version 1.0
* @intro:
*/
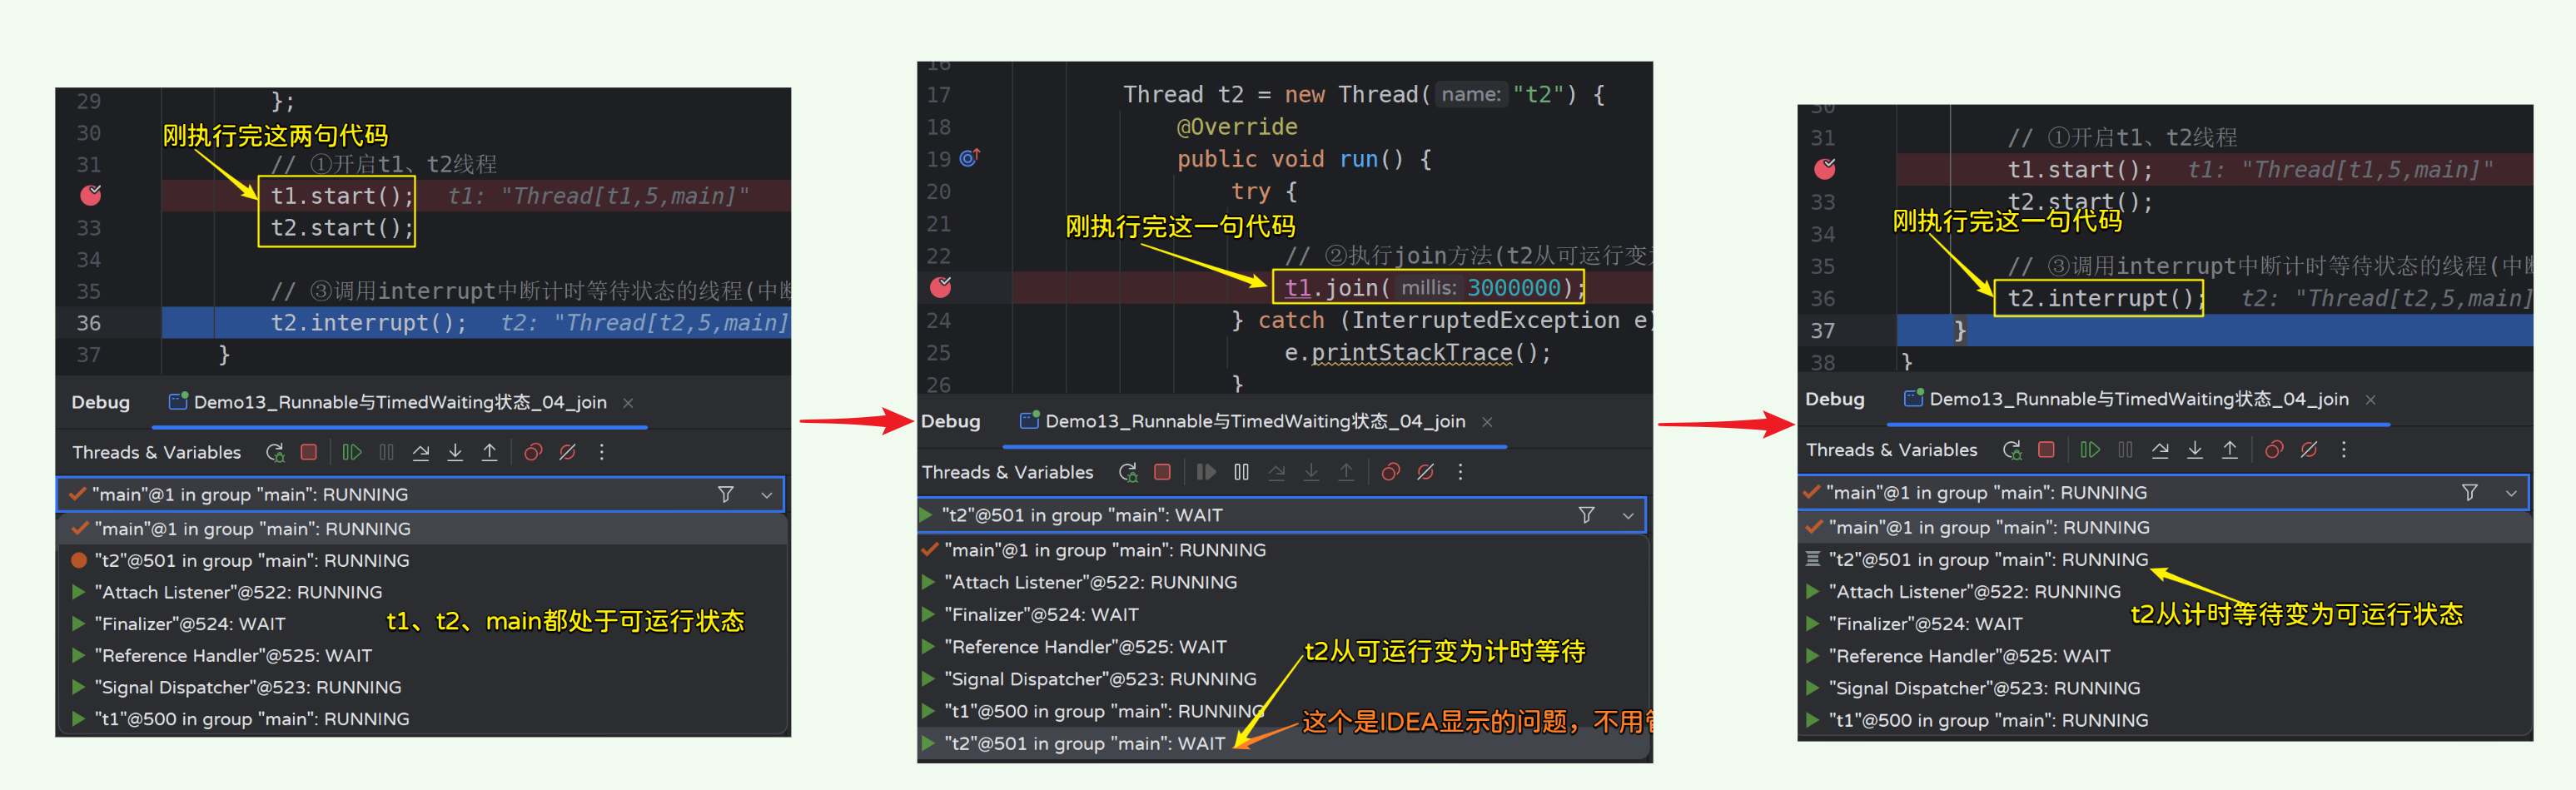
public class Demo13_Runnable与TimedWaiting状态_04_join {
public static void main(String[] args) throws InterruptedException {
Thread t1 = new Thread("t1") {
@Override
public void run() {
while (true){}
}
};
Thread t2 = new Thread("t2") {
@Override
public void run() {
try {
// ②执行join方法(t2从可运行变为了计时等待),如果时间结束,那么线程自动进入可运行状态
t1.join(3000000);
} catch (InterruptedException e) {
e.printStackTrace();
}
System.out.println("t2-after..");
}
};
// ①开启t1、t2线程
t1.start();
t2.start();
// ③调用interrupt中断计时等待状态的线程(中断状态为false),t2从计时等待变为了可运行状态
t2.interrupt();
}
}
2.2.2 状态变化的注意事项
- 1)线程从 New 状态是不可以直接进入 Blocked 状态的,它需要先经历 Runnable 状态。
- 2)线程生命周期不可逆,一旦进入 Runnable 状态就不能回到 New 状态;一旦被终止就不可能再有任何状态的变化。
- 3)所以一个线程只能有一次 New 和 Terminated 状态,只有处于中间状态才可以相互转换。也就是这两个状态不会参与相互转化
三、线程池
3.1 线程池概述
构造一个新的线程开销会比较大,因为这涉及到与操作系统的交互。如果你的程序中创建了大量的生命周期很短的线程,那么不应该把每个任务映射到一个单独的线程,而应该使用线程池(thread pool)。线程池中包含许多准备运行的线程。为线程池提供应该Runnable,就会有一个线程条用其run方法。当run方法结束时,这个线程并不会死亡,而是留在池中准备为下一个请求提供服务;
有了线程池之后,当线程使用完毕后,不是立即销毁,而是归还到线程池中,下次需要线程来执行任务时,直接去线程池中获取一条线程即可,这样线程就得到了很大程度上的复用;
总结线程池有如下优点:
- 1)降低系统资源消耗:通过重用已存在的线程,降低线程创建和销毁造成的系统消耗;
- 2)提高系统响应速度:当有任务到达时,通过复用已存在的线程,无需等待新线程的创建便能立即执行;
- 3)方便线程并发数的管控:因为线程若是无限制的创建,可能会导致内存占用过多而产生OOM,并且会造成cpu过度切换(cpu切换线程是有时间成本的)
3.2 线程池的使用
要配置一个线程池是比较复杂的,尤其是对于线程池的原理不是很清楚的情况下,很有可能配置的线程池不是较优的,因此在java.util.concurrent.Executors线程工厂类里面提供了一些静态工厂,生成一些常用的线程池。官方建议使用Executors工程类来创建线程池对象。
Executors类中有个创建线程池的方法如下:
public static ExecutorService newFixedThreadPool(int nThreads):返回线程池对象。
获取到了一个线程池ExecutorService 对象,那么怎么使用呢,在这里定义了一个使用线程池对象的方法如下:
-
public Future<?> submit(Runnable task):获取线程池中的某一个线程对象,执行Runnable任务 -
public <T> Future<T> submit(Callable<T> task):获取线程池中的某一个线程对象,执行Callable任务
Future接口:用来记录线程任务执行完毕后产生的结果。线程池创建与使用。
【测试代码】
package com.dfbz.demo01_线程池的使用;
import java.util.concurrent.ExecutorService;
import java.util.concurrent.Executors;
/**
* @author lscl
* @version 1.0
* @intro:
*/
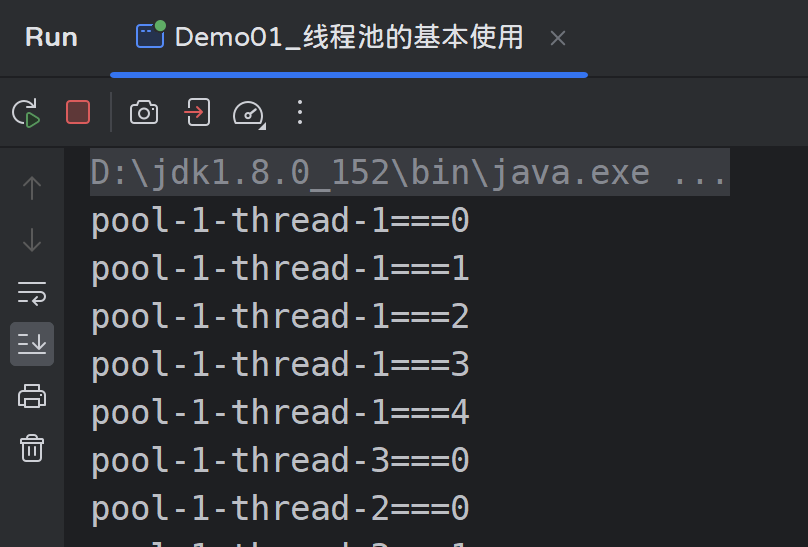
public class Demo01_线程池的基本使用 {
public static void main(String[] args) {
// 创建一个大小为10的线程池
ExecutorService executorService = Executors.newFixedThreadPool(10);
// 创建任务
MyRunnable task = new MyRunnable();
// 提交任务
executorService.submit(task);
executorService.submit(task);
executorService.submit(task);
// 关闭线程池
// executorService.shutdown();
}
}
class MyRunnable implements Runnable {
@Override
public void run() {
for (int i = 0; i < 10000; i++) {
System.out.println(Thread.currentThread().getName() + "===" + i);
}
}
}
执行效果:
3.3 线程池执行不同的任务
3.3.1 执行Runnable任务
线程池可以执行Runnable任务和Callable任务,线程池提交任务执行时,将会返回一个Future类,该类用于获取线程执行任务的结果集;当线程池执行的任务是Runnable时,那么Future类的返回值则为null;
package com.dfbz.demo01_线程池的使用;

import java.util.concurrent.ExecutorService;
import java.util.concurrent.Executors;
import java.util.concurrent.Future;

/**
 * @author lscl
 * @version 1.0
 * @intro:
 */
public class Demo02_线程池执行任务获取结果集_Runnable {
    public static void main(String[] args) throws Exception {

        // 创建线程池
        ExecutorService executorService = Executors.newFixedThreadPool(2);

        Future<?> runnableTask = executorService.submit(new Runnable() {
            @Override
            public void run() {

                try {
                    Thread.sleep(2000);
                } catch (InterruptedException e) {
                    e.printStackTrace();
                }

                System.out.println("任务执行完毕....");
            }
        });

        // 这句话会造成线程阻塞的,因为获取任务的结果集必须要任务全部执行完毕
        Object result = runnableTask.get();

        System.out.println("执行玩这个任务获取的结果集为: " + result);
    }
}
3.3.2 执行Callable任务
示例代码:
package com.dfbz.demo01_线程池的使用;

import java.util.concurrent.*;

/**
 * @author lscl
 * @version 1.0
 * @intro:
 */
public class Demo03_线程池执行任务获取结果集_Callable{
    public static void main(String[] args) throws Exception {
        ExecutorService executorService = Executors.newFixedThreadPool(2);

        // 执行Callable任务
        Future<String> future = executorService.submit(new Callable<String>() {
            @Override
            public String call() throws Exception {

                Thread.sleep(3000);
                System.out.println("callable执行完毕...");
                return "ok";
            }
        });

        // 这个方法会阻塞的,因为要等Callable任务执行完毕才能拿到结果集(call方法的返回值)
        String result = future.get();

        System.out.println("结果集为: " + result);
    }
}
四、File类
java.io.File 类是文件和目录路径名的抽象表示,主要用于文件和目录的创建、查找和删除等操作。
4.1 构造方法
public File(String pathname):通过将给定的路径名字符串转换为抽象路径名来创建新的 File实例。public File(String parent, String child):从父路径名字符串和子路径名字符串创建新的 File实例。public File(File parent, String child):从父抽象路径名和子路径名字符串创建新的 File实例。
示例代码:
package com.dfbz.demo01_File类的使用;

import java.io.File;

/**
 * @author lscl
 * @version 1.0
 * @intro:
 */
public class Demo01_File类的构造方法 {
    public static void main(String[] args) {
        // 文件路径名
        String pathname = "D:\\aaa.txt";
        File file1 = new File(pathname);

        // 文件路径名
        String pathname2 = "D:\\aaa\\bbb.txt";
        File file2 = new File(pathname2);

        // 通过父路径和子路径字符串
        String parentDir = "d:\\aaa";
        String childName = "bbb.txt";
        File file3 = new File(parentDir, childName);

        // 通过父级File对象和子路径字符串
        File parentFile = new File("d:\\aaa");
        String child = "bbb.txt";
        File file4 = new File(parentFile, child);
    }
}
4.2 成员方法
4.2.1 获取文件信息方法
public String getAbsolutePath():返回此File的绝对路径名字符串。public String getName():返回由此File表示的文件或目录的名称。public long length():返回由此File表示的文件的长度,如果是文件夹则返回0。
示例代码:
package com.dfbz.demo01_File类的使用;
import java.io.File;
/**
* @author lscl
* @version 1.0
* @intro:
*/
public class Demo02 {
public static void main(String[] args) {
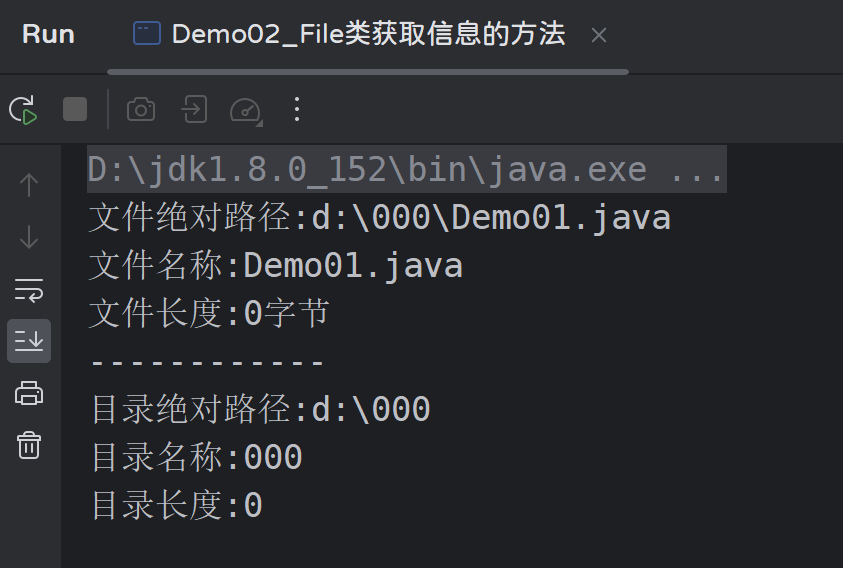
File f = new File("d:/000/Demo01.java");
System.out.println("文件绝对路径:" + f.getAbsolutePath());
System.out.println("文件名称:" + f.getName());
System.out.println("文件长度:" + f.length() + "字节");
System.out.println("------------");
File f2 = new File("d:/000");
System.out.println("目录绝对路径:" + f2.getAbsolutePath());
System.out.println("目录名称:" + f2.getName());
System.out.println("目录长度:" + f2.length());
}
}
运行结果:
4.2.2 判断文件的方法
public boolean exists():此File表示的文件或目录是否实际存在。public boolean isDirectory():此File表示的是否为目录。public boolean isFile():此File表示的是否为文件。即使文件没有后缀也是文件!
示例代码:
package com.dfbz.demo01_File类的使用;

import java.io.File;

/**
 * @author lscl
 * @version 1.0
 * @intro:
 */
public class Demo03_File判断相关方法 {
    public static void main(String[] args) {
        File f = new File("d:\\aaa\\bbb.java");
        File f2 = new File("d:\\aaa");
        // 判断是否存在
        System.out.println("d:\\aaa\\bbb.java 是否存在:" + f.exists());
        System.out.println("d:\\aaa 是否存在:" + f2.exists());
        // 判断是文件还是目录
        System.out.println("d:\\aaa 是否文件:" + f2.isFile());
        System.out.println("d:\\aaa 是否目录:" + f2.isDirectory());
    }
}
4.2.3 文件的创建与删除方法
public boolean createNewFile():创建一个文件,创建成功返回true,当创建失败时返回false,如:文件已经存在。public boolean delete():删除文件,删除成功返回true,删除失败返回false,如:文件不存在。public boolean mkdir():创建目录,创建成功返回true,创建失败返回false,如:目录已经存在。public boolean mkdirs():创建多级目录,创建成功返回true,创建失败返回false,如:目录已经存在。
Tips:删除文件夹的时候,必须保证文件夹是空的,否则不能删除;
示例代码:
package com.dfbz.demo01_File类的使用;

import java.io.File;
import java.io.IOException;

/**
 * @author lscl
 * @version 1.0
 * @intro:
 */
public class Demo04_File的创建与删除 {

    public static void main(String[] args) {
        File file = new File("aaa.txt");
        // 文件的删除
        System.out.println("是否删除成功文件: " + file.delete());

        File dir = new File("newDir");
        // 目录的删除
        System.out.println("是否删除成功目录: " + dir.delete());
    }

    public static void test3(String[] args) {
        // 创建多级目录
        File f3 = new File("newDir\\newDir");
        System.out.println(f3.mkdir());

        File f4 = new File("newDir\\newDir");
        System.out.println(f4.mkdirs());
    }

    public static void test2(String[] args) {
        // 目录的创建
        File f2 = new File("newDir");
        System.out.println("是否存在:" + f2.exists());
        System.out.println("是否创建:" + f2.mkdir());
        System.out.println("是否存在:" + f2.exists());
    }

    public static void test(String[] args) throws IOException {
        // 文件的创建
        File f = new File("aaa.txt");
        System.out.println("是否存在:" + f.exists());
        System.out.println("是否创建:" + f.createNewFile());
        System.out.println("是否存在:" + f.exists());

    }
}
4.2.4 目录的遍历
public String[] list():返回一个String数组,表示该File目录中的所有子文件或目录。public File[] listFiles():返回一个File数组,表示该File目录中的所有的子文件或目录。
示例代码:
package com.dfbz.demo01_File类的使用;

import java.io.File;

/**
 * @author lscl
 * @version 1.0
 * @intro:
 */
public class Demo05_遍历目录 {
    public static void main(String[] args) {
        File dir = new File("d:\\001");

        //获取当前目录下的文件以及文件夹的名称。
        String[] names = dir.list();
        for(String name : names){
            System.out.println(name);
        }

        System.out.println("-----------------");

        //获取当前目录下的文件以及文件夹对象,只要拿到了文件对象,那么就可以获取更多信息
        File[] files = dir.listFiles();
        for (File file : files) {
            System.out.println(file);
        }
    }
}
五、递归
5.1 递归概述
- 递归:指在当前方法内调用自己的这种现象。
- 递归的分类:
- 递归分为两种,直接递归和间接递归。
- 直接递归称为方法自身调用自己。
- 间接递归可以A方法调用B方法,B方法调用C方法,C方法调用A方法。
- 注意事项:
- 递归一定要有条件限定,保证递归能够停止下来,否则会发生栈内存溢出。
- 在递归中虽然有限定条件,但是递归次数不能太多。否则也会发生栈内存溢出。
- 构造方法,禁止递归
5.2 递归使用
5.2.1 案例代码
示例代码:
package com.dfbz.demo01;

/**
 * @author lscl
 * @version 1.0
 * @intro:
 */
public class Demo01_递归图解 {
    public static void main(String[] args) {
        print(1);
    }

    public static void print(int i) {
        System.out.println(i);
        if (i == 5) {
            return;
        }
        print(++i);
    }
}
5.2.2 递归图解
- main方法进栈执行,调用b(1)方法
- b方法进栈,又调用一次b方法,传递2
- b2(2)方法进栈,调用b(3)(注意:此时b(1)方法还未执行完毕,就跟main方法还未执行完毕一样)
- b2(3)方法进栈,调用b(4)
- ...
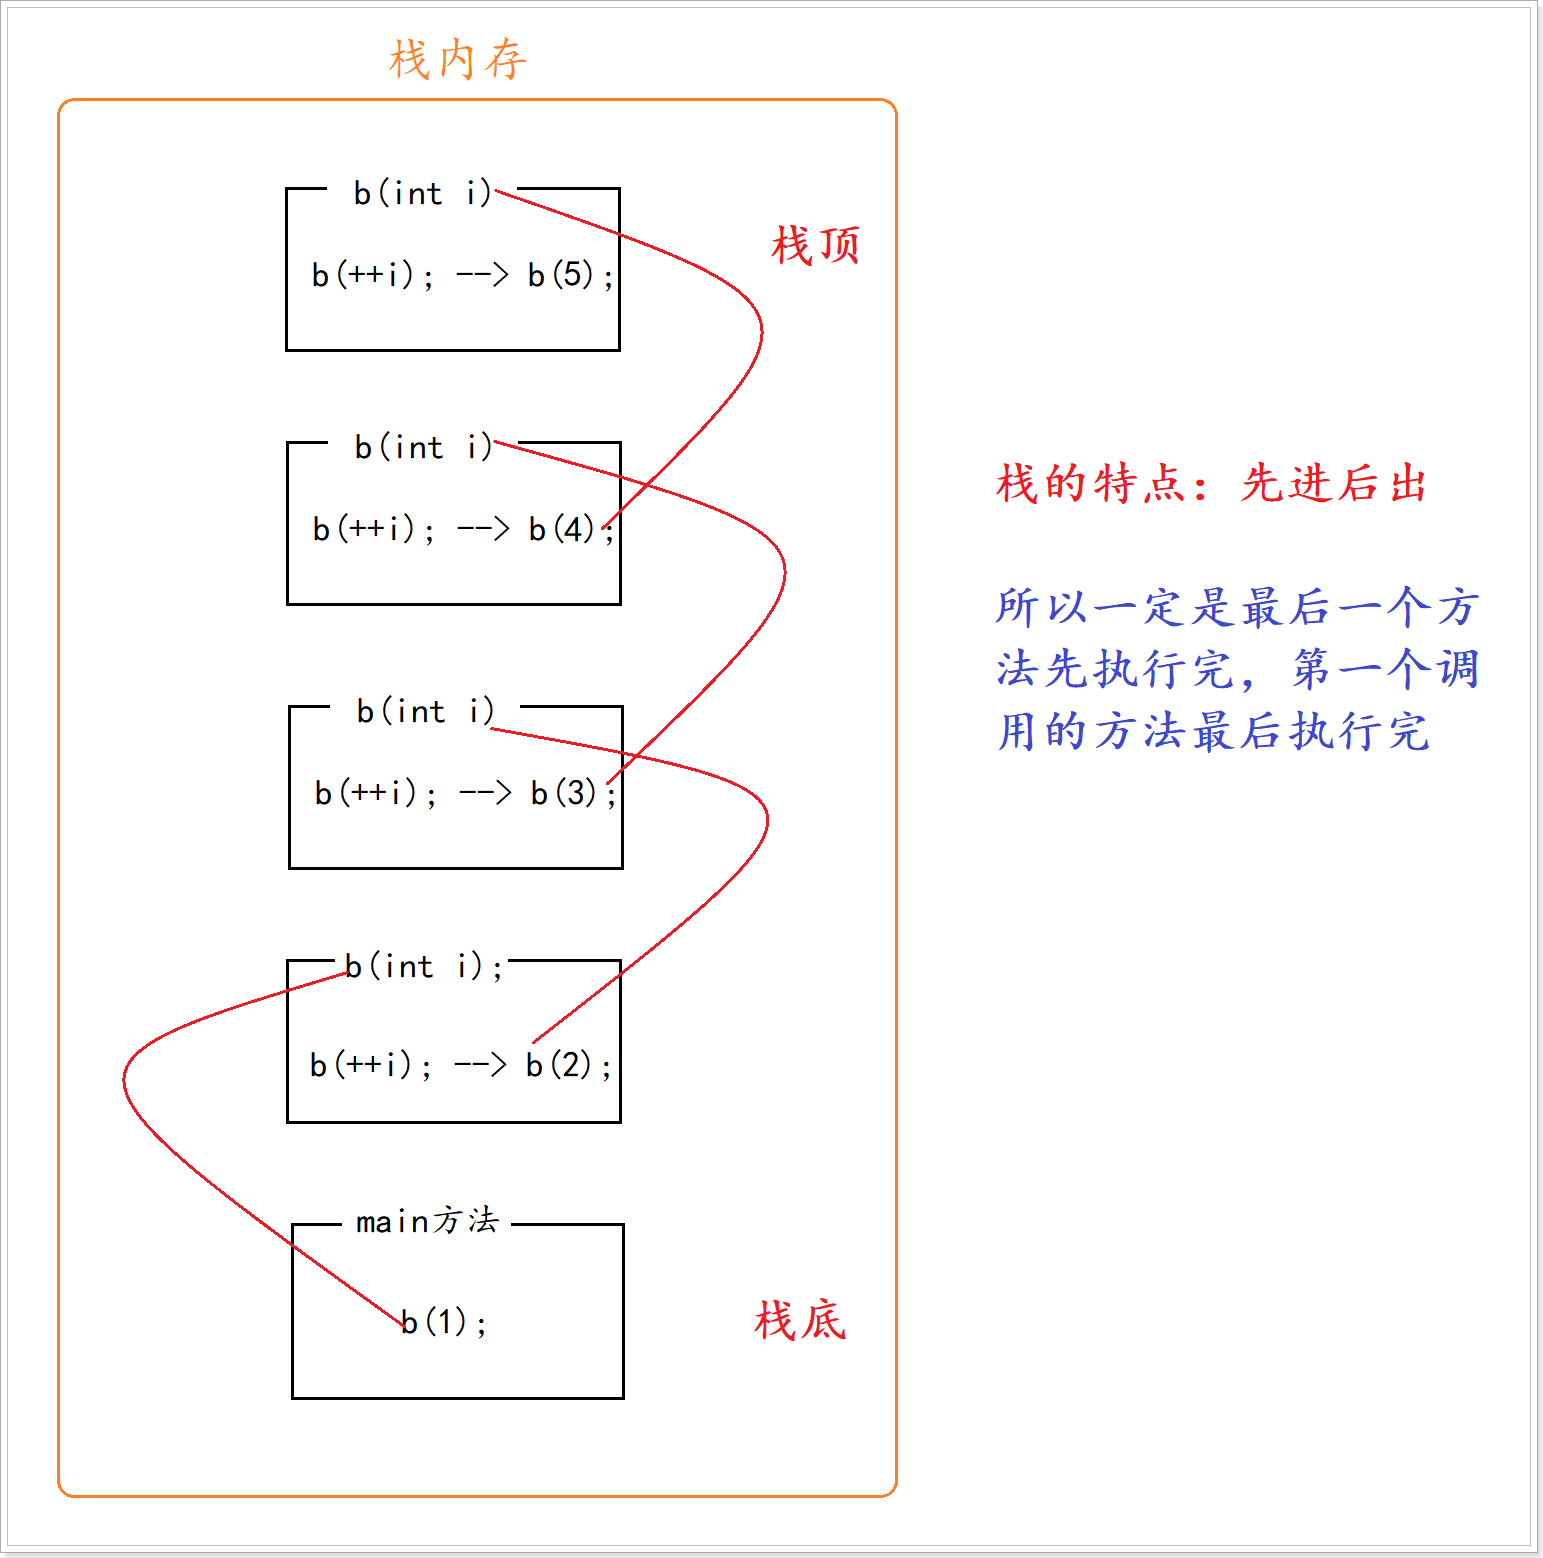
注意:递归一定要有条件限定,保证递归能够停止下来,次数不要太多,否则会发生栈内存溢出。
5.3 递归案例
5.3.1 使用递归计算累加和
num的累和 = num + (num-1)的累和,所以可以把累和的操作定义成一个方法,递归调用。
- 示例代码:
package com.dfbz.demo01;

/**
 * @author lscl
 * @version 1.0
 * @intro:
 */
public class Demo02_递归计算求和 {
    public static void main(String[] args) {
        //计算1~num的和,使用递归完成
        int num = 5;
        // 调用求和的方法
        int sum = getSum(num);
        // 输出结果
        System.out.println(sum);
    }

    public static int getSum(int num) {
      	/*
      	   num为1时,方法返回1,
      	   相当于是方法的出口,num总有是1的情况
      	*/
        if (num == 1) {
            return 1;
        }
      	/*
          num不为1时,方法返回 num +(num-1)的累和
          递归调用getSum方法
        */
        return num + getSum(num - 1);
    }
}
5.3.2 使用递归计算阶乘
- 阶乘:所有小于及等于该数的正整数的积。
n的阶乘:n! =
n * (n-1) * (n-2) ...* 3 * 2 * 1
这与累和类似,只不过换成了乘法运算,学员可以自己练习,需要注意阶乘值符合int类型的范围。
条件结束:n! = n * (n-1)!
- 示例代码:
package com.dfbz.demo01;

/**
 * @author lscl
 * @version 1.0
 * @intro:
 */
public class Demo03_递归求阶乘 {
    //计算n的阶乘,使用递归完成
    public static void main(String[] args) {
        int n = 3;
        // 调用求阶乘的方法
        int value = getValue(n);
        // 输出结果
        System.out.println("阶乘为:" + value);
    }

    public static int getValue(int n) {
        // 1的阶乘为1
        if (n == 1) {
            return 1;
        }
      	/*
      	  n不为1时,方法返回 n! = n*(n-1)!
          递归调用getValue方法
      	*/
        return n * getValue(n - 1);
    }
}
5.3.3 使用递归打印多级目录
分析:多级目录的打印,就是当目录的嵌套。遍历之前,无从知道到底有多少级目录,所以我们还是要使用递归实现。
- 示例代码:
package com.dfbz.demo01;

import java.io.File;

/**
 * @author lscl
 * @version 1.0
 * @intro:
 */
public class Demo04_递归目录 {
    public static void main(String[] args) {
        // 创建File对象
        File dir = new File("D:\\aaa");
        // 调用打印目录方法
        printDir(dir);
    }

    public static void printDir(File dir) {
        // 获取子文件和目录
        File[] files = dir.listFiles();
        // 循环打印
      	/*
      	  判断:
      	  当是文件时,打印绝对路径.
      	  当是目录时,继续调用打印目录的方法,形成递归调用.
      	*/
        for (File file : files) {
            // 判断
            if (file.isFile()) {
                // 是文件,输出文件绝对路径
                System.out.println("文件名:" + file.getAbsolutePath());
            } else {
                // 是目录,输出目录绝对路径
                System.out.println("目录:" + file.getAbsolutePath());
                // 继续遍历,调用printDir,形成递归
                printDir(file);
            }
        }
    }
}
5.3.4 使用递归完成文件搜索
搜索D:\001 目录中的.java 文件。
分析:
- 目录搜索,无法判断多少级目录,所以使用递归,遍历所有目录。
- 遍历目录时,获取的子文件,通过文件名称,判断是否符合条件。
package com.dfbz.demo01;

import java.io.File;

/**
 * @author lscl
 * @version 1.0
 * @intro:
 */
public class Demo05_递归搜索文件 {
    public static void main(String[] args) {
        // 创建File对象
        File dir = new File("D:\\001");
        // 调用打印目录方法
        printDir(dir);
    }

    public static void printDir(File dir) {
        // 获取子文件和目录
        File[] files = dir.listFiles();

        // 循环打印
        for (File file : files) {
            if (file.isFile()) {
                // 是文件,判断文件名并输出文件绝对路径
                if (file.getName().endsWith(".java")) {
                    System.out.println("文件名:" + file.getAbsolutePath());
                }
            } else {
                // 是目录,继续遍历,形成递归
                printDir(file);
            }
        }
    }
}
5.3.5 文件过滤器优化
java.io.FileFilter是一个接口,是File的过滤器。 该接口的对象可以传递给File类的listFiles(FileFilter) 作为参数, 接口中只有一个方法。
boolean accept(File pathname):将此目录的每个文件传递给accept方法,此方法返回true则保留此文件,反之剔除;
分析:
- 接口作为参数,需要传递子类对象,重写其中方法。我们选择匿名内部类方式,比较简单。
accept方法,参数为File,表示当前File下所有的子文件和子目录。保留住则返回true,过滤掉则返回false。保留规则:- 要么是.java文件。
- 要么是目录,用于继续遍历。
- 通过过滤器的作用,
listFiles(FileFilter)返回的数组元素中,子文件对象都是符合条件的,可以直接打印。
1) FileFilter基本用法
package com.dfbz.demo01;

import java.io.File;
import java.io.FileFilter;

/**
 * @author lscl
 * @version 1.0
 * @intro:
 */
public class Demo06_FileFilter_基本用法 {
    public static void main(String[] args) {

        File file = new File("D:\\001");

        // 创建一个文件过滤器
        MyFileFilter fileFilter = new MyFileFilter();

        // 利用文件过滤器来过滤文件
        File[] files = file.listFiles(fileFilter);

        for (File tempFile : files) {
            System.out.println(tempFile);
        }
    }
}

class MyFileFilter implements FileFilter{
    @Override
    public boolean accept(File pathname) {
        // 只要exe文件
        return pathname.getName().endsWith(".exe");
    }
}
2) FileFilter案例
搜索指定目录下的Java文件,包括子目录
package com.dfbz.demo01;

import java.io.File;
import java.io.FileFilter;

/**
 * @author lscl
 * @version 1.0
 * @intro:
 */
public class Demo07_FileFilter递归获取指定文件 {
    public static void main(String[] args) {
        File file = new File("E:\\BaiduNetDiskWorkspace\\workspace_class");
        searchFile(file);
    }

    public static void searchFile(File file) {
        // 只要这个目录的子目录和java文件
        File[] files = file.listFiles(new FileFilter() {
            @Override
            public boolean accept(File pathname) {
                return pathname.getName().endsWith(".java") || pathname.isDirectory();
            }
        });

        // 遍历这一级目录
        for (File tempFile : files) {

            // 如果是文件夹,再次递归搜索
            if (tempFile.isDirectory()) {
                searchFile(tempFile);
            } else {

                // 如果是普通文件,则打印
                System.out.println(tempFile.getName());
            }
        }
    }
}

 浙公网安备 33010602011771号