Nginx2
安全链接模块 secure_link_module
1、指定并允许检查请求的链接的真实性以及保护资源免遭未经授权的访问
2、限制链接生效周期
Syntax     :secure_link    expression;
Default    :--
Context    : htp,server,location


Syntax     :secure_link_md5    expression;
Default    :--
Context    :http,server,location

进行了秘钥,一系列信息,过期时间的加密,md5不可逆
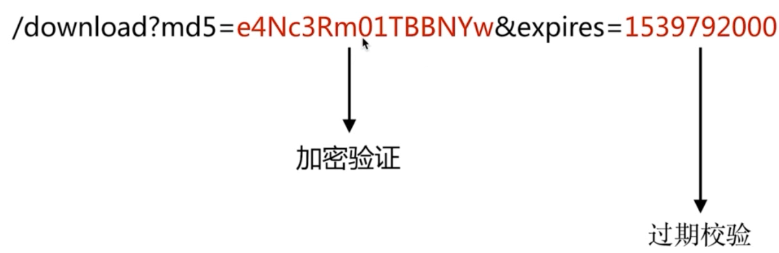
#链接的生成 yum install openssl
#!/bin/sh
servername="jeson.t.imooc.io"
download_file="/download/file.img"
time_num=$(date -d "2018-10-18 00:00:00" +%s)  # 时间戳
secret_num="imooc"

res=$(echo -n "${time_num}${download_file} ${secret_num}"|openssl md5 -binary | openssl base64 | tr +/ -_ | tr -d =)

echo "http://${servername}${download_file}?md5=${res}&expires=${time_num}"
server {
    listen       80;
    server_name  localhost;
    root /opt/app/code;
    location / {
        secure_link $arg_md5,$arg_expires;    #  url里携带的md5值,expires值
      # 重新加密,                  加密盐
        secure_link_md5 "$secure_link_expires$uri imooc";

        if ($secure_link = "") {
            return 403;  # 匹配成功
        }
        if ($secure_link = "0") {
            return 410;
        }
    }
    error_page   500 502 503 504 404  /50x.html;
    location = /50x.html {
        root   /usr/share/nginx/html;
    }
}
geoip_module模块
基于IP地址匹配MaxMind GeoIP二进制文件,读取ip所在地域信息
不同地域的ip访问不同的服务器
默认安装没有安装,yum install nginx-module-geoip 会在nginx/modules/下看到
1、区别国内外作HTTP访问规则
2、区别国内城市地域作HTTP访问规则
wegt https://dev.maxmind.com/geoip/download/geoip/database/GeoLiteCountry/GeoIP.dat.gz
wegt https://dev.maxmind.com/geoip/download/geoip/database/GeoLiteCity.dat.gz
gunzip
geoip_country /etc/nginx/geoip/GeoIP.dat;
geoip_city /etc/nginx/geoip/GeoLiteCity.dat;
server {
    listen       80;
    server_name  localhost;
    location / {
        if ($geoip_country_code != CN) {
            return 403;
        }
        root   /usr/share/nginx/html;
        index  index.html index.htm;
    }
   location /myip {            # 自己的出口ip
        default_type text/plain;
        return 200 "$remote_addr $geoip_country_name $geoip_country_code $geoip_city";
   }
    error_page   500 502 503 504 404  /50x.html;
    location = /50x.html {
        root   /usr/share/nginx/html;
    }
}
222.223.241.6 China CN Beijing
HTTPS
HTTP不安全
1、传输数据被中间人盗用、信息泄露
2、数据内容劫持、篡改
HTTPS协议的实现
对传输内容进行加密以及身份验证
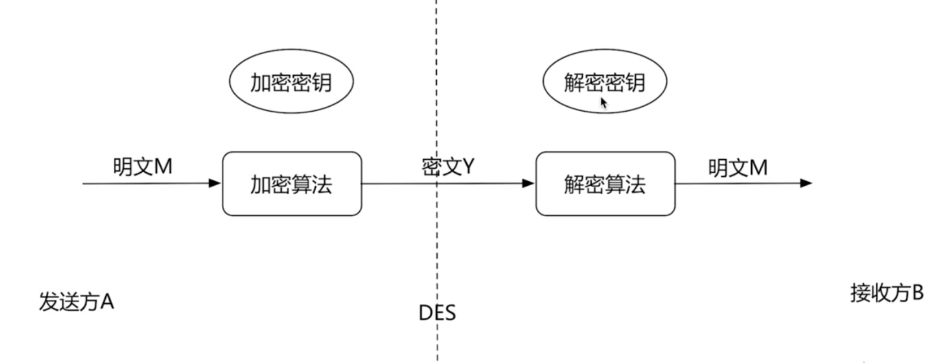
对称加密 :
性能高,对连接要求更高
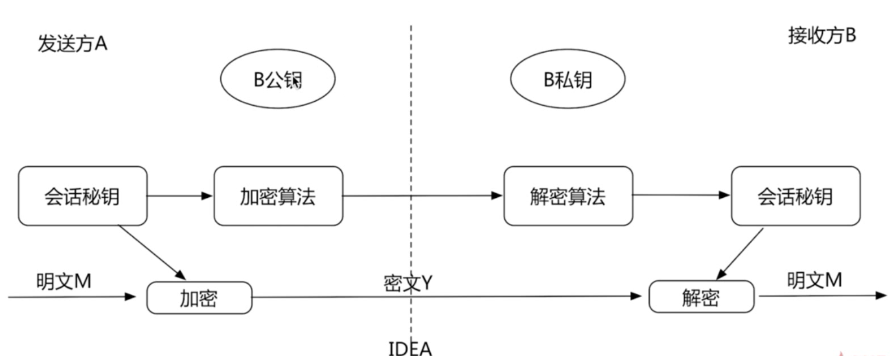
非对称加密
可靠,但性能低
HTTPs 加密原理
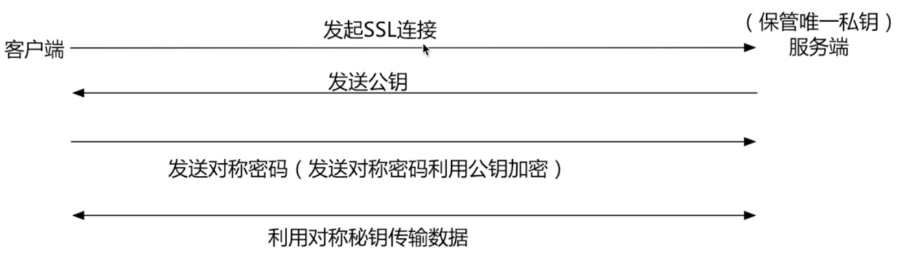
以上 中间人劫持:可以伪装客户端,服务端 ,不能防范
不再是发送公钥,而是发送CA签名证书
因为客户端会另外对CA签名证书进行校验,中间人是无法生成一个能够进行匹配CA签名证书的校验的,因为客户端会对CA证书进行校验
它江河第三方的签名机构进行校验,如果校验成功则利用公钥加密,否则停止会话;
返回的这个CA签名证书 是服务端之前和第三方机构进行了签名和授权,客户端在进行真正的连接前,还要进行一次校验。
如何生成CA签名证书
1、确保openssl安装  Syntax  :openssl  version
            rpm -qa|grep open
2、nginx在编译的过程中是否安装这个--with-http_ssl_module    Syntax  : nginx -V


步骤一、生成key秘钥
- openssl genrsa -idea -out xxxxxxxx.key 1024
- .........
- Enter pass phrase for xxxxxxxx.key:必须记住输入的密码
步骤二、生成证书签名请求文件(csr文件)
- openssl req -new -key xxxxxxxx.key -out xxxxxxx.csr
- 按照步骤输入东西
- 将csr,key文件打包发送第三方机构
- 个人忽略上一条往下走
步骤三、生成证书签名文件(CA证书)
- openssl x509 -req -days 3650 -in xxxxxxx.src -signkey xxxxxxx.key -out xxxxx.crt
- 证书失效时间10年
- 配置https服务
-
Syntax     :ssl   on|off;
Default    :ssl   off;    # 是否开启服务端https请求响应
Context    :http,server

Syntax     :ssl_certificate  on|off;
Default    :--        # 证书文件
Context    :http,server

Syntax     :ssl_certificate_key   file;
Default    :--        # 密码文件
Context    :http,server
server
 {
   listen       443;
   server_name  **********;
   ssl on;
   ssl_certificate /etc/nginx/ssl_key/jesonc.crt;
   ssl_certificate_key /etc/nginx/ssl_key/jesonc.key;
   #ssl_certificate_key /etc/nginx/ssl_key/jesonc_nopass.key;

   index index.html index.htm;
   location / {
       root  /opt/app/code;
   }
}
# 在nginx  重启、关闭时,要使用之前设置的密码
# https默认端口443
# 在访问的时候要加上https://
苹果要求的证书
a、服务器所有的连接使用TLS1.2以上版本(openssl   1.0.2)
b、HTTPS证书必须使用SHA256以上哈希算法签名
c、HTTPS证书必须使用RSA 2048位或ECC 256位以上公钥算法
d、使用前向加密技术


查看签名证书的类型
openssl  x509  -noout  -text -in ./jesonc.crt
#!/bin/sh
cd /opt/download
wget https://www.openssl.org/source/openssl-1.0.2k.tar.gz
tar -zxvf openssl-1.0.2k.tar.gz
cd openssl-1.0.2k
./config --prefix=/usr/local/openssl
make && make install
mv /usr/bin/openssl   /usr/bin/openssl.OFF
mv /usr/include/openssl   /usr/include/openssl.OFF
ln -s   /usr/local/openssl/bin/openssl   /usr/bin/openssl
ln -s   /usr/local/openssl/include/openssl   /usr/include/openssl
echo "/usr/local/openssl/lib"  >>/etc/ld.so.conf
ldconfig -v
openssl version -a
直接通过秘钥生成证书
openssl req -days 36500 -x5059 -sha256 -nodes -newkey rsa:2048 -keyout jesonc.key -out jesonc_apple.crt
没有要求输入密码
--------->输入一些相应的信息
openssl ras -in ./jesoncold.key -out ./jesonc_new.key 通过拷贝的方式去掉密码的保护
HTTPS服务优化
方式一、激活keepalive长连接
https 在http之前建立ssl的握手,ssl的连接就会多一次,服务端就会就行相应的认证(消耗CPU资源,以及IO资源)
类似于后端的服务,新型架构的产生(nginx),对于nginx我们可以扩容,以及负载均衡的出现,服务器的硬件的档次的提升,导致我们对性能的损耗往往不是特别重要,而是更多去权衡安全;但是我们也要考让服务器去处理更多的请求,提高并发
方式二、设置ssl session缓存
server
 {
   listen       443;
   server_name  116.62.103.228 jeson.t.imooc.io;

   keepalive_timeout 100;

   ssl on;
   ssl_session_cache   shared:SSL:10m;
   ssl_session_timeout 10m;

   #ssl_certificate /etc/nginx/ssl_key/jesonc.crt;
   ssl_certificate /etc/nginx/ssl_key/jesonc_apple.crt;
   ssl_certificate_key /etc/nginx/ssl_key/jesonc.key;
   #ssl_certificate_key /etc/nginx/ssl_key/jesonc_nopass.key;

   index index.html index.htm;
   location / {
       root  /opt/app/code;
   }
}
Nginx与LUA
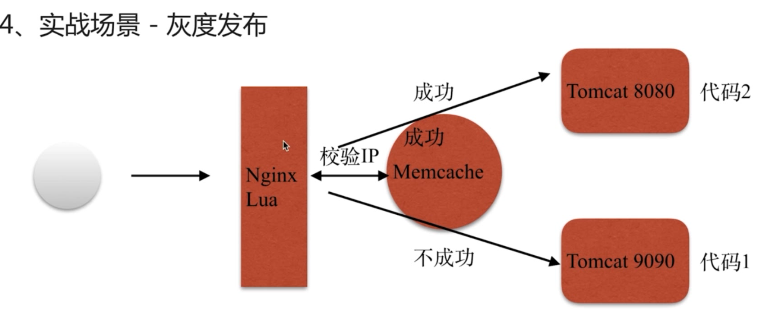
灰度发布:按照一定的关系区别,分部分的代码进行上线,使代码的发布能平滑过渡上线
1、用户的信息cookie等信息区别
2、根据用户ip
LUA:简洁、轻量、可扩展的脚本语言
nginx+lua优势:充分的结合Nginx的并发处理epoll优势和Lua的轻量实现简单的功能且高并发的场景
yum install memcached
端口默认11211
Lua 的基础语法
1、安装
yum install lua
centos 7.2默认集成5.1.4版本
- 直接交互式使用 # lua
- 脚本式 给其可执行权限chmod 直接运行
-
#!/usr/bin/lua
print("I'm  ss")
注释
- -- 行
- --[[块注释]]--
变量
- a = 'alo\n123'
- a = 'alo\n123\''
- a = '\97Io\10\04923"'
- a = [[alo
- 123"]]
- 数字只有double类型
- 布尔类型只有nil 和false 是false ,数字0、空字符串 都是true
- 默认都是全局变量 ,局部前边加local
--while 循环
sum = 0
num = 1
while num <= 100 do
  sum = sum + num
  num = num + 1
end
print("sum= ",sum)
 -- 不支持+=  -=
--for循环
sum = 0
for i= 1,100 do
    sum = sum + i
end
-- if-else
if age == 40 and sex =="male" then
    print("大于40男人")
elseif age >60 and sex ~="Female" then
    print("非女人大于60")
else
    local age = io.read()
    print("you age is "..age)
end
-- 字符串的拼接操作符 ‘..’
-- io库的分别从stdin和stdout读写的read和write函数
重新编译LuaJIT (lua的解释器,但更高效)
ngx_devel_kit    和   lua_nginx_module
重新编译Nginx


一、安装LUA环境及相关库

官方网站:https://github.com/openresty/lua-nginx-module

1、LuaJIT

wget http://luajit.org/download/LuaJIT-2.0.2.tar.gz

make install PREFIX=/usr/local/LuaJIT

export LUAJIT_LIB=/usr/local/LuaJIT/lib

export LUAJIT_INC=/usr/local/LuaJIT/include/luajit-2.0

2、ngx_devel_kit和lua-nginx-module

cd /opt/download

wget https://github.com/simpl/ngx_devel_kit/archive/v0.3.0.tar.gz

wget https://github.com/openresty/lua-nginx-module/archive/v0.10.9rc7.tar.gz

分别解压、安装

3、重新编译编译Nginx
cd /opt/download
wget http://nginx.org/download/nginx-1.12.1.tar.gz
执行解压,后按照如下方式编译:
./configure --prefix=/etc/nginx --sbin-path=/usr/sbin/nginx --modules-path=/usr/lib64/nginx/modules --conf-path=/etc/nginx/nginx.conf --error-log-path=/var/log/nginx/error.log --http-log-path=/var/log/nginx/access.log --pid-path=/var/run/nginx.pid --lock-path=/var/run/nginx.lock --http-client-body-temp-path=/var/cache/nginx/client_temp --http-proxy-temp-path=/var/cache/nginx/proxy_temp --http-fastcgi-temp-path=/var/cache/nginx/fastcgi_temp --http-uwsgi-temp-path=/var/cache/nginx/uwsgi_temp --http-scgi-temp-path=/var/cache/nginx/scgi_temp --user=nginx --group=nginx --with-compat --with-file-aio --with-threads --with-http_addition_module --with-http_auth_request_module --with-http_dav_module --with-http_flv_module --with-http_gunzip_module --with-http_gzip_static_module --with-http_mp4_module --with-http_random_index_module --with-http_realip_module --with-http_secure_link_module --with-http_slice_module --with-http_ssl_module --with-http_stub_status_module --with-http_sub_module --with-http_v2_module --with-mail --with-mail_ssl_module --with-stream --with-stream_realip_module --with-stream_ssl_module --with-stream_ssl_preread_module --with-cc-opt='-O2 -g -pipe -Wall -Wp,-D_FORTIFY_SOURCE=2 -fexceptions -fstack-protector-strong --param=ssp-buffer-size=4 -grecord-gcc-switches -m64 -mtune=generic -fPIC' --with-ld-opt='-Wl,-z,relro -Wl,-z,now -pie' --add-module=/opt/download/ngx_devel_kit-0.3.0 --add-module=/opt/download/lua-nginx-module-0.10.9rc7
make -j 4 && make install

4、加载lua库,加入到ld.so.conf文件
echo "/usr/local/LuaJIT/lib" >> /etc/ld.so.conf
然后执行如下命令:
ldconfig
| set_by_lua | 设置nginx访问量,可是实现复杂的赋值逻辑 |
| set_by_lua_file | |
| access_by_lua | 请求访问阶段处理,用于访问控制 |
| access_by_lua_file | |
| content_by_lua | 内容处理器,接受请求并输出响应 |
| content_by_lua_file | |
| Nginx 的 Lua API | |
| ngx.var | nginx变量 |
| ngx.req.get_headers | 获取请求头 |
| ngx.req.get_uri_args | 获取url请求参数 |
| ngx.redirect | 重定向 |
| ngx.print | 输出响应内容体 |
| ngx.say | 同nsx.print,但是会最后输出一个换行符 |
| ngx.header | 输出响应体 |
| 。。。 | |
server {
    listen       80;
    server_name  localhost;

    access_log  /var/log/nginx/log/host.access.log  main;

    location /hello {
        default_type 'text/plain';
        content_by_lua 'ngx.say("hello, lua")';
    }

    location /myip {
        default_type 'text/plain';
        content_by_lua '
            clientIP = ngx.req.get_headers()["x_forwarded_for"]
            ngx.say("IP:",clientIP)
            ';
    }

    location / {
        default_type "text/html";
        content_by_lua_file /opt/app/lua/dep.lua;
    }

    location @server{
        proxy_pass http://127.0.0.1:9090;
    }

    location @server_test{
        proxy_pass http://127.0.0.1:8080;
    }

    error_page   500 502 503 504 404  /50x.html;
    location = /50x.html {
        root   /usr/share/nginx/html;
    }

}
clientIP = ngx.req.get_headers()["X-Real-IP"]
if clientIP == nil then
    clientIP = ngx.req.get_headers()["x_forwarded_for"]
end
if clientIP == nil then
    clientIP = ngx.var.remote_addr
end
    local memcached = require "resty.memcached"
    local memc, err = memcached:new()
    if not memc then
        ngx.say("failed to instantiate memc: ", err)
        return
    end
    local ok, err = memc:connect("127.0.0.1", 11211)
    if not ok then
        ngx.say("failed to connect: ", err)
        return
    end
    local res, flags, err = memc:get(clientIP)
    ngx.say("value key: ",res,clientIP)
    if err then
        ngx.say("failed to get clientIP ", err)
        return
    end
    if  res == "1" then
        ngx.exec("@server_test")
        return
    end
    ngx.exec("@server")
wget https://github.com/agentzh/lua-resty-memcached/archive/v0.11.tar.gz
tar -zxvf v0.11.tar.gz
cp -r lua-resty-memcached-0.11/lib/resty /usr/local/share/lua/5.1/

 浙公网安备 33010602011771号