zabbix
开源监控系统
    Nagios
    Cacti
    zabbix
nagios
1、重在告警监控
2、但是zabbix更出色,告警配置web化
3、无监控历史数据、图形化支持差
4、不支持分布式监控
cacti
    重点在监控服务器。网络设备的监控数据并画图
  依赖snmp协议
  不好自定义监控
  告警支持不友好
zabbix
  所有监控都支持web化,采用php开发
  支持分布式
  支持多种方式数据采集:简单监控(ping\telnet)、agent监控(复杂逻辑)、ssh、snmp接口监控、JMX接口监控(tomact)
  告警配置web化:邮件、微信、钉钉、短信
  zabbix和grafana的结合方便监控数据的可视化
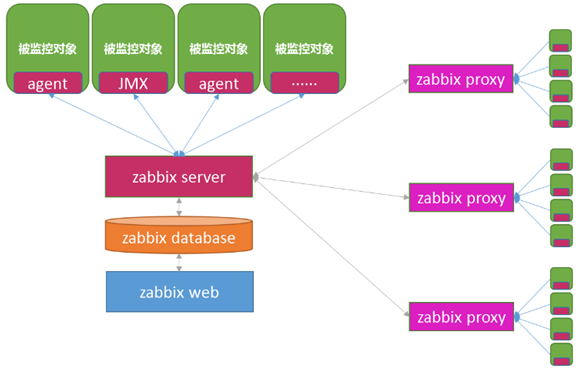
zabbix server  会去采集监控数据,采集的监控数据会写入到sql数据库
zabbix网页(php) 、所有的配置信息、用户认证信息等会写入sql数据库
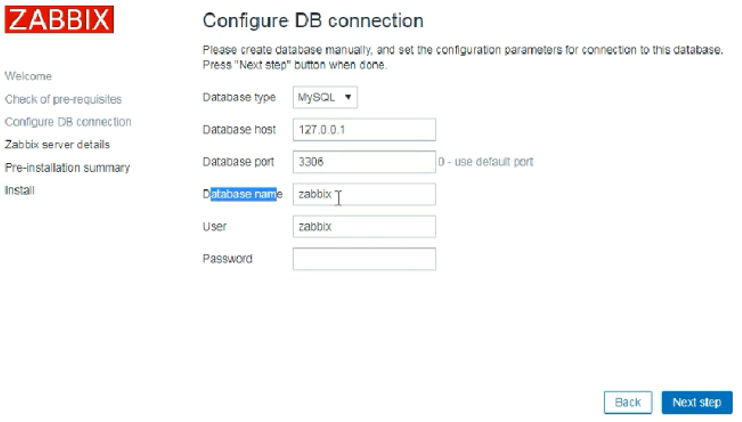
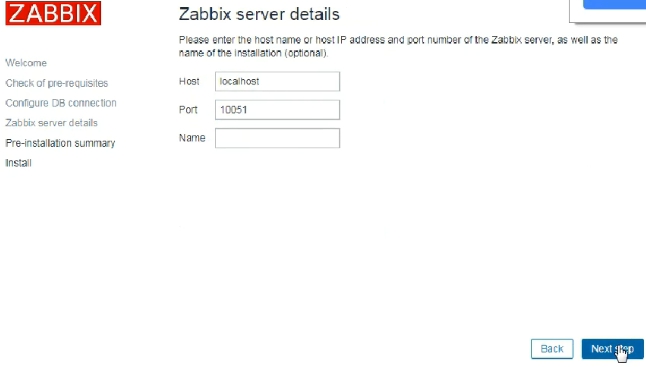
服务端安装
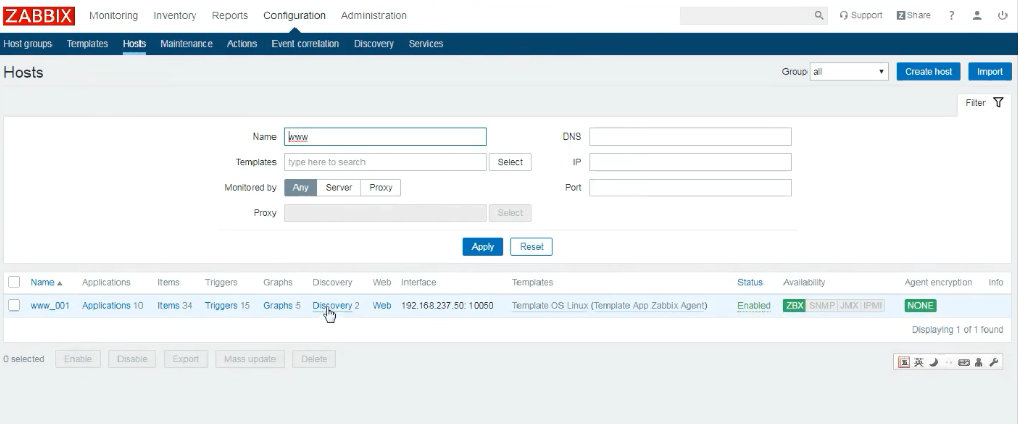
1、添加主机组

2、添加主机

3、添加监控项目

4、根据监控项目可添加图形或者触发器(报警)
1、添加用户组
2、添加用户
项目实战
客户端
1、ping检测、存活和丢包检测
  内置好了,使用fping工具       yum install -y epel-release fping
2、检查tcp端口 22

3、查看监控值
simple check,被监控的服务器无需安装客户端,如ping,端口检测之类的
zabbix agent,被动式监控服务器
zabbix agent(active),主动式监控服务器
snmp check,使用snmp协议去获取监控信息
zabbix trapper,主动式监控
External check,zabbix server上可编写监控脚本
Jmx agent,监控java进程
zabbix-agent
yum install -y gcc gcc-c++ make pcre-devel
useradd -s /sbin/nologin zabbix
cd /usr/local/src/
wget 'https://nchc.dl.sourceforge.net/project/zabbix/ZABBIX%20Latest%20Stable/4.0.3/zabbix-4.0.3.tar.gz'
tar -zxvf zabbix-4.0.3.tar.gz
cd zabbix-4.0.3
./configure --prefix=/usr/local/zabbix --enable-agent
make && make install
chown zabbix:zabbix -R /usr/local/zabbix/
###############################################################
# PidFile=/usr/local/zabbix/zabbix_agentd.pid
# LogFile=/usr/local/zabbix/zabbix_agentd.log
# Hostname=www_01 # 要和server端一致
# Server=192.168.237.49            # zabbix server的ip地址,多个ip使用逗号分隔   被动
# ServerActive=192.168.237.49      # agent主动上传数据,如果注释这个选项,那么当前服务器的主动监控就被禁用了
# UnsafeUserParameters=1
# Include=/usr/local/zabbix/etc/zabbix_agentd.conf.d/*.conf
##############################################################
zabbix_get
可以跟zabbix agent通讯获取监控信息

zabbix agent查看所有可监控项目:zabbix_agentd -p
server端使用方式:zabbix_get -s 192.168.237.50 -k key
  前提是agent端的配置项里server配置的是服务端的Ip
监控cpu负载
key: system.cpu.load[all,avg1]        Float型
key: system.cpu.load[all,avg5]        Float型
key: system.cpu.load[all,avg15]       Float型

监控cpu使用和空闲
system.cpu.util[,iowait,]    Float型
system.cpu.util[,system,]    Float型
system.cpu.util[,user,]      Float型
system.cpu.util[,idle,]      Float型

监控剩余内存(buffers\cached实际上也是剩余的)
vm.memory.size[available]

监控磁盘
名称:Disk pfree on $1
名称:inode pfree on $1
vfs.fs.size[/,pfree]         Float型
vfs.fs.inode[/,pfree]        Float型

监控流量
net.if.in[eth0]             整形(每秒速率) 默认返回字节数,需要*8
net.if.out[eth0]            整形(每秒速率) 默认返回字节数,需要*8

Shell计算流量
onetime=$(ifconfig|grep eth0 -A 6|grep 'RX packets'|awk '{print $5}')
sleep 30
twotime=$(ifconfig|grep eth0 -A 6|grep 'RX packets'|awk '{print $5}')
echo "incoming traffic is $((($twotime-$onetime)/30*8))bps"

onetime=$(ifconfig|grep eth0 -A 6|grep 'TX packets'|awk '{print $5}')
sleep 30
twotime=$(ifconfig|grep eth0 -A 6|grep 'TX packets'|awk '{print $5}')
echo "outer traffic is $((($twotime-$onetime)/30*8))bps"
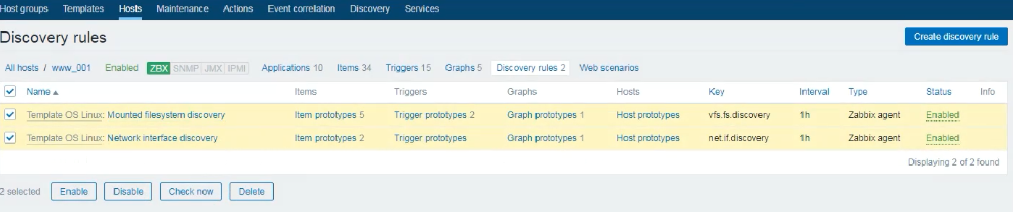
4.0自动发现
自定义监控项 key
zabbix agent提供了很多可监控的信息
但如果有需求,例如监控mysql等,自带的监控项无法满足我们的需求
这个key需要定义在客户端
自定义key说明
所有语言,只要能运行返回结果即可
运维常用的语言:Shell、Python

自定义key
无参数自定义key
有参数自定义key
使用自定义Shell脚本监控内存,一般脚本只需要输出数字即可

无参数shell脚本/tmp/memavailable.sh
free  -m | grep 'Mem:' |awk '{print $NF}'

有参数shell脚本/tmp/mem.sh
case "$1" in
  "available") free  -m | grep 'Mem:' |awk '{print $NF}';;
  "total") free  -m | grep 'Mem:' |awk '{print $2}';;
  "used") free  -m | grep 'Mem:' |awk '{print $3}';;
  *) echo "not supported";;
esac


###########   回显相应的数值    ##############


## 这个路径在agent的配置文件中有说明
Zabbix自定义key的配置/usr/local/zabbix/etc/zabbix_agentd.conf.d/mem.conf
UserParameter=mem.available,sh /tmp/memavailable.sh
UserParameter=mem.check[*],sh /tmp/mem.sh $1

# 服务端测试
zabbix_get -s 192.168.237.50 -k mem.available

网页上添加监控
创建items
mem.available
监控windows
windows版客户端(免安装)
https://www.zabbix.com/downloads/4.2.1/zabbix_agents-4.2.1-win-amd64.zip

编辑配置文件D:\Program Files\zabbix_agents-4.0.0\conf\zabbix_agentd.win.conf

LogFile=D:\Program Files\zabbix_agents-4.0.0\zabbix_agentd.log
Server=xxx
ServerActive=xxx
Hostname=xxx

cmd中执行命令注册为服务
d:

"D:\Program Files\zabbix_agents-4.0.0\bin\zabbix_agentd.exe" --config "D:\Program Files\zabbix_agents-4.0.0\conf\zabbix_agentd.win.conf" --install

cmd运行
查看日志
查看监听netstat -an|find "10050"
zabbix_get获取windows信息
zabbix_get -s xxx -k system.uname
zabbix_get -s xxx -k vm.memory.size[free]
zabbix_get -s xxx -k vfs.fs.size[C:,pfree]

windows防火墙放开10050端口
防火墙关闭的可以跳过这步
高级设置->入站规则->新建规则->端口->10050->允许连接->所有

zabbix页面上添加windows主机
直接应用windows模板
验证Windows监控是否正常

编写一个最简单的bat脚本D:\Program Files\zabbix_agents-4.0.0\echo.bat
@echo off
echo "100"

zabbix配置添加D:\Program Files\zabbix_agents-4.0.0\conf\zabbix_agentd.win.conf
UserParameter=echo.shijiange,D:\Program Files\zabbix_agents-4.0.0\echo.bat
配置文件
# This is a configuration file for Zabbix agent service (Windows)
# To get more information about Zabbix, visit http://www.zabbix.com

############ GENERAL PARAMETERS #################

### Option: LogType
#	Specifies where log messages are written to:
#		system  - Windows event log
#		file    - file specified with LogFile parameter
#		console - standard output
#
# Mandatory: no
# Default:
# LogType=file

### Option: LogFile
#	Log file name for LogType 'file' parameter.
#
# Mandatory: no
# Default:
# LogFile=

LogFile=c:\zabbix_agentd.log

### Option: LogFileSize
#	Maximum size of log file in MB.
#	0 - disable automatic log rotation.
#
# Mandatory: no
# Range: 0-1024
# Default:
# LogFileSize=1

### Option: DebugLevel
#	Specifies debug level:
#	0 - basic information about starting and stopping of Zabbix processes
#	1 - critical information
#	2 - error information
#	3 - warnings
#	4 - for debugging (produces lots of information)
#	5 - extended debugging (produces even more information)
#
# Mandatory: no
# Range: 0-5
# Default:
# DebugLevel=3

### Option: SourceIP
#	Source IP address for outgoing connections.
#
# Mandatory: no
# Default:
# SourceIP=

### Option: EnableRemoteCommands
#	Whether remote commands from Zabbix server are allowed.
#	0 - not allowed
#	1 - allowed
#
# Mandatory: no
# Default:
# EnableRemoteCommands=0

### Option: LogRemoteCommands
#	Enable logging of executed shell commands as warnings.
#	0 - disabled
#	1 - enabled
#
# Mandatory: no
# Default:
# LogRemoteCommands=0

##### Passive checks related

### Option: Server
#	List of comma delimited IP addresses, optionally in CIDR notation, or DNS names of Zabbix servers and Zabbix proxies.
#	Incoming connections will be accepted only from the hosts listed here.
#	If IPv6 support is enabled then '127.0.0.1', '::127.0.0.1', '::ffff:127.0.0.1' are treated equally and '::/0' will allow any IPv4 or IPv6 address.
#	'0.0.0.0/0' can be used to allow any IPv4 address.
#	Example: Server=127.0.0.1,192.168.1.0/24,::1,2001:db8::/32,zabbix.domain
#
# Mandatory: yes, if StartAgents is not explicitly set to 0
# Default:
# Server=

Server=127.0.0.1

### Option: ListenPort
#	Agent will listen on this port for connections from the server.
#
# Mandatory: no
# Range: 1024-32767
# Default:
# ListenPort=10050

### Option: ListenIP
#		List of comma delimited IP addresses that the agent should listen on.
#		First IP address is sent to Zabbix server if connecting to it to retrieve list of active checks.
#
# Mandatory: no
# Default:
# ListenIP=0.0.0.0

### Option: StartAgents
#	Number of pre-forked instances of zabbix_agentd that process passive checks.
#	If set to 0, disables passive checks and the agent will not listen on any TCP port.
#
# Mandatory: no
# Range: 0-100
# Default:
# StartAgents=3

##### Active checks related

### Option: ServerActive
#	List of comma delimited IP:port (or DNS name:port) pairs of Zabbix servers and Zabbix proxies for active checks.
#	If port is not specified, default port is used.
#	IPv6 addresses must be enclosed in square brackets if port for that host is specified.
#	If port is not specified, square brackets for IPv6 addresses are optional.
#	If this parameter is not specified, active checks are disabled.
#	Example: ServerActive=127.0.0.1:20051,zabbix.domain,[::1]:30051,::1,[12fc::1]
#
# Mandatory: no
# Default:
# ServerActive=

ServerActive=127.0.0.1

### Option: Hostname
#	Unique, case sensitive hostname.
#	Required for active checks and must match hostname as configured on the server.
#	Value is acquired from HostnameItem if undefined.
#
# Mandatory: no
# Default:
# Hostname=

Hostname=Windows host

### Option: HostnameItem
#	Item used for generating Hostname if it is undefined. Ignored if Hostname is defined.
#	Does not support UserParameters or aliases.
#
# Mandatory: no
# Default:
# HostnameItem=system.hostname

### Option: HostMetadata
#	Optional parameter that defines host metadata.
#	Host metadata is used at host auto-registration process.
#	An agent will issue an error and not start if the value is over limit of 255 characters.
#	If not defined, value will be acquired from HostMetadataItem.
#
# Mandatory: no
# Range: 0-255 characters
# Default:
# HostMetadata=

### Option: HostMetadataItem
#	Optional parameter that defines an item used for getting host metadata.
#	Host metadata is used at host auto-registration process.
#	During an auto-registration request an agent will log a warning message if
#	the value returned by specified item is over limit of 255 characters.
#	This option is only used when HostMetadata is not defined.
#
# Mandatory: no
# Default:
# HostMetadataItem=

### Option: RefreshActiveChecks
#	How often list of active checks is refreshed, in seconds.
#
# Mandatory: no
# Range: 60-3600
# Default:
# RefreshActiveChecks=120

### Option: BufferSend
#	Do not keep data longer than N seconds in buffer.
#
# Mandatory: no
# Range: 1-3600
# Default:
# BufferSend=5

### Option: BufferSize
#	Maximum number of values in a memory buffer. The agent will send
#	all collected data to Zabbix server or Proxy if the buffer is full.
#
# Mandatory: no
# Range: 2-65535
# Default:
# BufferSize=100

### Option: MaxLinesPerSecond
#	Maximum number of new lines the agent will send per second to Zabbix Server
#	or Proxy processing 'log', 'logrt' and 'eventlog' active checks.
#	The provided value will be overridden by the parameter 'maxlines',
#	provided in 'log', 'logrt' or 'eventlog' item keys.
#
# Mandatory: no
# Range: 1-1000
# Default:
# MaxLinesPerSecond=20

############ ADVANCED PARAMETERS #################

### Option: Alias
#	Sets an alias for an item key. It can be used to substitute long and complex item key with a smaller and simpler one.
#	Multiple Alias parameters may be present. Multiple parameters with the same Alias key are not allowed.
#	Different Alias keys may reference the same item key.
#	For example, to retrieve paging file usage in percents from the server:
#	Alias=pg_usage:perf_counter[\Paging File(_Total)\% Usage]
#	Now shorthand key pg_usage may be used to retrieve data.
#	Aliases can be used in HostMetadataItem but not in HostnameItem or PerfCounter parameters.
#
# Mandatory: no
# Range:
# Default:

### Option: Timeout
#	Spend no more than Timeout seconds on processing.
#
# Mandatory: no
# Range: 1-30
# Default:
# Timeout=3

### Option: PerfCounter
#	Syntax: <parameter_name>,"<perf_counter_path>",<period>
#	Defines new parameter <parameter_name> which is an average value for system performance counter <perf_counter_path> for the specified time period <period> (in seconds).
#	For example, if you wish to receive average number of processor interrupts per second for last minute, you can define new parameter "interrupts" as following:
#	PerfCounter = interrupts,"\Processor(0)\Interrupts/sec",60
#	Please note double quotes around performance counter path.
#	Samples for calculating average value will be taken every second.
#	You may run "typeperf -qx" to get list of all performance counters available in Windows.
#
# Mandatory: no
# Range:
# Default:

### Option: Include
#	You may include individual files in the configuration file.
#
# Mandatory: no
# Default:
# Include=

# Include=c:\zabbix\zabbix_agentd.userparams.conf
# Include=c:\zabbix\zabbix_agentd.conf.d\
# Include=c:\zabbix\zabbix_agentd.conf.d\*.conf

####### USER-DEFINED MONITORED PARAMETERS #######

### Option: UnsafeUserParameters
#	Allow all characters to be passed in arguments to user-defined parameters.
#	The following characters are not allowed:
#	\ ' " ` * ? [ ] { } ~ $ ! & ; ( ) < > | # @
#	Additionally, newline characters are not allowed.
#	0 - do not allow
#	1 - allow
#
# Mandatory: no
# Range: 0-1
# Default:
# UnsafeUserParameters=0

### Option: UserParameter
#	User-defined parameter to monitor. There can be several user-defined parameters.
#	Format: UserParameter=<key>,<shell command>
#
# Mandatory: no
# Default:
# UserParameter=

####### TLS-RELATED PARAMETERS #######

### Option: TLSConnect
#	How the agent should connect to server or proxy. Used for active checks.
#	Only one value can be specified:
#		unencrypted - connect without encryption
#		psk         - connect using TLS and a pre-shared key
#		cert        - connect using TLS and a certificate
#
# Mandatory: yes, if TLS certificate or PSK parameters are defined (even for 'unencrypted' connection)
# Default:
# TLSConnect=unencrypted

### Option: TLSAccept
#	What incoming connections to accept.
#	Multiple values can be specified, separated by comma:
#		unencrypted - accept connections without encryption
#		psk         - accept connections secured with TLS and a pre-shared key
#		cert        - accept connections secured with TLS and a certificate
#
# Mandatory: yes, if TLS certificate or PSK parameters are defined (even for 'unencrypted' connection)
# Default:
# TLSAccept=unencrypted

### Option: TLSCAFile
#	Full pathname of a file containing the top-level CA(s) certificates for
#	peer certificate verification.
#
# Mandatory: no
# Default:
# TLSCAFile=

### Option: TLSCRLFile
#	Full pathname of a file containing revoked certificates.
#
# Mandatory: no
# Default:
# TLSCRLFile=

### Option: TLSServerCertIssuer
#		Allowed server certificate issuer.
#
# Mandatory: no
# Default:
# TLSServerCertIssuer=

### Option: TLSServerCertSubject
#		Allowed server certificate subject.
#
# Mandatory: no
# Default:
# TLSServerCertSubject=

### Option: TLSCertFile
#	Full pathname of a file containing the agent certificate or certificate chain.
#
# Mandatory: no
# Default:
# TLSCertFile=

### Option: TLSKeyFile
#	Full pathname of a file containing the agent private key.
#
# Mandatory: no
# Default:
# TLSKeyFile=

### Option: TLSPSKIdentity
#	Unique, case sensitive string used to identify the pre-shared key.
#
# Mandatory: no
# Default:
# TLSPSKIdentity=

### Option: TLSPSKFile
#	Full pathname of a file containing the pre-shared key.
#
# Mandatory: no
# Default:
# TLSPSKFile=
分布式proxy
Zabbix服务器:192.168.237.49
Zabbix分布式Proxy:192.168.237.50
Zabbix客户端:192.168.237.51
proxy
分布式架构
Zabbix Server -> Zabbix Proxy -> Zabbix Agent(多台)
Agent的Server白名单要配置Proxy
先安装Mysql,缓存监控数据
安装Zabbix Proxy
需要初始化数据库
yum install mariadb-server mariadb mariadb-devel -y
systemctl restart mariadb
systemctl enable mariadb
yum install -y tar gcc make gcc-c++ net-snmp-devel libxml2-devel libcurl-devel pcre-devel
useradd -s /sbin/nologin zabbix
cd /usr/local/src/
wget 'https://nchc.dl.sourceforge.net/project/zabbix/ZABBIX%20Latest%20Stable/4.0.3/zabbix-4.0.3.tar.gz'
tar -zxvf zabbix-4.0.3.tar.gz
cd zabbix-4.0.3
./configure --prefix=/usr/local/zabbix --enable-proxy --enable-agent --with-mysql --with-net-snmp --with-libcurl --with-libxml2
make && make install
chown zabbix:zabbix /usr/local/zabbix/ -R
create database zabbix character set utf8 collate utf8_bin;
grant all privileges on zabbix.* to zabbix@'127.0.0.1' identified by 'zabbixpwd';
set names utf8;
use zabbix;
source /usr/local/src/zabbix-4.0.3/database/mysql/schema.sql;
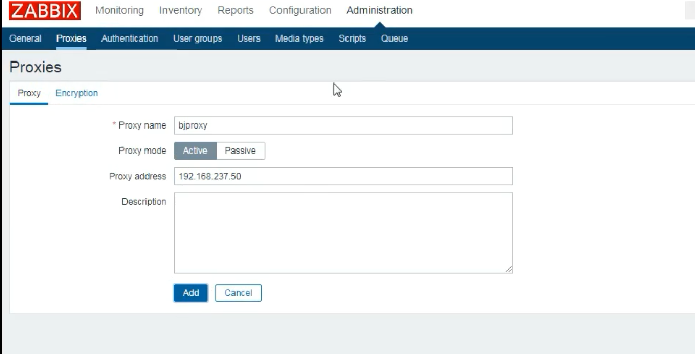
Zabbix分布式Proxy配置/usr/local/zabbix/etc/zabbix_proxy.conf
Hostname=bjproxy
Server=192.168.237.49    # 上报server
LogFile=/usr/local/zabbix/zabbix_proxy.log
DBHost=127.0.0.1
DBName=zabbix
DBUser=zabbix
DBPassword=zabbixpwd
DBPort=3306
ConfigFrequency=60

验证
启动Zabbix Proxy

/usr/local/zabbix/sbin/zabbix_proxy
Agent
PidFile=/usr/local/zabbix/zabbix_agentd.pid
LogFile=/usr/local/zabbix/zabbix_agentd.log
Hostname=www_001
Server=192.168.237.50         # proxy
ServerActive=192.168.237.50  # proxy
UnsafeUserParameters=1
Include=/usr/local/zabbix/etc/zabbix_agentd.conf.d/*.conf
server
添加主机
使用分布式监控
使用Linux模板

添加多台agent

分布式监控的数据交互
Zabbix Proxy 去监控Agent收集数据
Zabbix Proxy收集完数据给Zabbix Server
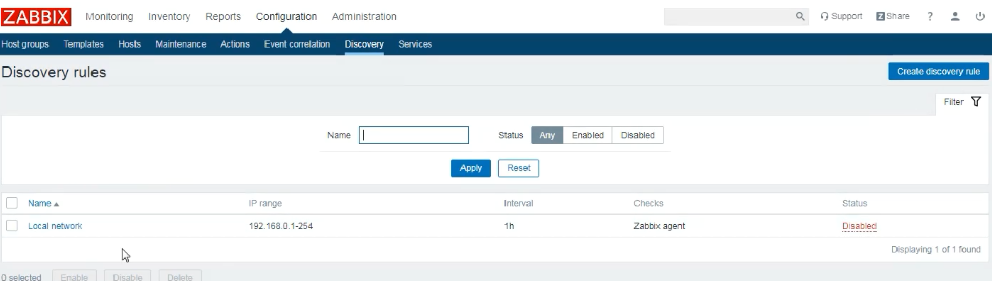
自动发现
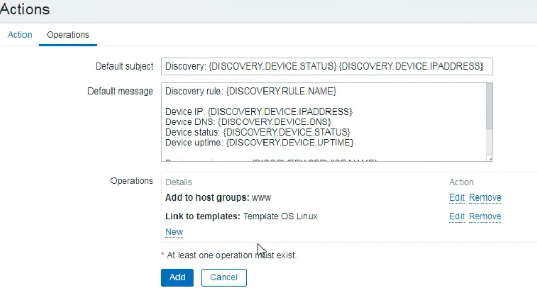
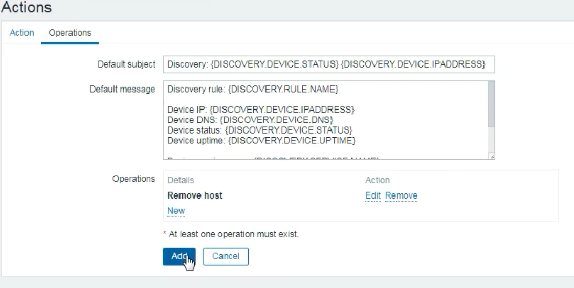
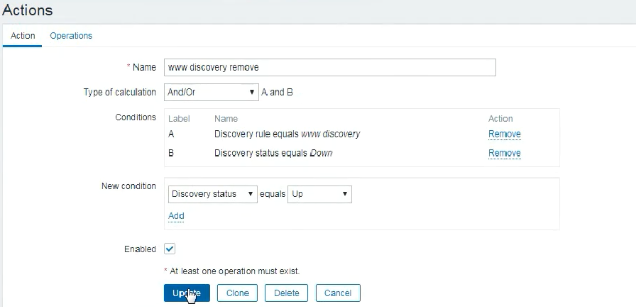
1、自动发现
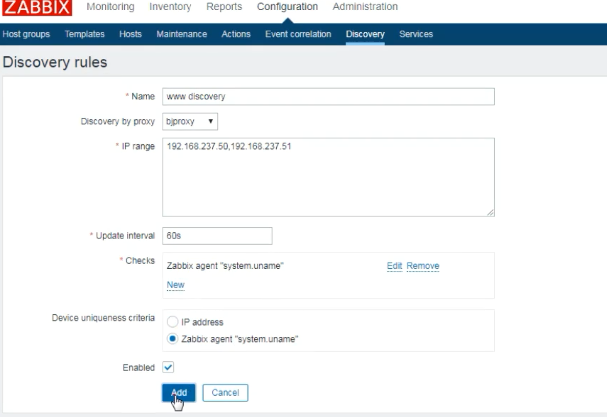
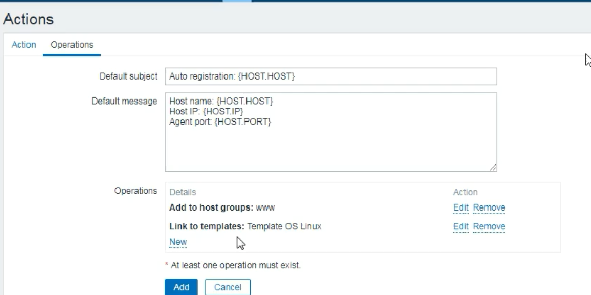
2、添加动作,应用模板

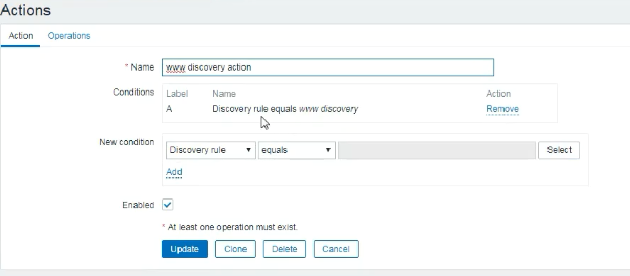
3、主机移除action
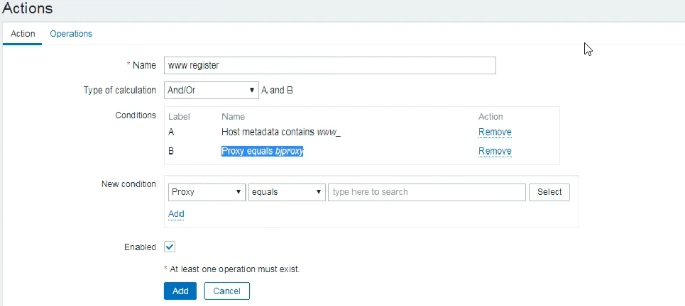
自动注册
主机自动发现和自动注册
自动发现主机名设置比较麻烦
自动发现配置起来比较麻烦,没有自动注册好
自动注册相对来说比自动发现好用
使用自动注册的话,添加主机的时候主机名使用Agent配置的Hostname

主机自动注册的流程
zabbix客户端需要配置ServerActive               # 主动
zabbix客户端把自己的元数据提供给zabbix服务器或zabbix分布式proxy
zabbix服务器添加动作,当收到元数据时候自动添加主机、链接模板等

Zabbix客户端配置HostMetadataItem
PidFile=/usr/local/zabbix/zabbix_agentd.pid
LogFile=/usr/local/zabbix/zabbix_agentd.log
Hostname=www_001
Server=192.168.237.50
ServerActive=192.168.237.50
#UnsafeUserParameters=1
Include=/usr/local/zabbix/etc/zabbix_agentd.conf.d/*.conf
HostMetadataItem=system.uname

Zabbix网页上配置自动注册自动添加主机
事件源选择自动注册
创建动作
动作中指定条件,假如说来自哪个Proxy,元数据包含什么(主机名)
验证自动注册

Zabbix的自动注册
添加主机会把Hostname填上
只需要一个Action就好
需要注意每个Agent都要加上HostMetadataItem这个配置

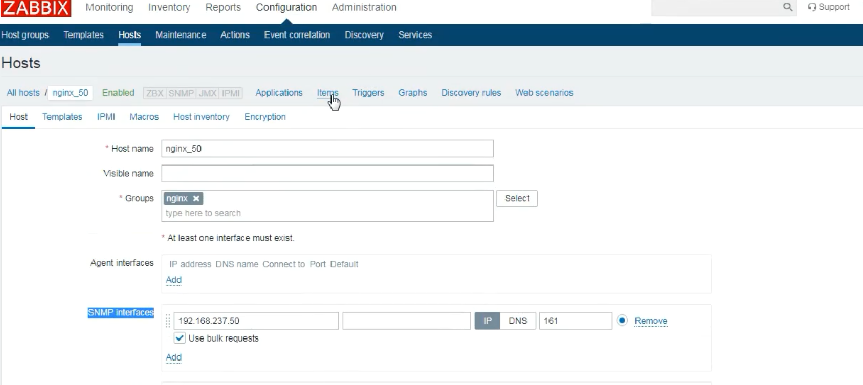
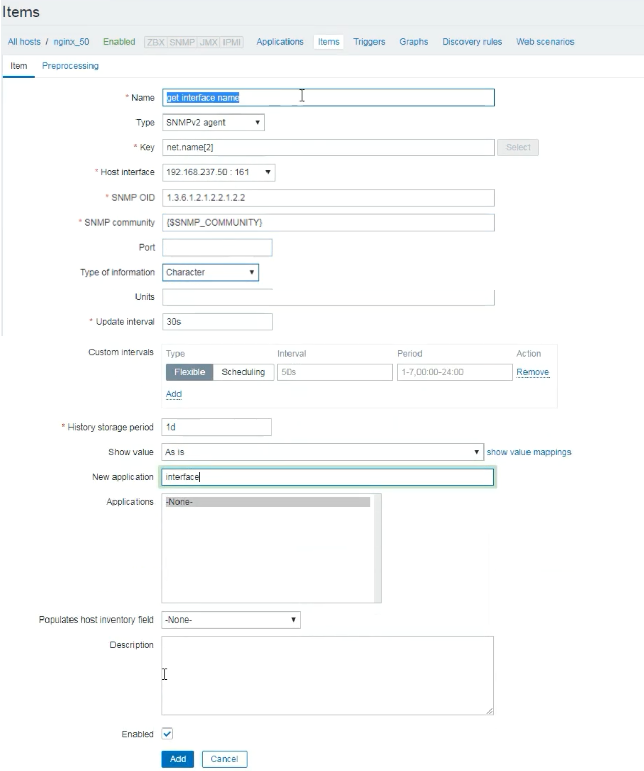
snmp监控
需要安装snmp 服务器安装即可 ,看snmp随笔


 浙公网安备 33010602011771号