linux内核编程入门--系统调用监控文件访问
参考的资料:
hello world https://www.cnblogs.com/bitor/p/9608725.html
linux内核监控模块——系统调用的截获 https://www.cnblogs.com/lxw315/p/4773566.html
实现:
实验目的:
内核模块的编写:完成一个Linux/Windows内核/驱动模块的编写,
能够实现对文件访问的监控、或者对键盘设备、USB设备、网络设备、
蓝牙设备等的监控。
实验内容:
通过linux内核模块编程,写一个模块使得进程访问文件时会把进程的进程名,进程id,文件名打印到系统日志,然后通过dmesg查看相关信息。
实验步骤:
1.思路
“截获”的过程是:修改系统调用表中调用函数的地址,将其执行我们自己实现的函数,再在我们自己的函数中完成我们想做的事情后,在返回到原来的系统调用执行流程中。
实现文件访问监控的思路为:截获sys_open系统调用。当进程打开文件时会调用系统中断sys_open,通过修改中断向量表使得先执行我们编写的函数my_sys_open,功能为打印当前访问的进程名,进程号,文件名,然后再执行sys_open。这样就相当于监控到了信息,信息通过printk打印到系统日志,通过dmesg查看即可。
2.代码实现
函数asmlinkage long my_sys_open(char * filename, int flags, int mode),就是自己实现的调用函数,这里的形参是参考系统原有的open调用函数的原型。
在my_sys_open()中,打印了当前是哪个进程在访问(进程名和进程号的信息),访问的是哪个文件(文件的绝对路径),打印完后跳转到原来的系统调用函数。
在模块初始化的过程中,执行start_hook()函数。在start_hook()函数中,先获得系统调用表的地址,将系统调用表中的原有open函数的地址保存下来,再将my_sys_open()函数的地址赋到系统调用表中。
修改系统调用表时,由于内核中的很多东西,比如系统调用表sys_call_table是只读的,需要修改一下权限才能修改。由于控制寄存器CR0的第16位若置位1,则表示禁止系统进程写只有只读权限的文件,所以在修改系统调用表sys_call_table之前先将CR0的第16位清零,在修改完后再恢复置位。
代码的close_cr()函数,是将CR0第16位清零,open_cr()函数是将CR0第16位恢复。
最后在卸载modu模块的时候,将系统调用表的内容还原。
#include<linux/init.h>
#include<linux/module.h>
#include<linux/moduleparam.h>
#include<linux/unistd.h>
#include<linux/sched.h>
#include<linux/syscalls.h>
#include<linux/string.h>
#include<linux/fs.h>
#include<linux/fdtable.h>
#include<linux/uaccess.h>

#include<linux/rtc.h>

MODULE_LICENSE("Dual BSD/GPL");

#define _DEBUG
#ifdef _DEBUG
#define kprintk(fmt,args...) printk(KERN_ALERT fmt,##args)
#define kprintf(fmt,args...) printf(fmt,##args)
#define kperror(str) perror(str)
#else
#define kprintk
#define kprintf
#define kperror
#endif

/*Function declaration*/
long * get_sys_call_table(void);
unsigned int close_cr(void);
void open_cr(unsigned int oldval);
void start_hook(void);
asmlinkage long (*orig_open)(char __user *filename, int flags, int mode);

long * g_sys_call_table = NULL; //save address of sys_call_table
long g_old_sys_open = 0; //save old address of sys_open
long g_oldcr0 = 0; //save address of cr0


struct _idtr{  //中断描述符表寄存器
    unsigned short limit;
    unsigned int base;
}__attribute__((packed));

struct _idt_descriptor{
    unsigned short offset_low;
    unsigned short sel;
    unsigned char none,flags;
    unsigned short offset_high;
}__attribute__((packed));

unsigned int close_cr(void){
    unsigned int cr0 = 0;
    unsigned int ret;
    asm volatile("movl %%cr0,%%eax":"=a"(cr0));
    ret = cr0;
    cr0 &= 0xfffeffff;
    asm volatile("movl %%eax,%%cr0"::"a"(cr0));
    return ret;
}

void open_cr(unsigned int oldval){
    asm volatile("movl %%eax,%%cr0"::"a"(oldval));
}

/*Get the address of sys_call_table*/
long * get_sys_call_table(void){ //在idtr寄存器


    struct _idt_descriptor * idt;
    struct _idtr idtr;
    unsigned int sys_call_off;
    int sys_call_table=0;
    unsigned char* p;
    int i;
    asm("sidt %0":"=m"(idtr));  //汇编,sidt指令获得中断描述符表基地址
    kprintk("   address of idtr: 0x%x\n",(unsigned int)&idtr);
    idt=(struct _idt_descriptor *)(idtr.base+8*0x80);  //0x80中断为系统调用中断 这是一个描述符,下面的操作得到描述符指向的具体地址
    sys_call_off=((unsigned int)(idt->offset_high<<16)|(unsigned int)idt->offset_low);
    kprintk("   address of idt 0x80: 0x%x\n",sys_call_off);   //0x80位
    p=(unsigned char *)sys_call_off;
    for(i=0;i<100;i++){
        if(p[i]==0xff&&p[i+1]==0x14&&p[i+2]==0x85){
            sys_call_table=*(int*)((int)p+i+3);
            kprintk("   address of sys_call_table: 0x%x\n",sys_call_table);

            return (long*)sys_call_table;
        }
    }

    return 0;
}

//My own sys_open
asmlinkage long my_sys_open(char * filename, int flags, int mode){ //打印当前使用sys-open函数的进程信息和文件名
    kprintk("The process is \"%s\"(pid is %i)\n",current->comm,current->pid);
    kprintk("The file is being accessed is \"%s\"\n",filename);
    return orig_open(filename,flags,mode);
}

void start_hook(void){ //得到系统调用表地址,寻找sys-open项,替换为my_sys-open,cr0寄存器16位置0,可以写只读项
    g_sys_call_table = get_sys_call_table();
    if(!g_sys_call_table){
        kprintk("Get sys_call_table error!\n");
        return;
    }
    if(g_sys_call_table[__NR_close] != (unsigned long)sys_close){
        kprintk("Incorrect sys_call_table address!\n");
        return;
    }

    g_old_sys_open = g_sys_call_table[__NR_open];
    orig_open = (long(*)(char *, int, int))g_sys_call_table[__NR_open];

    g_oldcr0=close_cr();
    g_sys_call_table[__NR_open] = my_sys_open;
    open_cr(g_oldcr0);
}

int monitor_init(void){   //启动模块
    kprintk("Monitor init\n");
    start_hook();
    return 0;
}

void monitor_exit(void){ //退出模块 恢复系统调用表sys_open函数所在项地址为原sys_open,cr0寄存器16位置1,禁止写只读文件
    if(g_sys_call_table && g_old_sys_open){
        g_oldcr0 = close_cr();
        g_sys_call_table[__NR_open] = g_old_sys_open;
        open_cr(g_oldcr0);
    }
    kprintk("Monitor exit\n");
}

module_init(monitor_init);
module_exit(monitor_exit);
3. Makefile
obj-m += hello.o
#generate the path
CURRENT_PATH:=$(shell pwd)
#the current kernel version number
LINUX_KERNEL:=$(shell uname -r)
#the absolute path
LINUX_KERNEL_PATH:=/usr/src/linux-headers-$(LINUX_KERNEL)
#complie object
all:
    make -C $(LINUX_KERNEL_PATH) M=$(CURRENT_PATH) modules
#clean
clean:
    make -C $(LINUX_KERNEL_PATH) M=$(CURRENT_PATH) clean
obj-m := hello.o
PWD := $(shell pwd)
KVER := $(shell uname -r)
KDIR :=/lib/modules/$(KVER)/build/

all:
    $(MAKE) -C $(KDIR) M=$(PWD)

clean:
    rm -rf *.o *.mod.c *.mod.o *.ko *.symvers *.order *.a
4.加载内核模块,卸载内核模块
通过insmod XX.ko加载模块,rmmod xx.ko卸载模块。
cat /proc/modules查看模块信息,lsmod查看所有的模块。
遇到的问题及解决:
1.编写完makefile 执行Make时报错 nothing to be done for all
原因:这是因为空格和tab的转换问题
比如下面两个make就不一样。

解决:删掉前面的空格,改成tab
2.insmod后ubuntu系统卡死
原因:VMware的问题,换成virtual box就可以正常运行。
实验结果记录:
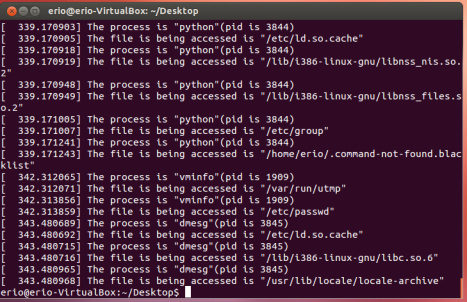
insmod 后dmesg,查看系统日志,可见记录了一些访问文件的进程名,id和文件名,于是实现了文件监控


 浙公网安备 33010602011771号