
JavaConcurrencyInPractice-线程池的使用
1、摘要
线程池的使用使得任务的提交与执行解耦开来,但是,线程池可以执行所有任务吗?
答案是——不能,线程池中封装了任务的执行策略,提供了几种执行策略的实现,
但是,不是所有的任务都能由这些策略来执行的:
1、依赖性任务,任务的执行依赖其他任务。
2、使用线程封闭机制的任务,用支持多线程的线程池来执行线程封闭的任务会失去并发安全性。
3、对响应时间敏感的任务,线程池中的线程数目太少,会限制响应速率。
4、使用了ThreadLocal的任务,线程池中的线程会被新线程替换掉(出故障消亡时),这是ThreadLocal中保存的信息会被丢失。
在一些任务中,需要拥有或排除某些特定的执行策略。
如果某些任务依赖于线程池中执行的其他任务,就要求线程池足够的大,从而确保不会发生死锁。
线程封闭的任务需要串行执行。
将这些需求写入文档,防止代码的维护人员因为使用了某种不合适的执行策略而导致问题。
2、线程池的大小
饥饿死锁:任务间有依赖关系,依赖任务不能得到执行,导致死锁。
解决办法:提升线程池中线程的数量。(治标不治本)
线程池大小过大,造成资源消耗;过小,资源利用率不高,且可能会发生活跃性问题。
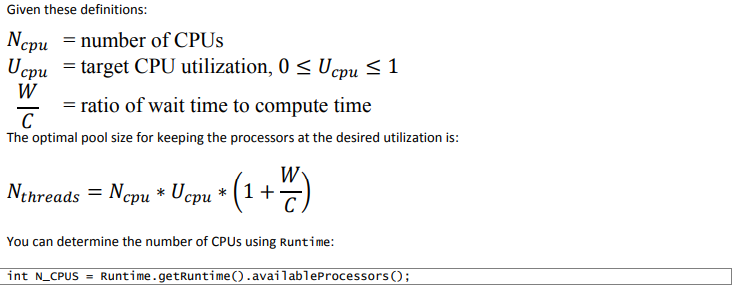
设置线程池的大小需要考虑:
CPU数量,内存大小,任务类型(IO或计算密集型),任务是否需要稀缺资源,
对于计算密集型任务,在有N个CPU的机器上,N+1大小的线程池通常最为适宜。
对于包含IO密集型的任务,线程池的大小应该更大。
2、配置线程池
Executors中提供了许多的现有的线程池的实现,我们也可以使用ThreadPoolExecutor来定制自己的线程池。
定制自己的线程池之前,先了解一下线程池的工作机制:
线程池中包含了一定数量的线程。这些线程不断地执行从任务队列中取出的任务。
在请求到达速率超过了线程池的处理速率时,任务会在一个Runnable队列中等待。
ThreadPoolExecutor提供了一个BlockingQueue来保存任务,可以有三种排队方法:
1、有界队列 2、无界队列 3、同步移交
在任务队列满了时:
饱和策略将用来决定如何处理新提交的任务。
可以通过setRejectedExecutionHandler来修改饱和策略。
标准的Executor都有几种不同的饱和策略:
AbortPolicy:继续提交任务时,将抛出RejectedExecutionException异常,调用者可以捕获该异常。
CallerRunsPolicy:任务会被分配到调用者线程中执行。调用者线程在执行期间不能继续提交任务。
DiscardPolicy:丢弃提交的任务。
DiscardOldestPolicy:丢弃最先提交的任务。
限制任务提交速率:
即,限制任务提交数量,在任务队列满时,提交操作阻塞。——使用Semaphore
/**
* 使用Semaphore来限制任务的提交速率
* 在任务队列满时,提交操作阻塞
*/
@ThreadSafe
public class BoundedExecutor {
     private final Executor exec;
     private final Semaphore semaphore;
     //bound为最多能够提交的数量
     public BoundedExecutor(Executor exec, int bound) {
         this.exec = exec;
         this.semaphore = new Semaphore(bound);
     }

     public void submitTask(final Runnable command)  throws InterruptedException {
         semaphore.acquire();
         try {
             exec.execute(new Runnable() {
                 public void run() {
                     try {
                         command.run();
                     } finally {
                         semaphore.release();
                     }
                 }
             });
         } catch (RejectedExecutionException e) {
             semaphore.release();
         }
     }
}
3、在线程池中创建线程
每当线程池需要创建线程时,都是通过线程工厂方法来完成的。线程工厂方法返回一个线程对象。
可以实现ThreadFactory接口来定义自己的线程工厂,并将其用于线程池。
/**
* 继承Thread,扩展实现线程生命周期的日志记录及绑定未检查异常处理器
*/
public class MyAppThread extends Thread {
     public static final String DEFAULT_NAME = "MyAppThread";
     private static volatile boolean debugLifecycle = false;
     private static final AtomicInteger created = new AtomicInteger();
     private static final AtomicInteger alive = new AtomicInteger();
     private static final Logger log = Logger.getAnonymousLogger();
     public MyAppThread(Runnable r) { this(r, DEFAULT_NAME); }
     public MyAppThread(Runnable runnable, String name) {
         super(runnable, name + "-" + created.incrementAndGet());
         setUncaughtExceptionHandler( new Thread.UncaughtExceptionHandler() {
             public void uncaughtException(Thread t,  Throwable e) {
                 log.log(Level.SEVERE,  "UNCAUGHT in thread " + t.getName(), e);
             }
         });
     }

     public void run() {
         // Copy debug flag to ensure consistent value throughout.
         boolean debug = debugLifecycle;
         if (debug) log.log(Level.FINE, "Created "+getName());
         try {
             alive.incrementAndGet();
             super.run();
         } finally {
             alive.decrementAndGet();
             if (debug) log.log(Level.FINE, "Exiting "+getName());
         }
     }
     public static int getThreadsCreated() { return created.get(); }
     public static int getThreadsAlive() { return alive.get(); }
     public static boolean getDebug() { return debugLifecycle; }
     public static void setDebug(boolean b) { debugLifecycle = b; }
}

/**
* 实现ThreadFactory 接口,返回自定义的线程实现
*/
public class MyThreadFactory implements ThreadFactory {
     private final String poolName;
     public MyThreadFactory(String poolName) {
         this.poolName = poolName;
     }
     public Thread newThread(Runnable runnable) {
         return new MyAppThread(runnable, poolName);
     }
}
4、扩展ThreadPoolExecutor
可以重写beforeExecute、afterExecute和terminated方法来扩展ThreadPoolExecutor的功能。
/**
* 覆写beforeExecute、afterExecute、terminated方法来扩展ThreadPoolExecutor
* 添加了任务执行前,执行后以及线程池关闭时的日志记录
*/
public class TimingThreadPool extends ThreadPoolExecutor {
     private final ThreadLocal<Long> startTime = new ThreadLocal<Long>();
     private final Logger log = Logger.getLogger("TimingThreadPool");
     private final AtomicLong numTasks = new AtomicLong();
     private final AtomicLong totalTime = new AtomicLong();

     protected void beforeExecute(Thread t, Runnable r) {
         super.beforeExecute(t, r);
         log.fine(String.format("Thread %s: start %s", t, r));
         startTime.set(System.nanoTime());
     }

     protected void afterExecute(Runnable r, Throwable t) {
         try {
             long endTime = System.nanoTime();
             long taskTime = endTime - startTime.get();
             numTasks.incrementAndGet();
             totalTime.addAndGet(taskTime);
             log.fine(String.format("Thread %s: end %s, time=%dns", t, r, taskTime));
         } finally {
             super.afterExecute(r, t);
         }
     }

     protected void terminated() {
         try {
             log.info(String.format("Terminated: avg time=%dns", totalTime.get() / numTasks.get()));
         } finally {
             super.terminated();
         }
     }
}
5、递归算法并行化
在循环中进行的计算或IO操作,只要每次迭代时相互独立的,就可以将串行计算转换为并行计算,
而不用等待计算完毕后再进行下一轮迭代。
void processSequentially(List<Element> elements) {
     for (Element e : elements)
         process(e);
}
// 每次迭代独立,则可以转换为并行
void processInParallel(Executor exec, List<Element> elements) {
     for (final Element e : elements)
         exec.execute(new Runnable() {
             public void run() { process(e); }
         });
}
这非常适合于递归算法,尤其是在进入下一层时需要对当前层进行计算的递归算法。
/**
* 将枚举并记录节点信息的递归算法改为并行
*/
public<T> void sequentialRecursive(List<Node<T>> nodes, Collection<T> results) {
     for (Node<T> n : nodes) {
         results.add(n.compute());     //计算不需要串行,可以并行处理
         sequentialRecursive(n.getChildren(), results);    //遍历过程有顺序要求,需要串行
     }
}
public<T> void parallelRecursive(final Executor exec,  List<Node<T>> nodes,  final Collection<T> results) {
     for (final Node<T> n : nodes) {
         exec.execute(new Runnable() {
             public void run() {
                 results.add(n.compute());
             }
         });
         parallelRecursive(exec, n.getChildren(), results);
     }
}

 浙公网安备 33010602011771号