Spring retry实践
在开发中,重试是一个经常使用的手段。比如MQ发送消息失败,会采取重试手段,比如工程中使用RPC请求外部服务,可能因为网络波动出现超时而采取重试手段......可以看见重试操作是非常常见的一种处理问题,系统设计的手段。
在普通的开发中,我们用while条件也能达到重试,但开发量大,代码不好维护,容易出现死循环等,今天来试一下spring retry这个专门的重试框架.先来个简单介绍

然后我们快速开始:
1.先引入jar
<dependency>
<groupId>org.springframework.retry</groupId>
<artifactId>spring-retry</artifactId>
</dependency>
2.定义一个service
package com.lpc.myboot.service.impl;
import java.util.Date;
import org.slf4j.Logger;
import org.slf4j.LoggerFactory;
import org.springframework.retry.annotation.Backoff;
import org.springframework.retry.annotation.EnableRetry;
import org.springframework.retry.annotation.Recover;
import org.springframework.retry.annotation.Retryable;
import org.springframework.stereotype.Service;
@EnableRetry
@Service
public class RetryService {
private static final Logger logger = LoggerFactory.getLogger(RetryService.class);
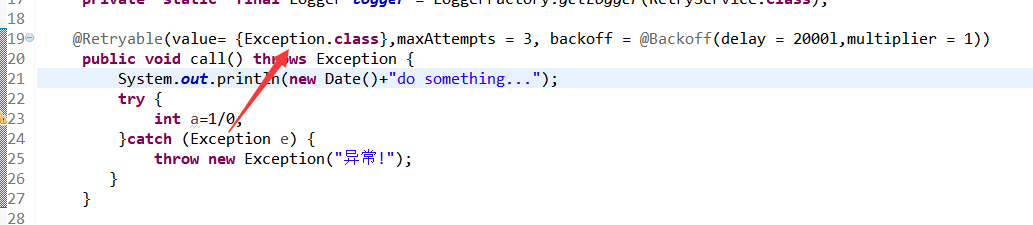
@Retryable(value= {Exception.class},maxAttempts = 3, backoff = @Backoff(delay = 2000l,multiplier = 1))
public void call() throws Exception {
System.out.println(new Date()+"do something...");
try {
int a=1/0;
}catch (Exception e) {
throw new Exception("异常!");
}
}
@Recover
public void recover(Exception e) {
System.out.println("方法调用失败兜底进入兜底操作!");
logger.info(e.getMessage());
}
}
其中@EnableRetry表示能否重试,
@Retryable表示重试的方法,
include 指定处理的异常类。默认为空, 当exclude也为空时,所有异常都重试
exclude指定不需要处理的异常。默认为空 ,当include也为空时,所有异常都重试
vaue指定要重试的异常。默认为空
maxAttempts 最大重试次数。默认3次
backoff 重试等待策略。默认使用@Backoff注解
@Backoff:重试回退策略(立即重试还是等待一会再重试)
不设置参数时,默认使用FixedBackOffPolicy,重试等待1000ms
只设置delay()属性时,使用FixedBackOffPolicy,重试等待指定的毫秒数
当设置delay()和maxDealy()属性时,重试等待在这两个值之间均态分布
使用delay(),maxDealy()和multiplier()属性时,使用ExponentialBackOffPolicy
当设置multiplier()属性不等于0时,同时也设置了random()属性时,使用ExponentialRandomBackOffPolicy
multiplier:指定延迟的倍数,比如delay=5000l,multiplier=2时,第一次重试为5秒后,第二次为10秒,第三次为20秒
@Recover: 用于方法。用于@Retryable失败时的“兜底”处理方法。 @Recover注释的方法必须要与@Retryable注解的方法“签名”保持一致,第一入参为要重试的异常,其他参数与@Retryable保持一致,返回值也要一样,否则无法执行
@CircuitBreaker:用于方法,实现熔断模式。
include 指定处理的异常类。默认为空
exclude指定不需要处理的异常。默认为空
vaue指定要重试的异常。默认为空
maxAttempts 最大重试次数。默认3次
openTimeout 配置熔断器打开的超时时间,默认5s,当超过openTimeout之后熔断器电路变成半打开状态(只要有一次重试成功,则闭合电路)
resetTimeout 配置熔断器重新闭合的超时时间,默认20s,超过这个时间断路器关闭
此注解解释参考:https://blog.csdn.net/u011116672/article/details/77823867?utm_source=copy
此时代码逻辑就完成了,是不是很简单,我们来运行下看看

可以看到2S执行一次操作,最后进入了失败兜底操作,是可以按照配置重试的,我们来说说几个问题
1.重试的方法必须有异常抛出去,并且抛出去的异常与value中定义的一样;
2. @Recover标注的方法必须是void,不能有返回值
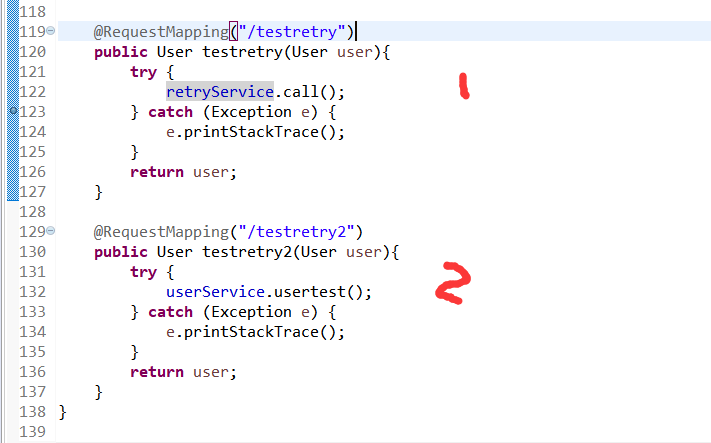
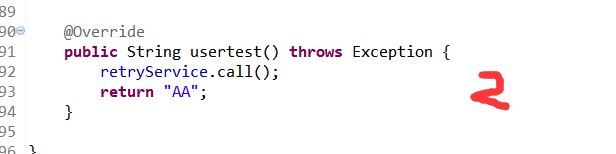
3.重试的service必须在其它service或者controller里才能调用,在本service方法中是不能被调用的,调用了也不会产生重试的效果,
下图是2种调用效果,因此重试的方法必须单独写成一个service;
至此就完成了,我们再来看看普通开发中是怎么用的
public class Test1 {
public static Boolean vpmsRetryCoupon(final String userId) {
// 构建重试模板实例
RetryTemplate retryTemplate = new RetryTemplate();
// 设置重试策略,主要设置重试次数
SimpleRetryPolicy policy = new SimpleRetryPolicy(10, Collections.<Class<? extends Throwable>, Boolean>singletonMap(Exception.class, true));
// 设置重试回退操作策略,主要设置重试间隔时间
FixedBackOffPolicy fixedBackOffPolicy = new FixedBackOffPolicy(); fixedBackOffPolicy.setBackOffPeriod(100);
retryTemplate.setRetryPolicy(policy); retryTemplate.setBackOffPolicy(fixedBackOffPolicy);
// 通过RetryCallback 重试回调实例包装正常逻辑逻辑,第一次执行和重试执行执行的都是这段逻辑
final RetryCallback<Object, Exception> retryCallback = new RetryCallback<Object, Exception>() {
//RetryContext 重试操作上下文约定,统一spring-try包装
public Object doWithRetry(RetryContext context) throws Exception {
boolean result = pushCouponByVpmsaa(userId);
if (!result) {
throw new RuntimeException();
//这个点特别注意,重试的根源通过Exception返回
} return true;
}
};
// 通过RecoveryCallback 重试流程正常结束或者达到重试上限后的退出恢复操作实例
final RecoveryCallback<Object> recoveryCallback = new RecoveryCallback<Object>() {
public Object recover(RetryContext context) throws Exception {
// logger.info("正在重试发券::::::::::::"+userId);
return null;
}
};
try {
// 由retryTemplate 执行execute方法开始逻辑执行
retryTemplate.execute(retryCallback, recoveryCallback);
} catch (Exception e) {
// logger.info("发券错误异常========"+e.getMessage());
e.printStackTrace();
}
return true;
}
public static void main(String[] args) {
vpmsRetryCoupon("43333");
}
public static Boolean pushCouponByVpmsaa(String userId) {
Random random = new Random();
int a = random.nextInt(10);
System.out.println("a是" + a);
if (a == 8) {
return true;
}else {
return false;
}
}
}
这样用起来非常繁琐,所以我们一般都用注解的方式来实现
参考文章:
https://blog.csdn.net/songhaifengshuaige/article/details/79441326 原理解析
https://www.cnblogs.com/EasonJim/p/7684649.html
https://blog.csdn.net/u012731081/article/details/78892897 原理解析
https://blog.csdn.net/u011116672/article/details/77823867

 浙公网安备 33010602011771号