


spring学习之一概念
概念
1、是开源的轻量级框架
2、是一站式框架,就是说在java ee的三层结构中,每一层它都提供了不同的解决技术
web层:springMVC
servoce层:spring IOC ,控制反转,通过配置的方式来创建bean对象
dao层:spring的jdbcTemplate
3、包含两大核心部分
(1)aop: 面向切面编程,相对于传统的纵向继承方式扩展功能,这种方式不需修改源代码就可以做到扩展,主要用于事务管理
(2) ioc : 控制反转,配置文件来实现创建对象
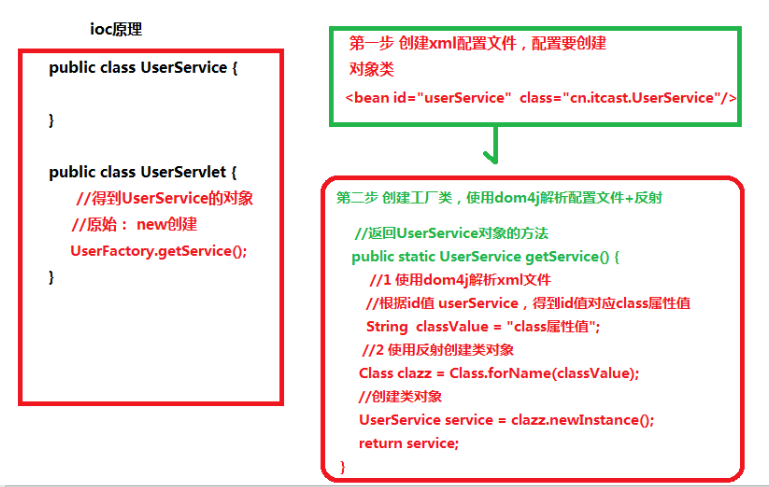
Ioc实现原理
这个技术的目的很简单,就是从配置文件中读出想要类名字串,利用反射来创建出他的实例,原理如下图
所需jar包 为4个核心的包
--- spring-beans-4.2.4.RELEASE.jar
--- spring-context-4.2.4.RELEASE.jar
--- spring-core-4.2.4.RELEASE.jar
--- spring-expression-4.2.4.RELEASE.jar
ioc的两种创建类的方式
(1)配置文件创建
(2)注解方式
-- 配置文件方式
第一步 创建配置文件,文件名与位置不固定,建议放在src下面,名字与源代码中默认文件名相同applicationContext.xml
第二步 在配置文件中引入schema约束文件
<?xml version="1.0" encoding="UTF-8"?>
<beans xmlns="http://www.springframework.org/schema/beans"
    xmlns:mvc="http://www.springframework.org/schema/mvc"
    xmlns:tx="http://www.springframework.org/schema/tx"
    xmlns:aop="http://www.springframework.org/schema/aop"
    xmlns:context="http://www.springframework.org/schema/context"
    xmlns:xsi="http://www.w3.org/2001/XMLSchema-instance"
    xsi:schemaLocation="
            http://www.springframework.org/schema/beans
            http://www.springframework.org/schema/beans/spring-beans.xsd
            http://www.springframework.org/schema/context
            http://www.springframework.org/schema/context/spring-context.xsd
            http://www.springframework.org/schema/mvc
            http://www.springframework.org/schema/mvc/spring-mvc.xsd
            http://www.springframework.org/schema/tx
            http://www.springframework.org/schema/tx/spring-tx.xsd
            http://www.springframework.org/schema/aop
            http://www.springframework.org/schema/aop/spring-aop.xsd "
    default-autowire="byName">
</beans>
第三步,配置需要创建的类
<?xml version="1.0" encoding="UTF-8"?>
<beans xmlns="http://www.springframework.org/schema/beans"
    xmlns:mvc="http://www.springframework.org/schema/mvc"
    xmlns:tx="http://www.springframework.org/schema/tx"
    xmlns:aop="http://www.springframework.org/schema/aop"
    xmlns:context="http://www.springframework.org/schema/context"
    xmlns:xsi="http://www.w3.org/2001/XMLSchema-instance"
    xsi:schemaLocation="
            http://www.springframework.org/schema/beans
            http://www.springframework.org/schema/beans/spring-beans.xsd
            http://www.springframework.org/schema/context
            http://www.springframework.org/schema/context/spring-context.xsd
            http://www.springframework.org/schema/mvc
            http://www.springframework.org/schema/mvc/spring-mvc.xsd
            http://www.springframework.org/schema/tx
            http://www.springframework.org/schema/tx/spring-tx.xsd
            http://www.springframework.org/schema/aop
            http://www.springframework.org/schema/aop/spring-aop.xsd "
    default-autowire="byName">
    //ioc配置
    <bean id = "user" class="cn.blueto.com.User"></bean>
</beans>
第四步, 引用对象
//加载配置文件
ApplicationContext c = new ClassPathXmlApplicationContext("applicationContext.xml");
//根据配置文件中的对象id取出
User user=c.getBean("user");
在这里值得注意的是,bean标签里有几种属性需要记住
1)id 表示对象的id,被引用时可填Id
2) class 创建对象所在的类的路径
3) name 与id效果一样,为了兼容之前的版本而保留,建议不使用
4)scope 表示范围,取值有
-singleton 默认值就是单例,表示全局只能创建一个实例
-prototype 多例,可创建多个实例
-request 创建对象放在request域里
-session 放在session域里
-gloabSession 放在globalSession里
----属性注入
就是给对象中的属性赋值,先看bean的定义
public class User{
       private String name;
      //有参数构造方式注入属性
       public User(String n){
             name = n;
       }
       //属性
       public void setName(String name){
              this.name=name;
       }
}
配置文件中写法
<bean id="user" class="package.user">
     //有参构造方式注入
     <constructor-arg name= "name", value="叫啥名好呢"></constructor-arg>
</bean>
setter方式注入
<bean id="user" class="package.user">
     <property name= "name", value="叫啥名好呢"></property>
</bean>
注入复杂对象写法
public class User{
       private String name;
       private Logininfo  login;

       //复杂对象属性
       public void setLogininfo(Logininfo n){
             login= n;
       }
       //属性
       public void setName(String name){
              this.name=name;
       }
}
复杂对象注入的配置文件中写法
<bean id="user" class="package.user">
     <property name= "login", ref="login"></property> //ref引用其他beab对象的id
</bean>
<bean id="login" class="package.Logininfo"></bean>
数组等对象注入
public class User{
       private String[] arrs;
       private List list;
       private Map map;
       private Properties properties;
       //setter方法
           。。。
}
<bean id="user" class="package.user">
     <property name= "arrs">
             <list>
                     <value>1</value>
                     <value>2</value>
                     <value>3</value>
             </list>
     </property>
     <property name= "list">
             <list>
                     <value>a</value>
                     <value>b</value>
                     <value>c</value>
             </list>
     </property>
     <property name= "map">
             <map>
                     <entry key ="a1" value="adfdf"></entry>
                     <entry key ="a2" value="adfdf"></entry>
                     <entry key ="a3" value="adfdf"></entry>
             </map>
     </property>
    <property name= "properties">
             <props>
                     <prop key ="driverClass">com.xxx.jdbc.Driver</prop>
                     <entry key ="passwd">123456</entry>
                     <entry key ="user">addd</entry>
             </props>
     </property>
</bean>
-- 注解方式创建对象
与上一种方式相比 ,使用注解方式的配置则简单多了
配置文件中写法
<beans xmlns="...">
        <!-- 开户注解扫描
           到指定包里扫描类,方法及属性上面是否有注解,指定包如果有多个,可用逗号分隔开,如果写成它的父包名字,则指包含父包下所有类
        -->
        <context:componet-scan base-package="cn.blueto"></context:componet-scan>
<!-- 开户注解扫描
           只扫描属性上面是否有注解
        -->
        <context:annotation-config></context:annotation-config>

</bean>
java类中写法
@Component(value="user")
@Scope(value="prototype")
public class User{
       private String name;
      //有参数构造方式注入属性
       public User(String n){
             name = n;
       }
       //属性
       public void setName(String name){
              this.name=name;
       }
}
取得实例
//加载配置文件
ApplicationContext c = new ClassPathXmlApplicationContext("applicationContext.xml");
//根据配置文件中的对象id取出
User user=c.getBean("user");
spring中的创建对象的4个注解
-@Component
-@Controller web层
-@Service 业务层
-@Repository 持久层,数据库操作层
目前四个注解都是一样的效果,只是创建对象而已
spring中的注入属性
-@Autowired 根据类名找到对象的实现类并创建,再注入到属性中
-@Resource 注入指定类的实例到属性中,@Resource(name="beanid")
Spring 加载配置文件原理
ioc原理是在服务加载配置文件后,创建配置文件中的bean对象,也就是执行这段代码:
//加载配置文件
ApplicationContext c = new ClassPathXmlApplicationContext("applicationContext.xml");
//根据配置文件中的对象id取出
//User user=c.getBean("user");
那服务启动后,在什么时候开始加载配置呢?它的加载过程是这样的
--服务器启动时,为每个web项目创建一个servletContext对象,当监听器监听到ServletContext对象创建后,开始加载配置文件,默认文件为applicationContext.xml
--把创建的各个bean对象通过setAttribute方法存到servletContext域里
--取对象时通过getAttribute得到
Spring中已经封装好了监听器并加载配置文件的方法,如果想要在服务启动后自动加载配置文件,只需要在web.xml文件中作如下配置即可
//配置监听器
<listener>
        <listener-class>org.springframework.web.context.ContextLoaderListener</listener-class>
</listener>

//配置指定加载的配置文件,如果 不配置,则去Src下面找默认的applicationContext.xml
<context-param>
        <param-name>contextConfigLocation</param-name>
        <param-value>classpath:bean.xml</param-value>     //如在src下直接写,如不在则要加包名路径
</context-param>

 浙公网安备 33010602011771号