

cc2530单片机的第一次实验,流水灯
第一个实验:控制流水灯
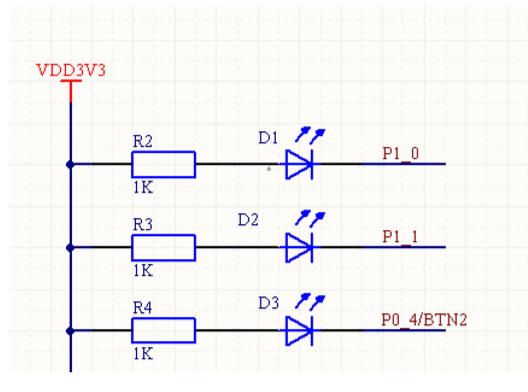
P1_0,P1_1,P0_4都连接在发光二极管的负极,所以,当这三个引脚为低电平,也就是0的时候,相应的发光二极管才会亮。
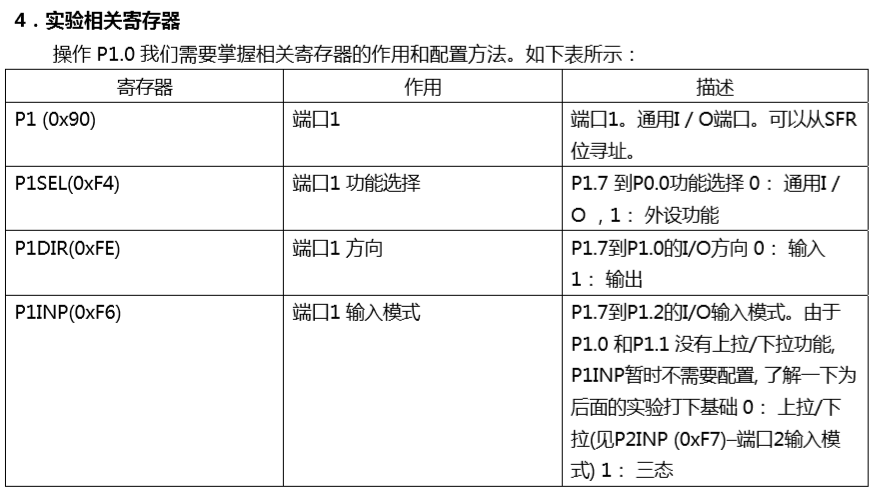
其实这里可以稍微的关注一下寄存器的地址,然后,编程的时候可以尝试操作一下!
控制发光二极管的步骤
graph TD
id1[设置相应的引脚为通用口也就是设置PnSEL寄存器]
id2[设置相应的引脚为输出也就是设置PnDIR寄存器]
id4[设置相应引脚的值也就是设置P1_0 P1_1 P0_4的值]
id1-->id2
id2-->id4
初始化
//置零用&=,置一用|=
P1SEL&=~0x03;                 //设置P1_1和P1_0为通用接口  1111 1100
P0SEL&=~0x10;                 //设置P0_4为通用接口  1110 1111
P1DIR|=0x03;                  //设置P1_0与P1_1为输出  0000 0011
P0DIR|=0x10;                   //设置P0_4为输出        0001 0000

//设置123灯全为灭
P1_0=1;
P1_1=1;
P0_4=1;
延时函数
void Delay(uint n)
{
uint i;
for(i = 0;i<n;i++);
for(i = 0;i<n;i++);
for(i = 0;i<n;i++);
for(i = 0;i<n;i++);
for(i = 0;i<n;i++);
}
全部代码
#include <ioCC2530.h>
#define uint unsigned int
#define uchar unsigned char //定义控制灯的端口
#define LED1 P1_0 //定义LED1 为P10 口控制
#define LED2 P1_1 //定义LED2 为P11 口控制
#define LED3 P0_4 //定义LED3 为P04 口控制

//延时 *****************************/
void Delay(uint n)
{
uint i;
for(i = 0;i<n;i++);
for(i = 0;i<n;i++);
for(i = 0;i<n;i++);
for(i = 0;i<n;i++);
for(i = 0;i<n;i++);
}


//初始化IO 口程序 *****************************/
void InitIO(void)
{

    //置零用&=,置一用|=
     P1SEL&=~0x03;                 //设置P1_1和P1_0为通用接口  1111 1100
     P0SEL&=~0x10;                 //设置P0_4为通用接口  1110 1111
     P1DIR|=0x03;                  //设置P1_0与P1_1为输出  0000 0011
     P0DIR|=0x10;                   //设置P0_4为输出        0001 0000
     //设置123灯全为灭
     P1_0=1;
     P1_1=1;
     P0_4=1;

}


//主函数 ***************************/

void main(void)
{
  InitIO();
  while(1)
  {
    LED1=!LED1;
    Delay(10000);
    LED2=!LED2;
    Delay(10000);
    LED3=!LED3;
    Delay(10000);
  }

}
心得
通过这个实验,应该记住初始化的流程,以及那几个寄存器的用途

 浙公网安备 33010602011771号