CentOS7.x安装kickstart
kickstart简介
kickstartkickstart是RedHat公司开源的软件,所以对CentOS兼容性最好,是一种无人值守的安装方式就是将手动安装配置的步骤,记录到文件中,然后通过kickstart安装系统时,读取写好的配置文件即可。
cobbler时kickstart升级版,通过将kickstart所有的组件封装,简化了使用者的使用难度,而且添加了web页面,只要简单配置
PXE说明
PXE,全名Pre-boot Execution Environment,预启动执行环境;
通过网络接口启动计算机,不依赖本地存储设备(如硬盘)或本地已安装的操作系统;
由Intel和Systemsoft公司于1999年9月20日公布的技术;
客户端/Server的工作模式;
PXE客户端会调用网际协议(IP)、用户数据报协议(UDP)、动态主机设定协议(DHCP)、小型文件传输协议(TFTP)等网络协议;
PXE客户端(客户端)这个术语是指机器在PXE启动过程中的角色。一个PXE客户端可以是一台服务器、笔记本电脑或者其他装有PXE启动代码的机器(我们电脑的网卡)
pxe工作过程
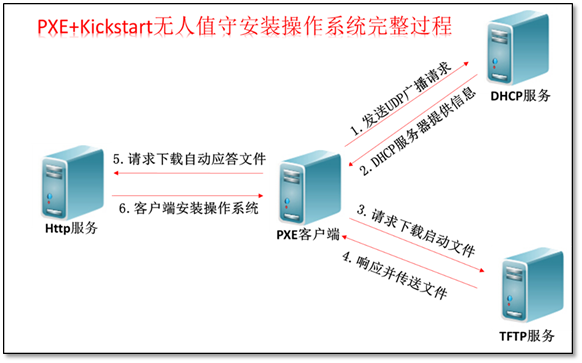
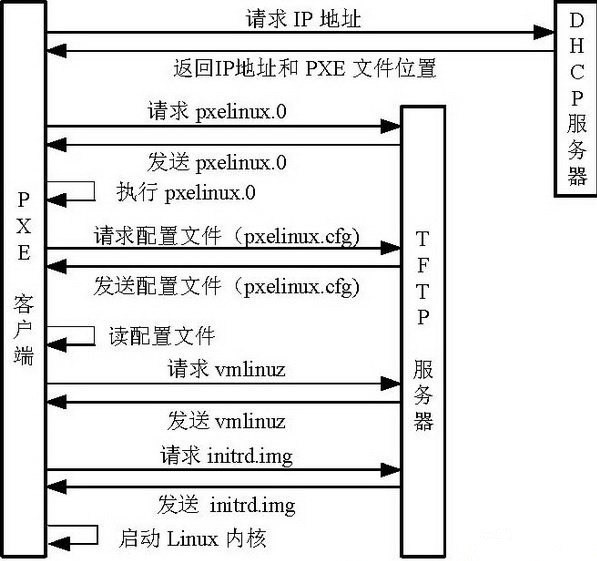
PXE Client向DHCP发送请求
PXE Client从自己的PXE网卡启动,通过PXE BootROM(自启动芯片)会以UDP(简单用户数据报协议)发送一个广播请求,向本网络中的DHCP服务器索取IP。
DHCP服务器提供信息
DHCP服务器收到客户端的请求,验证是否来至合法的PXE Client的请求,验证通过它将给客户端一个“提供”响应,这个“提供”响应中包含了为客户端分配的IP地址、pxelinux启动程序(TFTP)位置,以及配置文件所在位置。
PXE客户端请求下载启动文件
客户端收到服务器的“回应”后,会回应一个帧,以请求传送启动所需文件。这些启动文件包括:pxelinux.0、pxelinux.cfg/default、vmlinuz、initrd.img等文件。
Boot Server响应客户端请求并传送文件
当服务器收到客户端的请求后,他们之间之后将有更多的信息在客户端与服务器之间作应答, 用以决定启动参数。BootROM由TFTP通讯协议从Boot Server下载启动安装程序所必须的文件(pxelinux.0、pxelinux.cfg/default)。default文件下载完成后,会根据该文件中定义的引导顺序,启动Linux安装程序的引导内核。
请求下载自动应答文件
客户端通过pxelinux.cfg/default文件成功的引导Linux安装内核后,安装程序首先必须确定你通过什么安装介质来安装linux,如果是通过网络安装(NFS, FTP, HTTP),则会在这个时候初始化网络,并定位安装源位置。接着会读取default文件中指定的自动应答文件ks.cfg所在位置,根据该位置请求下载该文件。
这里有个问题,在第2步和第5步初始化2次网络了,这是由于PXE获取的是安装用的内核以及安装程序等,而安装程序要获取的是安装系统所需的二进制包以及配置文件。因此PXE模块和安装程序是相对独立的,PXE的网络配置并不能传递给安装程序,从而进行两次获取IP地址过程,但IP地址在DHCP的租期内是一样的。
客户端安装操作系统
将ks.cfg文件下载回来后,通过该文件找到OS Server,并按照该文件的配置请求下载安装过程需要的软件包。
OS Server和客户端建立连接后,将开始传输软件包,客户端将开始安装操作系统。安装完成后,将提示重新引导计算机。
系统环境准备
# cat /etc/centos-release
CentOS Linux release 7.6.1810 (Core)
# uname -r
3.10.0-957.el7.x86_64
# getenforce
Disabled
# systemctl status firewalld.service
● firewalld.service - firewalld - dynamic firewall daemon
Loaded: loaded (/usr/lib/systemd/system/firewalld.service; disabled; vendor preset: enabled)
Active: inactive (dead)
Docs: man:firewalld(1)
# hostname
template
# hostname -I
10.0.0.100 192.168.1.100
注:注意局域网内不要有其他的DHCP服务存在,vmware等一定要关闭DHCP服务。
安装kickstart
# yum -y install dhcp tftp-server xinetd syslinux
# yum -y install nginx #可以自己编译,也可以yum安装。
注:开启一个端口用此命令监控pxe工作时的部分状态,
# tail -f /var/log/messages
注:下面介绍的安装按照pxe服务启动,配置开始。
修改DHCP配置
由于dhcp配置文件没有所以复制一份精简的dhcp配置文件。
# egrep -v '^$|^#' /usr/share/doc/dhcp-4.2.5/dhcpd.conf.example > /etc/dhcp/dhcpd.conf
# vim /etc/dhcp/dhcpd.conf
option domain-name "example.org";
option domain-name-servers ns1.example.org;
default-lease-time 600;
max-lease-time 7200;
log-facility local7;
# 下边这段添加在第一个subnet的大括号内
subnet 10.0.0.0 netmask 255.255.255.0 {
range 10.0.0.200 10.0.0.230; # 可分配的起始IP-结束IP
option subnet-mask 255.255.255 # 设定netmask.0;
default-lease-time 21600; # 设置默认的IP租用期限
max-lease-time 43200; # 设置最大的IP租用期限
next-server 10.0.0.100; # 客户端TFTP服务器的ip 这里不指定,会找不到tftp文件报错为 arp timeout
filename "/pxelinux.0"; # 告知客户端从TFTP根目录下载
}
......
# netstat -antup|grep dhcp
udp 0 0 0.0.0.0:67 0.0.0.0:* 10208/dhcpd
注:后边保持默认,有兴趣可以参考man dhcp解释说明。
注:有时候发现启动不了,删除多余的subnet字段即可,以及地址池所有的IP是不是已经都分完了,尽量将机器配置成静态IP,DHCP也不适合后台永久开启。
注:指定监听端口参考,# cat /etc/sysconfig/dhcpd
修改tftp配置,
注:CentOS7默认不安装xinetd服务,所以一定要安装
# vim /etc/xinetd.d/tftp
# default: off
# description: The tftp server serves files using the trivial file transfer \
# protocol. The tftp protocol is often used to boot diskless \
# workstations, download configuration files to network-aware printers, \
# and to start the installation process for some operating systems.
service tftp
{
socket_type = dgram
protocol = udp
wait = yes
user = root
server = /usr/sbin/in.tftpd
server_args = -s /var/lib/tftpboot # 指定目录,保持默认,不用修改
disable = no # 由原来的yes改为no
per_source = 11
cps = 100 2
flags = IPv4
}
这里编译安装nginx
注:解压nginx压缩包,进入到解压目录
./configure --prefix=/date/application/nginx-1.14.2 --user=nginx --group=nginx --with-http_stub_status_module --with-http_ssl_module
# vim /date/application/nginx/conf/nginx.conf
worker_processes 1;
events {
worker_connections 1024;
}
http {
include mime.types;
default_type application/octet-stream;
sendfile on;
keepalive_timeout 65;
server {
listen 80;
server_name localhost;
location / {
autoindex on; #打开目录浏览功能
autoindex_exact_size off; # off:以可读的方式显示文件大小
autoindex_localtime on; # on、off:是否以服务器的文件时间作为显示的时间
charset utf-8,gbk; #展示中文文件名
root html/centos7-os; #将centos7的镜像放入此位置
index index.html index.htm;
}
error_page 500 502 503 504 /50x.html;
location = /50x.html {
root html;
}
}
}
# mkdir -p /date/application/nginx/html/centos7-os #镜像放在此处。
# mount /dev/cdrom /date/application/nginx/html/centos7-os 挂在镜像,如果没有也可以用cp复制。
注:只要把安装光盘内容能通过web发布即可。因为是演示,如果复制镜像就有点浪费时间。但生产环境就一定要复制了,光盘读取速度有限

配置pxe引导程序
安装的syslinux就是一个强大的引导加载程序,而且兼容各种介质。
# yum install syslinux -y
# cp /usr/share/syslinux/pxelinux.0 /var/lib/tftpboot/
# 复制启动菜单程序文件
# cp -a /date/application/nginx/html/centos7-os /isolinux/* /var/lib/tftpboot/
# pwd
/var/lib/tftpboot
# ll -h
总用量 57M
-r--r--r-- 1 root root 2.0K 3月 20 23:14 boot.cat
-rw-r--r-- 1 root root 84 3月 20 23:14 boot.msg
-rw-r--r-- 1 root root 281 3月 20 23:14 grub.conf
-rw-r--r-- 1 root root 51M 3月 20 23:14 initrd.img
-rw-r--r-- 1 root root 24K 3月 20 23:14 isolinux.bin
-rw-r--r-- 1 root root 3.0K 3月 20 23:14 isolinux.cfg
-rw-r--r-- 1 root root 187K 3月 20 23:14 memtest
-rw-r--r-- 1 root root 27K 3月 20 23:09 pxelinux.0
-rw-r--r-- 1 root root 186 3月 20 23:14 splash.png
-r--r--r-- 1 root root 2.2K 3月 20 23:14 TRANS.TBL
-rw-r--r-- 1 root root 150K 3月 20 23:14 vesamenu.c32
-rwxr-xr-x 1 root root 6.4M 3月 20 23:14 vmlinuz
# 新建一个pxelinux.cfg目录,存放客户端的配置文件。
# mkdir -p /var/lib/tftpboot/pxelinux.cfg
# cp /date/mirrors/centos7-os/isolinux/isolinux.cfg /var/lib/tftpboot/pxelinux.cfg/default
注:配置到这里基本上就实现了,pxe网络引导的部分,可以通过pxe测试,本人的配置不知道哪里出错,导致网络安装失败,有大佬可以提示一下,报错原因是启动iscsi启动失败。
注:注意default文件不配置的话,就是网络安装系统,更改后就会无人值守安装了。
配置无人值守关键部分,及调整ks文件。
# vim /var/lib/tftpboot/pxelinux.cfg/default
default centos7 #默认加载菜单,指向的时下边的label
promet 0 # 开启会显示命令行'boot: '提示符。prompt值为0时则不提示,将会直接启动'default'参数中指定的内容。
timeout 600 # timeout时间是引导时等待用户手动选择的时间,设为1可直接引导,单位为1/10秒。
display boot.msg
# 菜单背景图片、标题、颜色。
# Clear the screen when exiting the menu, instead of leaving the menu displayed.
# For vesamenu, this means the graphical background is still displayed without
# the menu itself for as long as the screen remains in graphics mode.
menu clear
menu background splash.png
menu title CentOS 7
menu vshift 8
menu rows 18
menu margin 8
#menu hidden
menu helpmsgrow 15
menu tabmsgrow 13
# Border Area
menu color border * #00000000 #00000000 none
# Selected item
menu color sel 0 #ffffffff #00000000 none
# Title bar
menu color title 0 #ff7ba3d0 #00000000 none
# Press [Tab] message
menu color tabmsg 0 #ff3a6496 #00000000 none
# Unselected menu item
menu color unsel 0 #84b8ffff #00000000 none
# Selected hotkey
menu color hotsel 0 #84b8ffff #00000000 none
# Unselected hotkey
menu color hotkey 0 #ffffffff #00000000 none
# Help text
menu color help 0 #ffffffff #00000000 none
# A scrollbar of some type? Not sure.
menu color scrollbar 0 #ffffffff #ff355594 none
# Timeout msg
menu color timeout 0 #ffffffff #00000000 none
menu color timeout_msg 0 #ffffffff #00000000 none
# Command prompt text
menu color cmdmark 0 #84b8ffff #00000000 none
menu color cmdline 0 #ffffffff #00000000 none
# Do not display the actual menu unless the user presses a key. All that is displayed is a timeout message.
menu tabmsg Press Tab for full configuration options on menu items.
menu separator # insert an empty line
menu separator # insert an empty line
# label指定在boot:提示符下输入的关键字,比如boot:centos7[ENTER],这个会启动label linux下标记的kernel和initrd.img文件。
label centos7 # 一个标签就是前面图片的一行选项。
menu default
kernel vmlinuz # 指定要启动的内核。同样要注意路径,默认是/tftpboot目录。
#下面这个参数initrd=initrd.img 指定追加给内核的参数,initrd.img是一个最小的linux系统
# append initrd=initrd.img ks=http://10.0.0.7/ks_config/CentOS-6.7-ks.cfg ksdevice=eth0 #这里的ip要指定对
# ksdevice=eth0代表当客户端有多块网卡的时候,要实现自动化需要设置从eth1安装,不指定的话,安装的时候系统会让你选择,那就不叫全自动化了。
append initrd=initrd.img inst.ks=http://10.0.0.100/centos7-ks/centos7-ks.cfg devfs=nomount nofb
label linux
menu label ^Install CentOS 7
kernel vmlinuz
append initrd=initrd.img inst.stage2=hd:LABEL=CentOS\x207\x20x86_64 quiet
label check
menu label Test this ^media & install CentOS 7
menu default
kernel vmlinuz
append initrd=initrd.img inst.stage2=hd:LABEL=CentOS\x207\x20x86_64 rd.live.check quiet
menu separator # insert an empty line
# utilities submenu
menu begin ^Troubleshooting
menu title Troubleshooting
label vesa
menu indent count 5
menu label Install CentOS 7 in ^basic graphics mode
text help
Try this option out if you're having trouble installing
CentOS 7.
endtext
kernel vmlinuz
append initrd=initrd.img inst.stage2=hd:LABEL=CentOS\x207\x20x86_64 xdriver=vesa nomodeset quiet
label rescue
menu indent count 5
menu label ^Rescue a CentOS system
text help
If the system will not boot, this lets you access files
and edit config files to try to get it booting again.
endtext
kernel vmlinuz
append initrd=initrd.img inst.stage2=hd:LABEL=CentOS\x207\x20x86_64 rescue quiet
label memtest
menu label Run a ^memory test
text help
If your system is having issues, a problem with your
system's memory may be the cause. Use this utility to
see if the memory is working correctly.
endtext
kernel memtest
menu separator # insert an empty line
label local
menu label Boot from ^local drive
localboot 0xffff
menu separator # insert an empty line
menu separator # insert an empty line
label returntomain
menu label Return to ^main menu
menu exit
menu end
调试ks文件
注:此为编译安装的nginx配置文件下的html的位置centos7-ks/centos7-ks.cfg。如果按着我的操作,这个使用下面的命令,并进入此目录
# mkdir -p /date/application/nginx/html/centos7-ks
# cd /date/application/nginx/html/centos7-ks
# vim centos7-ks.cfg
#version=RHEL7
#Install OS instead of upgrade #告知安装程序,这是一次全新安装,而不是升级
install
# System authorization information
auth --enableshadow --passalgo=sha512
# Use Web installation #通过http下载安装镜像 #这里指定错误,就会获取不到镜像文件
url --url=http://10.0.0.100/centos7-os
# Keyboard layouts #设置键盘类型
keyboard --vckeymap=us --xlayouts='us'
# System language # 指定语言
lang en_US.UTF-8
# Selinux configuration #关闭selinux
selinux --disabled
# Firewall configuration #关闭防火墙
firewall --disabled
#X is not configured on the installed system. #如果存在,安装的系统上就不会配置X.
skipx
#Use text mode install #文本安装
text
# Network information #网卡默认配置dhcp,这里可以指定网卡静态
network --bootproto=dhcp --device=bootif --noipv6 --onboot=yes
# Root password #root密码,下边是两种生成方法
# openssl passwd -1 "123456"
# $1$wdGZMEVM$eP2NR1NXnMNFqg1zXx.oa.
# perl -e 'print crypt("123456",q($1$IPPBXADM)),"\n"'
# $1$IPPBXADM$eZHK0PrVUWHcOqxUFovpo1
# 其中IPPBXADMINROOT为要给用户设置的密码,$1$IPPBXADM字符串是自定义字符串,shadow里一般用$1$后面跟8个字符这种格式。
rootpw --iscrypted $1$wdGZMEVM$eP2NR1NXnMNFqg1zXx.oa.
# System services 这里默认安装时间同步服务,被我禁止了,默认时直接安装的
#services --enabled="chronyd"
# System timezone #设置时区
timezone Asia/Shanghai --isUtc
# user --name=用户名 --password=生成的密码 --iscrypted --uid=指定uid --gecos="用户组名称" --gid=指定组gid #指定新的用户到系统中
# System bootloader configuration #设置分区
bootloader --location=mbr
# Partition clearing information #清空分区
clearpart --all --initlabel
#Clear the Master Boot Record #任何磁盘上的无效分区表都将被初始化.这会毁坏有无效分区表的磁盘上的所有内容.
zerombr
#Partition clearing information #手动分区
part / --fstype="ext4" --asprimary --ondisk=sda --size=10240
part /boot --fstype="ext4" --ondisk=sda --size=1024
part swap --fstype="swap" --ondisk=sda --size=1024
#%end
#Reboot after installation #重启安装系统包
reboot
%packages
@base
@compat-libraries
@core
@debugging
@development
@server-policy
@workstation-policy
python-dmidecode
sgpio
device-mapper-persistent-data
systemtap-client
%end
#%packages 软件包段
#@groupname:指定安装的包组
#package_name:指定安装的包
#-package_name:指定不安装的包
%post
# 这里指定开机后要操作的shell脚本或命令
%end
%pre:安装系统前执行的命令或脚本(由于只依赖于启动镜像,支持的命令很少)
%post:安装系统后执行的命令或脚本(基本支持所有命令)
开启所有的服务
# systemctl restart dhcp #不建议常开,可能会重装你的系统
# systemctl restart xinetd
# systemctl enable xinetd
# 编译安装nginx的 ./nginx #启动nginx
# systemctl restart nginx
# systemctl enable nginx
查询所有服务
# netstat -antup|grep -E "dhcp|nginx|xine"
tcp 0 0 0.0.0.0:80 0.0.0.0:* LISTEN 7443/nginx: master
udp 0 0 0.0.0.0:67 0.0.0.0:* 10208/dhcpd
udp 0 0 0.0.0.0:69 0.0.0.0:* 6951/xinetd
# ps -ef|grep -E "dhcp|nginx|xine"
root 6951 1 0 12:55 ? 00:00:00 /usr/sbin/xinetd -stayalive -pidfile /var/run/xinetd.pid
root 7443 1 0 13:17 ? 00:00:00 nginx: master process nginx
nginx 7444 7443 0 13:17 ? 00:00:03 nginx: worker process
dhcpd 10208 1 0 20:39 ? 00:00:00 /usr/sbin/dhcpd -f -cf /etc/dhcp/dhcpd.conf -user dhcpd -group dhcpd --no-pid
PXE配置文件default
由于多个客户端可以从一个PXE服务器引导,PXE引导映像使用了一个复杂的配置文件搜索方式来查找针对客户机的配置文件。如果客户机的网卡的MAC地址为8F:3H:AA:6B:CC:5D,对应的IP地址为10.0.0.195,那么客户机首先尝试以MAC地址为文件名匹配的配置文件,如果不存在就以IP地址来查找。根据上述环境针对这台主机要查找的以一个配置文件就是 /tftpboot/pxelinux.cfg/01-8F:3H:AA:6B:CC:5D。如果该文件不存在,就会根据IP地址来查找配置文件了,这个算法更复杂些,PXE映像查找会根据IP地址16进制命名的客户机配置文件。例如:10.0.0.195对应的16进制的形式为C0A801C3。(可以通过syslinux软件包提供的gethostip命令将10进制的IP转换为16进制)
如果C0A801C3文件不存在,就尝试查找C0A801C文件,如果C0A801C也不存在,那么就尝试C0A801文件,依次类推,直到查找C文件,如果C也不存在的话,那么最后尝试default文件。
总体来说,pxelinux搜索的文件的顺序是:
/tftpboot/pxelinux.cfg/01-88-99-aa-bb-cc-dd
/tftpboot/pxelinux.cfg/C0A801C3
/tftpboot/pxelinux.cfg/C0A801C
/tftpboot/pxelinux.cfg/C0A801
/tftpboot/pxelinux.cfg/C0A80
/tftpboot/pxelinux.cfg/C0A8
/tftpboot/pxelinux.cfg/C0A
/tftpboot/pxelinux.cfg/C0
/tftpboot/pxelinux.cfg/C
/tftpboot/pxelinux.cfg/default
应用:如果已经从厂商获取了服务器MAC地址,就可以差异化定制安装服务器了。
网卡无法启动解决
解决办法:
将NetworkManager服务停止,再重新启动network服务
# systemctl disable NetworkManager
Removed symlink /etc/systemd/system/multi-user.target.wants/NetworkManager.service.
Removed symlink /etc/systemd/system/dbus-org.freedesktop.NetworkManager.service.
Removed symlink /etc/systemd/system/dbus-org.freedesktop.nm-dispatcher.service.
# systemctl stop NetworkManager

 浙公网安备 33010602011771号