GIt
Git概述
Git 是一个免费的、开源的分布式版本控制系统,可以快速高效地处理从小型到大型的各种项目。
Git 易于学习,占地面积小,性能极快。 它具有廉价的本地库,方便的暂存区域和多个工作
流分支等特性。其性能优于 Subversion、CVS、Perforce 和 ClearCase 等版本控制工具。
何为版本控制
版本控制是一种记录文件内容变化,以便将来查阅特定版本修订情况的系统。
版本控制其实最重要的是可以记录文件修改历史记录,从而让用户能够查看历史版本,方便版本切换。

为什么需要版本控制
个人开发过渡到团队协作。
版本控制工具
CVS、SVN(Subversion)、VSS……
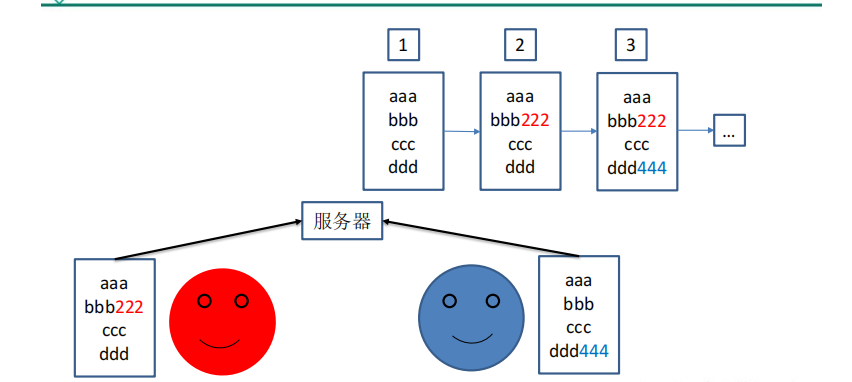
集中化的版本控制系统诸如 CVS、SVN 等,都有一个单一的集中管理的服务器,保存所有文件的修订版本,而协同工作的人们都通过客户端连到这台服务器,取出最新的文件或者提交更新。多年以来,这已成为版本控制系统的标准做法。
这种做法带来了许多好处,每个人都可以在一定程度上看到项目中的其他人正在做些什么。而管理员也可以轻松掌控每个开发者的权限,并且管理一个集中化的版本控制系统,要远比在各个客户端上维护本地数据库来得轻松容易。
事分两面,有好有坏。这么做显而易见的缺点是中央服务器的单点故障。如果服务器宕机一小时,那么在这一小时内,谁都无法提交更新,也就无法协同工作。

分布式版本控制工具
Git、Mercurial、Bazaar、Darcs……
像 Git 这种分布式版本控制工具,客户端提取的不是最新版本的文件快照,而是把代码仓库完整地镜像下来(本地库)。这样任何一处协同工作用的文件发生故障,事后都可以用其他客户端的本地仓库进行恢复。因为每个客户端的每一次文件提取操作,实际上都是一次对整个文件仓库的完整备份。
分布式的版本控制系统出现之后,解决了集中式版本控制系统的缺陷:
- 服务器断网的情况下也可以进行开发(因为版本控制是在本地进行的)
- 每个客户端保存的也都是整个完整的项目(包含历史记录,更加安全)

Git 简史

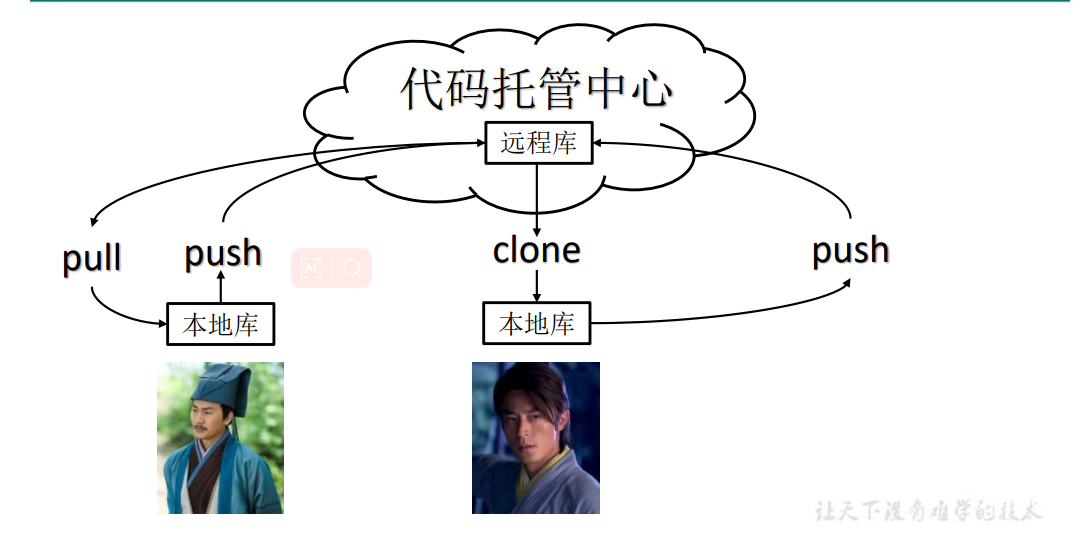
Git 工作机制

Git 和代码托管中心
代码托管中心是基于网络服务器的远程代码仓库,一般我们简单称为远程库。
- 局域网
- GitLab
- 互联网
- GitHub(外网)
- Gitee 码云(国内网站)
Git 安装
官网地址: https://git-scm.com/ 查看 GNU 协议,可以直接点击下一步

选择 Git 安装位置,要求是非中文并且没有空格的目录,然后下一步

Git 选项配置,推荐默认设置,然后下一步。

Git 安装目录名,不用修改,直接点击下一步

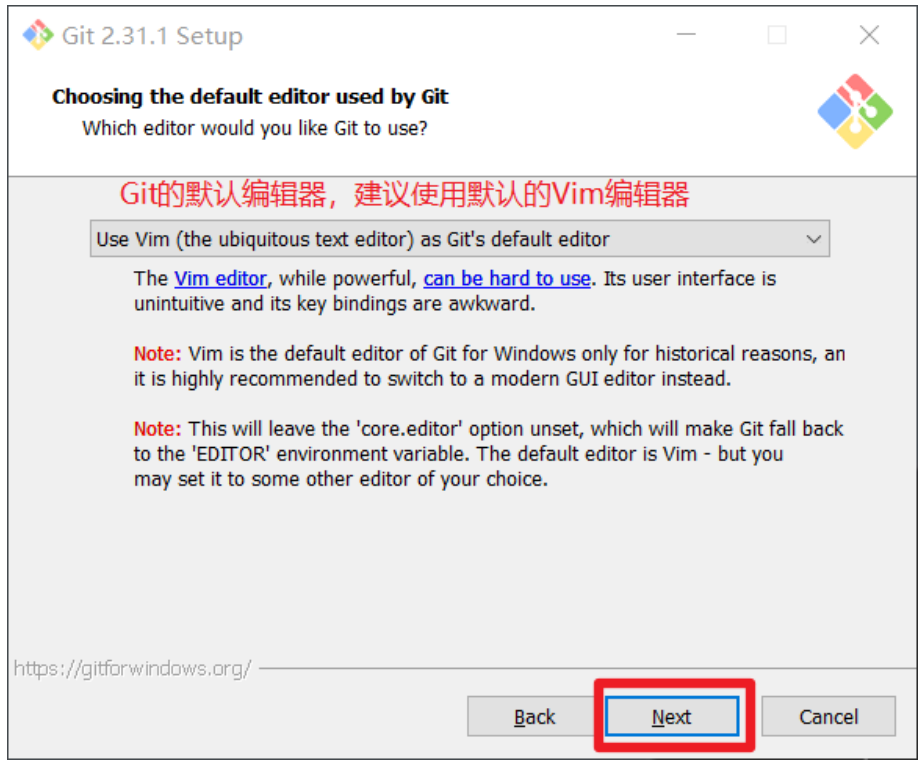
Git 的默认编辑器,建议使用默认的 Vim 编辑器,然后点击下一步。
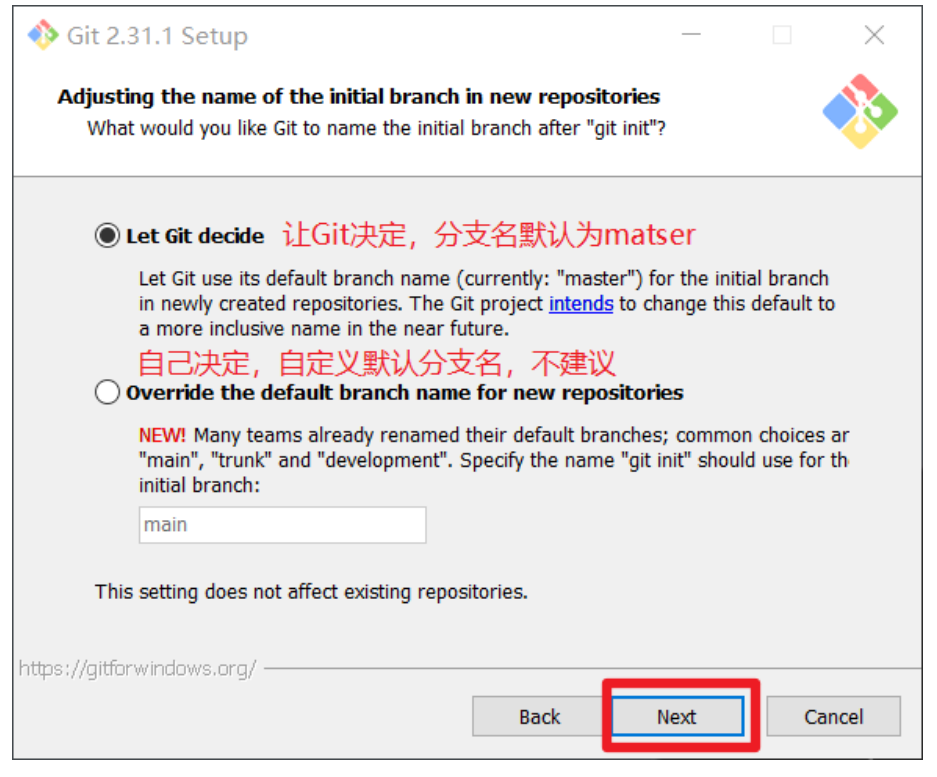
默认分支名设置,选择让 Git 决定,分支名默认为 master,下一步
修改 Git 的环境变量,选第一个,不修改环境变量,只在 Git Bash 里使用 Git。

选择后台客户端连接协议,选默认值 OpenSSL,然后下一步

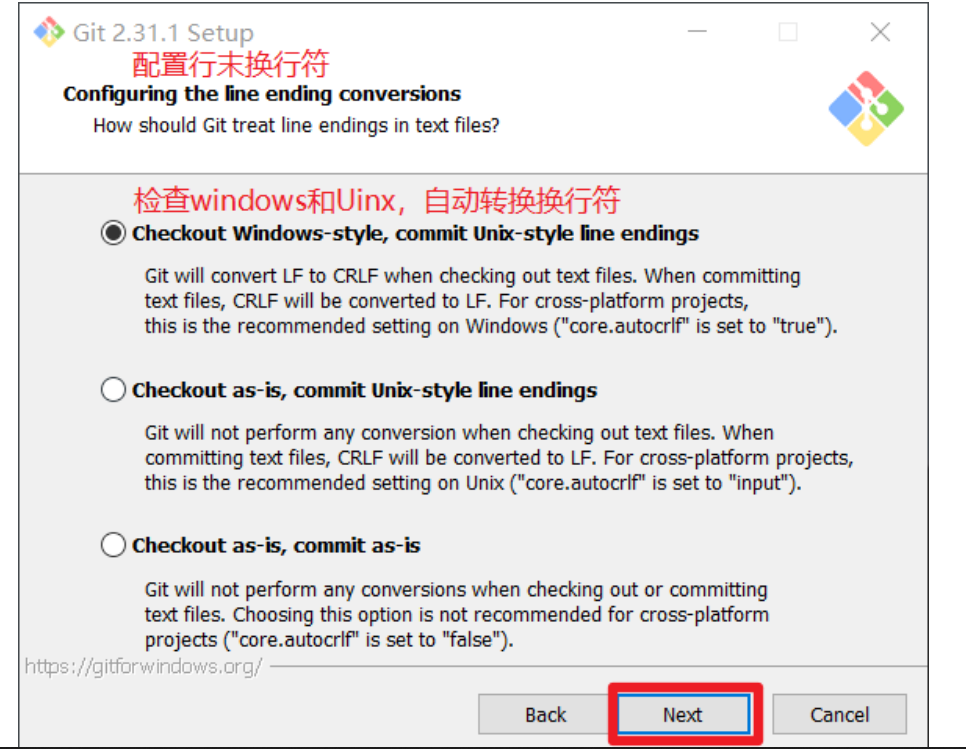
配置 Git 文件的行末换行符,Windows 使用 CRLF,Linux 使用 LF,选择第一个自动 转换,然后继续下一步。
选择 Git 终端类型,选择默认的 Git Bash 终端,然后继续下一步

选择 Git pull 合并的模式,选择默认,然后下一步

选择 Git 的凭据管理器,选择默认的跨平台的凭据管理器,然后下一步。

其他配置,选择默认设置,然后下一步

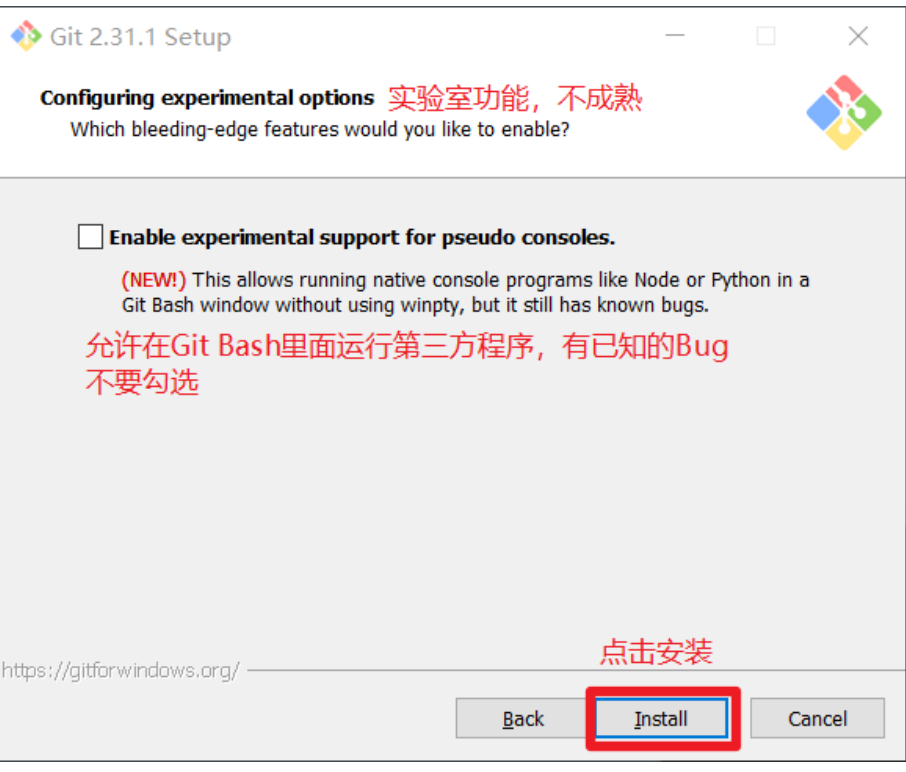
实验室功能,技术还不成熟,有已知的 bug,不要勾选,然后点击右下角的 Install 按钮,开始安装 Git。
点击 Finsh 按钮,Git 安装成功!
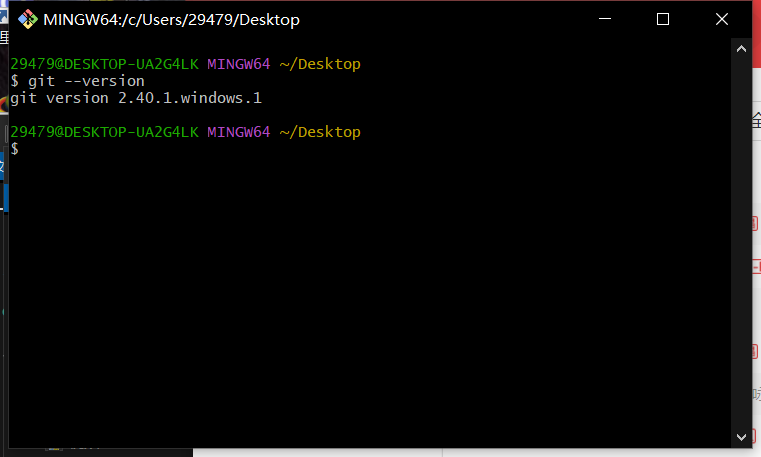
右键任意位置,在右键菜单里选择 Git Bash Here 即可打开 Git Bash 命令行终端。

在 Git Bash 终端里输入 git --version 查看 git 版本,如图所示,说明 Git 安装成功
Git 常用命令
| 命令名称 | 作用 |
|---|---|
| git config --global user.name 用户名 | 设置用户签名 |
| git config --global user.email 邮箱 | 设置用户签名 |
| git init | 初始化本地库 |
| git status | 查看本地库状态 |
| git add 文件名 | 添加到暂存区 |
| git commit -m "日志信息" 文件名 | 提交到本地库 |
| git reflog | 查看历史记录 |
| git reset --hard 版本号 | 版本穿梭 |
设置用户签名
基本语法
git config --global user.name 用户名
git config --global user.email 邮箱
案例实操
全局范围的签名设置:
Layne@LAPTOP-Layne MINGW64 /d/Git-Space/SH0720 (master)
设置用户名:
$ git config --global user.name lkj
设置邮箱:
$ git config --global user.email 2947956985@qq.com

查看:
可以去C盘的:C:\Users\29479\.gitconfig
或者使用 cat ~/.gitconfig 命令直接查看


说明:
签名的作用是区分不同操作者身份。用户的签名信息在每一个版本的提交信息中能够看 到,以此确认本次提交是谁做的。Git 首次安装必须设置一下用户签名,否则无法提交代码。
※注意:这里设置用户签名和将来登录 GitHub(或其他代码托管中心)的账号没有任 何关系。
初始化本地库
基本语法
git init
案例实操
29479@DESKTOP-UA2G4LK MINGW64 /e/Git/Git-Space/git-demo01
$ git init
Initialized empty Git repository in E:/Git/Git-Space/git-demo01/.git/

29479@DESKTOP-UA2G4LK MINGW64 /e/Git/Git-Space/git-demo01 (master)
$ ll -a
total 4
drwxr-xr-x 1 29479 197609 0 May  1 23:48 ./
drwxr-xr-x 1 29479 197609 0 May  1 23:46 ../
drwxr-xr-x 1 29479 197609 0 May  1 23:48 .git/

查看本地库状态
基本语法
git status
首次查看(工作区没有任何文件)
29479@DESKTOP-UA2G4LK MINGW64 /e/Git/Git-Space/git-demo01 (master)
$ git status
On branch master

No commits yet

nothing to commit (create/copy files and use "git add" to track)

添加文件再次查看(检测到未追踪的文件)
29479@DESKTOP-UA2G4LK MINGW64 /e/Git/Git-Space/git-demo01 (master)
$ vim test.txt #添加一个vim test.txt文件

29479@DESKTOP-UA2G4LK MINGW64 /e/Git/Git-Space/git-demo01 (master)
$ cat test.txt #查看文件内容
Hello Git

29479@DESKTOP-UA2G4LK MINGW64 /e/Git/Git-Space/git-demo01 (master)
$ git status #再次初始化git库
On branch master

No commits yet

Untracked files:
  (use "git add <file>..." to include in what will be committed)
        test.txt

nothing added to commit but untracked files present (use "git add" to track)

添加暂存区
将工作区的文件添加到暂存区
基本语法
git add 文件名
案例实操
29479@DESKTOP-UA2G4LK MINGW64 /e/Git/Git-Space/git-demo01 (master)
$ git add test.txt
warning: in the working copy of 'test.txt', LF will be replaced by CRLF the next time Git touches it

查看状态(检测到暂存区有新文件)
29479@DESKTOP-UA2G4LK MINGW64 /e/Git/Git-Space/git-demo01 (master)
$ git status
On branch master

No commits yet

Changes to be committed:
  (use "git rm --cached <file>..." to unstage)
        new file:   test.txt

提交本地库
将暂存区的文件提交到本地库
基本语法
git commit -m "日志信息" 文件名
案例实操
29479@DESKTOP-UA2G4LK MINGW64 /e/Git/Git-Space/git-demo01 (master)
$ git commit -m "第一次提交" test.txt
warning: in the working copy of 'test.txt', LF will be replaced by CRLF the next time Git touches it
[master (root-commit) edf33b4] 第一次提交
 1 file changed, 1 insertion(+)
 create mode 100644 test.txt

查看状态(没有文件需要提交)
29479@DESKTOP-UA2G4LK MINGW64 /e/Git/Git-Space/git-demo01 (master)
$ git status
On branch master
nothing to commit, working tree clean

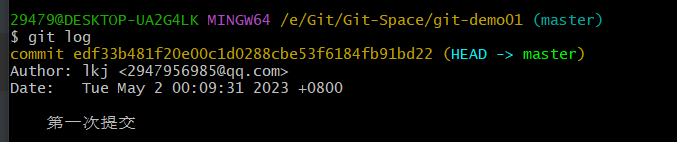
查看日志
命令:
$ git log
案例实操
29479@DESKTOP-UA2G4LK MINGW64 /e/Git/Git-Space/git-demo01 (master)
$ git log
commit edf33b481f20e00c1d0288cbe53f6184fb91bd22 (HEAD -> master)
Author: lkj <2947956985@qq.com>
Date:   Tue May 2 00:09:31 2023 +0800

    第一次提交
修改文件
Layne@LAPTOP-Layne MINGW64 /d/Git-Space/SH0720 (master)
$ vim hello.txt
hello git! hello atguigu! 2222222222222
hello git! hello atguigu!
hello git! hello atguigu!
hello git! hello atguigu!
hello git! hello atguigu!
hello git! hello atguigu!
hello git! hello atguigu!
hello git! hello atguigu!
hello git! hello atguigu!
hello git! hello atguigu!
hello git! hello atguigu!
hello git! hello atguigu!
hello git! hello atguigu!
hello git! hello atguigu!
hello git! hello atguigu!
hello git! hello atguigu!
- 查看状态(检测到工作区有文件被修改)
Layne@LAPTOP-Layne MINGW64 /d/Git-Space/SH0720 (master)
$ git status
On branch master
Changes not staged for commit:
 (use "git add <file>..." to update what will be committed)
 (use "git checkout -- <file>..." to discard changes in working
directory)
 modified: hello.txt
no changes added to commit (use "git add" and/or "git commit -a")
- 将修改的文件再次添加暂存区
Layne@LAPTOP-Layne MINGW64 /d/Git-Space/SH0720 (master)
$ git add hello.txt
warning: LF will be replaced by CRLF in hello.txt.
The file will have its original line endings in your working
directory.
- 查看状态(工作区的修改添加到了暂存区)
Layne@LAPTOP-Layne MINGW64 /d/Git-Space/SH0720 (master)
$ git status
On branch master
Changes to be committed:
 (use "git reset HEAD <file>..." to unstage)
 modified: hello.txt
历史版本
查看历史版本
- 基本语法
git reflog 查看版本信息
git log 查看版本详细信息
- 案例实操
Layne@LAPTOP-Layne MINGW64 /d/Git-Space/SH0720 (master)
$ git reflog
087a1a7 (HEAD -> master) HEAD@{0}: commit: my third commit
ca8ded6 HEAD@{1}: commit: my second commit
86366fa HEAD@{2}: commit (initial): my first commit
版本穿梭
- 基本语法
git reset --hard 版本号
- 案例实操
--首先查看当前的历史记录,可以看到当前是在 087a1a7 这个版本
Layne@LAPTOP-Layne MINGW64 /d/Git-Space/SH0720 (master)
$ git reflog
087a1a7 (HEAD -> master) HEAD@{0}: commit: my third commit
ca8ded6 HEAD@{1}: commit: my second commit
86366fa HEAD@{2}: commit (initial): my first commit
--切换到 86366fa 版本,也就是我们第一次提交的版本
Layne@LAPTOP-Layne MINGW64 /d/Git-Space/SH0720 (master)
$ git reset --hard 86366fa
HEAD is now at 86366fa my first commit
--切换完毕之后再查看历史记录,当前成功切换到了 86366fa 版本
Layne@LAPTOP-Layne MINGW64 /d/Git-Space/SH0720 (master)
$ git reflog
86366fa (HEAD -> master) HEAD@{0}: reset: moving to 86366fa
087a1a7 HEAD@{1}: commit: my third commit
ca8ded6 HEAD@{2}: commit: my second commit
86366fa (HEAD -> master) HEAD@{3}: commit (initial): my first commit
--然后查看文件 hello.txt,发现文件内容已经变化
$ cat hello.txt
hello git! hello atguigu!
hello git! hello atguigu!
hello git! hello atguigu!
hello git! hello atguigu!
hello git! hello atguigu!
hello git! hello atguigu!
hello git! hello atguigu!
Git 切换版本,底层其实是移动的 HEAD 指针,具体原理如下图所示。

Git 分支操作
什么是分支
在版本控制过程中,同时推进多个任务,为每个任务,我们就可以创建每个任务的单独 分支。使用分支意味着程序员可以把自己的工作从开发主线上分离开来,开发自己分支的时 候,不会影响主线分支的运行。对于初学者而言,分支可以简单理解为副本,一个分支就是 一个单独的副本。(分支底层其实也是指针的引用)

分支的好处
同时并行推进多个功能开发,提高开发效率。
各个分支在开发过程中,如果某一个分支开发失败,不会对其他分支有任何影响。失败 的分支删除重新开始即可。
分支的操作
| 命令名称 | 作用 |
|---|---|
| git branch 分支名 | 创建分支 |
| git branch -v | 查看分支 |
| git checkout 分支名 | 切换分支 |
| git merge 分支名 | 把指定的分支合并到当前分支上 |
查看分支
- 基本语法
git branch -v
- 案例实操
Layne@LAPTOP-Layne MINGW64 /d/Git-Space/SH0720 (master)
$ git branch -v
* master 087a1a7 my third commit (*代表当前所在的分区)
创建分支
- 基本语法
git branch 分支名
- 案例实操
Layne@LAPTOP-Layne MINGW64 /d/Git-Space/SH0720 (master)
$ git branch hot-fix
Layne@LAPTOP-Layne MINGW64 /d/Git-Space/SH0720 (master)
$ git branch -v
hot-fix 087a1a7 my third commit (刚创建的新的分支,并将主分支 master
的内容复制了一份)
* master 087a1a7 my third commit
修改分支
--在 maste 分支上做修改
Layne@LAPTOP-Layne MINGW64 /d/Git-Space/SH0720 (master)
$ vim hello.txt
--添加暂存区
Layne@LAPTOP-Layne MINGW64 /d/Git-Space/SH0720 (master)
$ git add hello.txt
--提交本地库
Layne@LAPTOP-Layne MINGW64 /d/Git-Space/SH0720 (master)
$ git commit -m "my forth commit" hello.txt
[master f363b4c] my forth commit
1 file changed, 1 insertion(+), 1 deletion(-)
--查看分支
Layne@LAPTOP-Layne MINGW64 /d/Git-Space/SH0720 (master)
$ git branch -v
 hot-fix 087a1a7 my third commit (hot-fix 分支并未做任何改变)
* master f363b4c my forth commit (当前 master 分支已更新为最新一次提交
的版本)
--查看 master 分支上的文件内容
Layne@LAPTOP-Layne MINGW64 /d/Git-Space/SH0720 (master)
$ cat hello.txt
hello git! hello atguigu! 2222222222222
hello git! hello atguigu! 3333333333333
hello git! hello atguigu!
hello git! hello atguigu!
hello git! hello atguigu!
hello git! hello atguigu!
hello git! hello atguigu!
hello git! hello atguigu!
hello git! hello atguigu!
hello git! hello atguigu!
hello git! hello atguigu!
hello git! hello atguigu!
hello git! hello atguigu!
hello git! hello atguigu!
hello git! hello atguigu! master test
hello git! hello atguigu!
切换分支
- 基本语法
git checkout 分支名
- 案例实操
Layne@LAPTOP-Layne MINGW64 /d/Git-Space/SH0720 (master)
$ git checkout hot-fix
Switched to branch 'hot-fix'
--发现当先分支已由 master 改为 hot-fix
Layne@LAPTOP-Layne MINGW64 /d/Git-Space/SH0720 (hot-fix)
$
--查看 hot-fix 分支上的文件内容发现与 master 分支上的内容不同
Layne@LAPTOP-Layne MINGW64 /d/Git-Space/SH0720 (hot-fix)
$ cat hello.txt
hello git! hello atguigu! 2222222222222
hello git! hello atguigu! 3333333333333
hello git! hello atguigu!
hello git! hello atguigu!
hello git! hello atguigu!
hello git! hello atguigu!
hello git! hello atguigu!
hello git! hello atguigu!
hello git! hello atguigu!
hello git! hello atguigu!
hello git! hello atguigu!
hello git! hello atguigu!
hello git! hello atguigu!
hello git! hello atguigu!
hello git! hello atguigu!
hello git! hello atguigu!
--在 hot-fix 分支上做修改
Layne@LAPTOP-Layne MINGW64 /d/Git-Space/SH0720 (hot-fix)
$ cat hello.txt
hello git! hello atguigu! 2222222222222
hello git! hello atguigu! 3333333333333
hello git! hello atguigu!
hello git! hello atguigu!
hello git! hello atguigu!
hello git! hello atguigu!
hello git! hello atguigu!
hello git! hello atguigu!
hello git! hello atguigu!
hello git! hello atguigu!
hello git! hello atguigu!
hello git! hello atguigu!
hello git! hello atguigu!
hello git! hello atguigu!
hello git! hello atguigu!
hello git! hello atguigu! hot-fix test
--添加暂存区
Layne@LAPTOP-Layne MINGW64 /d/Git-Space/SH0720 (hot-fix)
$ git add hello.txt
--提交本地库
Layne@LAPTOP-Layne MINGW64 /d/Git-Space/SH0720 (hot-fix)
$ git commit -m "hot-fix commit" hello.txt
合并分支
- 基本语法
git merge 分支名
- 案例实操 在 master 分支上合并 hot-fix 分支
Layne@LAPTOP-Layne MINGW64 /d/Git-Space/SH0720 (master)
$ git merge hot-fix
Auto-merging hello.txt
CONFLICT (content): Merge conflict in hello.txt
Automatic merge failed; fix conflicts and then commit the result.
产生冲突
冲突产生的表现:后面状态为 MERGING
Layne@LAPTOP-Layne MINGW64 /d/Git-Space/SH0720 (master|MERGING)
冲突产生的原因:
合并分支时,两个分支在同一个文件的同一个位置有两套完全不同的修改。Git 无法替 我们决定使用哪一个。必须人为决定新代码内容。
查看状态(检测到有文件有两处修改)
Layne@LAPTOP-Layne MINGW64 /d/Git-Space/SH0720 (master|MERGING)
$ git status
On branch master
You have unmerged paths.
 (fix conflicts and run "git commit")
 (use "git merge --abort" to abort the merge)
Unmerged paths:
 (use "git add <file>..." to mark resolution)
 both modified: hello.txt
no changes added to commit (use "git add" and/or "git commit -a")
解决冲突
- 编辑有冲突的文件,删除特殊符号,决定要使用的内容
特殊符号:<<<<<<< HEAD 当前分支的代码 ======= 合并过来的代码 >>>>>>> hot-fix
hello git! hello atguigu! 2222222222222
hello git! hello atguigu! 3333333333333
hello git! hello atguigu!
hello git! hello atguigu!
hello git! hello atguigu!
hello git! hello atguigu!
hello git! hello atguigu!
hello git! hello atguigu!
hello git! hello atguigu!
hello git! hello atguigu!
hello git! hello atguigu!
hello git! hello atguigu!
hello git! hello atguigu!
hello git! hello atguigu!
hello git! hello atguigu! master test
hello git! hello atguigu! hot-fix test
- 添加到暂存区
Layne@LAPTOP-Layne MINGW64 /d/Git-Space/SH0720 (master|MERGING)
$ git add hello.txt
- 执行提交(注意:此时使用 git commit 命令时不能带文件名)
Layne@LAPTOP-Layne MINGW64 /d/Git-Space/SH0720 (master|MERGING)
$ git commit -m "merge hot-fix"
[master 69ff88d] merge hot-fix
--发现后面 MERGING 消失,变为正常
Layne@LAPTOP-Layne MINGW64 /d/Git-Space/SH0720 (master)
$
创建分支和切换分支图解

master、hot-fix 其实都是指向具体版本记录的指针。当前所在的分支,其实是由 HEAD 决定的。所以创建分支的本质就是多创建一个指针。
HEAD 如果指向 master,那么我们现在就在 master 分支上。
HEAD 如果执行 hotfix,那么我们现在就在 hotfix 分支上。所以切换分支的本质就是移动 HEAD 指针。
Git 团队协作机制
团队内协作
跨团队协作

GitHub 操作
GitHub 网址:https://github.com/
Ps:全球最大同性交友网站,技术宅男的天堂,新世界的大门,你还在等什么?
创建远程仓库


远程仓库操作
| 命令名称 | 作用 |
|---|---|
| git remote -v | 查看当前所有远程地址别名 |
| git remote add 别名 远程地址 | 起别名 |
| git push 别名 分支 | 推送本地分支上的内容到远程仓库 |
| git clone 远程地址 | 将远程仓库的内容克隆到本地 |
| git pull 远程库地址别名 远程分支名 | 将远程仓库对于分支最新内容拉下来后与当前本地分支直接合并 |
创建远程仓库别名
- 基本语法
git remote -v 查看当前所有远程地址别名
git remote add 别名 远程地址
- 案例实操
Layne@LAPTOP-Layne MINGW64 /d/Git-Space/SH0720 (master)
$ git remote -v
Layne@LAPTOP-Layne MINGW64 /d/Git-Space/SH0720 (master)
$ git remote add ori https://github.com/atguiguyueyue/git-shTest.git
Layne@LAPTOP-Layne MINGW64 /d/Git-Space/SH0720 (master)
$ git remote -v
ori https://github.com/atguiguyueyue/git-shTest.git (fetch)
ori https://github.com/atguiguyueyue/git-shTest.git (push)
https://github.com/atguiguyueyue/git-shTest.git
这个地址在创建完远程仓库后生成的连接,如图所示红框中

推送本地分支到远程仓库
- 基本语法
git push 别名 分支
- 案例实操
Layne@LAPTOP-Layne MINGW64 /d/Git-Space/SH0720 (master)
$ git push ori master
Logon failed, use ctrl+c to cancel basic credential prompt.
Username for 'https://github.com': atguiguyueyue
Counting objects: 3, done.
Delta compression using up to 12 threads.
Compressing objects: 100% (2/2), done.
Writing objects: 100% (3/3), 276 bytes | 276.00 KiB/s, done.
Total 3 (delta 0), reused 0 (delta 0)
To https://github.com/atguiguyueyue/git-shTest.git
* [new branch] master -> master
此时发现已将我们 master 分支上的内容推送到 GitHub 创建的远程仓库

克隆远程仓库到本地
- 基本语法
git clone 远程地址
- 案例实操
Layne@LAPTOP-Layne MINGW64 /d/Git-Space/pro-linghuchong
$ git clone https://github.com/atguiguyueyue/git-shTest.git
Cloning into 'git-shTest'...
remote: Enumerating objects: 3, done.
remote: Counting objects: 100% (3/3), done.
remote: Compressing objects: 100% (2/2), done.
remote: Total 3 (delta 0), reused 3 (delta 0), pack-reused 0
Unpacking objects: 100% (3/3), done.
https://github.com/atguiguyueyue/git-shTest.git
这个地址为远程仓库地址,克隆结果:初始化本地仓库

--创建远程仓库别名
Layne@LAPTOP-Layne MINGW64 /d/Git-Space/pro-linghuchong/git-shTest
(master)
$ git remote -v
origin https://github.com/atguiguyueyue/git-shTest.git (fetch)
origin https://github.com/atguiguyueyue/git-shTest.git (push)
小结:clone 会做如下操作。1、拉取代码。2、初始化本地仓库。3、创建别名
邀请加入团队
- 选择邀请合作者
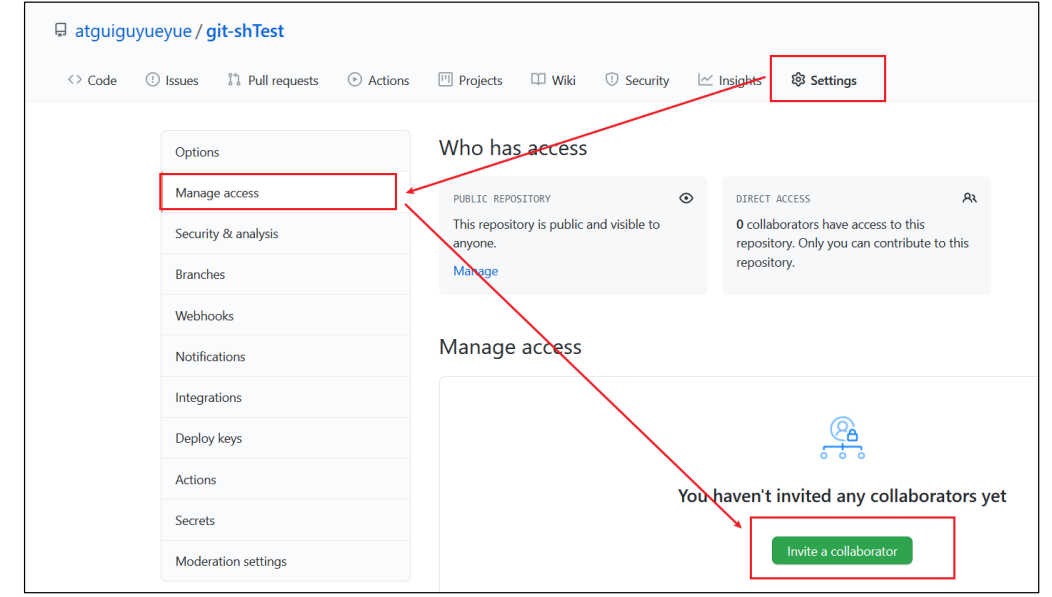
- 填入想要合作的人
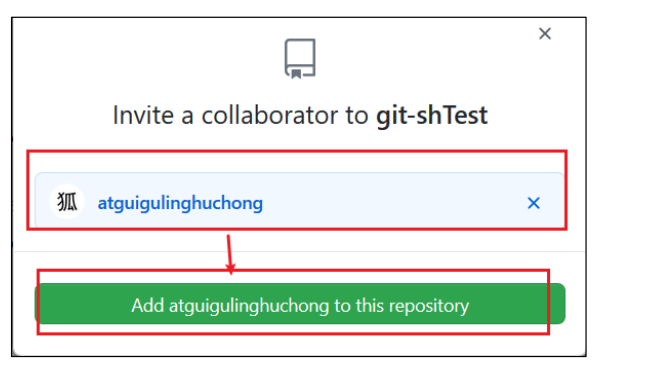
- 复 制 地 址 并 通 过 微 信 钉 钉 等 方 式 发 送 给 该 用 户 , 复 制 内 容 如 下 :https://github.com/atguiguyueyue/git-shTest/invitations

- 在 atguigulinghuchong 这个账号中的地址栏复制收到邀请的链接,点击接受邀请
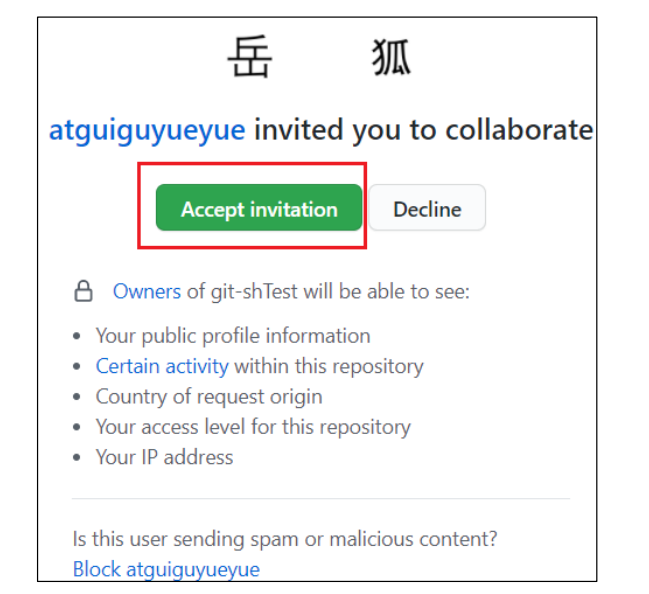
- 成功之后可以在 atguigulinghuchong 这个账号上看到 git-Test 的远程仓库。

- 令狐冲可以修改内容并 push 到远程仓库。
--编辑 clone 下来的文件
Layne@LAPTOP-Layne MINGW64 /d/Git-Space/pro-linghuchong/git-shTest
(master)
$ vim hello.txt
Layne@LAPTOP-Layne MINGW64 /d/Git-Space/pro-linghuchong/git-shTest
(master)
$ cat hello.txt
hello git! hello atguigu! 2222222222222
hello git! hello atguigu! 33333333333333
hello git! hello atguigu!
hello git! hello atguigu!
hello git! hello atguigu! 我是最帅的,比岳不群还帅
hello git! hello atguigu!
hello git! hello atguigu!
hello git! hello atguigu!
hello git! hello atguigu!
hello git! hello atguigu!
hello git! hello atguigu!
hello git! hello atguigu!
hello git! hello atguigu!
hello git! hello atguigu!
hello git! hello atguigu! master test
hello git! hello atguigu! hot-fix test
--将编辑好的文件添加到暂存区
Layne@LAPTOP-Layne MINGW64 /d/Git-Space/pro-linghuchong/git-shTest
(master)
$ git add hello.txt
--将暂存区的文件上传到本地库
Layne@LAPTOP-Layne MINGW64 /d/Git-Space/pro-linghuchong/git-shTest
(master)
$ git commit -m "lhc commit" hello.txt
[master 5dabe6b] lhc commit
1 file changed, 1 insertion(+), 1 deletion(-)
--将本地库的内容 push 到远程仓库
Layne@LAPTOP-Layne MINGW64 /d/Git-Space/pro-linghuchong/git-shTest
(master)
$ git push origin master
Logon failed, use ctrl+c to cancel basic credential prompt.
Username for 'https://github.com': atguigulinghuchong
Counting objects: 3, done.
Delta compression using up to 12 threads.
Compressing objects: 100% (2/2), done.
Writing objects: 100% (3/3), 309 bytes | 309.00 KiB/s, done.
Total 3 (delta 1), reused 0 (delta 0)
remote: Resolving deltas: 100% (1/1), completed with 1 local object.
To https://github.com/atguiguyueyue/git-shTest.git
 7cb4d02..5dabe6b master -> master
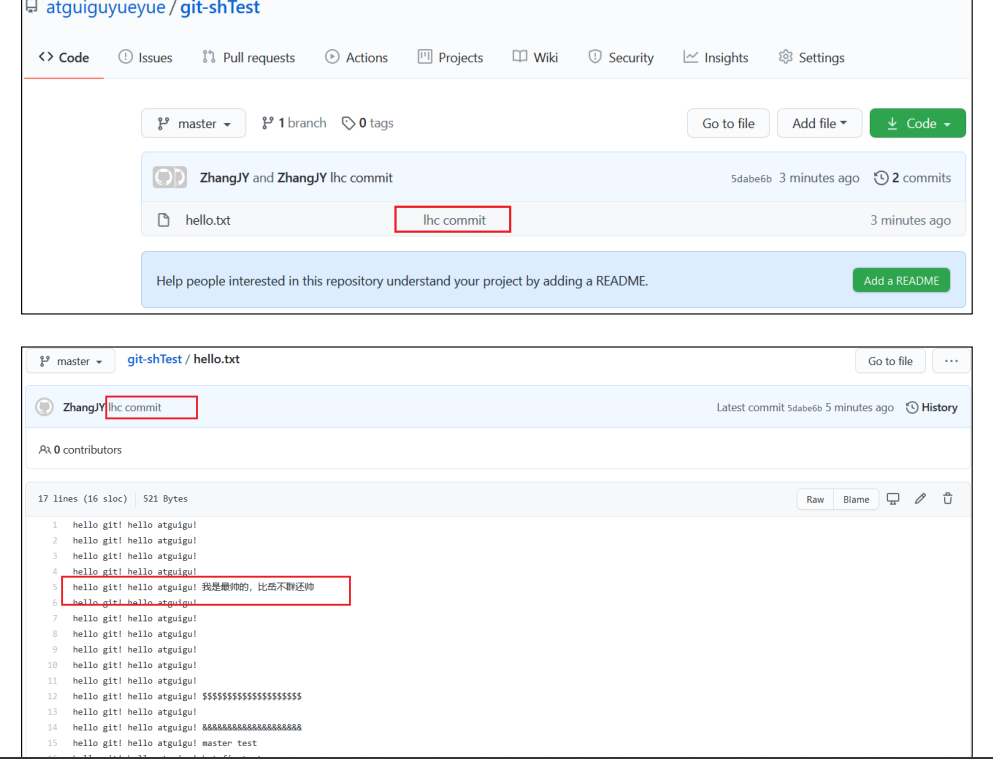
- 回到 atguiguyueyue 的 GitHub 远程仓库中可以看到,最后一次是 lhc 提交的
拉取远程库内容
- 基本语法
git pull 远程库地址别名 远程分支名
- 案例实操
--将远程仓库对于分支最新内容拉下来后与当前本地分支直接合并
Layne@LAPTOP-Layne MINGW64 /d/Git-Space/SH0720 (master)
$ git pull ori master
remote: Enumerating objects: 5, done.
remote: Counting objects: 100% (5/5), done.
remote: Compressing objects: 100% (1/1), done.
remote: Total 3 (delta 1), reused 3 (delta 1), pack-reused 0
Unpacking objects: 100% (3/3), done.
From https://github.com/atguiguyueyue/git-shTest
* branch master -> FETCH_HEAD
 7cb4d02..5dabe6b master -> ori/master
Updating 7cb4d02..5dabe6b
Fast-forward
hello.txt | 2 +-
1 file changed, 1 insertion(+), 1 deletion(-)
Layne@LAPTOP-Layne MINGW64 /d/Git-Space/SH0720 (master)
$ cat hello.txt
hello git! hello atguigu! 2222222222222
hello git! hello atguigu! 33333333333333
hello git! hello atguigu!
hello git! hello atguigu!
hello git! hello atguigu! 我是最帅的,比岳不群还帅
hello git! hello atguigu!
hello git! hello atguigu!
hello git! hello atguigu!
hello git! hello atguigu!
hello git! hello atguigu!
hello git! hello atguigu!
hello git! hello atguigu!
hello git! hello atguigu!
hello git! hello atguigu!
hello git! hello atguigu! master test
hello git! hello atguigu! hot-fix test
跨团队协作
- 将远程仓库的地址复制发给邀请跨团队协作的人,比如东方不败

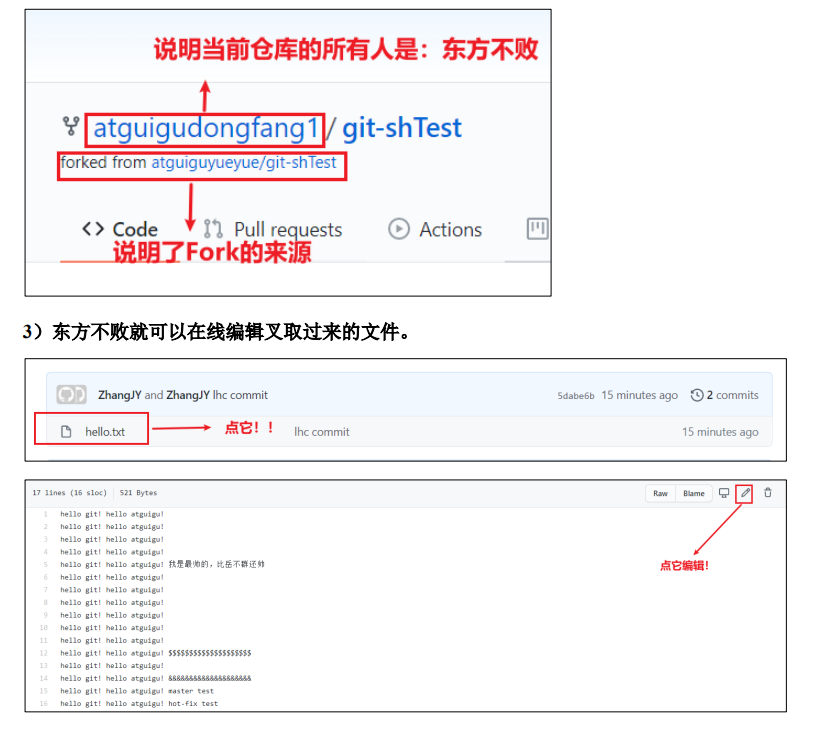
- 在东方不败的 GitHub 账号里的地址栏复制收到的链接,然后点击 Fork 将项目叉到自 己的本地仓库。

叉入中…

叉成功后可以看到当前仓库信息
- 东方不败就可以在线编辑叉取过来的文件。
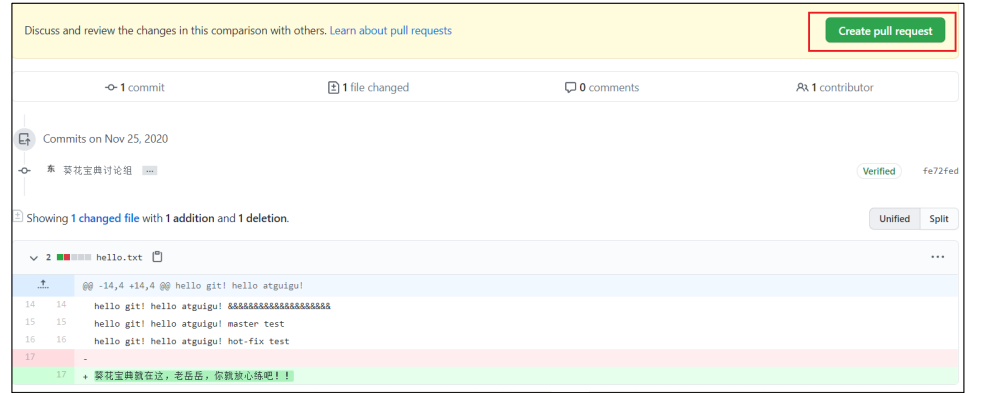
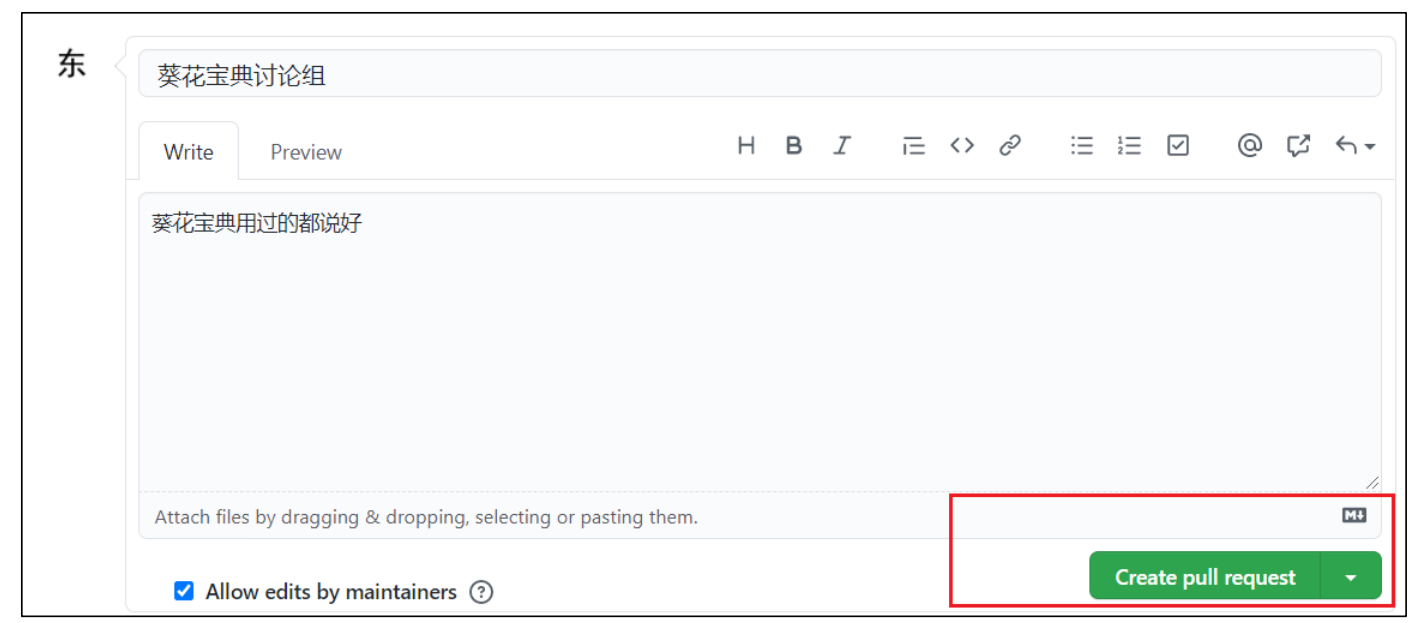
- 编辑完毕后,填写描述信息并点击左下角绿色按钮提交。

- 接下来点击上方的 Pull 请求,并创建一个新的请求

- 回到岳岳 GitHub 账号可以看到有一个 Pull request 请求。

进入到聊天室,可以讨论代码相关内容

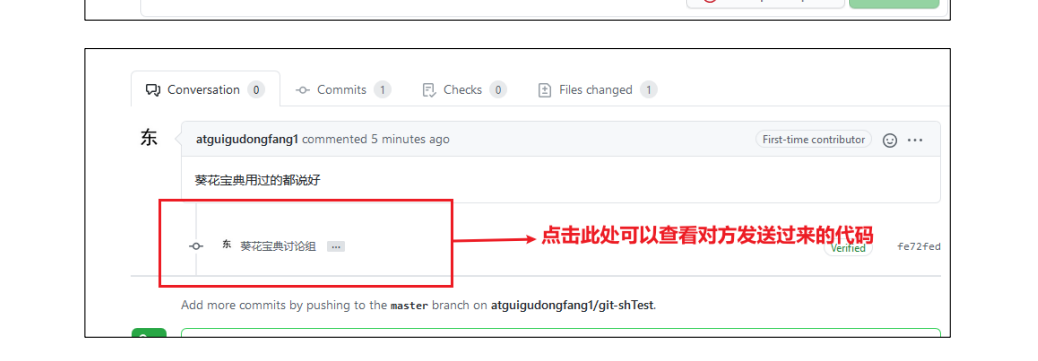
- 如果代码没有问题,可以点击 Merge pull reque 合并代码。

SSH 免密登录
我们可以看到远程仓库中还有一个 SSH 的地址,因此我们也可以使用 SSH 进行访问。

具体操作如下:
--进入当前用户的家目录
Layne@LAPTOP-Layne MINGW64 /d/Git-Space/SH0720 (master)
$ cd
--删除.ssh 目录
Layne@LAPTOP-Layne MINGW64 ~
$ rm -rvf .ssh
removed '.ssh/known_hosts'
removed directory '.ssh'
--运行命令生成.ssh 秘钥目录[注意:这里-C 这个参数是大写的 C]
Layne@LAPTOP-Layne MINGW64 ~
$ ssh-keygen -t rsa -C atguiguyueyue@aliyun.com
Generating public/private rsa key pair.
Enter file in which to save the key (/c/Users/Layne/.ssh/id_rsa):
Created directory '/c/Users/Layne/.ssh'.
Enter passphrase (empty for no passphrase):
Enter same passphrase again:
Your identification has been saved in /c/Users/Layne/.ssh/id_rsa.
Your public key has been saved in /c/Users/Layne/.ssh/id_rsa.pub.
The key fingerprint is:
SHA256:7CPfRLITKcYDhaqpEDeok7Atvwh2reRmpxxOC6dkY44
atguiguyueyue@aliyun.com
The key's randomart image is:
+---[RSA 2048]----+
| .. |
| .. |
| . .. |
|+ + o . . |
|oO . = S . |
|X . .. + = |
|+@ * .. = . |
|X.&o+. o = |
|Eo+Oo . . |
+----[SHA256]-----+
--进入.ssh 目录查看文件列表
Layne@LAPTOP-Layne MINGW64 ~
$ cd .ssh
Layne@LAPTOP-Layne MINGW64 ~/.ssh
$ ll -a
total 21
drwxr-xr-x 1 Layne 197609 0 11 月 25 19:27 ./
drwxr-xr-x 1 Layne 197609 0 11 月 25 19:27 ../
-rw-r--r-- 1 Layne 197609 1679 11 月 25 19:27 id_rsa
-rw-r--r-- 1 Layne 197609 406 11 月 25 19:27 id_rsa.pub
--查看 id_rsa.pub 文件内容
Layne@LAPTOP-Layne MINGW64 ~/.ssh
$ cat id_rsa.pub
ssh-rsa
AAAAB3NzaC1yc2EAAAADAQABAAABAQDRXRsk9Ohtg1AXLltsuNRAGBsx3ypE1O1Rkdzpm
l1woa6y6G62lZri3XtCH0F7GQvnMvQtPISJFXXWo+jFHZmqYQa/6kOIMv2sszcoj2Qtwl
lGXTPn/4T2h/cHjSHfc+ks8OYP7OWOOefpOCbYY/7DWYrl89k7nQlfd+A1FV/vQmcsa1L
P5ihqjpjms2CoUUen8kZHbjwHBAHQHWRE+Vc371MG/dwINvCi8n7ibI86o2k0dW0+8SL+
svPV/Y0G9m+RAqgec8b9U6DcSSAMH5uq4UWfnAcUNagb/aJQLytrH0pLa8nMv3XdSGNNo
AGBFeW2+K81XrmkP27FrLI6lDef atguiguyueyue@aliyun.com


 浙公网安备 33010602011771号