
vue发布自定义组件到npm
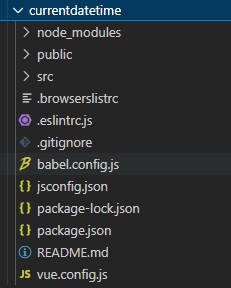
一、使用 vue create currentdatetime创建项目(可查考https://cli.vuejs.org/zh/guide/creating-a-project.html),创建成功后项目目录结构如下:
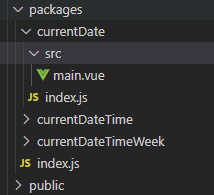
二、在项目的根目录新建一个packages文件夹,用于存放需要发布的组件。
三、支持对package目录的处理,在vue.config.js文件中修改配置中的chainWebpack选项。
const { defineConfig } = require('@vue/cli-service')
const path = require('path')
module.exports = defineConfig({
  transpileDependencies: false, // 默认情况下 babel-loader 会忽略所有 node_modules 中的文件。你可以启用本选项,以避免构建后的代码中出现未转译的第三方依赖。
  publicPath: './', // 部署应用包时的基本URL
  outputDir: 'dist', // 当运行 vue-cli-service build 时生成的生产环境构建文件的目录。
  assetsDir: 'static', // 放置生成的静态资源 (js、css、img、fonts) 的 (相对于 outputDir 的) 目录
  indexPath: 'index.html', // 设置index.html
  filenameHashing: true, // 设置打包生成的静态资源的文件名中是否加入hash以便控制浏览器缓存问题
  productionSourceMap: false, // 设置生产环境的 source map 开启与关闭
  devServer: {
    open: true, // npm run dev启动项目后是否自动打开浏览器
    host: 'localhost', // 匹配本机IP地址(默认是0.0.0.0或localhost)
    port: 8080, // 端口号    ,默认:8080
    hot: true, // 是否开启热更新(局部刷新,不刷新整个页面)
    https: false, // 是否启用https
    compress: true // 是否启动gzip压缩,用于减少服务器向前端传输的数据量,提高浏览的速度
  },
  // 扩展 webpack 配置,使 packages 加入编译
  chainWebpack: config => {
    config.module
    .rule('js')
    .include
    .add(__dirname + 'packages')
    .end()
    .use('babel')
    .loader('babel-loader')
    .tap(options => {
      // 修改它的选项...
      return options
    })
  }
})
四、可参考element-ui的组件结构,在packages目录下新建组件的目录结构。
例如需要新建一个组件 currentDate,则在packages下新建 文件夹 currentDate,然后在该目录下新建src/main.vue的文件,用于编写组件信息,在currentDate的目录下建一个index.js用于导出该组件。
五、编写currentDate/index.js文件,对外提供对组件的引用
import CurrentDate from './src/main';

/* istanbul ignore next */
CurrentDate.install = function(Vue) {
  Vue.component(CurrentDate.name, CurrentDate);
};

export default CurrentDate;
六、在packages的目录下,创建一个index.js文件,用于整合所有的组件并对外导出,以便一个完整的组件库。
// 引入该目录下所有的组件
import CurrentDate from "./currentDate/index.js";
import CurrentDateTime from "./currentDateTime/index.js";
import CurrentDateTimeWeek from "./currentDateTimeWeek/index.js";

const components = [
  CurrentDate, CurrentDateTime, CurrentDateTimeWeek
]

const MyModule = {}
MyModule.install = Vue => {
  components.forEach(component => {
    Vue.component(component.name, component)
  })
}

if (typeof window !== 'undefined' && window.Vue) {
  MyModule.install(window.Vue)
}

export default MyModule
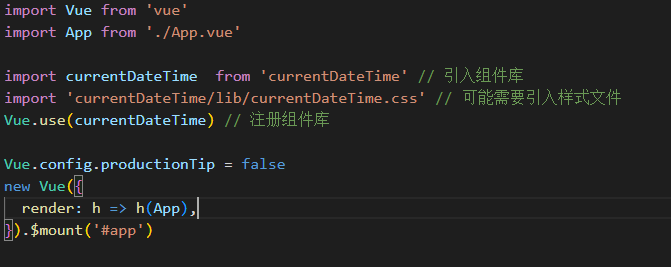
七、可以在项目结构里面引入该组件,以便测试组件的正确性。
7.1 在src/main.js中引入并注册该组件:
import Vue from 'vue'
import App from './App.vue'

import MyModule from '../packages/index.js' // 引入组件库
Vue.use(MyModule) // 注册组件库

Vue.config.productionTip = false
new Vue({
  render: h => h(App),
}).$mount('#app')
7.2 可直接在app.vue中使用组件,以便查看效果:
<template>
  <div id="app">
    <CurrentDate></CurrentDate>
    <CurrentDateTime></CurrentDateTime>
    <CurrentDateTimeWeek></CurrentDateTimeWeek>
  </div>
</template>

<style lang="scss">
#app {
  font-family: Avenir, Helvetica, Arial, sans-serif;
  -webkit-font-smoothing: antialiased;
  -moz-osx-font-smoothing: grayscale;
  text-align: center;
  color: #2c3e50;
  margin-top: 60px;
}
</style>
八、发布到npm
8.1 修改package.json,在 scripts 下增加一个编辑到库的命令:
–target: 构建目标,默认为应用模式。这里修改为 lib 启用库模式。
–dest : 输出目录,默认 dist。这里我们改成 lib
[entry]: 最后一个参数为入口文件,默认为 src/App.vue。这里我们指定编译 packages/ 组件库目录。
{
  "name": "currentdatetime", // npm包名称
  "version": "1.0.0", // 版本信息
  "description": "显示当前时间", // 描述信息
  "main": "lib/currentdatetime.umd.min.js", // 入口文件
  "keyword": "currentdatetime currentdate currentdatetimeweek", // 关键字
  "license": "MIT", // 开源协议
  "private": false, // 这个只有设置为 false 才能发布到 npm
  "scripts": {
    "dev": "vue-cli-service serve",
    "build": "vue-cli-service build",
    "lint": "vue-cli-service lint",
    "lib": "vue-cli-service build --target lib --name currentdatetime --dest lib packages/index.js" // 新增的一个npm run lib的命令,运行时会在根目录生成一个lib的文件夹,并把组件编译到该目录下
  },
  "dependencies": {
    "core-js": "^3.8.3",
    "vue": "^2.6.14"
  },
  "devDependencies": {
    "@babel/core": "^7.12.16",
    "@babel/eslint-parser": "^7.12.16",
    "@vue/cli-plugin-babel": "~5.0.0",
    "@vue/cli-plugin-eslint": "~5.0.0",
    "@vue/cli-service": "~5.0.0",
    "eslint": "^7.32.0",
    "eslint-plugin-vue": "^8.0.3",
    "sass": "^1.32.7",
    "sass-loader": "^12.0.0",
    "vue-template-compiler": "^2.6.14"
  }
}
8.2 添加 .npmignore 文件,设置忽略发布文件
忽略目录
src/
packages/
public/

忽略指定文件
vue.config.js
babel.config.js
*.map
8.3 登录到npm,npm账号注册可在官网进行(npm官网)
npm login // 在终端执行登录命令,输入用户名、密码、邮箱即可登录
npm publish // 执行发布命令,发布组件到npm
九、引入并注册发布的组件库

 浙公网安备 33010602011771号