代理和负载
代理
代理的概念
在互联网请求里面,为了安全客户端往往无法直接向服务端发起请求,就需要用到代理服务,来实现客户端和服务端通信,并且代理可以将流量分流给多个服务端。
代理的方式
1.正向代理
客户端找到代理服务之后,还需要使用某个IP地址来找对应的服务器。
应用:VPN
2.反向代理
客户端只需要找代理服务,不需要找服务器,由代理服务来导向某个服务器。
应用:负载均衡
nginx代理服务支持的协议
ngx_http_uwsgi_module : Python
ngx_http_fastcgi_module : PHP
ngx_http_scgi_module : Java
ngx_http_v2_module : Golang
ngx_http_proxy_module : HTTP
nginx代理实践
尝试使用lb01代理web01
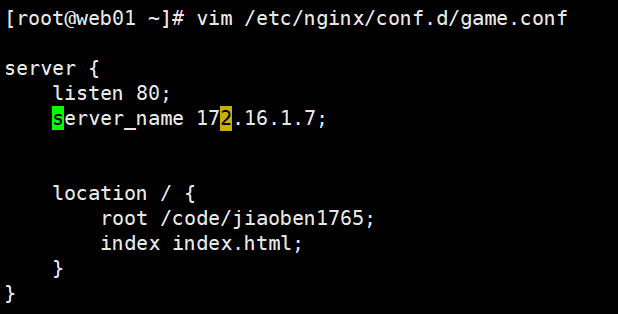
1.部署web01
在web01中部署nginx使得访问ip地址会打开一个网站
2.下载lb01中的nginx
lb01中的nginx推荐使用编译安装
1.下载 nginx源代码包

2.解压

3.安装依赖
安装nginx模块需要一些依赖文件需要提前下载

4.设置编译参数
安装一些必要的模块

5.进行编译安装


3.nginx优化
编译安装的nginx最好进行一些步骤的优化
将/usr/local/nginx/conf/下的文件移动到/etc/nginx/下(无此文件夹需新建)


新建/etc/nginx/conf.d文件夹来存放配置文件

修改/etc/nginx/nginx.conf文件
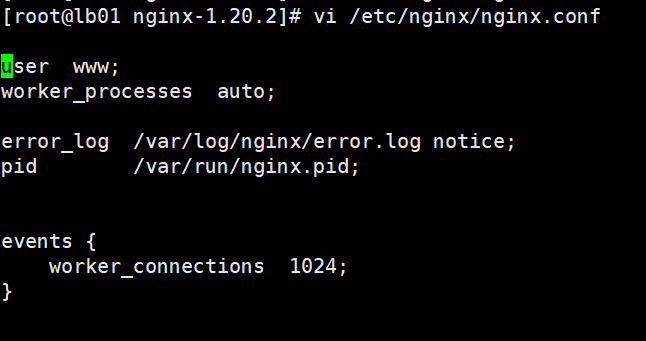

user  root;
worker_processes  auto;

error_log  /var/log/nginx/error.log notice;
pid        /var/run/nginx.pid;


events {
    worker_connections  1024;
}


http {
    include       /etc/nginx/mime.types;
    default_type  application/octet-stream;

    log_format  main  '$remote_addr - $remote_user [$time_local] "$request" '
                      '$status $body_bytes_sent "$http_referer" '
                      '"$http_user_agent" "$http_x_forwarded_for"';

    log_format json '{"@timestamp":"$time_iso8601",'
                  '"host":"$server_addr",'
                  '"service":"nginxTest",'
                  '"trace":"$upstream_http_ctx_transaction_id",'
                  '"log":"log",'
                  '"clientip":"$remote_addr",'
                  '"remote_user":"$remote_user",'
                  '"request":"$request",'
                  '"http_user_agent":"$http_user_agent",'
                  '"size":$body_bytes_sent,'
                  '"responsetime":$request_time,'
                  '"upstreamtime":"$upstream_response_time",'
                  '"upstreamhost":"$upstream_addr",'
                  '"http_host":"$host",'
                  '"url":"$uri",'
                  '"domain":"$host",'
                  '"xff":"$http_x_forwarded_for",'
                  '"referer":"$http_referer",'
                  '"status":"$status"}';
    access_log /var/log/nginx/access.log json ;

    # access_log  /var/log/nginx/access.log  main;

    sendfile        on;
    #tcp_nopush     on;

    keepalive_timeout  65;

    #gzip  on;

    include /etc/nginx/conf.d/*.conf;
}
在/usr/local/nginx/conf/目录下新建一个软链接指向nginx.conf

新建www系统用户
新建一个www的用户


在/usr/lib/systemd/system/目录下创建一个nginx.service文件
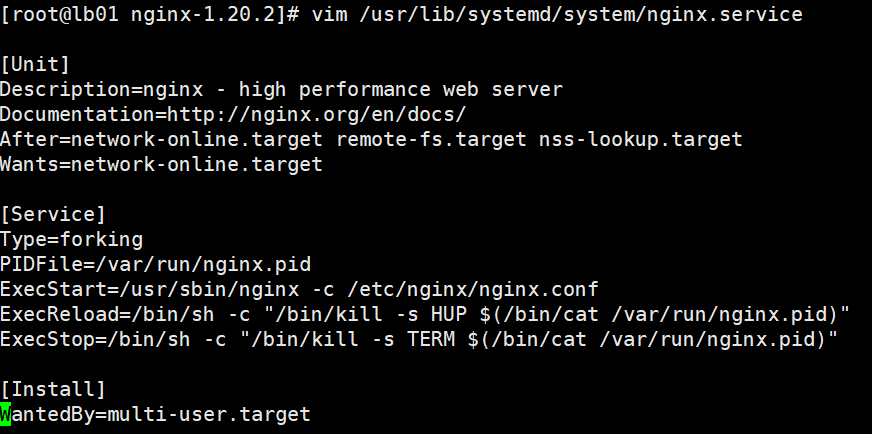

[Unit]
Description=nginx - high performance web server
Documentation=http://nginx.org/en/docs/
After=network-online.target remote-fs.target nss-lookup.target
Wants=network-online.target

[Service]
Type=forking
PIDFile=/var/run/nginx.pid
ExecStart=/usr/sbin/nginx -c /etc/nginx/nginx.conf
ExecReload=/bin/sh -c "/bin/kill -s HUP $(/bin/cat /var/run/nginx.pid)"
ExecStop=/bin/sh -c "/bin/kill -s TERM $(/bin/cat /var/run/nginx.pid)"

[Install]
WantedBy=multi-user.target
将/usr/local/nginx/sbin/目录下的nginx启动文件移动到/usr/sbin/目录下

在/var/log/目录下新建一个nginx文件夹存放日志

尝试启动nginx

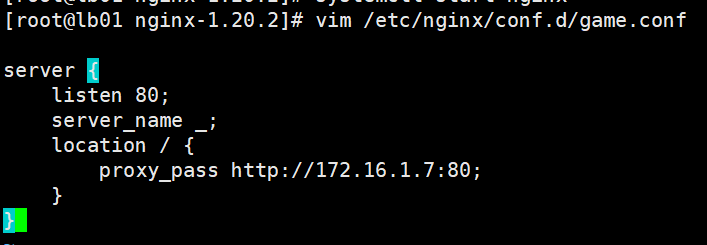
4.部署反向代理
5.测试
0
新建文件优化nginx
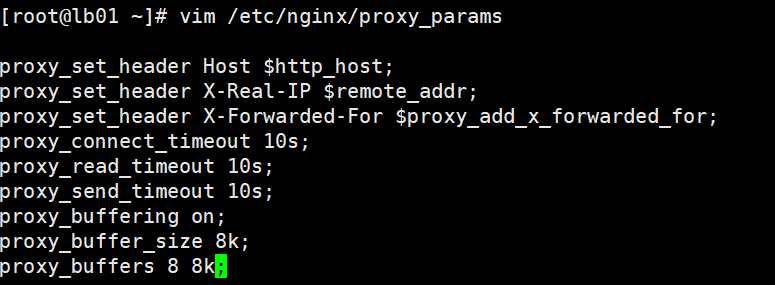

proxy_set_header Host $http_host;
proxy_set_header X-Real-IP $remote_addr;
proxy_set_header X-Forwarded-For $proxy_add_x_forwarded_for;
proxy_connect_timeout 10s;
proxy_read_timeout 10s;
proxy_send_timeout 10s;
proxy_buffering on;
proxy_buffer_size 8k;
proxy_buffers 8 8k;
常用参数
Syntax:    proxy_set_header field value;
Default:    proxy_set_header Host $http_host;
            proxy_set_header Connection close;
Context:    http, server, location

# 用户请求的时候HOST的值是linux.proxy.com, 那么代理服务会像后端传递请求的还是linux.proxy.com
proxy_set_header Host $http_host;
# 将$remote_addr的值放进变量X-Real-IP中,$remote_addr的值为客户端的ip
proxy_set_header X-Real-IP $remote_addr;
# 客户端通过代理服务访问后端服务, 后端服务通过该变量会记录真实客户端地址
proxy_set_header X-Forwarded-For $proxy_add_x_forwarded_for;
Syntax: proxy_connect_timeout time;
Default: proxy_connect_timeout 60s;
Context: http, server, location

#nginx代理等待后端服务器的响应时间
Syntax:    proxy_read_timeout time;
Default:    proxy_read_timeout 60s;
Context:    http, server, location

#后端服务器数据回传给nginx代理超时时间
Syntax: proxy_send_timeout time;
Default: proxy_send_timeout 60s;
Context: http, server, location

# 推荐设置
proxy_connect_timeout 1s;
proxy_read_timeout 3s;
proxy_send_timeout 3s;
#nignx会把后端返回的内容先放到缓冲区当中,然后再返回给客户端,边收边传, 不是全部接收完再传给客户端
Syntax: proxy_buffering on | off;
Default: proxy_buffering on;
Context: http, server, location

#设置nginx代理保存用户头信息的缓冲区大小
Syntax: proxy_buffer_size size;
Default: proxy_buffer_size 4k|8k;
Context: http, server, location

#proxy_buffers 缓冲区
Syntax: proxy_buffers number size;
Default: proxy_buffers 8 4k|8k;
Context: http, server, location
负载均衡
负载均衡的作用
当我们的Web服务器直接面向用户,往往要承载大量并发请求,单台服务器难以负荷,使用多台Web服务器组成集群,前端使用Nginx负载均衡,将请求分散的打到我们的后端服务器集群中,实现负载的分发。那么会大大提升系统的吞吐率、请求性能、高容灾。
负载均衡的实现
负载均衡是通过将后端服务打包成一个IP连接池,然后从中选择ip。
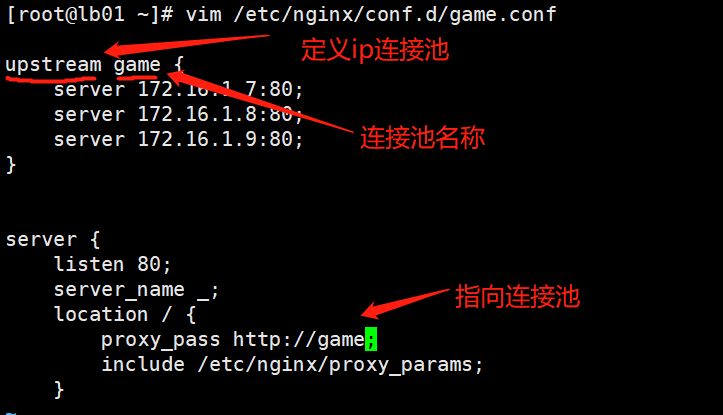
负载均衡的比例
负载均衡中IP连接池的使用比例有三种方式
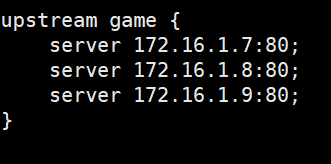
1.轮询
默认情况下,nginx负载均衡处于轮询状态。即轮流访问每个ip。
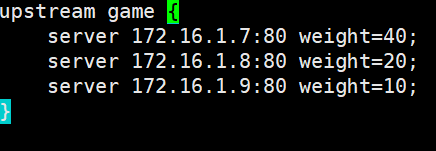
2.权重
nginx中的权重为0-100,数字越大,权重越高
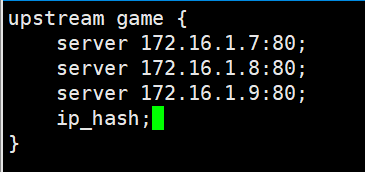
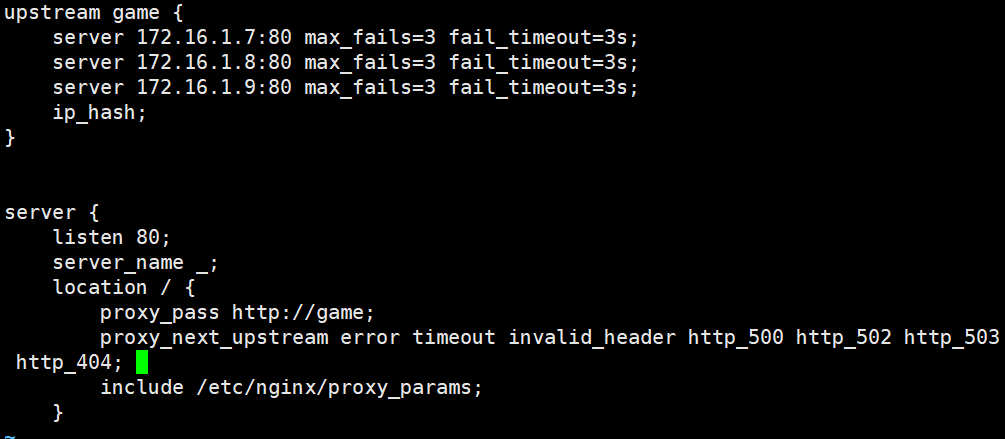
3.ip_hash
使用ip_hash则每一个ip固定会访问某一个后端
负载均衡后端状态
后端的状态分为以下几种
| 概述 | |
|---|---|
| down | 当前的server暂时不参与负载均衡 |
| backup | 预留的备份服务器 |
| max_fails | 允许请求失败的次数 |
| fail_timeout |
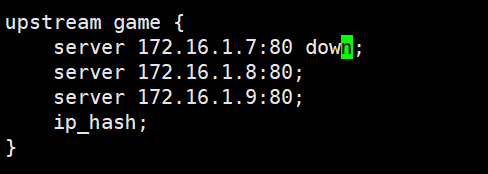
1.down
down指对于某一个后端暂时不分配流量
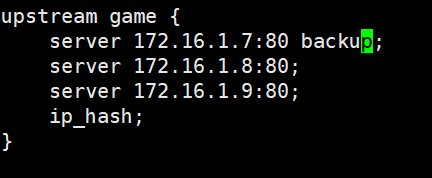
2.backup
backup表示备用,只有其他机器全部宕机之后才会启用
3.

error             # 与服务器建立连接,向其传递请求或读取响应头时发生错误;
timeout           # 在与服务器建立连接,向其传递请求或读取响应头时发生超时;
invalid_header    # 服务器返回空的或无效的响应;
http_500          # 服务器返回代码为500的响应;
http_502          # 服务器返回代码为502的响应;
http_503          # 服务器返回代码为503的响应;
http_504          # 服务器返回代码504的响应;
http_403          # 服务器返回代码为403的响应;
http_404          # 服务器返回代码为404的响应;
http_429          # 服务器返回代码为429的响应(1.11.13);
non_idempotent    # 通常,请求与 非幂等 方法(POST,LOCK,PATCH)不传递到请求是否已被发送到上游服务器(1.9.13)的下一个服务器; 启用此选项显式允许重试此类请求;
off               # 禁用将请求传递给下一个服务器。
2.安装django、uwsgi和pymysql


3.将文件代码上传解压

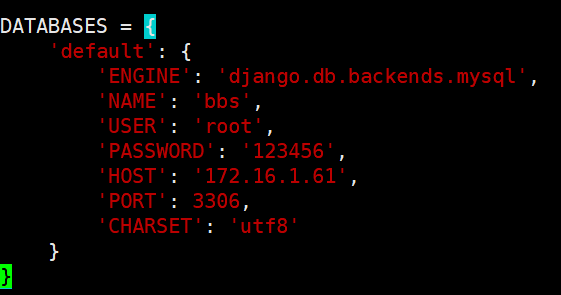
4.修改配置文件


5.启动测试

2.配置nginx并启动
1.编辑项目配置文件
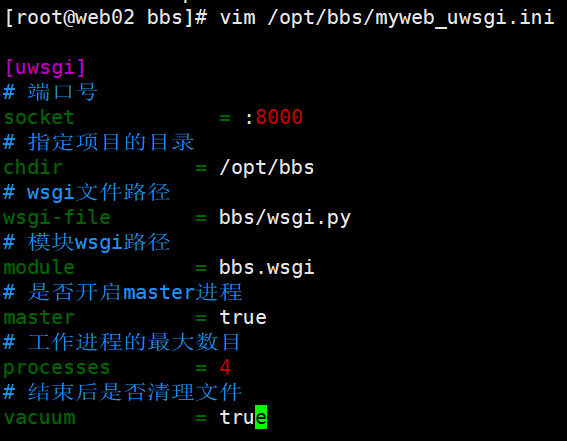
2.启动uwsgi

3.编辑nginx配置文件
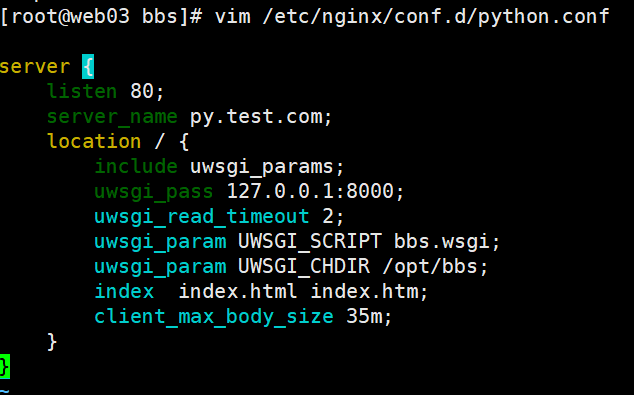
4.重启nginx

3.部署负载均衡
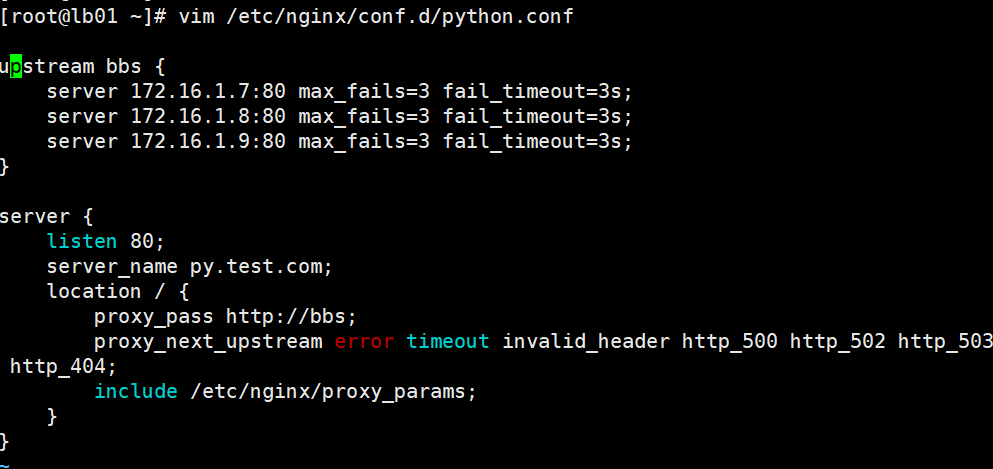

upstream bbs {
    server 172.16.1.7:80 max_fails=3 fail_timeout=3s;
    server 172.16.1.8:80 max_fails=3 fail_timeout=3s;
    server 172.16.1.9:80 max_fails=3 fail_timeout=3s;
}

server {
    listen 80;
    server_name py.test.com;
    location / {
        proxy_pass http://bbs;
        proxy_next_upstream error timeout invalid_header http_500 http_502 http_503 http_404;
        include /etc/nginx/proxy_params;
    }
}
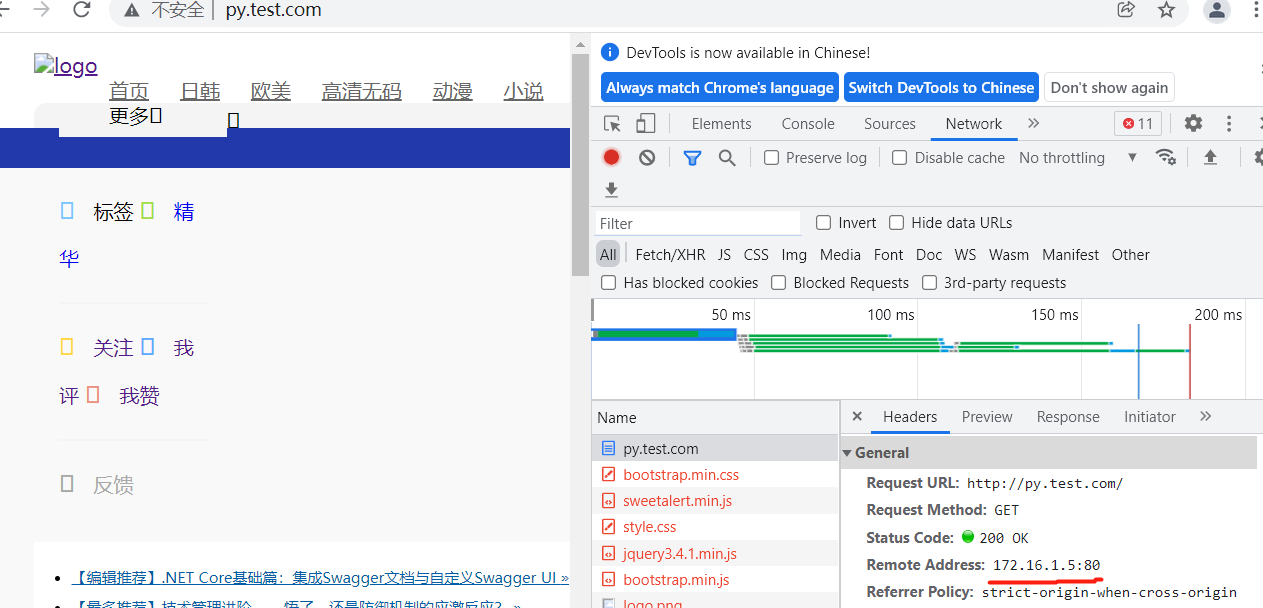
4.测试




 浙公网安备 33010602011771号