

通知实战 设置通知图片(iOS10以后的)
解释两个基本扩展(Notification Content、Notification Service)
Notification Content其实是用来自定义长按通知显示通知的自定义界面
Notification Service是用来处理远程通知的,我们可以在远程通知到来之际,我们在Notification Service
里面由30s的时间来处理这条通知的
首先使用Notification Service
1.创建扩展target
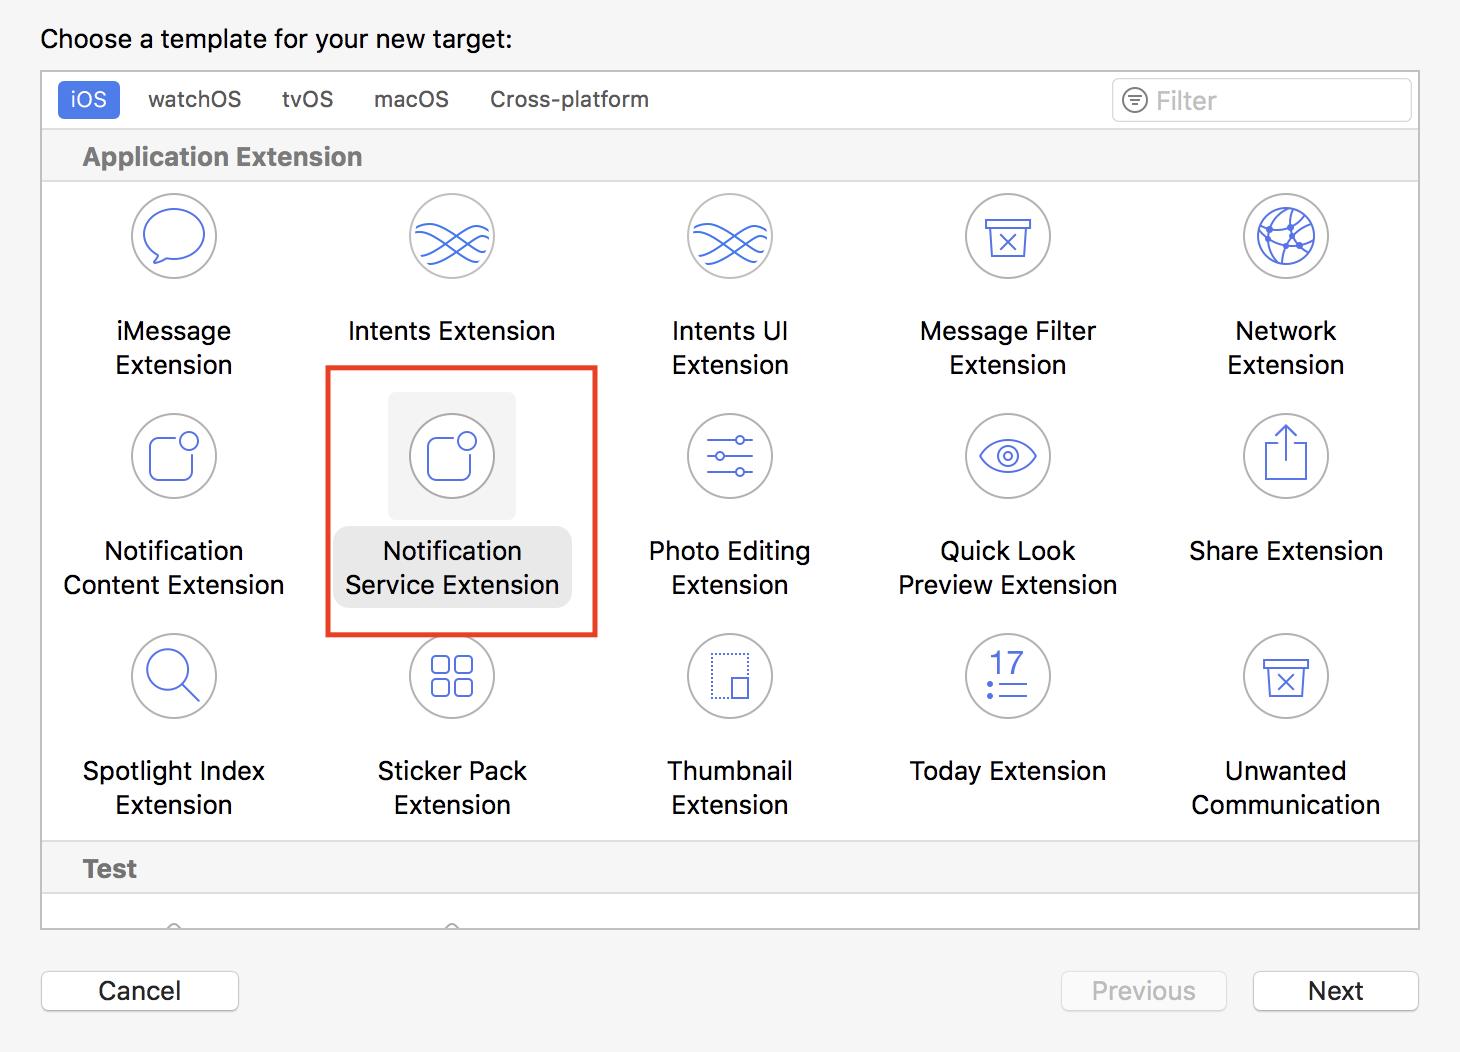
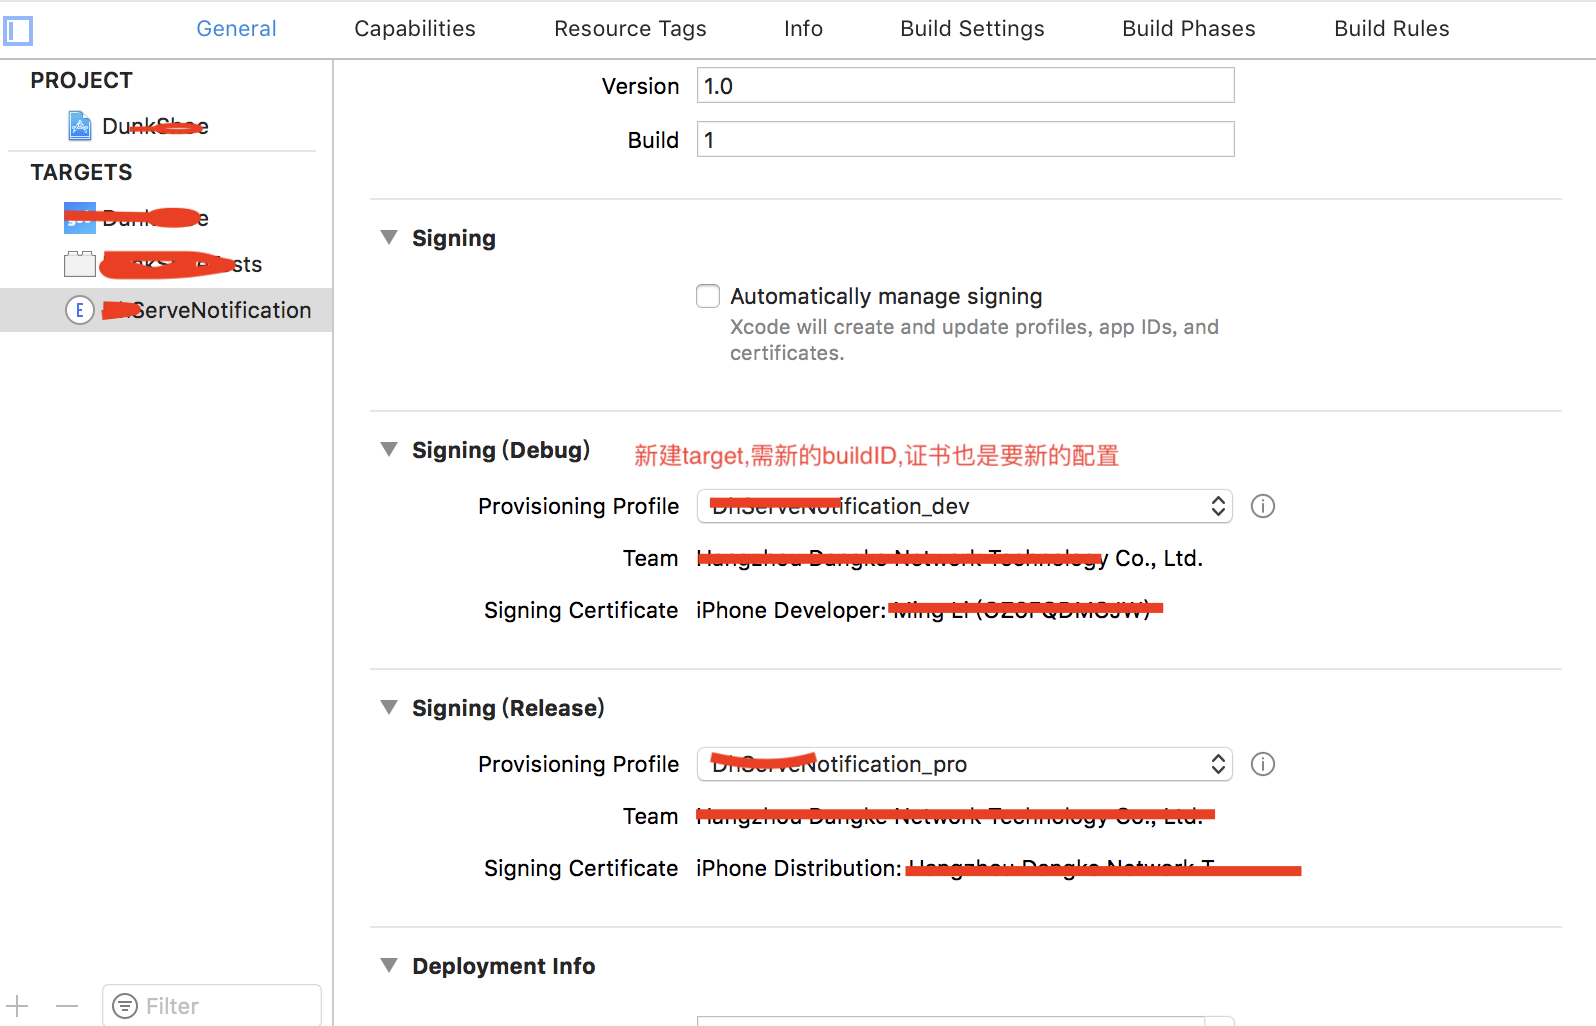
2. 这里会新建一个扩展的target,新的target需要新的ID,新的证书等(证书和id不会的请百度)
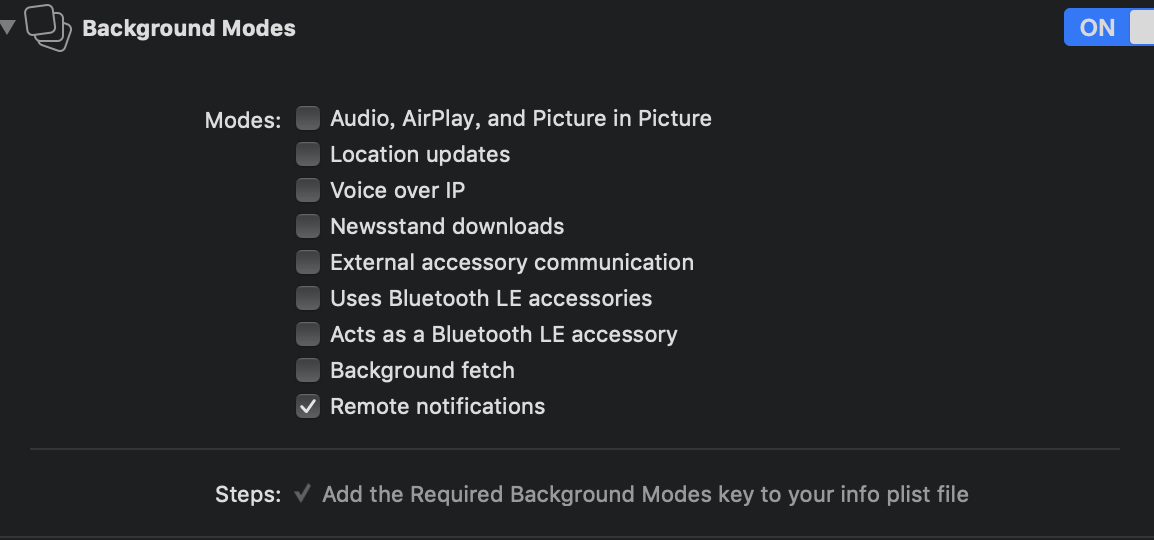
3.然后对主target进行设置

注意如果没有用到后台的播放什么的只选Remote notifications,免得被拒绝
4. 对扩展的target进行设置

5.这里用的是极光推送,需要极光的相关文件(需要文件的可以去极光开发中心获取demo)

6.扩展target添加文件
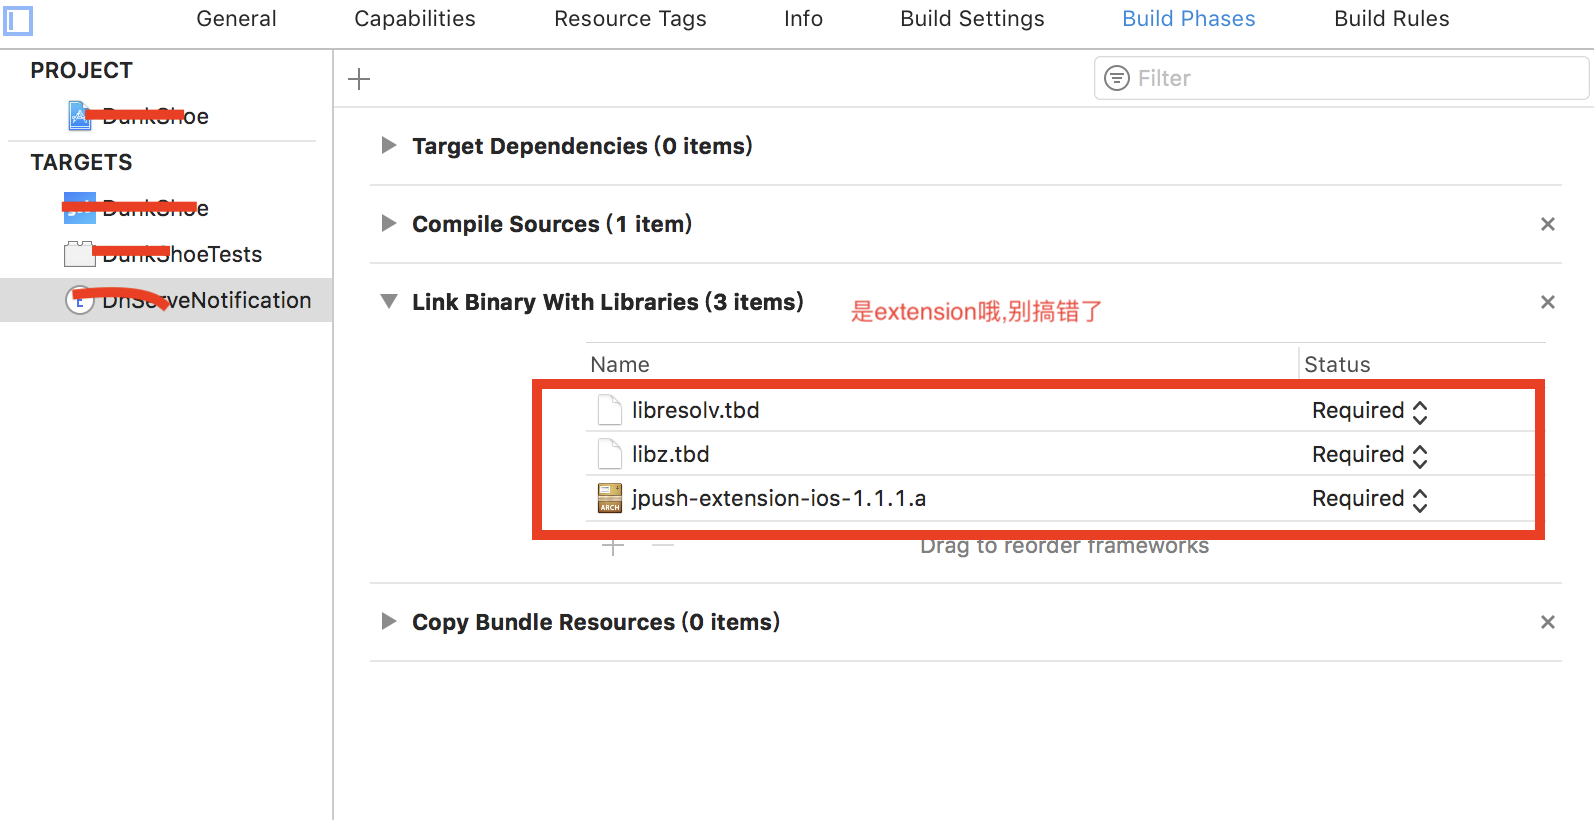
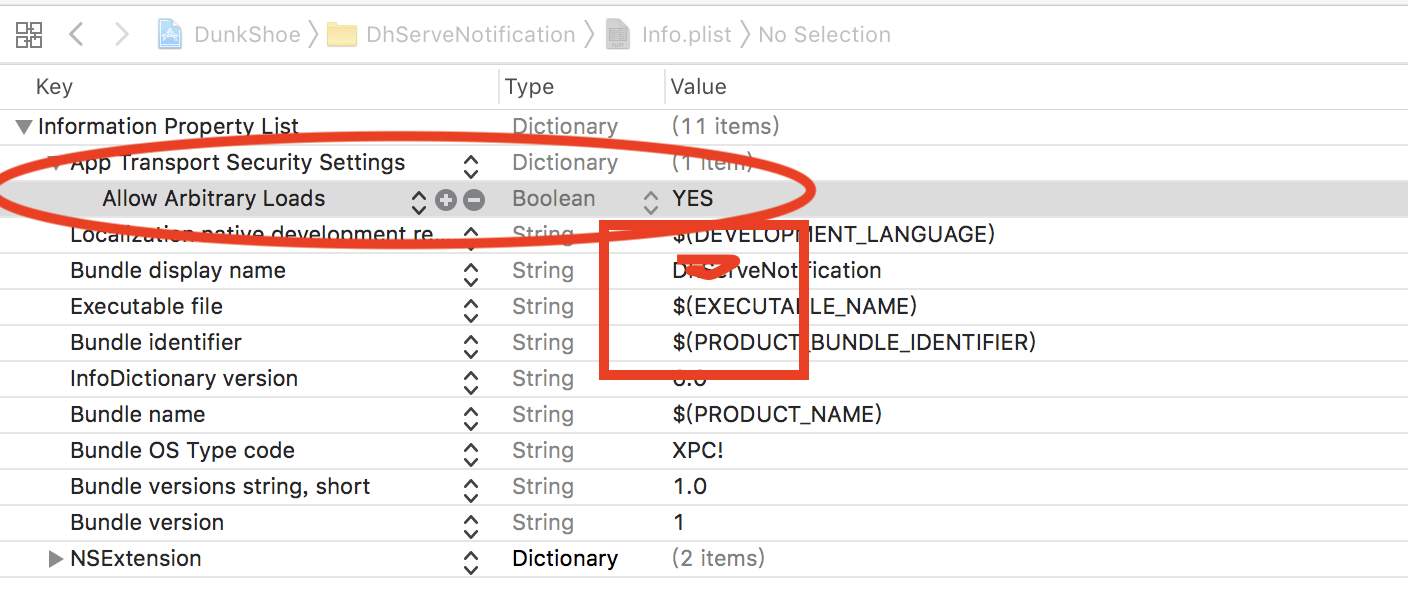
7.当添加后为了可以访问http,在对应的plist文件进行设置
8.设置完成之后就可以看代码了

#import "NotificationService.h"
#import "JPushNotificationExtensionService.h"

@interface NotificationService ()

@property (nonatomic, strong) void (^contentHandler)(UNNotificationContent *contentToDeliver);
@property (nonatomic, strong) UNMutableNotificationContent *bestAttemptContent;

@end

@implementation NotificationService

- (void)didReceiveNotificationRequest:(UNNotificationRequest *)request withContentHandler:(void (^)(UNNotificationContent * _Nonnull))contentHandler {

    self.contentHandler = contentHandler;
    self.bestAttemptContent = [request.content mutableCopy];
    //    self.bestAttemptContent.title = [NSString stringWithFormat:@"%@ [NotificationService]", self.bestAttemptContent.title];
    NSString * attachmentPath = self.bestAttemptContent.userInfo[@"myAttachmentURL"];
    //if exist
    if (attachmentPath) {
        //download
        NSURL *fileURL = [NSURL URLWithString:attachmentPath];
        [self downloadAndSave:fileURL handler:^(NSString *localPath) {
            if (localPath) {
                UNNotificationAttachment * attachment = [UNNotificationAttachment attachmentWithIdentifier:@"myAttachment" URL:[NSURL fileURLWithPath:localPath] options:nil error:nil];
                self.bestAttemptContent.attachments = @[attachment];
            }
            [self apnsDeliverWith:request];
        }];
    }else{
        [self apnsDeliverWith:request];
    }
}

- (void)downloadAndSave:(NSURL *)fileURL handler:(void (^)(NSString *))handler {

    NSURLSession * session = [NSURLSession sharedSession];
    NSURLSessionDownloadTask *task = [session downloadTaskWithURL:fileURL completionHandler:^(NSURL * _Nullable location, NSURLResponse * _Nullable response, NSError * _Nullable error) {
        NSString *localPath = nil;
        if (!error) {
            NSString * localURL = [NSString stringWithFormat:@"%@/%@", NSTemporaryDirectory(),fileURL.lastPathComponent];
            if ([[NSFileManager defaultManager] moveItemAtPath:location.path toPath:localURL error:nil]) {
                localPath = localURL;
            }
        }
        handler(localPath);
    }];
    [task resume];

}

- (void)apnsDeliverWith:(UNNotificationRequest *)request {

    //please invoke this func on release version
    //[JPushNotificationExtensionService setLogOff];

    //service extension sdk
    //upload to calculate delivery rate
    [JPushNotificationExtensionService jpushSetAppkey:@"3a6190XXXXXXX28907"];
    [JPushNotificationExtensionService jpushReceiveNotificationRequest:request with:^ {
        NSLog(@"apns upload success");
        self.contentHandler(self.bestAttemptContent);
    }];
}

- (void)serviceExtensionTimeWillExpire {

    self.contentHandler(self.bestAttemptContent);
}
@end
其中的 "myAttachmentURL" 是自己定义的即可 (代码请仔细阅读,原理是获取网络图片,然后再显示)
9. 通过极光进行推送测试(目标平台选择开发环境即可,证书配置,请参考极光文档)
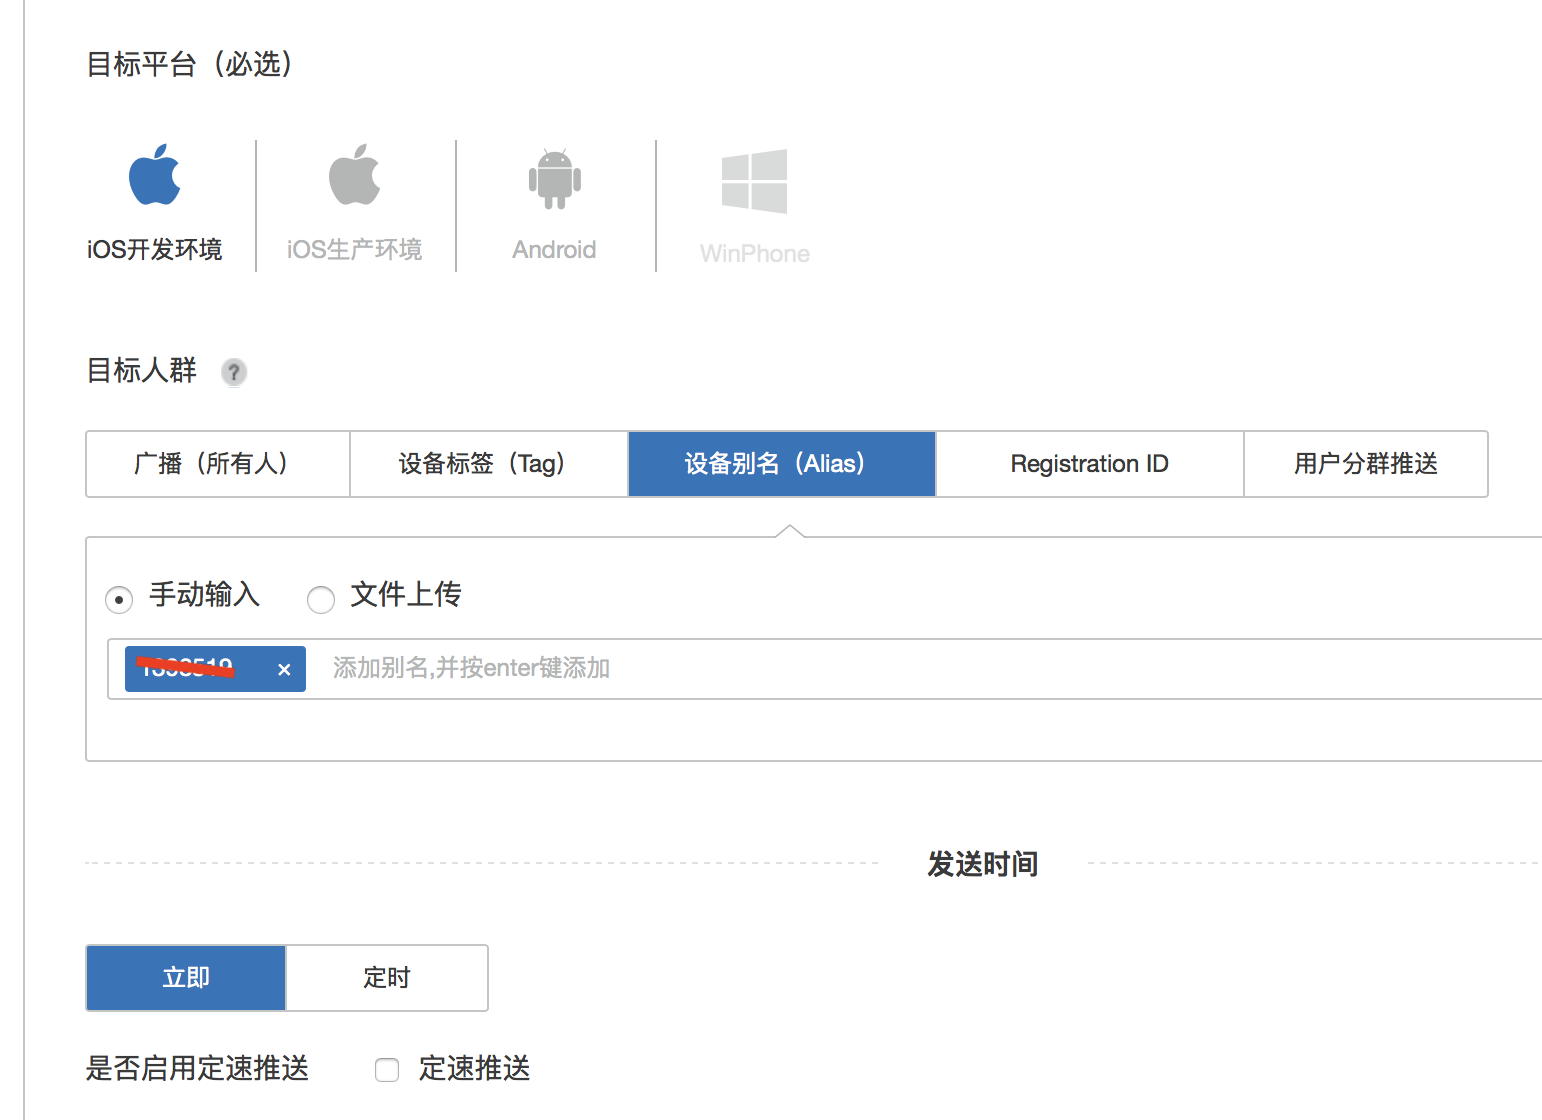
10.设置参数, 测试开始完成推送. "myAttachmentURL"是自己设置的哦!记得设置 mutable-content

11.收到推送

12.Notification Service断点调试说明

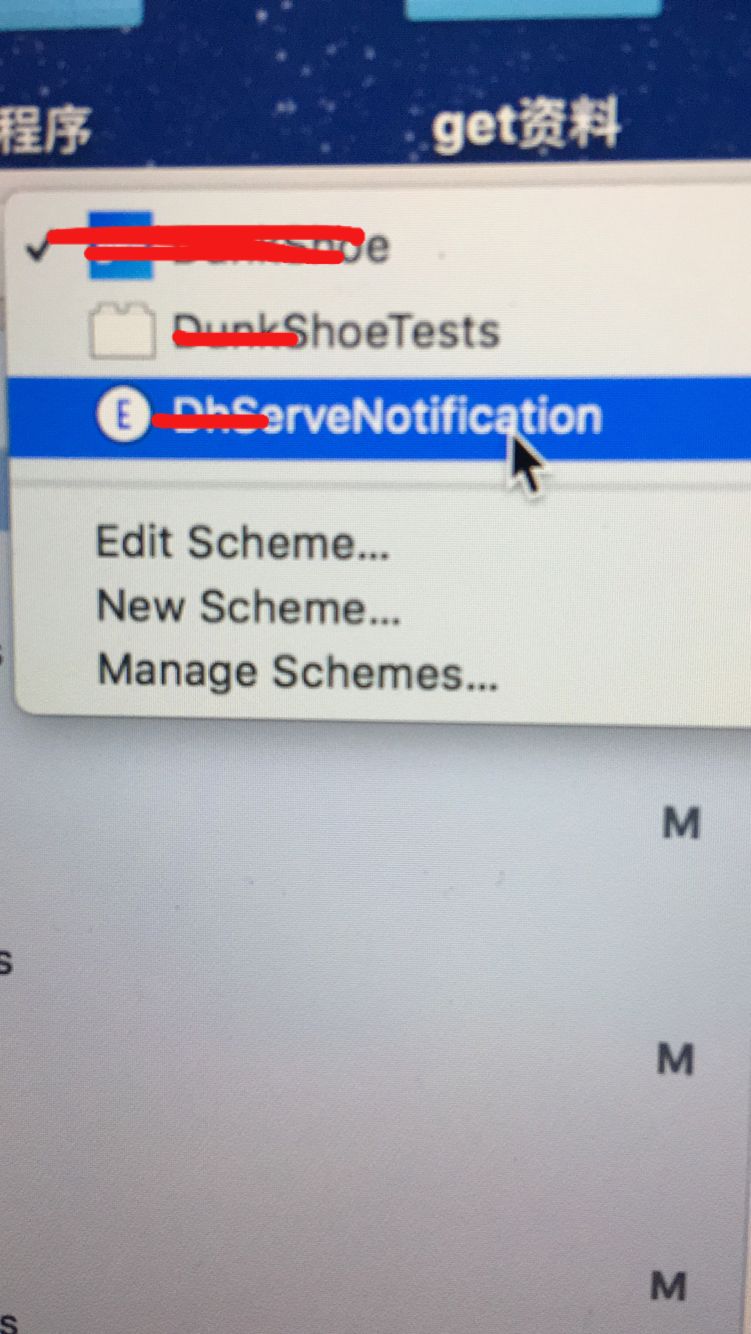
选择target时并没有我们的扩展target,需要点击管理target进而点击Autocreate Schemes Now
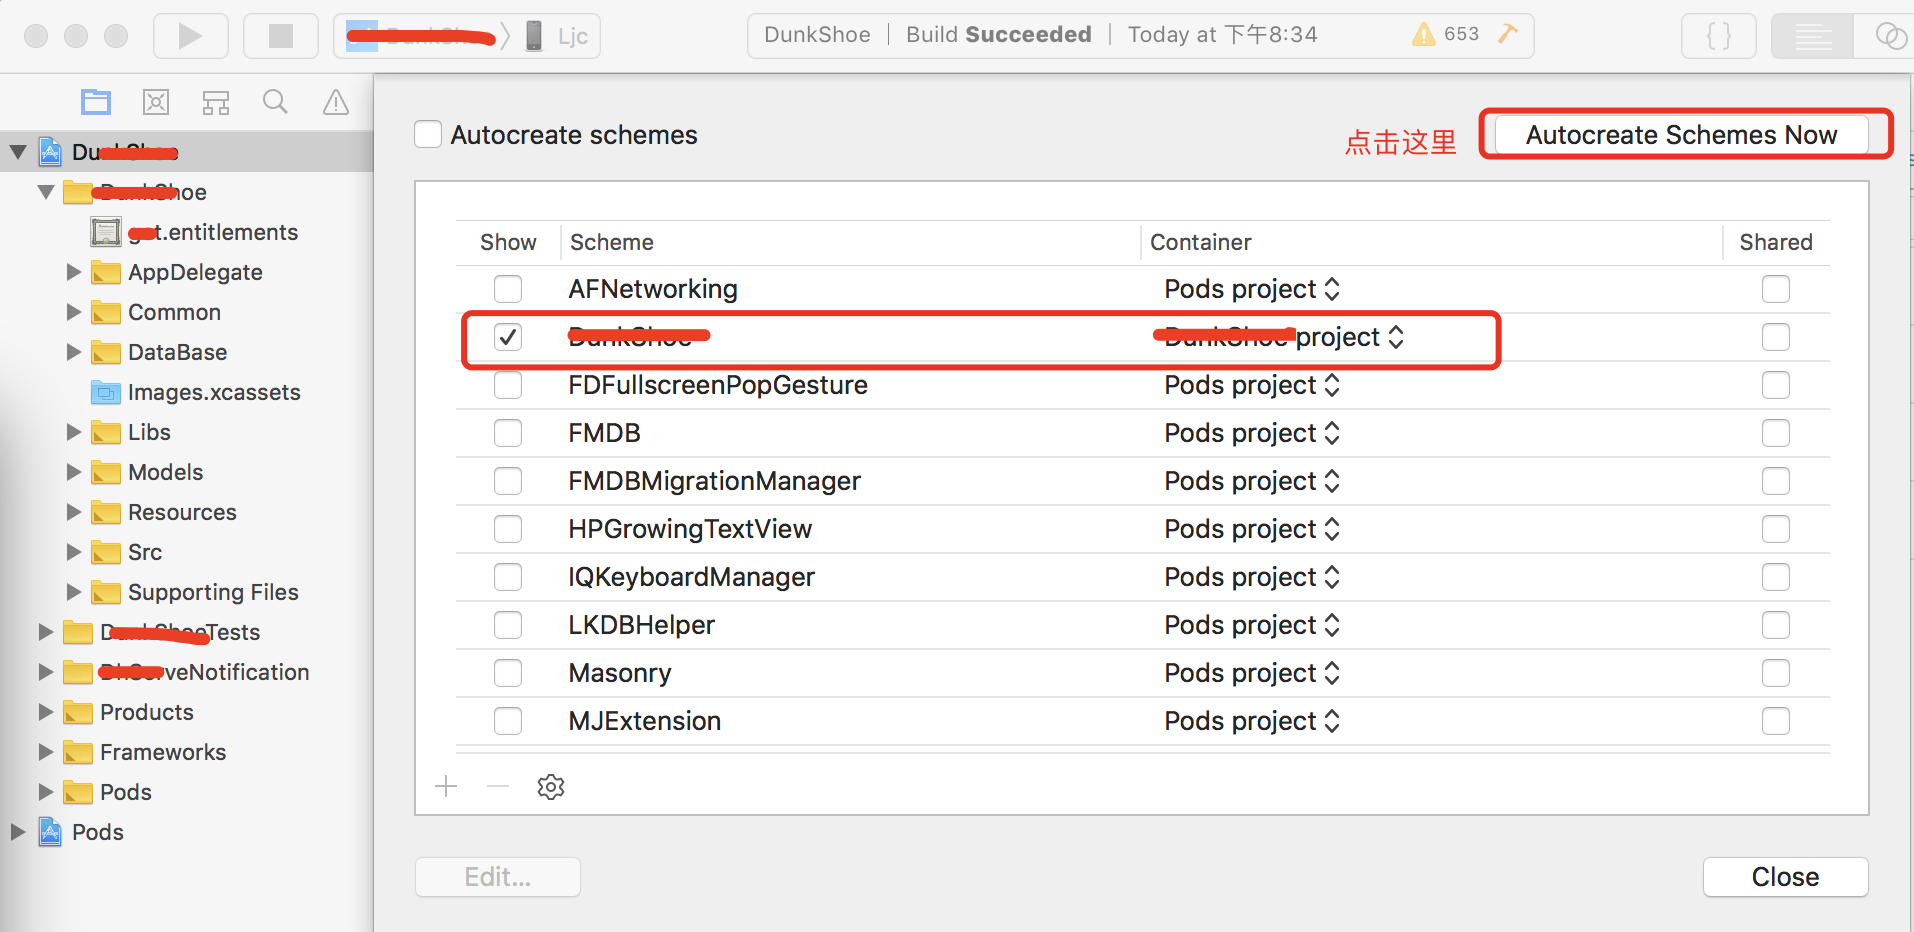

这个时候扩展的target出现了
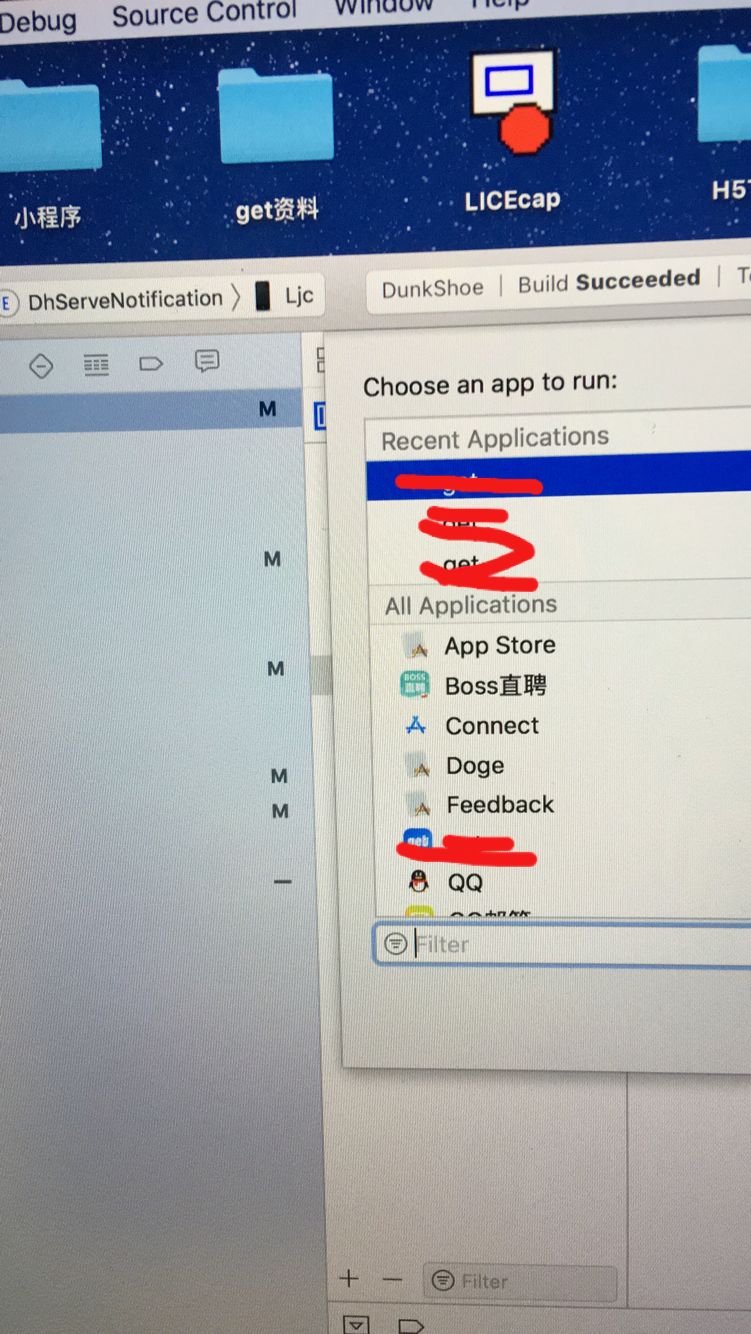
好了可以运行了(会进行一次选择,选择我们的主app即可,运行后在 NotificationService.m 文件中的断点就可以捕捉到啦)
到这里Notification Service的使用说明就结束了,以后有补充的再写啦!

 浙公网安备 33010602011771号