


Mobile App UI自动化locator - 实践
在开展mobile app UI层自动化测试时,编写目标元素的locator是比较耗时的一个环节,弄清楚locator背后的逻辑,可以有效降低UI层测试维护成本。此篇博客以webdriverio+appium作为UI自动化工具为例子,看看有哪些selector方法,以及在实现应用时,如何有效提供元素ID,让UI自动化测试更加容易。
WebDriverIO提供哪些IOS的locator
如果IOS10以及以上版本,基本都是用XCUITest driver,所以这里介绍的locator也是XCUITest框架支持的locator。实际总共就提供了三种类型的locator,-ios predicate string,-ios class chain,Accessibilty ID。下面是官网给出的三种不同locator方式的example。
// predicate string locatorconst selector = `type == 'XCUIElementTypeSwitch' && name CONTAINS 'Allow'`const switch = await $(`-ios predicate string:${selector}`)await switch.click() // class chain locatorconst selector = '**/XCUIElementTypeCell[`name BEGINSWITH "D"`]/**/XCUIElementTypeButton'const button = await $(`-ios class chain:${selector}`)await button.click() // Accessibility ID locatorconst elem = await $('~my_accessibility_identifier')await elem.click()其中predicate string实际是WebDriverAgent提供的通过元素属性定位元素的方法,上面的example code中使用了type、name属性,除这些属性外还支持value,label等属性对元素进行定位。class chain也是WebDriverAgent提供的另外一种定位元素的方法。除了通过name属性进行定位外,还可以支持label,value等。例如:
XCUIElementTypeWindow[`name == "you're the winner"`]/XCUIElementTypeAny[`visible == 1`],XCUIElementTypeWindow/XCUIElementTypeAny[`value == "bla1" OR label == "bla2"`]。上面的元素定位中accessibility id是最简单的,如何保证app的常用元素都有唯一的标识呢?实际很简单
ReactNative开发的应用设置
WebdriverIO官方提供的被测app是由ReactNative开发的,使用WebDriverIO作为客户端工具,如果期望通过$('~xxx')进行元素定位,如果是IOS,则输入的xxx属性是accessibility ID,如果是Android,则输入的xxx属性是content-desc。在使用ReactNative开发应用的时候,如果期望转换出来的ios app有accessibility ID属性,那么需要为元素设置唯一的TestID属性,如果期望转换出来的Android app有content-desc属性,那么需要为元素设置accessibilityLable属性。当然,如果只给元素设置了TestID也是ok的,因为对于Android的app,TestID会转变成app的resource-id,有了resource-id,那么可以使用new UISelector().resourceId("xxx")来进行定位。
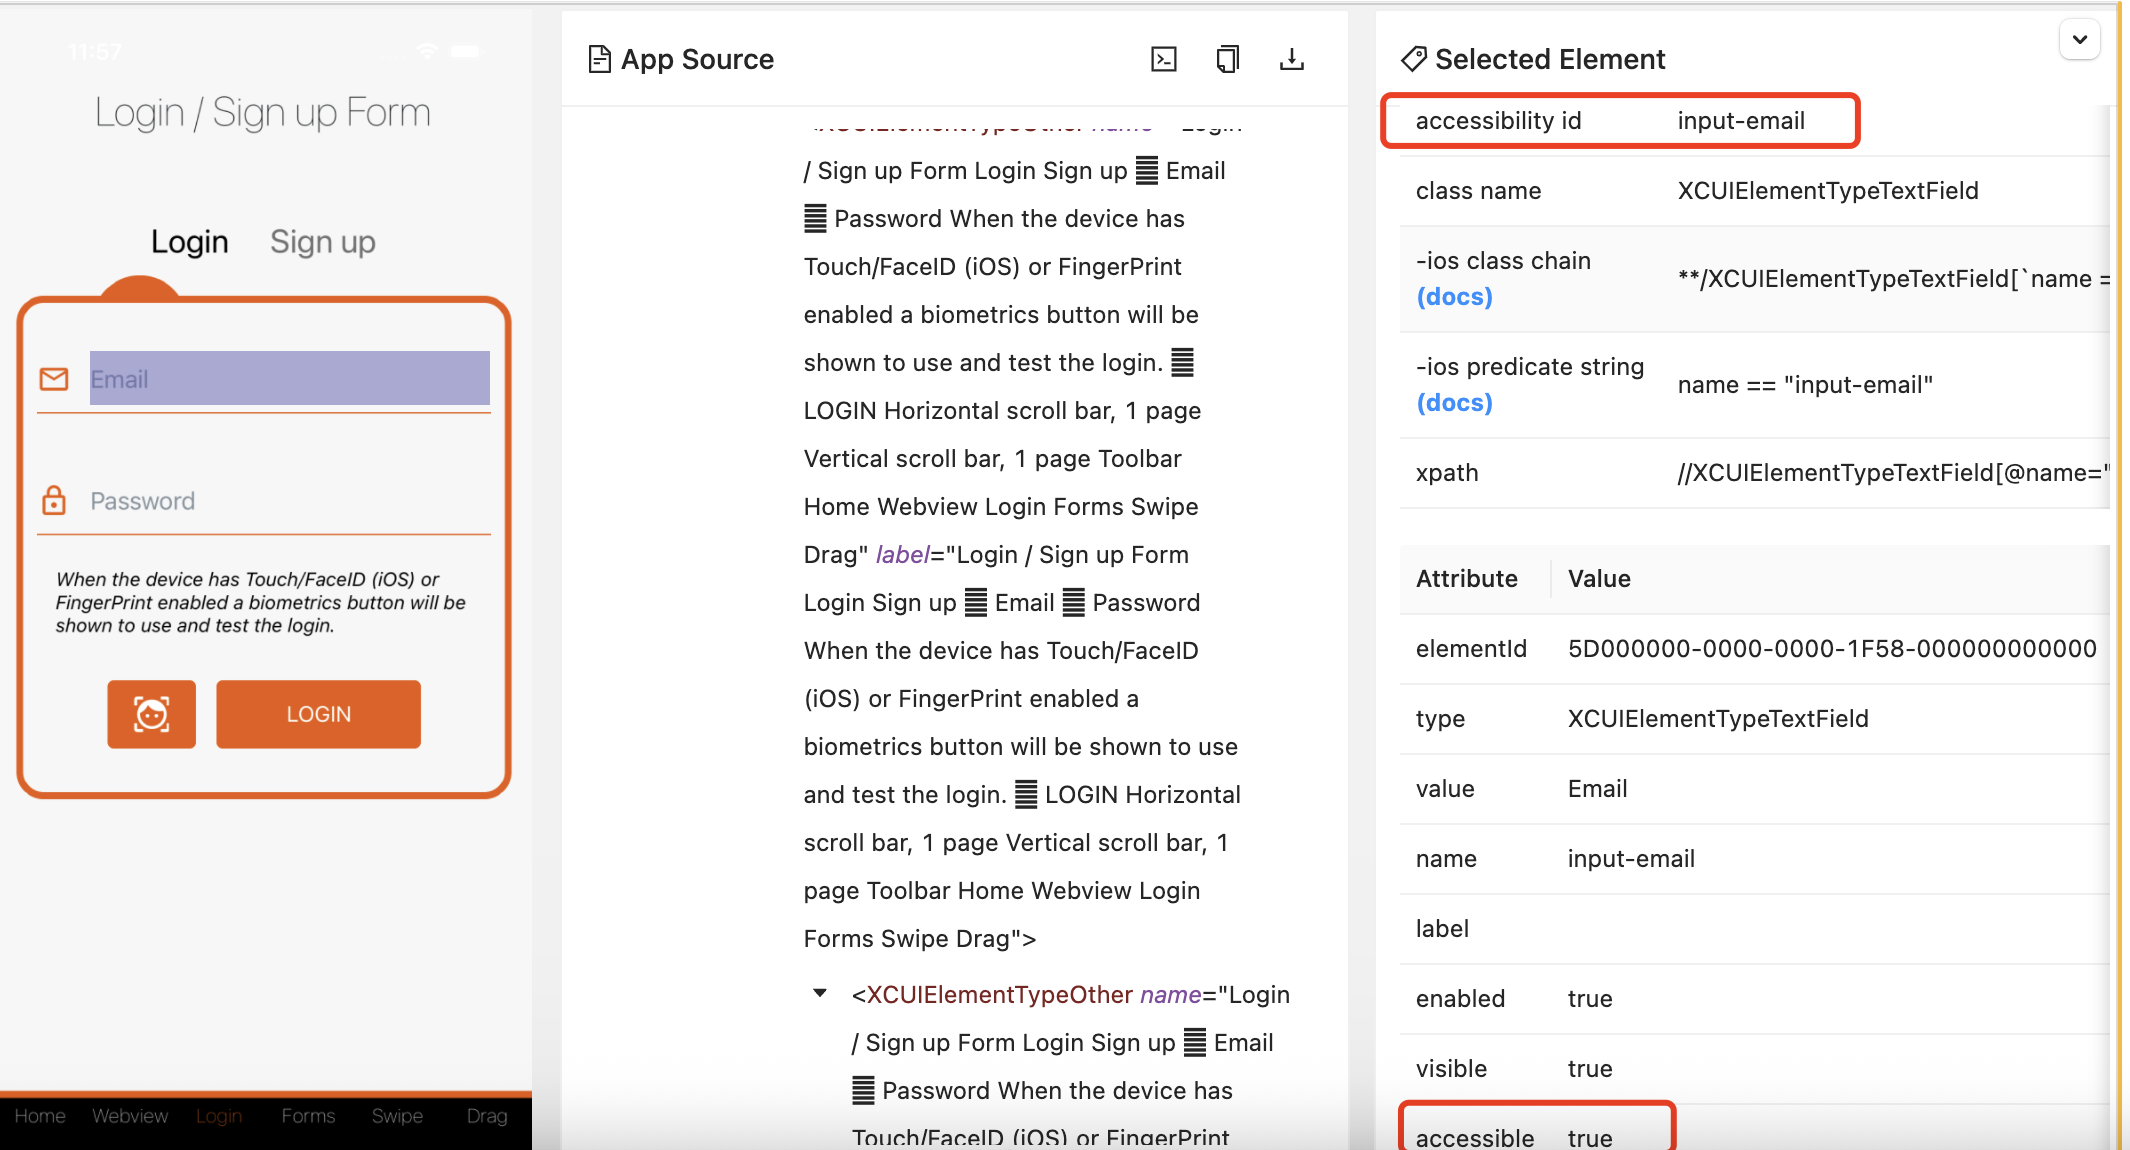
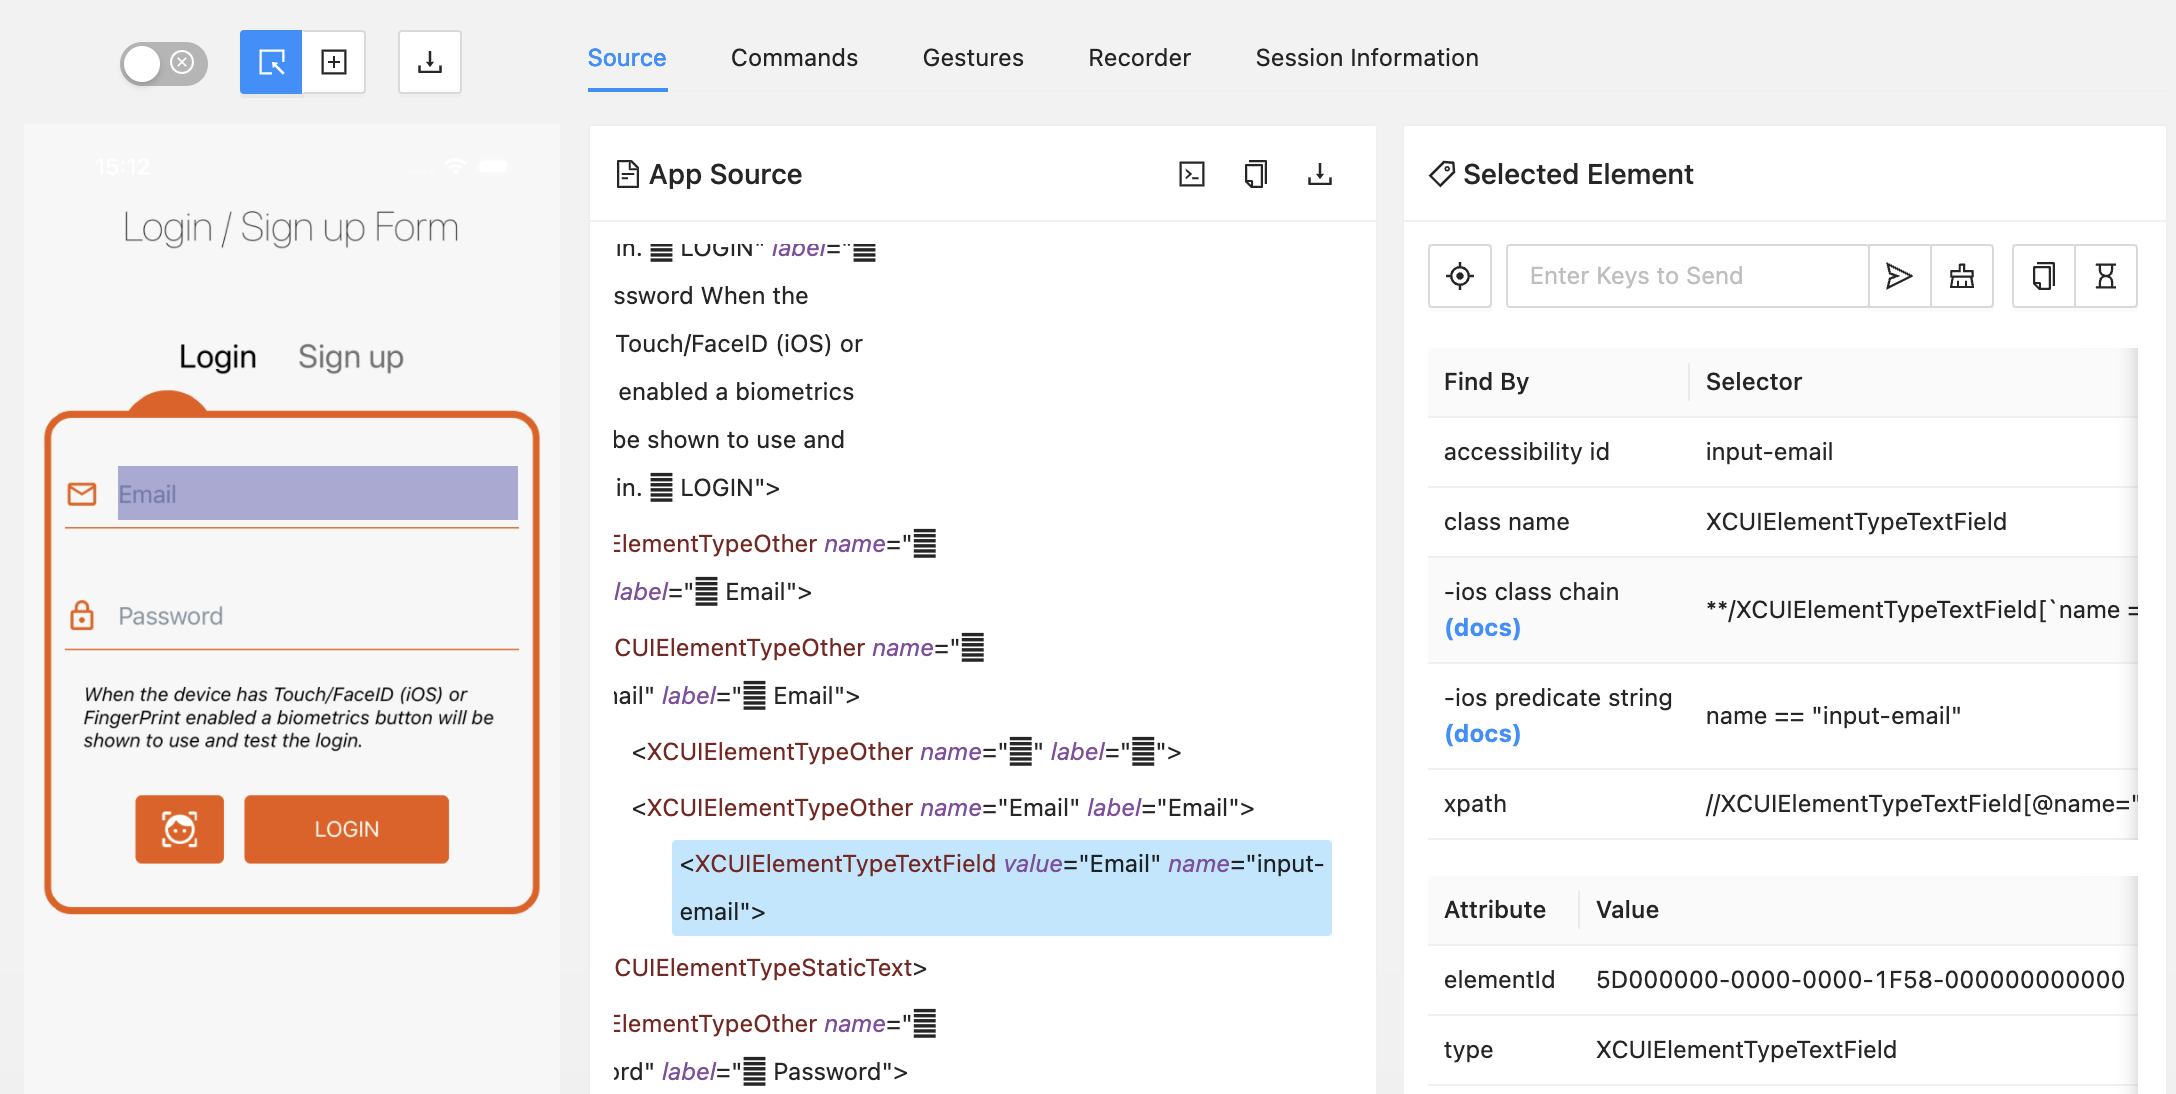
下图是使用Appium Inspector查看WebDriverIO官方提供的测试app,以登录为例,email,password输入框都有accessibility id属性,在下面的属性中accessible属性是true。
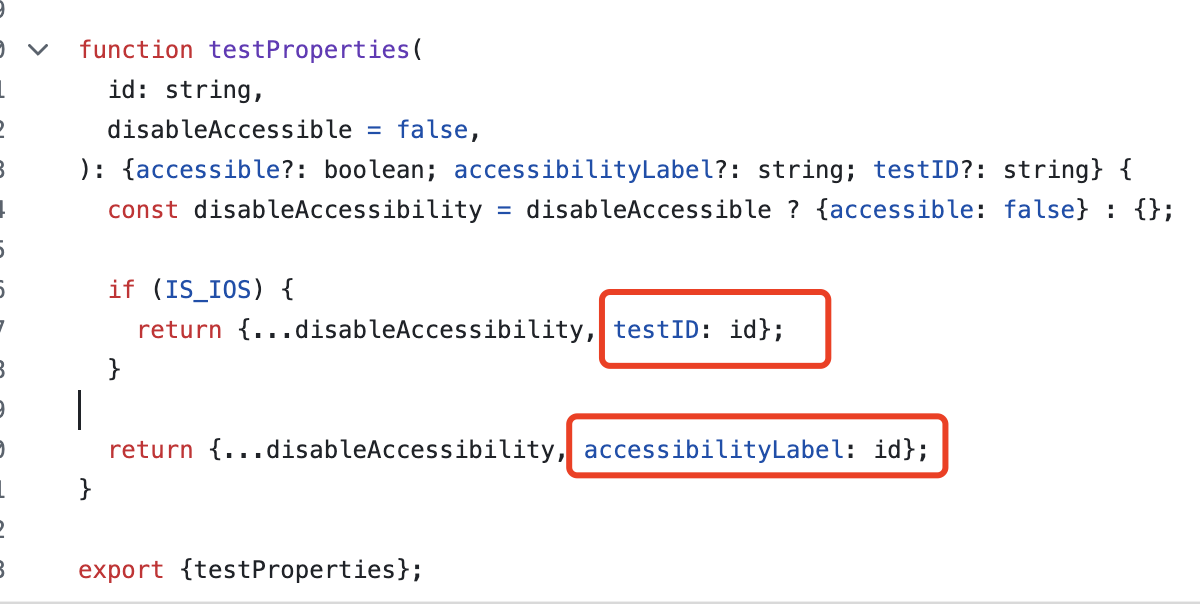
在ReactNative中,如何保证元素都有accessbilityID值呢?下面是app的source code,以上面的email输入框为例子,在Input component中引用了testProperties对象,testProperties对象中根据Platform是ios或者Android,设置了testID或者accessibilityLabel属性。开发在实现应用的时候可以约定为页面可见元素增加testID,这样定位app的元素会节省很多时间。

Flutter开发的应用
上面介绍了ReactNative开发的应用,如果是Flutter开发的应用支持设置唯一ID么?在Appium Flutter Driver文档中有介绍,从Flutter 3.19版本开始,Flutter支持设置唯一ID,即通过设置semanticLabel属性,转换成app后,就会变成Android的resource-id或者IOS的accessibilityID。下面是一段example代码,在这个Button中设置了semanticLabel属性,值是‘my_button_label',当转换成mobile apple后,如果是Android,那么该button的resource-id就是‘my_button_label',如果是IOS,这个button的accessibilityID就是'my_button_label'.
import 'package:flutter/material.dart'; void main() { runApp(MyApp());} class MyApp extends StatelessWidget { @override Widget build(BuildContext context) { return MaterialApp( home: Scaffold( appBar: AppBar(title: Text('Accessibility Identifier Example')), body: Center( child: ElevatedButton( key: ValueKey('my_button_key'), // 设置 Key 用于测试 onPressed: () {}, child: Text('Press Me'), semanticLabel: 'my_button_label', // 设置语义标签 ), ), ), ); }}可以看到,如果采用跨平台的框架开发mobile app时,进行统一的属性设置,后续开展UI自动化测试时,定位页面元素会变得更加容易。当然,如果是采用纯原生开发,那么就分别针对IOS和Andorid设置每个元素的accessibilityID和resource-id即可。
如果是一些老的app,让开发统一为每个元素设置ID会有些困难,当目标app中大部分元素没有accessibiltiyID值时,我们需要熟悉另外两个常用的元素定位方法-ios predicate thing:和-ios class chain:,以下面简单app为例子,我们不使用accessibilityID进行定位,用其他方式进行定位操作。
下面是定位和操作目标元素代码,可以看到在定位元素的时候,基本把Appium inspector中显示的Selector copy过来即可。如果是android前面需要添加前缀android=,如果是ios,需要添加前缀-ios predicate string:或者-ios class chain:,需要注意一点:后面不要有空格,否则会出现parse失败的错误。
class NewLoginScreen { public async goToLoginScreen() { await $('~Login').click(); } public async login(email: string, password: string) { const emailInput = driver.isAndroid ? 'android=new UiSelector().resourceId("input-email")' : '-ios predicate string:name == "input-email"'; const passwordInput = driver.isAndroid ? 'android=new UiSelector().resourceId("input-password")' : '-ios class chain:**/XCUIElementTypeSecureTextField[`name == "input-password"`]'; const loginButton = driver.isAndroid ? 'android=new UiSelector().text("LOGIN")' : '-ios predicate string:name == "LOGIN" AND label == "LOGIN" AND type == "XCUIElementTypeOther"'; const alertOK = driver.isAndroid ? 'android=new UiSelector().name("OK")' : '-ios class chain:**/XCUIElementTypeButton[`name == "OK"`]' await $(emailInput).setValue(email); await $(passwordInput).setValue(password); await $(loginButton).click(); await $(alertOK).click(); }}export default new NewLoginScreen(); import NewLoginScreen from "../screenobjects/NewLoginScreen.js";import TabBar from '../screenobjects/components/TabBar.js'; describe("can login successfully", () => { beforeEach(async () => { await TabBar.waitForTabBarShown(); await TabBar.openLogin(); }) it("can login", async () => { await NewLoginScreen.goToLoginScreen() await NewLoginScreen.login("test001@gmail.com", "12345678") })})WebDriverIO提供的Android locator
上面介绍的都是IOS,对于Android,前面的博客有介绍Android的locator。如果采用WebDriverIO这个工具,Android选用UIAutomator2 Driver,那么定位目标元素主要有两种方式,方式一:通过content-desc,即$('~content-desc')定位目标元素,方式二:通过UISelector()定位目标元素。UISelector()中常用的有resourceId,className,text,index进行元素定位。其他text包括textStartsWith,textContains,更多信息查看here。下面是一些example code。
const selector = 'new UiSelector().text("Cancel").className("android.widget.Button")'const button = await $(`android=${selector}`)await button.click() public async checkScreenshotFirstLineMenu() { const selector = driver.isAndroid ? 'android=new UiSelector().className("androidx.compose.ui.platform.ComposeView").instance(1)' : '//XCUIElementTypeButton[@name="xx"]'; await browser.checkElement(await $(selector), "firstLineMenuForHome", { enableLayoutTesting: true }) } public async clickMore() { const selector = driver.isAndroid ? 'android=new UiSelector().text("更多")' : '//XCUIElementTypeButton[@name="xx"]'; await $(selector).click() }总结而言,如果是新项目,为每个元素定义TestID或者semanticLabel,后续开展UI自动化测试时会更加容易,如果是老项目,需要结合多种元素定位方式进行元素定位。


 浙公网安备 33010602011771号