1、Hibernate之生成SessionFactory源码追踪
2016-04-15 19:55 宏愿。 阅读(1804) 评论(0) 编辑 收藏 举报
Hibernate的所有session都是由sessionFactory来生成的,那么,sessionFactory是怎么得来的呢?它与我们配置的xxx.cfg.xml文件以及xxx.hbm.xml文件之间又有着怎么样的联系呢?
先看一小段生成sessionFactory的代码:
code_1:
public class HibernateTest {

    @Test
    public void test() {

        System.out.println("test...");

        //1. 创建一个 SessionFactory 对象
        SessionFactory sessionFactory = null;

            //1). 创建 Configuration 对象: 对应 hibernate 的基本配置信息和 对象关系映射信息
            Configuration configuration = new Configuration().configure();

            //4.0 之前这样创建
            //sessionFactory = configuration.buildSessionFactory();

            //2). 创建一个 ServiceRegistry 对象: hibernate 4.x 新添加的对象
            //hibernate 的任何配置和服务都需要在该对象中注册后才能有效.
            ServiceRegistry serviceRegistry =
                new ServiceRegistryBuilder().applySettings(configuration.getProperties())
                                            .buildServiceRegistry();

            //3). 利用serviceRegistry来创建sessionFactory实例
            sessionFactory = configuration.buildSessionFactory(serviceRegistry);

        //2. 创建一个 Session 对象
        Session session = sessionFactory.openSession();

        //3. 开启事务
        Transaction transaction = session.beginTransaction();

        //4. 执行保存操作
        News news = new News("Java12345", "ATGUIGU", new Date(new java.util.Date().getTime()));
        session.save(news);

        //5. 提交事务
        transaction.commit();

        //6. 关闭 Session
        session.close();

        //7. 关闭 SessionFactory 对象
        sessionFactory.close();
    }

}
从上面的代码很清晰的可以看见,这一切的源头都在 Configuration configuration = new Configuration().configure() 这条语句上:创建ServiceRegistry 需要用到configuration,生成sessionFactory同样需要用到configuration。
Configuration的生成过程
从源代码中可以看到,Configuration的configure()方法共有5中重载方式:
code_2:
public Configuration configure();        //无参
public Configuration configure(String resource)
public Configuration configure(URL url)
public Configuration configure(File configFile)
public Configuration configure(org.w3c.dom.Document document)
现在从无参的configure()方法开始分析,它代表了一种默认的行为,默认读取类路径下的hibernate.cfg.xml文件作为hibernate的配置文件:
code_3:
public Configuration configure() throws HibernateException {
    configure( "/hibernate.cfg.xml" );    //默认读取classpath路径下的hibernate.cfg.xml文件
    return this;
}
继续追踪configure( "/hibernate.cfg.xml" )方法:
code_4:
1 public Configuration configure(String resource) throws HibernateException {
2     InputStream stream = getConfigurationInputStream( resource );    //通过传入的资源路径获取一个输入流
3     return doConfigure( stream, resource );    //这个方法会完成解析的第一步:将输入流转换成Document对象
4 }
继续追踪 return doConfigure( stream, resource ) 语句,可以发现底层会通过SAX解析工具将输入流转换成Document对象。然后调用然后调用doConfigure(Document doc)来继续解析这个文档:
code_5:
 1 protected Configuration doConfigure(InputStream stream, String resourceName) throws HibernateException {
 2
 3     ErrorLogger errorLogger = new ErrorLogger( resourceName );  //将输入流转换成Document对象
 5     Document document = xmlHelper.createSAXReader( errorLogger,  entityResolver )
 6                 .read( new InputSource( stream ) );
 7         //具体解析document树,并将结果以键值对的形式存放到properties中
 8     doConfigure( document );
 9
10     return this;
11 }
doConfigure(Document doc)是实际解析文档的方法,前面configure()的5种重载方法最后都要调用这个方法来完成实际的解析。我们看看它的解析思路:
code_6:
 1 protected Configuration doConfigure(Document doc) throws HibernateException {
 2     Element sfNode = doc.getRootElement().element( "session-factory" );
 3     String name = sfNode.attributeValue( "name" );
 4     if ( name != null ) {    //session-factory根节点是可以有name属性值的
 5         properties.setProperty( Environment.SESSION_FACTORY_NAME, name );
 6     }
 7     //遍历文档中所有的property节点,读取器name属性值以及节点的文本,
 8     //以name-value的形式放入到properties中
 9     addProperties( sfNode );
10     //解析除了property之外的节点:mapping、class-cache、collection-cache
11     parseSessionFactory( sfNode, name );
12
13     Element secNode = doc.getRootElement().element( "security" );
14     if ( secNode != null ) {
15         parseSecurity( secNode );
16     }
17
18     LOG.configuredSessionFactory( name );
19     LOG.debugf( "Properties: %s", properties );
20
21     return this;
22 }
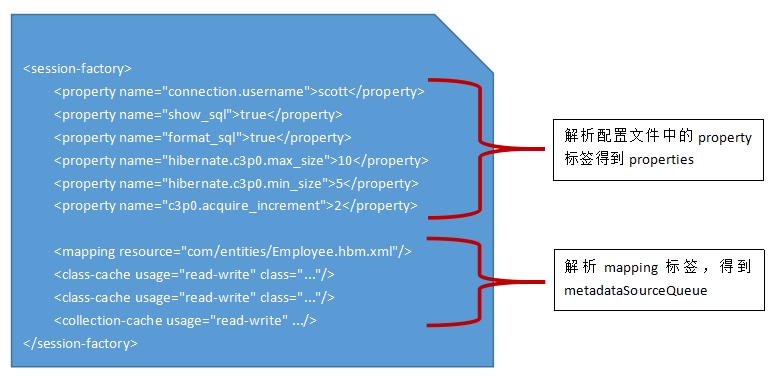
doConfigure(Document doc)方法中对Document的解析主要分为两个步骤进行:①解析xxx.cfg.xml配置文档中所有的property节点;②解析xxx.cfg.xml配置文档中除了property节点之外的其它5种节点。
先来看看第①步,它在addProperties(...)方法中完成(code_6代码段的第9行)思路很清晰,用一个迭代器来遍历文档中所有的property节点,并将name-value存放到Configuration的properties属性中:
code_7:
 1 private void addProperties(Element parent) {
 2     //指定,只会遍历property节点
 3     Iterator itr = parent.elementIterator( "property" );
 4     while ( itr.hasNext() ) {//循环遍历
 5         Element node = (Element) itr.next();
 6         //读取节点的name属性值
 7         String name = node.attributeValue( "name" );
 8         //读取节点的文本值
 9         String value = node.getText().trim();
10         LOG.debugf( "%s=%s", name, value );
11         //将name-value值存放如properties中
12         properties.setProperty( name, value );
13         //待研究...
14         if ( !name.startsWith( "hibernate" ) ) {
15             properties.setProperty( "hibernate." + name, value );
16         }
17     }
18         Environment.verifyProperties( properties );
19 }
再来看看第②步,它在parseSessionFactory( ...)方法中进行(code_6代码段的第10行),它主要解析3类标签:mapping、class-cache、collection-cache:
code_8:
 1 private void parseSessionFactory(Element sfNode, String name) {
 2     Iterator elements = sfNode.elementIterator();
 3     while ( elements.hasNext() ) {
 4         Element subelement = (Element) elements.next();
 5         String subelementName = subelement.getName();
 6         //解析mapping节点,mapping可以指定hibernate的映射文件位置
 7         if ( "mapping".equals( subelementName ) ) {
 8             //具体解析mapping节点
 9             parseMappingElement( subelement, name );
10         }
11         //下面两个是和hibernate的二级缓存相关的配置,不做深入探讨
12         else if ( "class-cache".equals( subelementName ) ) {
13             String className = subelement.attributeValue( "class" );
14             Attribute regionNode = subelement.attribute( "region" );
15             final String region = ( regionNode == null ) ? className : regionNode.getValue();
16             boolean includeLazy = !"non-lazy".equals( subelement.attributeValue( "include" ) );
17             setCacheConcurrencyStrategy( className, subelement.attributeValue( "usage" ), region, includeLazy );
18         }
19         else if ( "collection-cache".equals( subelementName ) ) {
20             String role = subelement.attributeValue( "collection" );
21             Attribute regionNode = subelement.attribute( "region" );
22             final String region = ( regionNode == null ) ? role : regionNode.getValue();
23             setCollectionCacheConcurrencyStrategy( role, subelement.attributeValue( "usage" ), region );
24         }
25     }
26 }
后面两个标签class-cache和collection-cache是和hibernate的二级缓存相关,不作深入探讨。主要看看解析mapping的方法:
code_9:
 1 private void parseMappingElement(Element mappingElement, String name) {
 2     //从源代码可以看出,mapping节点支持的属性值有5个
 3     final Attribute resourceAttribute = mappingElement.attribute( "resource" );
 4     final Attribute fileAttribute = mappingElement.attribute( "file" );
 5     final Attribute jarAttribute = mappingElement.attribute( "jar" );
 6     final Attribute packageAttribute = mappingElement.attribute( "package" );
 7     final Attribute classAttribute = mappingElement.attribute( "class" );
 8
 9     if ( resourceAttribute != null ) {
10         final String resourceName = resourceAttribute.getValue();
11         LOG.debugf( "Session-factory config [%s] named resource [%s] for mapping", name, resourceName );
12         //将hibernate的映射文件作进一步的解析
13         addResource( resourceName );
14     }
15     else if ( fileAttribute != null ) {
16         final String fileName = fileAttribute.getValue();
17         LOG.debugf( "Session-factory config [%s] named file [%s] for mapping", name, fileName );
18         addFile( fileName );
19     }
20     else if ( jarAttribute != null ) {
21         final String jarFileName = jarAttribute.getValue();
22         LOG.debugf( "Session-factory config [%s] named jar file [%s] for mapping", name, jarFileName );
23         addJar( new File( jarFileName ) );
24     }
25     else if ( packageAttribute != null ) {
26         final String packageName = packageAttribute.getValue();
27         LOG.debugf( "Session-factory config [%s] named package [%s] for mapping", name, packageName );
28         addPackage( packageName );
29     }
30     else if ( classAttribute != null ) {
31         final String className = classAttribute.getValue();
32         LOG.debugf( "Session-factory config [%s] named class [%s] for mapping", name, className );
33         try {
34             addAnnotatedClass( ReflectHelper.classForName( className ) );
35         }
36         catch ( Exception e ) {
37             throw new MappingException(
38                     "Unable to load class [ " + className + "] declared in Hibernate configuration <mapping/> entry",
39                     e
40             );
41         }
42     }
43     else {
44         throw new MappingException( "<mapping> element in configuration specifies no known attributes" );
45     }
46 }
addResource( resourceName )是如何解析的呢?那么它是如何工作的呢?这里不再一步一步追踪源代码,因为嵌套太深,直接给出一个感性的认识即可:
在Configuration中定义了一个名为MetadataSourceQueue的内部内,同时Configuration中还有一个该队列的属性值:metadataSourceQueue。
addResource( resourceName )方法嵌套到最后会调用metadataSourceQueue.add(...)方法来将映射的元数据存储到metadataSourceQueue队列中。要使用的时候,从该队列中取就可以了。
metadataSourceQueue的底层存储是一个Map类型...
到现在为止,Configuration对象就得到了,总结一下,其重要的几个点:
1、configure()方法默认读取/hibernate.cfg.xml作为hibernate的配置文件。当然,configure()方法还有其它重载形式可用。
2、doConfigure(Document document)方法会调用两个重要的方法:addProperties( sfNode )和parseSessionFactory( sfNode, name );
3、addProperties( sfNode )方法会解析配置文件中的property节点,并将解析到的name-value放入到properties中
4、parseSessionFactory( sfNode, name )方法会解析配置文件中除了property节点外的其它3个类型的节点(4.2版本):mapping、class-cache和collection-cache
5、mapping配置是和映射相关的,class-cache和collection-cache是与二级缓存相关的。
6、mapping解析的结果会存放到metadataSourceQueue对象中。
7、所以,整个过程得到Configuration中两个重要的属性值:properties和metadataSourceQueue。