

c++ opencv 16bit tiff图像学习笔记
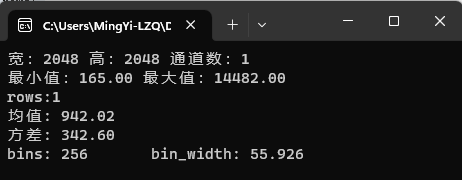
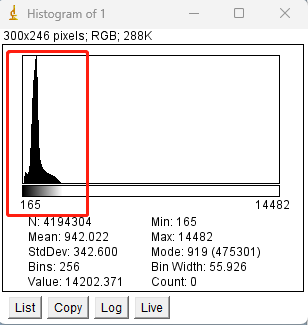
1、读取图像基本信息:长、宽、通道数、灰度最大值、最小值、均值、方差值和灰度直方图


#include<opencv2/opencv.hpp>
using namespace cv;
using namespace std;

int main(int argc, char** argv)
{
    //  读入图像
    Mat src = imread("C:\\Users\\MingYi-LZQ\\Desktop\\1.tif", IMREAD_UNCHANGED);
    if (src.empty())
    {
        printf("不能找到文件。\n");
        return -1;
    }
    namedWindow("input", WINDOW_NORMAL);
    imshow("input", src);

    int height = src.rows;
    int width = src.cols;
    int ch = src.channels();
    printf("宽:%d 高:%d 通道数:%d\n", width, height, ch);

    double min_val;
    double max_val;
    Point minloc;
    Point maxloc;
    minMaxLoc(src, &min_val, &max_val, &minloc, &maxloc);
    printf("最小值:%.2f 最大值:%.2f\n", min_val, max_val);

    //  均值方差
    Scalar s = mean(src);
    Mat mm, mstd;
    meanStdDev(src, mm, mstd);
    int rows = mstd.rows;
    printf("rows:%d\n", rows);
    if (rows == 1) {
        printf("均值: %.2f\n", s[0]);
        printf("方差: %.2f\n", mstd.at<double>(0, 0));
    }
    else if (rows == 3) {
        printf("均值: %.2f   %.2f   %.2f\n", s[0], s[1], s[2]);
        printf("方差: %.2f   %.2f   %.2f\n", mstd.at<double>(0, 0), mstd.at<double>(1, 0), mstd.at<double>(2, 0));
    }

    //  像素值统计信息,统计灰度直方图
    int bins = 256;
    vector<int> hist(bins);
    //  初始化灰度直方图
    for (int i = 0; i < bins; i++)
        hist[i] = 0;
    double bin_width = (max_val - min_val) / bins;
    printf("bins: %d    bin_width: %.3f\n", bins, bin_width);

    int index = 0;
    //统计灰度直方图
    for (int row = 0; row < height; row++)
    {
        for (int col = 0; col < width; col++)
        {
            int pv = src.at<ushort>(row, col);
            if (pv >= min_val && pv <= max_val) {
                index = (pv - min_val) / bin_width;
                if (index == bins)
                    index--;
                hist[index]++;
            }
        }
    }
    waitKey(0);
    destroyAllWindows();
    return 0;
}
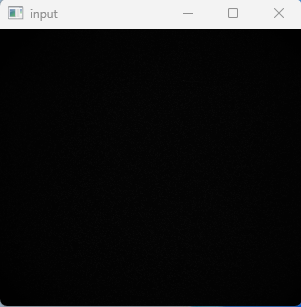
由于该图的基本有效信息都在低灰度值区域内,所以原图基本呈黑色
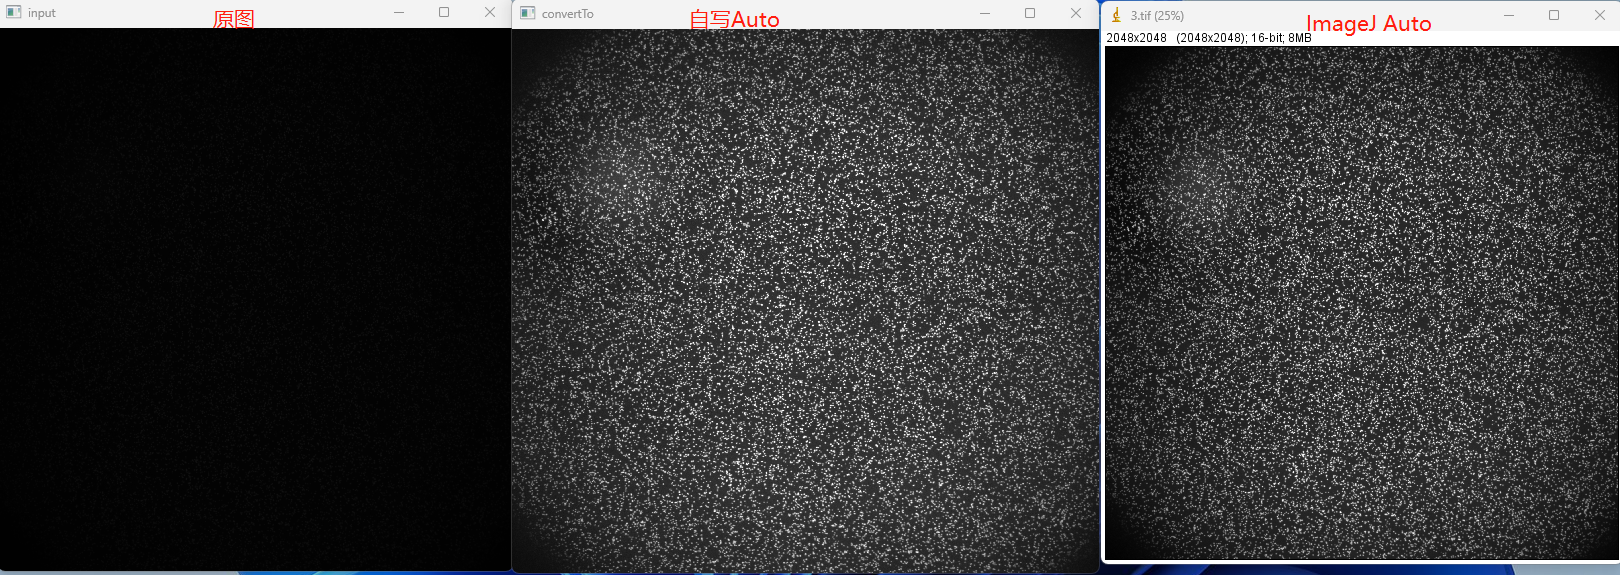
2、使用 cv::Mat::convertTo() 调整对比对和亮度
cv::Mat::convertTo 的函数原型为:void cv::Mat::convertTo (OutputArray m, int rtype, double alpha = 1, double beta = 0)
参数 m:输出矩阵;如果在操作之前没有正确的大小或类型,则重新分配。
参数 rtype:所需的输出矩阵类型,或者更确切地说,深度,通道的数量与输入相同;如果rtype为负,则输出矩阵将与输入矩阵具有相同的类型。
参数 alpha:可选的比例因子,用于调整对比度。
参数 beta:可选的缩放因子,用于调整亮度。
该函数是Mat对象的一个方法,用于将Mat的数组转换为另一种可选伸缩的数据类型。
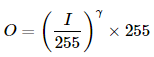
该方法将源像素值转换为目标数据类型。其转换公式为:

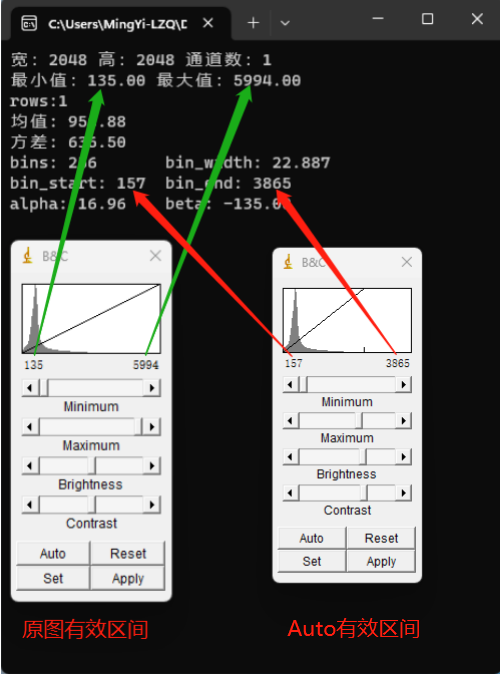
自动计算对比度alpha(该方法是本人根据ImageJ里自动Auto的个人理解)
统计有效信息区间的最大值和最小值
统计方法是找到灰度直方图区域像素数的个数在总像素数*0.0002之内的区间
#include<opencv2/opencv.hpp>
using namespace cv;
using namespace std;

int main(int argc, char** argv)
{
    //  读入图像
    Mat src = imread("C:\\Users\\MingYi-LZQ\\Desktop\\3.tif", IMREAD_UNCHANGED);
    if (src.empty())
    {
        printf("不能找到文件。\n");
        return -1;
    }
    namedWindow("input", WINDOW_NORMAL);
    imshow("input", src);

    int height = src.rows;
    int width = src.cols;
    int N = height * width;//像素总个数
    int ch = src.channels();
    printf("宽:%d 高:%d 通道数:%d\n", width, height, ch);

    double min_val;
    double max_val;
    Point minloc;
    Point maxloc;
    minMaxLoc(src, &min_val, &max_val, &minloc, &maxloc);
    printf("最小值:%.2f 最大值:%.2f\n", min_val, max_val);

    //  均值方差
    Scalar s = mean(src);
    Mat mm, mstd;
    meanStdDev(src, mm, mstd);
    int rows = mstd.rows;
    printf("rows:%d\n", rows);
    if (rows == 1) {
        printf("均值: %.2f\n", s[0]);
        printf("方差: %.2f\n", mstd.at<double>(0, 0));
    }
    else if (rows == 3) {
        printf("均值: %.2f   %.2f   %.2f\n", s[0], s[1], s[2]);
        printf("方差: %.2f   %.2f   %.2f\n", mstd.at<double>(0, 0), mstd.at<double>(1, 0), mstd.at<double>(2, 0));
    }

    //  像素值统计信息,统计灰度直方图
    int bins = 256;
    vector<int> hist(bins);
    //  初始化灰度直方图
    for (int i = 0; i < bins; i++)
        hist[i] = 0;
    double bin_width = (max_val - min_val) / bins;
    printf("bins: %d    bin_width: %.3f\n", bins, bin_width);

    int index = 0;
    //统计灰度直方图
    for (int row = 0; row < height; row++)
    {
        for (int col = 0; col < width; col++)
        {
            int pv = src.at<ushort>(row, col);
            if (pv >= min_val && pv <= max_val) {
                index = (pv - min_val) / bin_width;
                if (index == bins)
                    index--;
                hist[index]++;
            }
        }
    }

    //统计有效信息区间的最大值和最小值
    //统计方法是找到灰度直方图区域像素数的个数在总像素数*0.0002之内的区间
    int bin_start = -1;//区间的最小值
    int bin_end = 0;//区间的最大值
    int N_threshold = N * 0.0002;//区间阈值个数
    for (int i = 0; i < bins; i++) {
        if (hist[0] > N_threshold) {//起始区间个数就在阈值之内,则只找区间结束值
            bin_start = min_val;
            if (hist[i] < height * width * 0.0002) {
                bin_end = (i - 1) * bin_width + min_val;
                break;
            }
        }
        else {
            if (bin_start < 0) {//先找区间起始值
                if (hist[i] > height * width * 0.0002) {
                    bin_start = i * bin_width + min_val;
                }
            }
            else {//再找区间结束值
                if (hist[i] < height * width * 0.0002) {
                    bin_end = (i - 1) * bin_width + min_val;
                    break;
                }
            }
        }
    }
    printf("bin_start: %d    bin_end: %d\n", bin_start, bin_end);

    double alpha = 1.0;//可选的比例因子,用于调整对比度。
    double beta = 0.0;//可选的缩放因子,用于调整亮度。
    double gama = 1.0;
    Mat dst1, dst2, dst3;
    alpha = static_cast<double>(65535) / bin_end;//自动计算对比度
    beta = min_val * -1;
    // 调用 convertTo() 函数调整对比度和亮度
    src.convertTo(dst2, -1, alpha, beta);
    printf("alpha: %.2f    beta: %.2f\n", alpha, beta);

    namedWindow("convertTo", WINDOW_NORMAL);
    imshow("convertTo", dst2);

    imwrite("C:\\Users\\MingYi-LZQ\\Desktop\\out.tif", dst2);
    waitKey(0);
    destroyAllWindows();
    return 0;
}
3、gama校正去除图像朦胧感
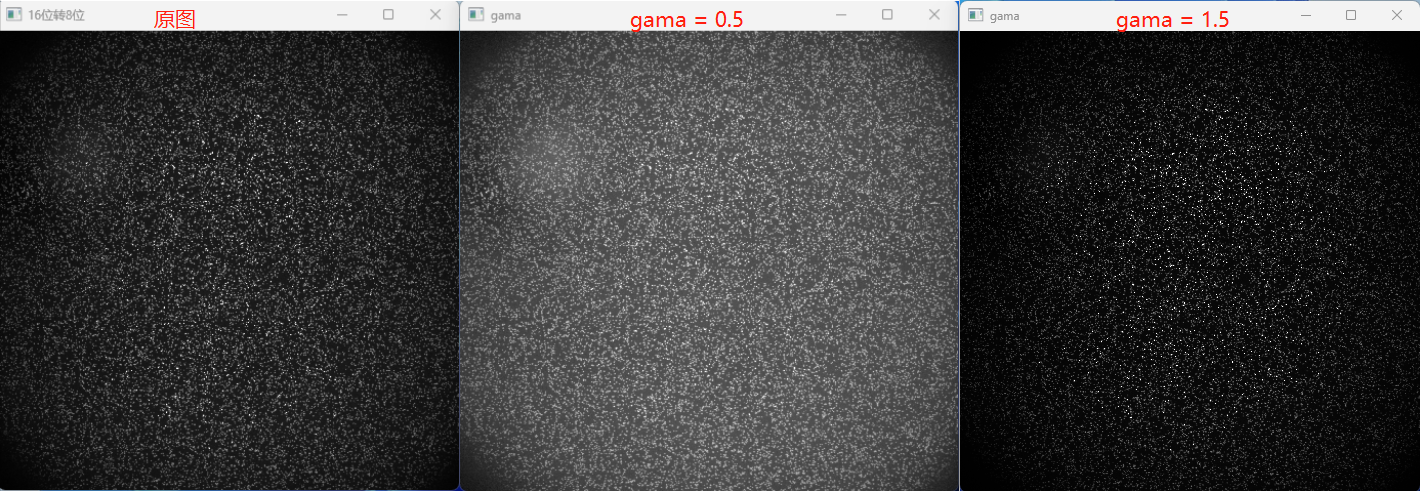
由于alpha和beta使得图像像素整体提高alpha倍和增长beta量,使得图像高有限区间增加的同时让低有效区间增加也特别明显,图像看起来有一种朦胧感。
Gamma校正可以使用输入值和映射输出值之间的非线性转换来校正图像的亮度:
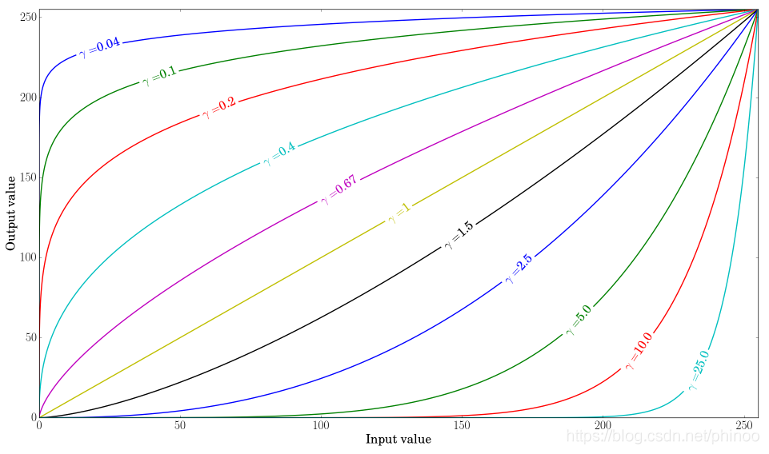
当gama大于1时,低有效区间像素增加较少,高有效区间像素增加较多,让图像对比度更加明显,gama校正代码如下
#include<opencv2/opencv.hpp>
using namespace cv;
using namespace std;

int main(int argc, char** argv)
{
    //  读入图像
    Mat src = imread("C:\\Users\\MingYi-LZQ\\Desktop\\3.tif", IMREAD_UNCHANGED);
    if (src.empty())
    {
        printf("不能找到文件。\n");
        return -1;
    }
    namedWindow("input", WINDOW_NORMAL);
    imshow("input", src);

    int height = src.rows;
    int width = src.cols;
    int N = height * width;//像素总个数
    int ch = src.channels();
    printf("宽:%d 高:%d 通道数:%d\n", width, height, ch);

    double min_val;
    double max_val;
    Point minloc;
    Point maxloc;
    minMaxLoc(src, &min_val, &max_val, &minloc, &maxloc);
    printf("最小值:%.2f 最大值:%.2f\n", min_val, max_val);

    //  均值方差
    Scalar s = mean(src);
    Mat mm, mstd;
    meanStdDev(src, mm, mstd);
    int rows = mstd.rows;
    printf("rows:%d\n", rows);
    if (rows == 1) {
        printf("均值: %.2f\n", s[0]);
        printf("方差: %.2f\n", mstd.at<double>(0, 0));
    }
    else if (rows == 3) {
        printf("均值: %.2f   %.2f   %.2f\n", s[0], s[1], s[2]);
        printf("方差: %.2f   %.2f   %.2f\n", mstd.at<double>(0, 0), mstd.at<double>(1, 0), mstd.at<double>(2, 0));
    }

    //  像素值统计信息,统计灰度直方图
    int bins = 256;
    vector<int> hist(bins);
    //  初始化灰度直方图
    for (int i = 0; i < bins; i++)
        hist[i] = 0;
    double bin_width = (max_val - min_val) / bins;
    printf("bins: %d    bin_width: %.3f\n", bins, bin_width);

    int index = 0;
    //统计灰度直方图
    for (int row = 0; row < height; row++)
    {
        for (int col = 0; col < width; col++)
        {
            int pv = src.at<ushort>(row, col);
            if (pv >= min_val && pv <= max_val) {
                index = (pv - min_val) / bin_width;
                if (index == bins)
                    index--;
                hist[index]++;
            }
        }
    }

    //统计有效信息区间的最大值和最小值
    //统计方法是找到灰度直方图区域像素数的个数在总像素数*0.0002之内的区间
    int bin_start = -1;//区间的最小值
    int bin_end = 0;//区间的最大值
    int N_threshold = N * 0.0002;//区间阈值个数
    for (int i = 0; i < bins; i++) {
        if (hist[0] > N_threshold) {//起始区间个数就在阈值之内,则只找区间结束值
            bin_start = min_val;
            if (hist[i] < height * width * 0.0002) {
                bin_end = (i - 1) * bin_width + min_val;
                break;
            }
        }
        else {
            if (bin_start < 0) {//先找区间起始值
                if (hist[i] > height * width * 0.0002) {
                    bin_start = i * bin_width + min_val;
                }
            }
            else {//再找区间结束值
                if (hist[i] < height * width * 0.0002) {
                    bin_end = (i - 1) * bin_width + min_val;
                    break;
                }
            }
        }
    }
    printf("bin_start: %d    bin_end: %d\n", bin_start,bin_end);

    double alpha = 1.0;//可选的比例因子,用于调整对比度。
    double beta = 0.0;//可选的缩放因子,用于调整亮度。
    double gama = 1.0;
    Mat dst1, dst2, dst3;
    alpha = static_cast<double>(65535) / bin_end;//自动计算对比度
    beta = min_val * -1;
    // 调用 convertTo() 函数调整对比度和亮度
    src.convertTo(dst2, -1, alpha, beta);
    printf("alpha: %.2f    beta: %.2f\n", alpha, beta);

    namedWindow("convertTo", WINDOW_NORMAL);
    imshow("convertTo", dst2);

    cout << "* Enter the gama value [0,255]: ";    cin >> gama;

    //16位图像转换为8位图像,因为LUT函数只支持8位图像
    Mat dst = Mat::zeros(height, width, CV_8UC1);//先生成空的目标图片
    //用指针访问像素,速度更快
    ushort* p_img;
    uchar* p_dst;
    for (int i = 0; i < height; i++)
    {
        p_img = src.ptr<ushort>(i);//获取每行首地址
        p_dst = dst.ptr<uchar>(i);
        for (int j = 0; j < width; ++j)
        {
            if (p_img[j] > bin_end)
                p_dst[j] = 255;
            else
                p_dst[j] = (p_img[j] - min_val) / (max_val - min_val) * 255;//该转换方法可以有效减小图像失真。
        }
    }
    namedWindow("16位转8位", WINDOW_NORMAL);
    imshow("16位转8位", dst);

    // 构建查找表
    Mat lookUpTable(1, 256, CV_8U);
    uchar* p = lookUpTable.ptr();
    for (int i = 0; i < 256; ++i)
        p[i] = saturate_cast<uchar>(pow(i / 255.0, gama) * 255.0);

    // 使用查找表进行对比度亮度调整
    LUT(dst, lookUpTable, dst3);
    namedWindow("gama", WINDOW_NORMAL);
    imshow("gama", dst3);

    waitKey(0);
    destroyAllWindows();
    return 0;
}
本文引用参考:8、OpenCV调整图像对比度和亮度_opencv增加黑白对比度_phinoo的博客-CSDN博客

 浙公网安备 33010602011771号