

netty直接可以做连接,没必要运行在Tomcat下,只需要打一个jar包,就可以对外提供服务,今天写下如何通过maven配置一之前的netty项目,并且通过maven 的inSatall命令在idea中将项目打包。有的公司可能涉及需要代码混淆,这里不做表述。
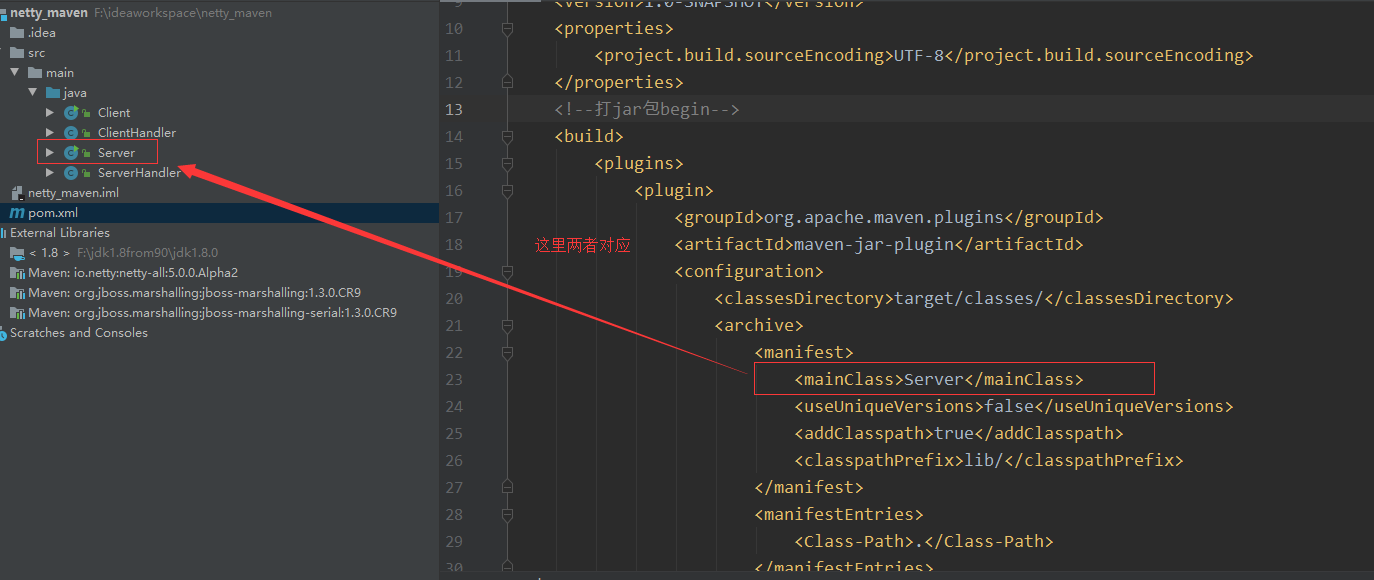
首先pom的配置(idea可用,eclipse中还要添加一些兼容性配置这里没有):


 1 <?xml version="1.0" encoding="UTF-8"?>
 2 <project xmlns="http://maven.apache.org/POM/4.0.0"
 3          xmlns:xsi="http://www.w3.org/2001/XMLSchema-instance"
 4          xsi:schemaLocation="http://maven.apache.org/POM/4.0.0 http://maven.apache.org/xsd/maven-4.0.0.xsd">
 5     <modelVersion>4.0.0</modelVersion>
 6
 7     <groupId>org.example</groupId>
 8     <artifactId>netty_maven</artifactId>
 9     <version>1.0-SNAPSHOT</version>
10     <properties>
11         <project.build.sourceEncoding>UTF-8</project.build.sourceEncoding>
12     </properties>
13     <!--打jar包begin-->
14     <build>
15         <plugins>
16             <plugin>
17                 <groupId>org.apache.maven.plugins</groupId>
18                 <artifactId>maven-jar-plugin</artifactId>
19                 <configuration>
20                     <classesDirectory>target/classes/</classesDirectory>
21                     <archive>
22                         <manifest>
23                             <mainClass>Server</mainClass>
24                             <useUniqueVersions>false</useUniqueVersions>
25                             <addClasspath>true</addClasspath>
26                             <classpathPrefix>lib/</classpathPrefix>
27                         </manifest>
28                         <manifestEntries>
29                             <Class-Path>.</Class-Path>
30                         </manifestEntries>
31                     </archive>
32                 </configuration>
33             </plugin>
34             <plugin>
35                 <groupId>org.apache.maven.plugins</groupId>
36                 <artifactId>maven-dependency-plugin</artifactId>
37                 <executions>
38                     <execution>
39                         <id>copy-dependencies</id>
40                         <phase>package</phase>
41                         <goals>
42                             <goal>copy-dependencies</goal>
43                         </goals>
44                         <configuration>
45                             <type>jar</type>
46                             <includeTypes>jar</includeTypes>
47                             <outputDirectory>
48                                 ${project.build.directory}/lib
49                             </outputDirectory>
50                         </configuration>
51                     </execution>
52                 </executions>
53
54             </plugin>
55         </plugins>
56     </build>
57     <!--打jar包end-->
58     <dependencies>
59         <!--       netty begin -->
60         <dependency>
61             <artifactId>netty-all</artifactId>
62             <groupId>io.netty</groupId>
63             <version>5.0.0.Alpha2</version>
64         </dependency>
65         <dependency>
66             <groupId>org.jboss.marshalling</groupId>
67             <artifactId>jboss-marshalling</artifactId>
68             <version>1.3.0.CR9</version>
69         </dependency>
70         <dependency>
71             <groupId>org.jboss.marshalling</groupId>
72             <artifactId>jboss-marshalling-serial</artifactId>
73             <version>1.3.0.CR9</version>
74         </dependency>
75         <!--netty end-->
76     </dependencies>
77
78 </project>
项目代码路径:
项目代码:netty入门 这里的代码可以只写server和ServerHandler
运行命令
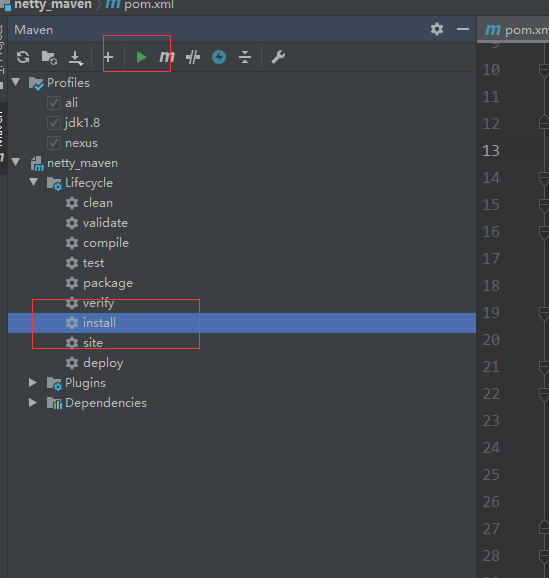
运行maven的install命令,在eclipse中和idea中的打开方式不一样,这里只说idea:首先,打开view→Tool Windows → Maven

然后选择install,点击运行(如下图):
结果的jar包
打好jar包后,得到的jar包在target 目录下。

运行jar包
在打好的jar包目录运行命令,执行jar包:java - jar jar包名称

文章来源:http://www.cnblogs.com/liyasong/

 浙公网安备 33010602011771号