springboot使用swagger
swagger页面访问地址:http://localhost:端口号/swagger-ui.html
maven包
    <dependencies>
        <dependency>
            <groupId>io.springfox</groupId>
            <artifactId>springfox-swagger2</artifactId>
            <version>2.9.2</version>
        </dependency>
        <dependency>
            <groupId>io.springfox</groupId>
            <artifactId>springfox-swagger-ui</artifactId>
            <version>2.9.2</version>
        </dependency>
    </dependencies>
配置
简单配置
创建一个类,标注上@Configuration、@EnableSwagger2注解并创建一个Docket对象。
@Configuration
@EnableSwagger2
public class SwagerrConfiguration {
     private static ApiInfo DEFAULT = null;
     @Bean
    public Docket docket(){
        return new Docket(DocumentationType.SWAGGER_2);
    }
}
配置信息
@Configuration
@EnableSwagger2
public class SwagerrConfiguration {
    private static ApiInfo DEFAULT = null;
    @Bean
    public Docket docket(){
            Contact DEFAULT_CONTACT = new Contact("姜兴", "http://www.baidu.com", "2465180091@qq.com");
            DEFAULT = new ApiInfo("姜兴的开发接口",
                    "Api Documentation",
                    "V-1.0",
                    "http://www.baidu.com",
                    DEFAULT_CONTACT,
                    "Apache 2.0",
                    "http://www.apache.org/licenses/LICENSE-2.0",
                    new ArrayList());
        return new Docket(DocumentationType.SWAGGER_2)
                .apiInfo(DEFAULT)
                .select()
                //.apis(RequestHandlerSelectors.basePackage("com.example.demo2.controller"))//按照包名扫描
                //.apis(RequestHandlerSelectors.any())全部扫面
                //.apis(RequestHandlerSelectors.none())不扫面
               // .paths(PathSelectors.ant("controller"))//过滤指定包下的接口
                .build();
    }
}
关闭
@Configuration
@EnableSwagger2//开启swagger
public class SwagerrConfiguration {
    private static ApiInfo DEFAULT = null;
    @Bean//创建swagger实例
    public Docket docket(Environment environment){
            Contact DEFAULT_CONTACT = new Contact("姜兴", "http://www.baidu.com", "2465180091@qq.com");
            DEFAULT = new ApiInfo("姜兴的开发接口",
                    "Api Documentation",
                    "V-1.0",
                    "http://www.baidu.com",
                    DEFAULT_CONTACT,
                    "Apache 2.0",
                    "http://www.apache.org/licenses/LICENSE-2.0",
                    new ArrayList());
        Profiles profiles = Profiles.of("dev");//设置在那个环境下显示swagger,这里设置环境为dev时显示
        boolean b = environment.acceptsProfiles(profiles);//判断是不是现在的环境是不是我们想要的环境
        return new Docket(DocumentationType.SWAGGER_2)
                .apiInfo(DEFAULT)
                .enable(b)//配置swagger是否开启,如果为false则关闭swagger,默认为true
                .select()
                .build();
    }
}
分组
@Configuration
@EnableSwagger2//开启swagger
public class SwagerrConfiguration {
private static ApiInfo DEFAULT = null;
@Bean//创建swagger实例
public Docket docket(Environment environment){
Contact DEFAULT_CONTACT = new Contact("姜兴", "http://www.baidu.com", "2465180091@qq.com");
DEFAULT = new ApiInfo("姜兴的开发接口",
"Api Documentation",
"V-1.0",
"http://www.baidu.com",
DEFAULT_CONTACT,
"Apache 2.0",
"http://www.apache.org/licenses/LICENSE-2.0",
new ArrayList());
Profiles profiles = Profiles.of("dev");//设置在那个环境下显示swagger
boolean b = environment.acceptsProfiles(profiles);//获得项目的环境
return new Docket(DocumentationType.SWAGGER_2)
.apiInfo(DEFAULT)
.groupName("姜兴")
.enable(b)//配置swagger是否开启,如果为false则关闭swagger,默认为true
.select()
.build();
}
@Bean//创建swagger实例
public Docket docket1(Environment environment){
Contact DEFAULT_CONTACT = new Contact("姜明轩", "http://www.baidu.com", "2465180091@qq.com");
DEFAULT = new ApiInfo("姜明轩开发接口",
"Api Documentation",
"V-1.0",
"http://www.baidu.com",
DEFAULT_CONTACT,
"Apache 2.0",
"http://www.apache.org/licenses/LICENSE-2.0",
new ArrayList());
Profiles profiles = Profiles.of("dev");//设置在那个环境下显示swagger
boolean b = environment.acceptsProfiles(profiles);//获得项目的环境
return new Docket(DocumentationType.SWAGGER_2)
.apiInfo(DEFAULT)
.groupName("姜明轩")
.enable(b)//配置swagger是否开启,如果为false则关闭swagger,默认为true
.select()
.build();
}
}
docs.html
swagger-ui-layer的访问地址:
http://host:{port}/docs.html
maven
<dependency>
    <groupId>io.springfox</groupId>
    <artifactId>springfox-swagger2</artifactId>
    <version>2.9.2</version>
</dependency>
<dependency>
    <groupId>com.github.caspar-chen</groupId>
    <artifactId>swagger-ui-layer</artifactId>
    <version>1.1.3</version>
</dependency>
配置
@Configuration
@EnableSwagger2
public class SwaggerConfig {
@Bean
public Docket ProductApi() {
return new Docket(DocumentationType.SWAGGER_2)
.genericModelSubstitutes(DeferredResult.class)
.useDefaultResponseMessages(false)
.forCodeGeneration(false)
.pathMapping("/")
.select()
.build()
.apiInfo(productApiInfo());
}
private ApiInfo productApiInfo() {
ApiInfo apiInfo = new ApiInfo("XXX系统数据接口文档",
"文档描述。。。",
"1.0.0",
"API TERMS URL",
"联系人邮箱",
"license",
"license url");
return apiInfo;
}
}
springboot集成swagger
maven包
<!-- Swagger -->
<dependency>
    <groupId>com.spring4all</groupId>
    <artifactId>swagger-spring-boot-starter</artifactId>
    <version>1.7.1.RELEASE</version>
</dependency>
配置
在启动类中使用 @EnableSwagger2Doc 开启 Swagger,代码如下所示。
@EnableSwagger2Doc
@SpringBootApplication
public class AuthApplication {
    public static void main(String[] args) {
        SpringApplication.run(AuthApplication.class, args);
    }
}
注解
controller
类上的注解
@Api
对请求类的说明
tags="说明该类的作用"    value="该参数没什么意义, 所以不需要配置"
value   url 的路径值
tags    如果设置这个值、value 的值会被覆盖
description 对 api 资源的描述
basePath    基本路径
position 如果配置多个 Api 想改变显示的顺序位置
produces 如, “application/json, application/xml”
consumes 如, “application/json, application/xml”
protocols 协议类型,如: http, https, ws, wss.
authorizations 高级特性认证时配置
hidden 配置为 true ,将在文档中隐藏
方法上的注解
@ApiOperation
方法的说明
"用在请求的方法上, 说明方法的作用"    value="说明方法的作用"    notes="方法的备注说明"
@ApiImplicitParams、@ApiImplicitParam
方法的参数的说明;@ApiImplicitParams 用于指定单个参数的说明
name: 参数名
value: 参数的汉字说明, 解释
required: 参数是否必须传
paramType: 参数放在哪个地方
. header --> 请求参数的获取:@RequestHeader
. query --> 请求参数的获取:@RequestParam
. path(用于 restful 接口)–> 请求参数的获取:@PathVariable
. body(请求体)--> @RequestBody User user
. form(普通表单提交)
dataType: 参数类型, 默认 String, 其它值 dataType=“Integer”
defaultValue: 参数的默认值
@ApiResponses、@ApiResponse
方法返回值的说明 ;@ApiResponses 用于指定单个参数的说明
@ApiResponses: 方法返回对象的说明
@ApiResponse: 每个参数的说明
code: 数字, 例如 400
message: 信息, 例如 “请求参数没填好”
response: 抛出异常的类
例子1
@API(tags="用户模块")
@Controller
public class UserController {
    @ApiOperation(value="用户登录",notes="随边说点啥")
    @ApiImplicitParams({
        @ApiImplicitParam(name="mobile",value="手机号",required=true,paramType="form"),
        @ApiImplicitParam(name="password",value="密码",required=true,paramType="form"),
        @ApiImplicitParam(name="age",value="年龄",required=true,paramType="form",dataType="Integer")
    })
    @PostMapping("/login")
    public JsonResult login(@RequestParam String mobile, @RequestParam String password,
    @RequestParam Integer age){
        //...
        return JsonResult.ok(map);
    }
}
例子2
@API(tags="用户模块")
@Controller
public class UserController {
    @ApiOperation("获取用户信息")
    @ApiImplicitParams({
        @ApiImplicitParam(paramType="query", name="userId", dataType="String", required=true, value="用户 Id")
    })
    @ApiResponses({
        @ApiResponse(code = 400, message = "请求参数没填好"),
        @ApiResponse(code = 404, message = "请求路径没有或页面跳转路径不对")
    })
    @ResponseBody
    @RequestMapping("/list")
    public JsonResult list(@RequestParam String userId) {
        ...
        return JsonResult.ok().put("page", pageUtil);
    }
}
Bo与Vo
类上的注解
@ApiModel
用在 JavaBean 类上,说明 JavaBean 的 用途
属性上的注解
@ApiModelProperty
用在 JavaBean 类的属性上面,说明此属性的的含议
例子
@ApiModel(description= "返回响应数据")
public class RestMessage implements Serializable{
    @ApiModelProperty(value = "是否成功")
    private boolean success=true;
    @ApiModelProperty(value = "返回对象")
    private Object data;
    @ApiModelProperty(value = "错误编号")
    private Integer errCode;
    @ApiModelProperty(value = "错误信息")
    private String message;
    /* getter/setter 略 */
}
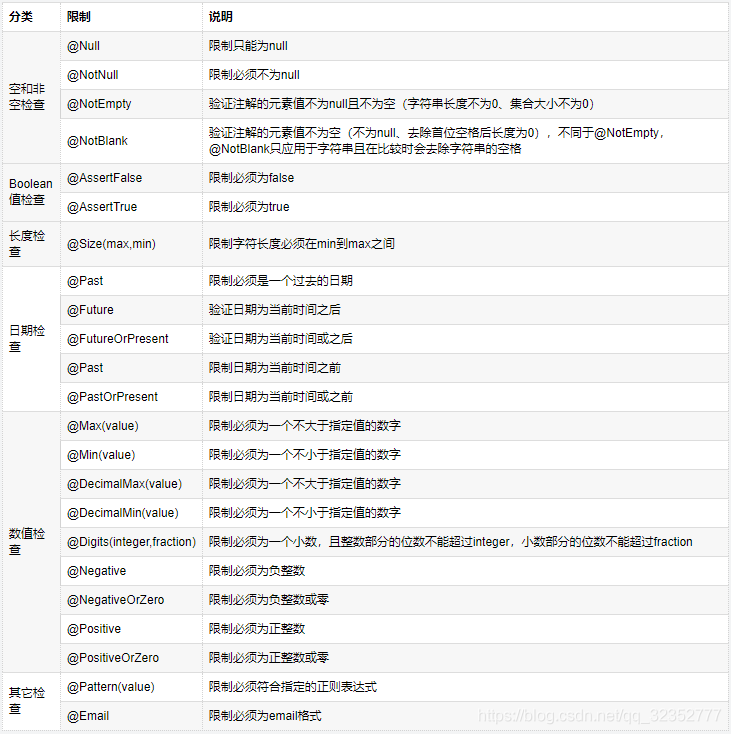
分组校验
@Validation是一套帮助我们继续对传输的参数进行数据校验的注解,通过配置Validation可以很轻松的完成对数据的约束。
@Validated作用在类、方法和参数上
@Target({ElementType.TYPE, ElementType.METHOD, ElementType.PARAMETER})
@Retention(RetentionPolicy.RUNTIME)
@Documented
public @interface Validated {
    Class<?>[] value() default {};
}

 浙公网安备 33010602011771号