


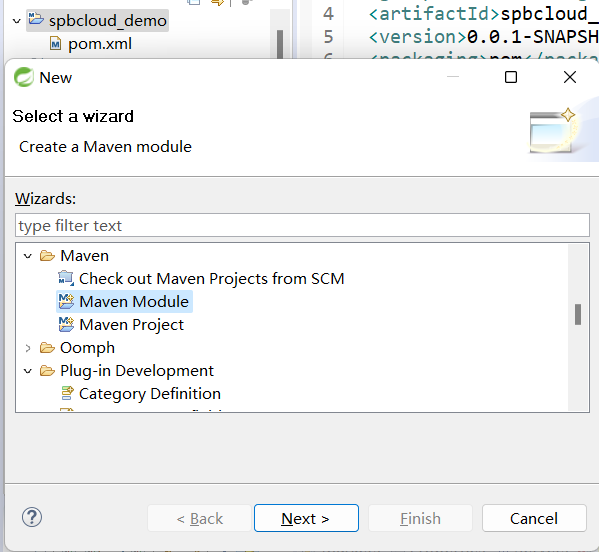
1、搭建父类工程
正常建maven项目:

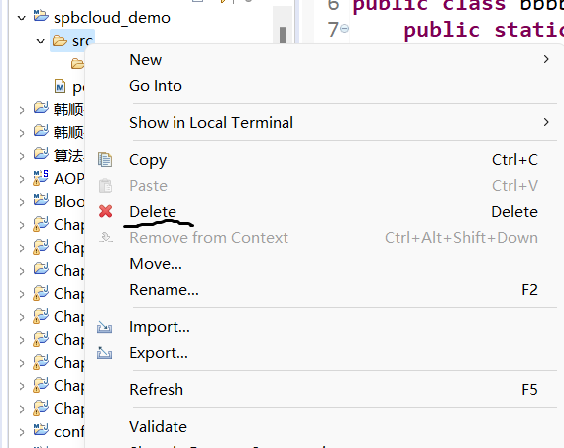
删掉里边的src目录
添加依赖
<!--
        dependmanagement是用在父工程中声明依赖,不引用。子模块继承之后再引包。
             作用是,锁定版本,子模块不用写grouid and version
    -->
    <dependencyManagement>

        <dependencies>
            <!--boot 2.3.3 -->
            <dependency>
                <groupId>org.springframework.boot</groupId>
                <artifactId>spring-boot-dependencies</artifactId>
                <version>2.3.3.RELEASE</version>
                <type>pom</type>
                <!-- Maven也是单继承。这里继承了spring-boot中的dependencyManagement
                     但是下面还要继承spring-cloud中的dependencyManagement。
                    使用scope=import就可以实现多继承了
                -->
                <scope>import</scope>
            </dependency>

            <!--cloud hoxton.sr9 -->
            <dependency>
                <groupId>org.springframework.cloud</groupId>
                <artifactId>spring-cloud-dependencies</artifactId>
                <version>Hoxton.SR9</version>
                <type>pom</type>
                <scope>import</scope>
            </dependency>

        </dependencies>

    </dependencyManagement>
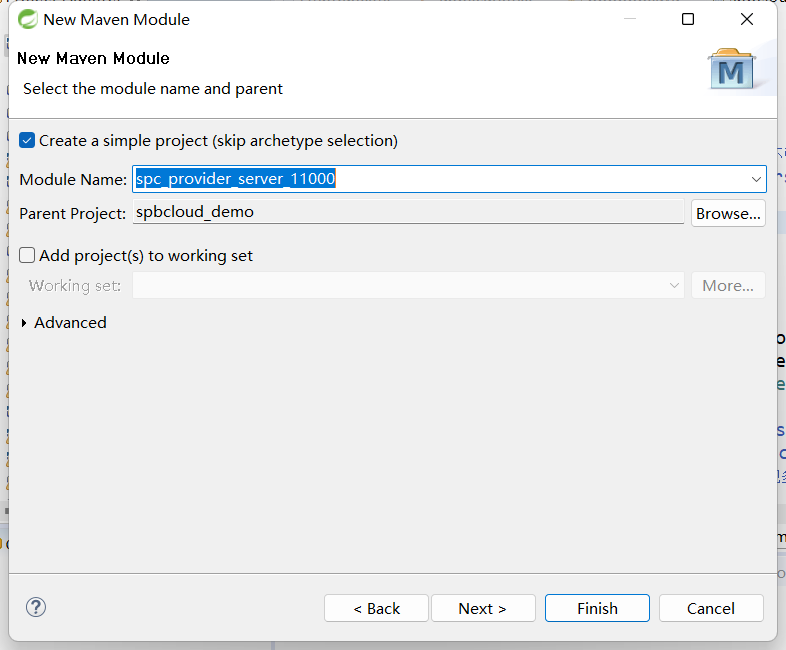

手动加springboot相关依赖spc_provider_server_11000
<dependencies>
        <!--以下是boot -->
        <dependency>
            <groupId>org.springframework.boot</groupId>
            <artifactId>spring-boot-starter-web</artifactId>
        </dependency>

        <!--热部署 dev -->
        <dependency>
            <groupId>org.springframework.boot</groupId>
            <artifactId>spring-boot-devtools</artifactId>
            <scope>runtime</scope>
            <optional>true</optional>
        </dependency>
    </dependencies>
建启动类MyApplication在spc_provider_server_11000
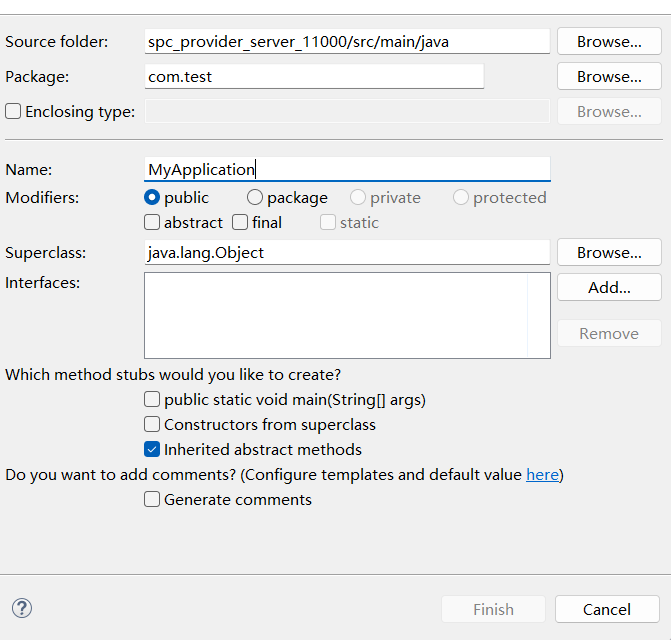

MyApplication.java
package com.test;

import org.springframework.boot.SpringApplication;
import org.springframework.boot.autoconfigure.SpringBootApplication;

@SpringBootApplication
public class MyApplication {

    public static void main(String[] args) {
        // TODO Auto-generated method stub
        SpringApplication.run(MyApplication.class, args);
    }

}
正常建四个包

添加ResponseBean实体类和Course实体类

ResponseBean.java
package com.test.po;

import java.io.Serializable;

public class ResponseBean<T> implements Serializable{
    // 泛型属性,代表任意类型的数据对象
    private T data;
    // 数据状态码,给前端程序用的
    private Integer code;
    // 数据状态信息,发到前端给人看的
    private String msg;

    // 该构造器用来封装正常操作结果的数据
    public ResponseBean(T data) {
        this.code = 200;
        this.msg = "success";
        this.data = data;
    }

    // 该构造器用来封装异常操作的结果
    // code此时代表异常状态码
    // msg此时代表异常信息
    // 异常状态下数据保持null的状态
    public ResponseBean(Integer code, String msg) {
        super();
        this.code = code;
        this.msg = msg;
    }

    // 其他用途的构造器
    public ResponseBean(T data, Integer code, String msg) {
        super();
        this.data = data;
        this.code = code;
        this.msg = msg;
    }

    public ResponseBean() {
        super();
        // TODO Auto-generated constructor stub
    }

    public T getData() {
        return data;
    }

    public void setData(T data) {
        this.data = data;
    }

    public Integer getCode() {
        return code;
    }

    public void setCode(Integer code) {
        this.code = code;
    }

    public String getMsg() {
        return msg;
    }

    public void setMsg(String msg) {
        this.msg = msg;
    }


}
Course.java
package com.test.po;

import java.io.Serializable;

public class Course implements Serializable{
    private String cno;
    private String cname;
    private String tno;

    public String getCno() {
        return cno;
    }

    public void setCno(String cno) {
        this.cno = cno;
    }

    public String getCname() {
        return cname;
    }

    public void setCname(String cname) {
        this.cname = cname;
    }

    public String getTno() {
        return tno;
    }

    public void setTno(String tno) {
        this.tno = tno;
    }

}
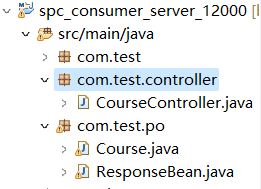
建CourseController测试
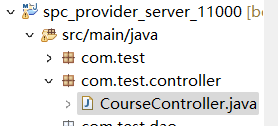
CourseController.java
package com.test.controller;

import org.springframework.web.bind.annotation.GetMapping;
import org.springframework.web.bind.annotation.PathVariable;
import org.springframework.web.bind.annotation.RequestMapping;
import org.springframework.web.bind.annotation.RestController;

import com.test.po.Course;
import com.test.po.ResponseBean;

@RestController
@RequestMapping("/course")
public class CourseController {

    @GetMapping("/getCourse/{cno}")
    public ResponseBean<Course> getCourse(@PathVariable("cno") String cno){
        Course c=new Course();
        c.setCno(cno);
        c.setCname("art");
        c.setTno("100");
        ResponseBean<Course> rb=new ResponseBean<Course>(c);
        return rb;
    }

}
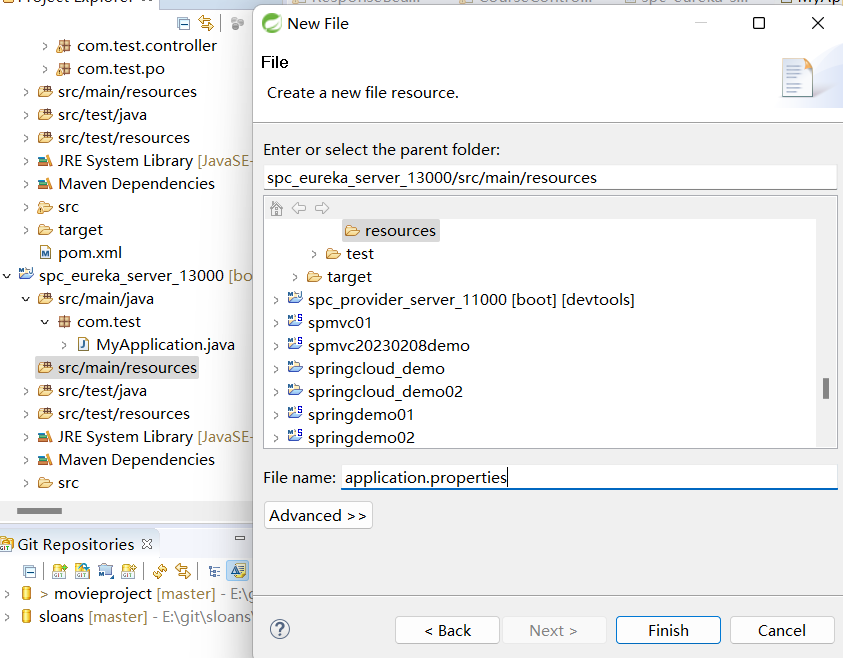
再src/main/resources建application.properties

application.properties
server.port=11000
spring.application.name=provider-server
启动 spc_provider_server_11000测试
3、创建子工程(服务消费者)
流程与上边创建生产者一样
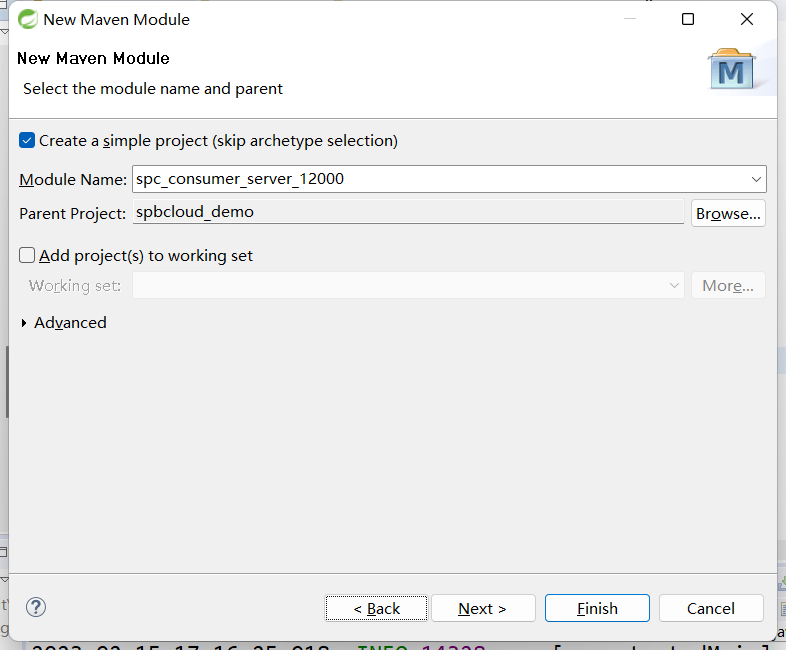
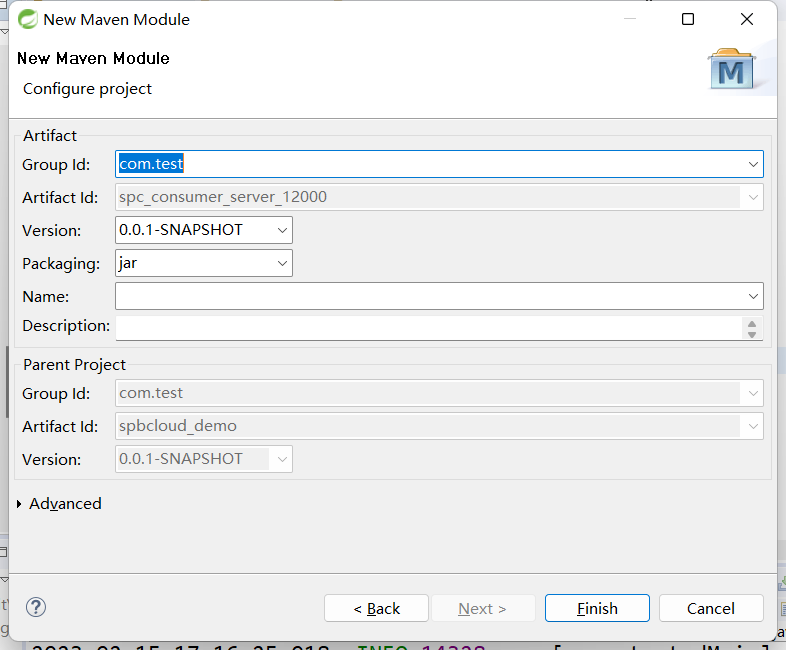
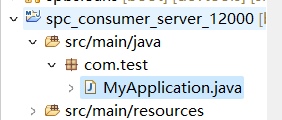
一样添加springboot相关依赖spc_consumer_server_12000
<dependencies>
        <!--以下是boot -->
        <dependency>
            <groupId>org.springframework.boot</groupId>
            <artifactId>spring-boot-starter-web</artifactId>
        </dependency>

        <!--热部署 dev -->
        <dependency>
            <groupId>org.springframework.boot</groupId>
            <artifactId>spring-boot-devtools</artifactId>
            <scope>runtime</scope>
            <optional>true</optional>
        </dependency>
    </dependencies>
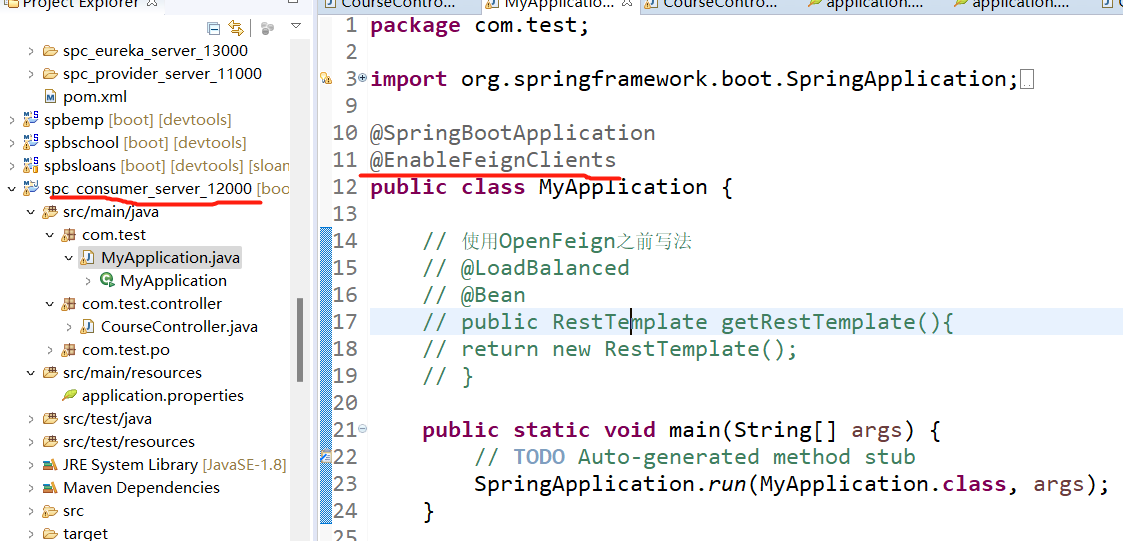
创建启动类spc_consumer_server_12000,与上边生产者一样,但是启动类中多了RestTemplate
MyApplication.java
package com.test;

import org.springframework.boot.SpringApplication;
import org.springframework.boot.autoconfigure.SpringBootApplication;
import org.springframework.context.annotation.Bean;
import org.springframework.web.client.RestTemplate;

@SpringBootApplication
public class MyApplication {

    /**
     * 使用spring提供的RestTemplate发送http请求调用微服务
     * 这里创建RestTemplate对象交给容器管理
     */
    @Bean
    public RestTemplate getRestTemplate(){
        return new RestTemplate();
    }

    public static void main(String[] args) {
        // TODO Auto-generated method stub
        SpringApplication.run(MyApplication.class, args);
    }

}
加po与controller,po里边和上边生产者一样
CourseController.java
package com.test.controller;

import org.springframework.beans.factory.annotation.Autowired;
import org.springframework.web.bind.annotation.GetMapping;
import org.springframework.web.bind.annotation.PathVariable;
import org.springframework.web.bind.annotation.RequestMapping;
import org.springframework.web.bind.annotation.RestController;
import org.springframework.web.client.RestTemplate;

import com.test.po.Course;
import com.test.po.ResponseBean;

@RestController
@RequestMapping("/course")
public class CourseController {

    @Autowired
    private RestTemplate restTemplate;

    @GetMapping("/getCourse/{cno}")
    public ResponseBean<Course> getCourse(@PathVariable("cno") String cno){
        String url="http://localhost:11000/course/getCourse/"+cno;
        ResponseBean<Course> rb=restTemplate.getForObject(url, ResponseBean.class);
        return rb;
    }

}
和生产者一样创建application.properties
application.properties
server.port=12000
spring.application.name=consumer-server
启动,测试,用服务消费者获取服务生产者数据
1.eureka服务端
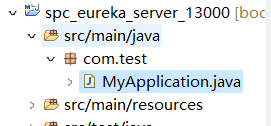
和生产者服务者一样创建module(spc_eureka_server_13000)


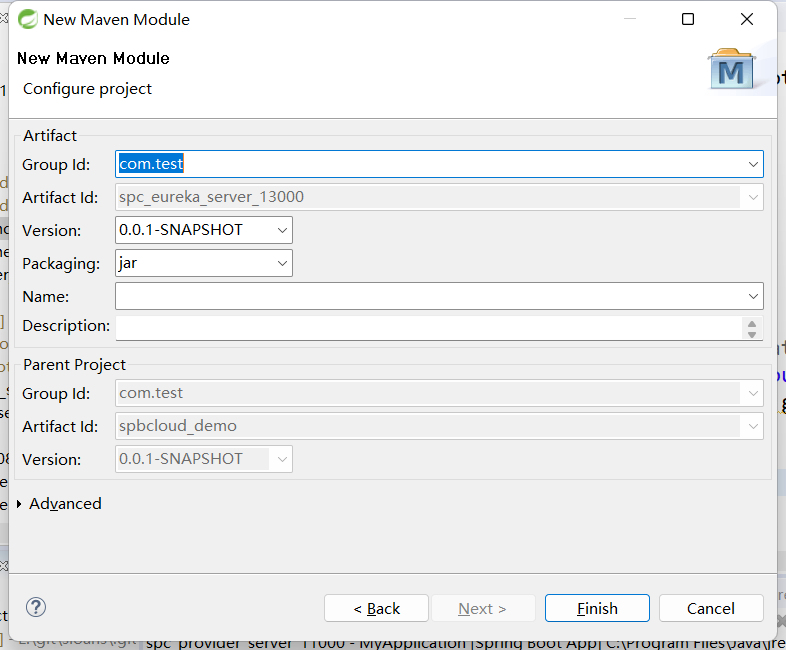
添加依赖spc_eureka_server_13000
<dependencies>

        <!-- 添加 eureka server 依赖 -->
        <dependency>
            <groupId>org.springframework.cloud</groupId>
            <artifactId>spring-cloud-starter-netflix-eureka-server</artifactId>
        </dependency>

        <!--热部署 gav -->
        <dependency>
            <groupId>org.springframework.boot</groupId>
            <artifactId>spring-boot-devtools</artifactId>
            <scope>runtime</scope>
            <optional>true</optional>
        </dependency>

    </dependencies>
一样需要启动类
package com.test;

import org.springframework.boot.SpringApplication;
import org.springframework.boot.autoconfigure.SpringBootApplication;
import org.springframework.cloud.netflix.eureka.server.EnableEurekaServer;

@SpringBootApplication
@EnableEurekaServer //激活Eureka Server
public class MyApplication {

    public static void main(String[] args) {
        // TODO Auto-generated method stub
        SpringApplication.run(MyApplication.class, args);
    }

}
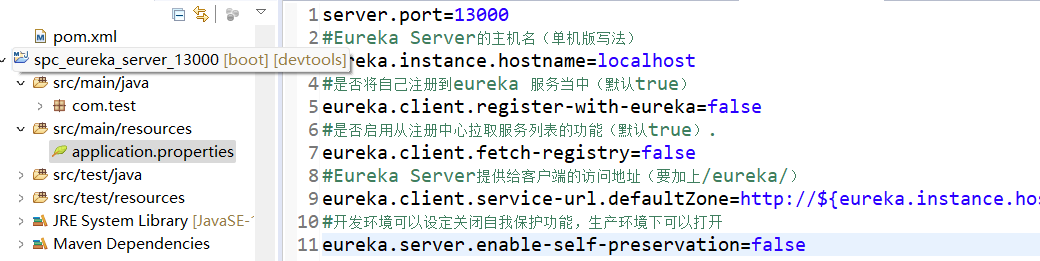
创建application.properties
application.properties
server.port=13000
#Eureka Server的主机名(单机版写法)
eureka.instance.hostname=localhost
#是否将自己注册到eureka 服务当中(默认true)
eureka.client.register-with-eureka=false
#是否启用从注册中心拉取服务列表的功能(默认true).
eureka.client.fetch-registry=false
#Eureka Server提供给客户端的访问地址(要加上/eureka/)
eureka.client.service-url.defaultZone=http://${eureka.instance.hostname}:${server.port}/eureka/
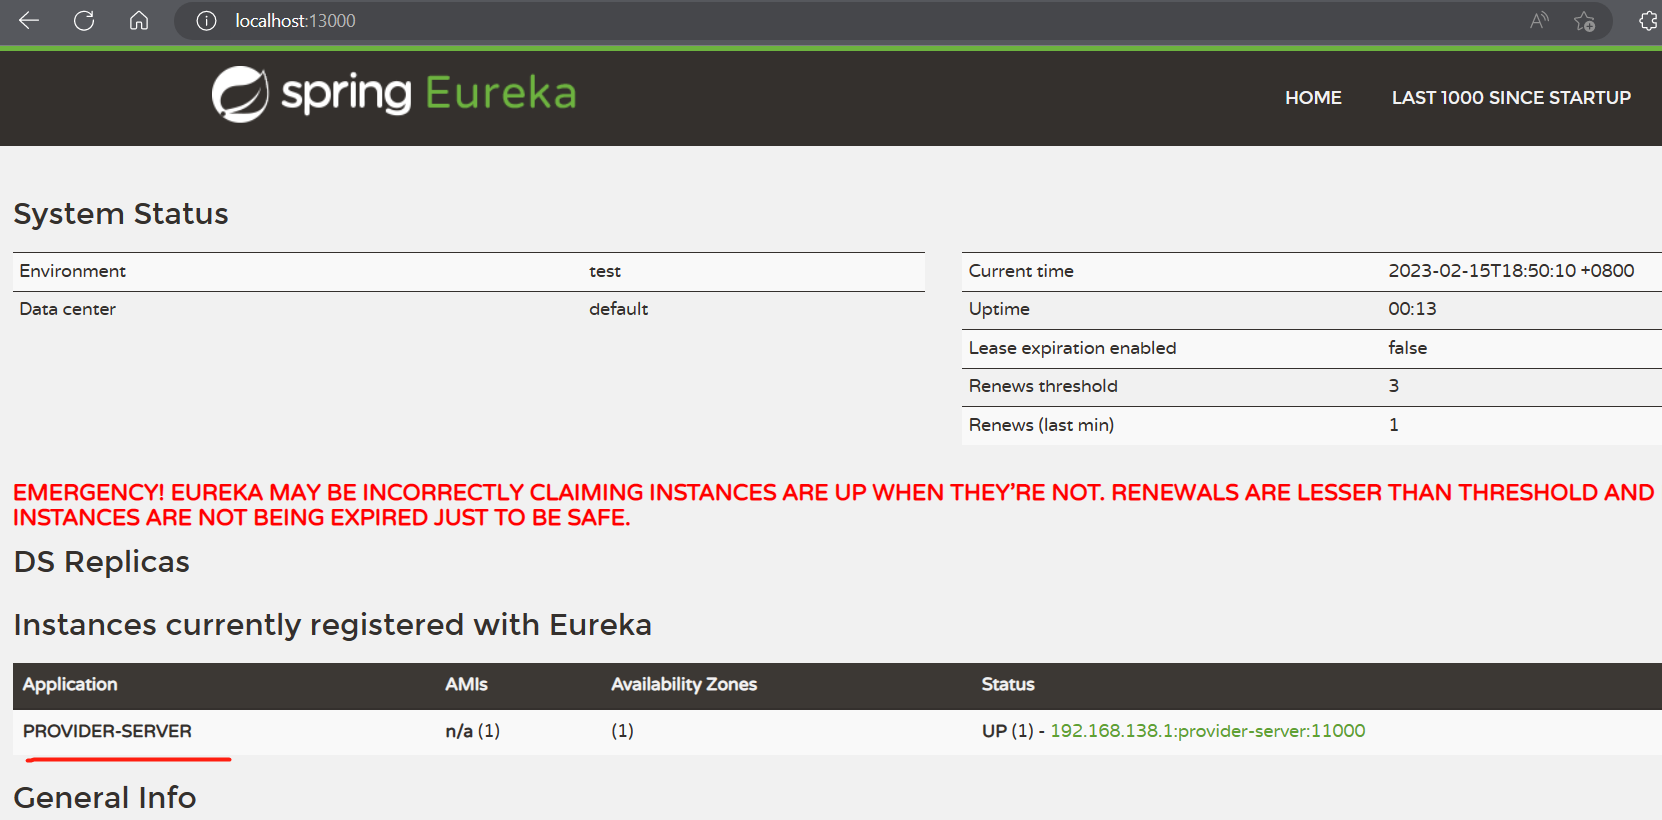
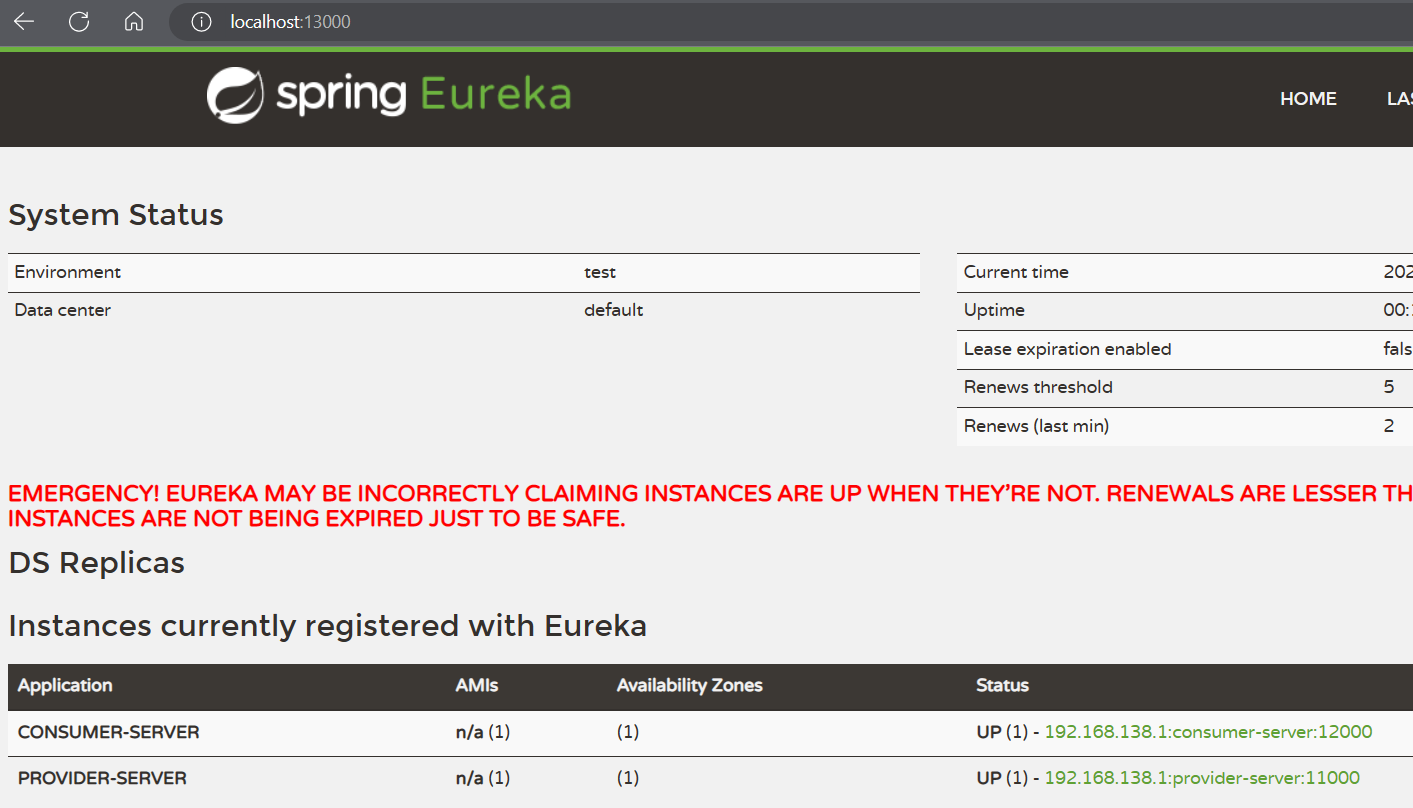
启动测试
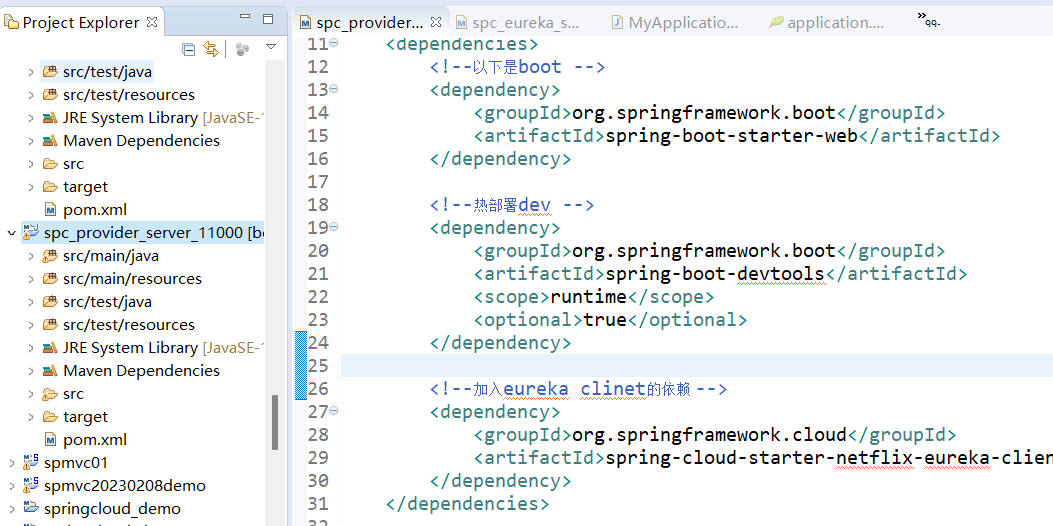
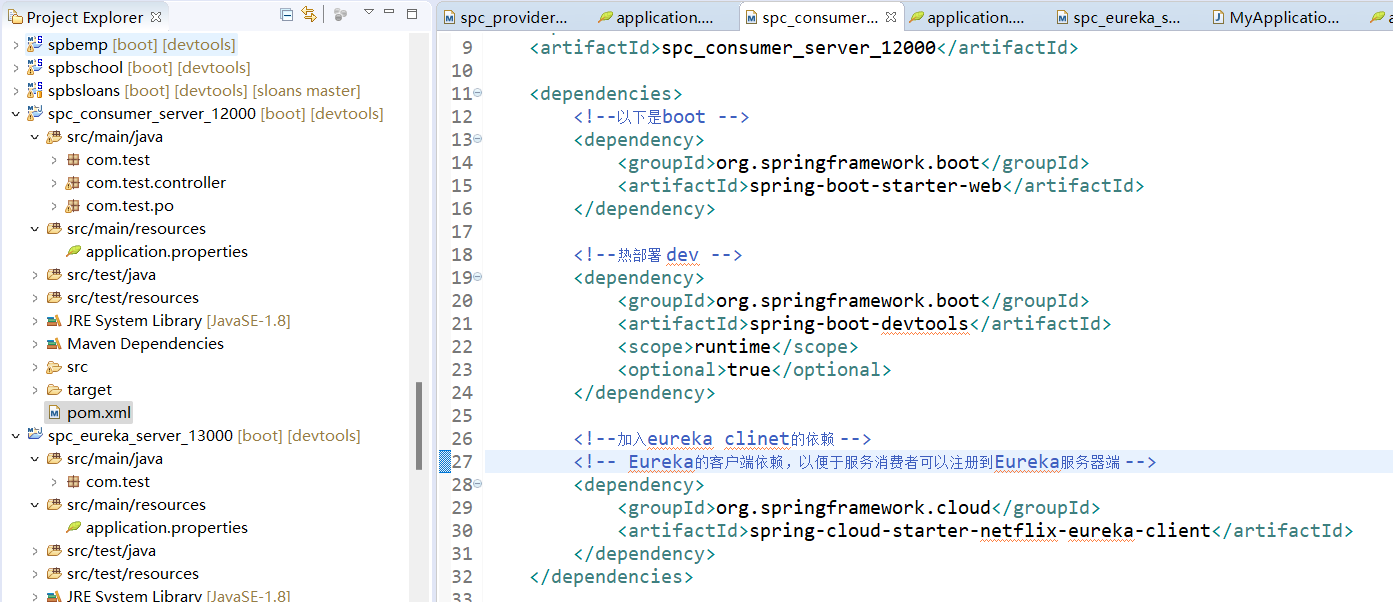
<!--加入eureka clinet的依赖-->
<!-- Eureka的客户端依赖,以便于服务生产者可以注册到Eureka服务器端 -->
<dependency>
    <groupId>org.springframework.cloud</groupId>
    <artifactId>spring-cloud-starter-netflix-eureka-client</artifactId>
</dependency>
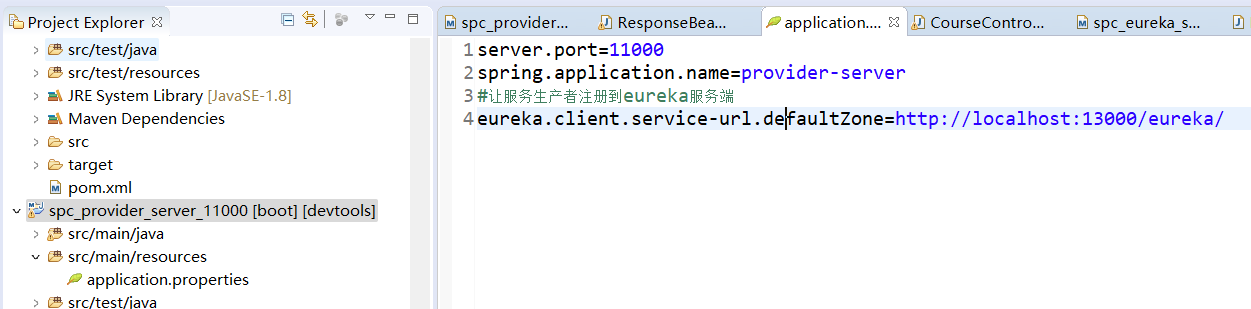
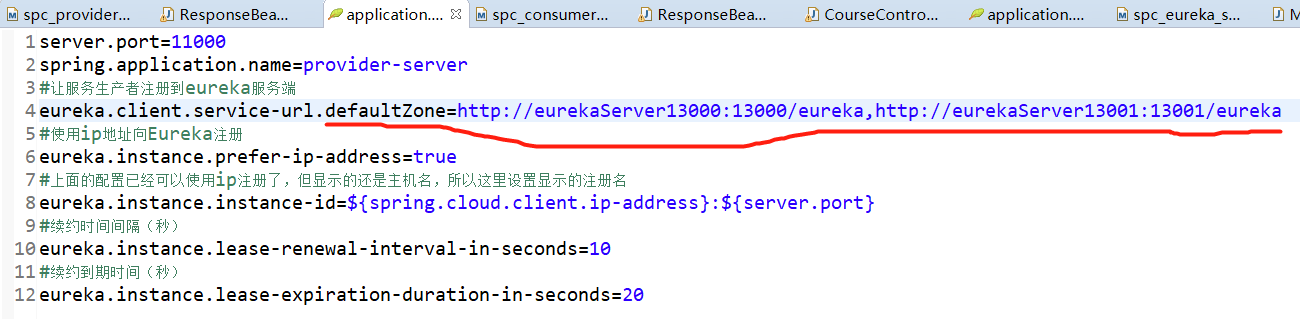
向application.properties中加配置spc_provider_server_11000
#让服务生产者注册到eureka服务端
eureka.client.service-url.defaultZone=http://localhost:13000/eureka/
将消费者也注册到eureka中,流程和上边生产者一样

3.改动消费者代码,消费者访问生产者需要走eureka(spc_consumer_server_12000)
CourseController.java
package com.test.controller;

import java.util.List;

import org.springframework.beans.factory.annotation.Autowired;
import org.springframework.cloud.client.ServiceInstance;
import org.springframework.cloud.client.discovery.DiscoveryClient;
import org.springframework.web.bind.annotation.GetMapping;
import org.springframework.web.bind.annotation.PathVariable;
import org.springframework.web.bind.annotation.RequestMapping;
import org.springframework.web.bind.annotation.RestController;
import org.springframework.web.client.RestTemplate;

import com.test.po.Course;
import com.test.po.ResponseBean;

@RestController
@RequestMapping("/course")
public class CourseController {

    @Autowired
    private RestTemplate restTemplate;

    @Autowired
    private DiscoveryClient client;

    @GetMapping("/getCourse/{cno}")
    public ResponseBean<Course> getCourse(@PathVariable("cno") String cno) {
        List<ServiceInstance> list = client.getInstances("provider-server");
        ServiceInstance si = list.get(0);
        // 服务生产者的URL和端口信息来自Eureka服务端取到的信息
        String url = "http://" + si.getHost() + ":" + si.getPort() + "/course/getCourse/" + cno;
        ResponseBean<Course> rb = restTemplate.getForObject(url, ResponseBean.class);
        return rb;
    }

}
测试
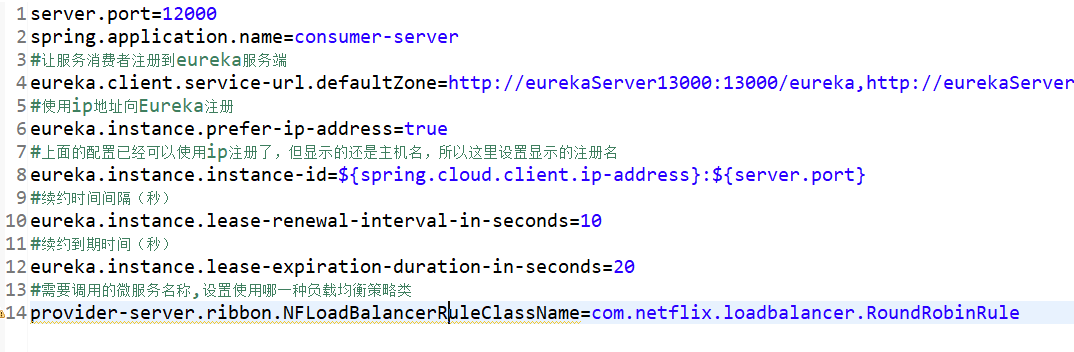
4.使用IP和端口向Eureka注册
配置这个原因:
意思就是默认情况status显示主机名,但是配置后显示ip,

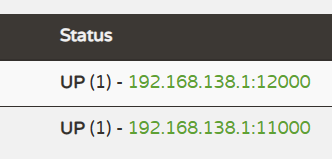
#使用ip地址向Eureka注册
eureka.instance.prefer-ip-address=true
#上面的配置已经可以使用ip注册了,但显示的还是主机名,所以这里设置显示的注册名
eureka.instance.instance-id=${spring.cloud.client.ip-address}:${server.port}
微服务启动后,会周期性地向Eureka Server发送心跳(默认周期为30秒)以续约自己的信息。如果Eureka Server在一定时间内没有接收到某个微服务节点的心跳,Eureka Server将会注销该微服务节点(默认周期90秒);
如果认为默认周期时间过长,那么可以通过如下配置来修改续约时间:
#续约时间间隔(秒)
eureka.instance.lease-renewal-interval-in-seconds=10
 #续约到期时间(秒)
eureka.instance.lease-expiration-duration-in-seconds=20

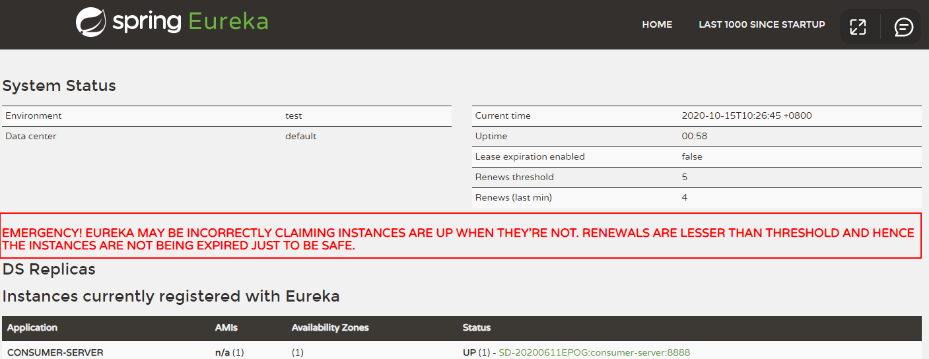
- 默认情况下,Eureka在90秒内没有接收到某个微服务节点的心跳,就会认为该微服务节点已宕机,并将其从服务列表中剔除。
- 但是,当网络分区故障发生时,微服务与Eureka Server之间无法正常通信,以上行为就会非常危险:因为微服务本身是健康的,此时不应该注销这个微服务。
- Eureka通过自我保护机制来解决这个问题。当Eureka Server的某节点发现在短时间内丢失过多客户端时(可能发生了网络分区故障),Eureka会将当前的实例注册信息保护起来,不在注销任何微服务。
- 具体来说:如果在15分钟内超过85%的客户端节点都没有正常的心跳,那么Eureka就认为客户端与注册中心出现了网络故障,Eureka Server自动进入自我保护机制(在单机状态下很容易进入自我保护机制)。此时,Eureka会将当前的实例注册信息保护起来,同时提示这个警告。
- 当网络故障恢复后,该Eureka Server节点会自动退出自我保护机制。
在开发过程中,我们并不需要自我保护机制。那么可以通过设置eureka.server.enable-self-preservation来关闭自我保护机制。
#开发环境可以设定关闭自我保护功能,生产环境下可以打开
eureka.server.enable-self-preservation=false
7.Eureka Server 集群
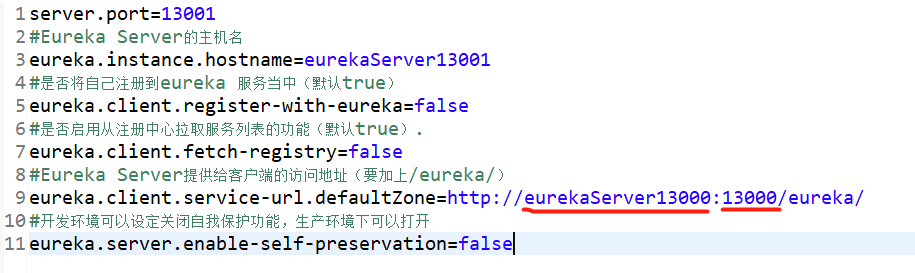
在一台计算机上搭建Eureka Server集群时,eureka.instance.hostname不能重名,但它又是Eureka Server服务的IP地址,所以需要修改个人电脑中hosts文件。在hosts文件中,就可以将不同的eureka.instance.hostname名映射给同一个本机IP地址。
## springcloud 配置
127.0.0.1 eurekaServer13000
127.0.0.1 eurekaServer13001
注意:
1. windows系统下hosts文件内容不区分大小写;Linux系统下区分大小写;
2. 不能写localhost,因为localhost是本机域名,不是一个IP地址。
复制粘贴出来一个eureka(spc_eureka_server_13001)

修改两个eureka服务端的application.properties
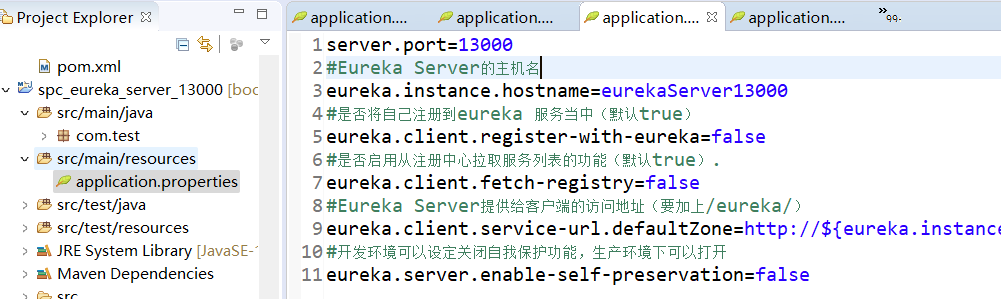
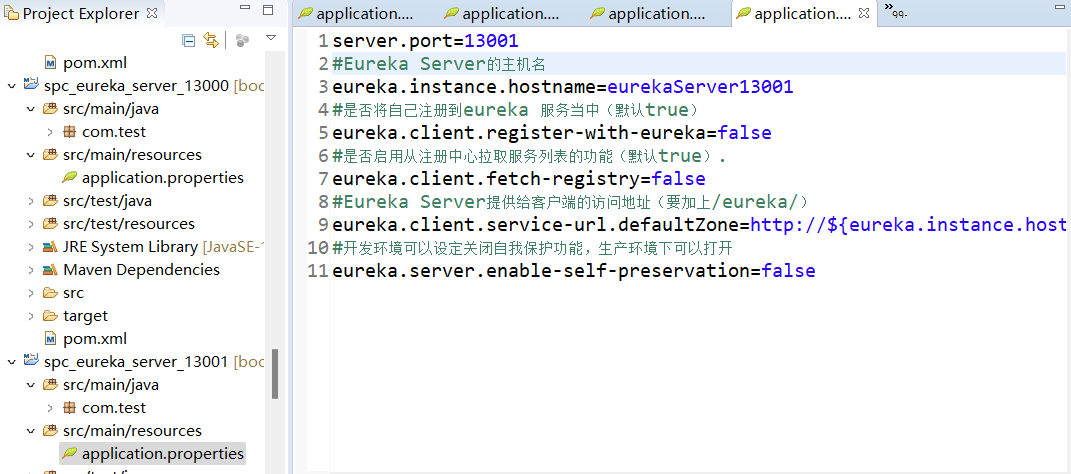
注意:eureka.instance.hostname属性要和hosts文件配置的一致
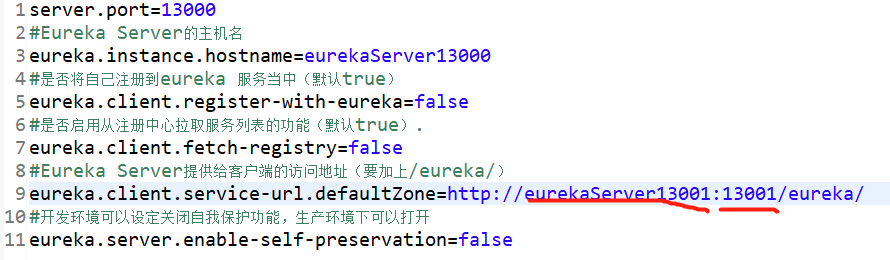
eureka集群相互注册
分别修改spc_eureka_server_13000和spc_eureka_server_13001工程中的properties配置文件,添加如下配置属性
将微服务注册到Eureka Server集群只需要修改properties配置文件即可。
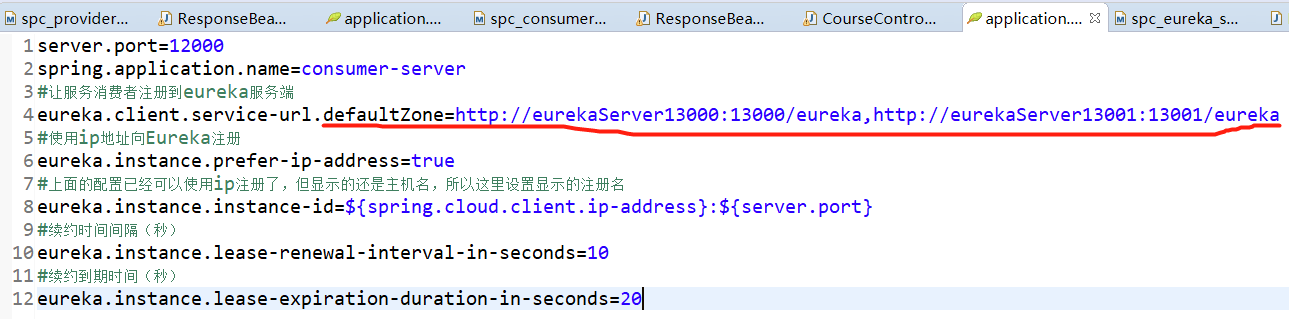
修改服务消费者和提供者的defaultZone配置,添加多个Eureka Server的地址:
测试
1.
复制粘贴spc_provider_server_11000,名字为spc_provider_server_11001,并且改application.properties的server.port


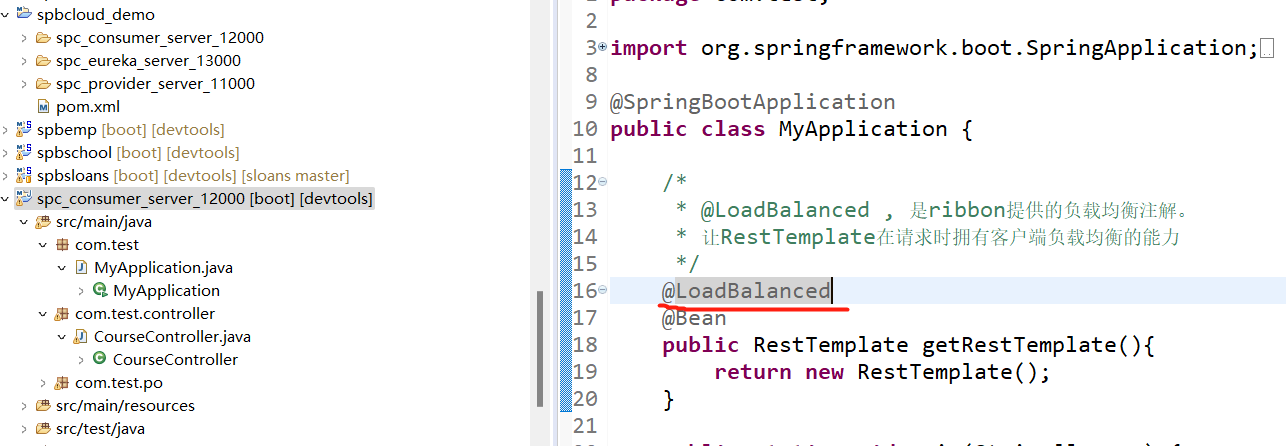
2.启动负载均衡器
将@LoadBalanced注解加再消费者启动类中getRestTemplate方法上
修改消费者spc_consumer_server_12000的CourseController.java
package com.test.controller;

import java.util.List;

import org.springframework.beans.factory.annotation.Autowired;
import org.springframework.cloud.client.ServiceInstance;
import org.springframework.cloud.client.discovery.DiscoveryClient;
import org.springframework.web.bind.annotation.GetMapping;
import org.springframework.web.bind.annotation.PathVariable;
import org.springframework.web.bind.annotation.RequestMapping;
import org.springframework.web.bind.annotation.RestController;
import org.springframework.web.client.RestTemplate;

import com.test.po.Course;
import com.test.po.ResponseBean;

@RestController
@RequestMapping("/course")
public class CourseController {

    @Autowired
    private RestTemplate restTemplate;

    @Autowired
    private DiscoveryClient client;

    @GetMapping("/getCourse/{cno}")
    public ResponseBean<Course> getCourse(@PathVariable("cno") String cno) {
        // 未启用负载均衡之前的写法
        // List<ServiceInstance> list = client.getInstances("provider-server");
        // ServiceInstance si = list.get(0);
        // 服务生产者的URL和端口信息来自Eureka服务端取到的信息
        // String url = "http://" + si.getHost() + ":" + si.getPort() +
        // "/course/getCourse/" + cno;
        // 启用负载均衡后的写法
        String url = "http://provider-server/course/getCourse/" + cno;
        ResponseBean<Course> rb = restTemplate.getForObject(url, ResponseBean.class);
        return rb;
    }

}
给生产者加点打印语句啥的方便测试
测试
3.负载均衡策略
Ribbon内置了多种负载均衡策略:
- 轮询策略(com.netflix.loadbalancer.RoundRobinRule)
- 随机策略(com.netflix.loadbalancer.RandomRule)
- 重试策略(com.netflix.loadbalancer.RetryRule):在一个配置时间段内(超时时间),当选择服务实例不成功,则一直尝试选择一个可用的服务实例。
- 权重策略(com.netflix.loadbalancer.WeightedResponseTimeRule):会计算每个服务的权重,越高的被调用的可能性越大。
- 最佳策略(com.netflix.loadbalancer.BestAvailableRule):遍历所有的服务实例,过滤掉故障实例,并返回请求数最小的实例。
- 可用过滤策略(com.netflix.loadbalancer.AvailabilityFilteringRule):过滤掉故障和请求数超过阈值的服务实例,再从剩下的实力中轮询调用。
负责均衡策略是可以通过配置文件进行修改的。在服务消费者consumer_server_12000 的application.properties配置文件中修改负载均衡策略:
向consumer_server_12000 的application.properties中添加配置
#需要调用的微服务名称,设置使用哪一种负载均衡策略类
provider-server.ribbon.NFLoadBalancerRuleClassName=com.netflix.loadbalancer.RoundRobinRule
测试
4.基于Feign的服务调用
- SpringCloud对Feign进行了增强,也就是OpenFeign。
- OpenFeign支持SpringMVC注解,并整合了Ribbon和Eureka,从而让Feign也具有负载均衡的功能。
在spc_consumer_server_12000工程中添加OpenFeign的依赖
<!--SpringCloud整合的openFeign -->
<dependency>
    <groupId>org.springframework.cloud</groupId>
    <artifactId>spring-cloud-starter-openfeign</artifactId>
</dependency>
4.2主启动类添加Feign注解
在主启动类上添加开启Feign支持的注解@EnableFeignClients
4.3配置调用接口
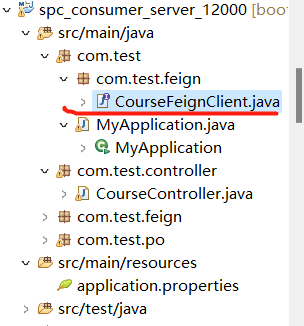
CourseFeignClient.java
package com.test.feign;

import org.springframework.cloud.openfeign.FeignClient;
import org.springframework.web.bind.annotation.GetMapping;
import org.springframework.web.bind.annotation.PathVariable;

import com.test.po.Course;
import com.test.po.ResponseBean;

//在Eureka上注册过的服务生产者的服务名
@FeignClient(name = "provider-server")
public interface CourseFeignClient {

    @GetMapping("/course/getCourse/{cno}")
    public ResponseBean<Course> getCourse(@PathVariable("cno") String cno);

}
4.4修改CourseController.java
CourseController.java
package com.test.controller;

import java.util.List;

import org.springframework.beans.factory.annotation.Autowired;
import org.springframework.cloud.client.ServiceInstance;
import org.springframework.cloud.client.discovery.DiscoveryClient;
import org.springframework.web.bind.annotation.GetMapping;
import org.springframework.web.bind.annotation.PathVariable;
import org.springframework.web.bind.annotation.RequestMapping;
import org.springframework.web.bind.annotation.RestController;
import org.springframework.web.client.RestTemplate;

import com.test.feign.CourseFeignClient;
import com.test.po.Course;
import com.test.po.ResponseBean;

@RestController
@RequestMapping("/course")
public class CourseController {

    // 使用OpenFeign之前的写法
    // @Autowired
    // private RestTemplate restTemplate;
    //
    // @Autowired
    // private DiscoveryClient client;

    // 使用OpenFeign后写法
    @Autowired
    private CourseFeignClient cfc;

    @GetMapping("/getCourse/{cno}")
    public ResponseBean<Course> getCourse(@PathVariable("cno") String cno) {
        // 未启用负载均衡之前的写法
        // List<ServiceInstance> list = client.getInstances("provider-server");
        // ServiceInstance si = list.get(0);
        // 服务生产者的URL和端口信息来自Eureka服务端取到的信息
        // String url = "http://" + si.getHost() + ":" + si.getPort() +
        // "/course/getCourse/" + cno;
        // 启用负载均衡后的写法
        // 使用OpenFeign之前的写法
        // String url = "http://provider-server/course/getCourse/" + cno;
        // ResponseBean<Course> rb = restTemplate.getForObject(url,
        // ResponseBean.class);

        // 使用OpenFeign后的写法
        ResponseBean<Course> rb = cfc.getCourse(cno);
        return rb;
    }

}
测试
续:eclipse微服务续,Hystrix+Gateway+Config配置管理中心+Bus动态刷新配置 - Lwmm - 博客园 (cnblogs.com)

 浙公网安备 33010602011771号