Spring
一、Spring概述
1.1 web项目开发中的耦合度问题
-
在Servlet中需要调用service中的方法,则需要在Servlet类中通过new关键字创建Service的实例
public interface ProductService{
    public List<Product> listProducts();
}
public class ProductServiceImpl1 implements ProductService{ public List<Product> listProducts(){ //查询热销商品 } }public class ProductServiceImpl2 implements ProductService{ public List<Product> listProducts(){ //查询好评商品 } }public class ProductListServlet extends HttpServlet{ //在servlet中使用new关键字创建ProductServiceImpl1对象,增加了servlet和service的耦合度 private ProductService productService = new ProductServiceImpl1(); protected void doGet(HttpServletRequest request,HttpServletResponse response){ doPost(request,response); } protected void doPost(HttpServletRequest request,HttpServletResponse response){ productService.listProducts(); } } -
在service实现类中需要调用DAO中的方法,也需要在servcie实现类通过new关键字创建DAO实现类对象
-
如果使用new关键字创建对象:
- 失去了面向接口编程的灵活性
- 代码的侵入性增强(增加了耦合度)、降低了代码的灵活性
- 增强项目的扩展性
1.2 面向接口编程
解决方案:在Servlet中定义Service接口的对象变量,不使用new关键字创建实现类对象,在servlet的实例化的时候,通过反射动态的给Service对象变量赋值。
如何实现:Spring可以做到!!!
1.3 Spring介绍
Spring是一个
轻量级的控制反转和面向切面的容器框架,用来解决企业项目开发的复杂度问题—解耦
- 轻量级:体积小,对代码没有侵入性
- 控制反转:IoC(Inverse of Control),把创建对象的工作交由Spring完成,Spring在创建对象的时候同时可以完成对象属性赋值(DI)
- 面向切面:AOP(Aspect Oriented Programming)面向切面编程,可以在不改变原有业务逻辑的情况下实现对业务的增强
- 容器:实例的容器,管理创建的对象
1.4 Spring架构
-
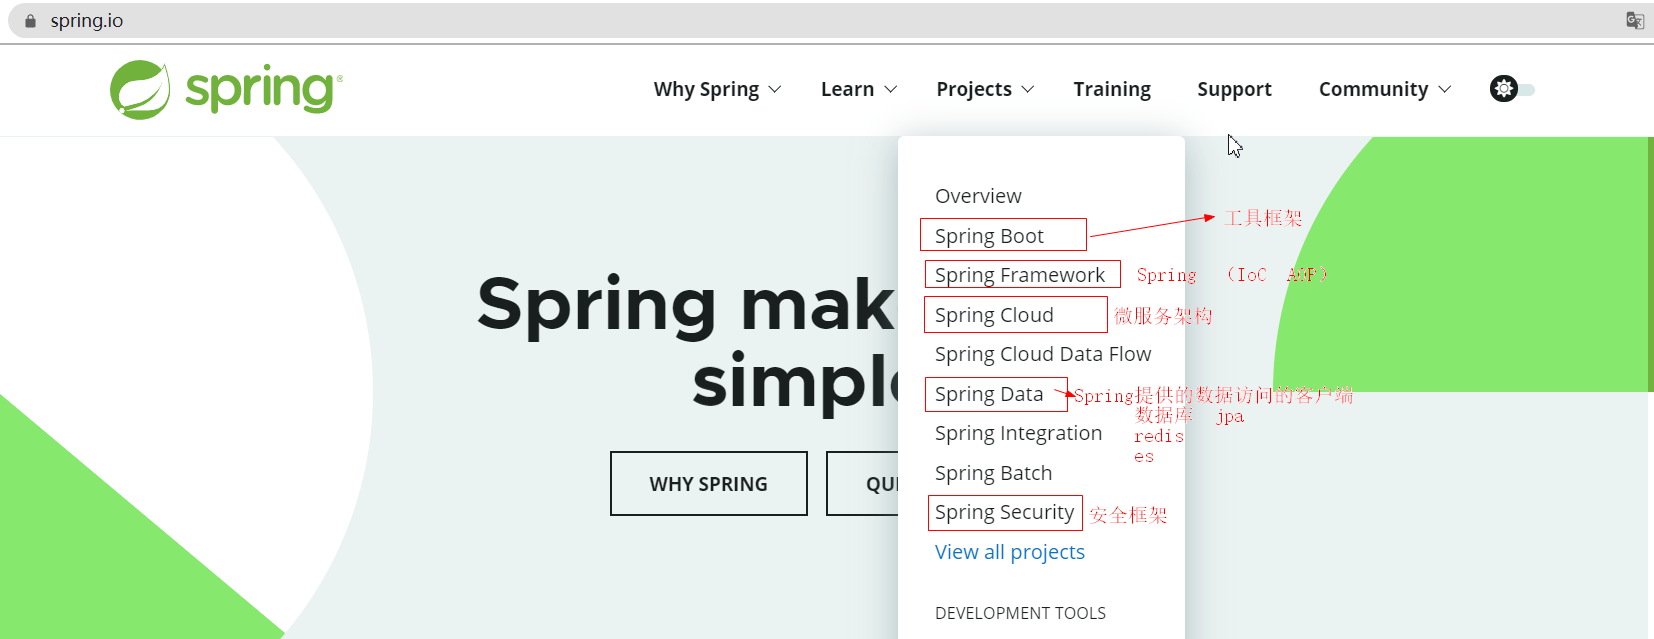
-
Spring架构图
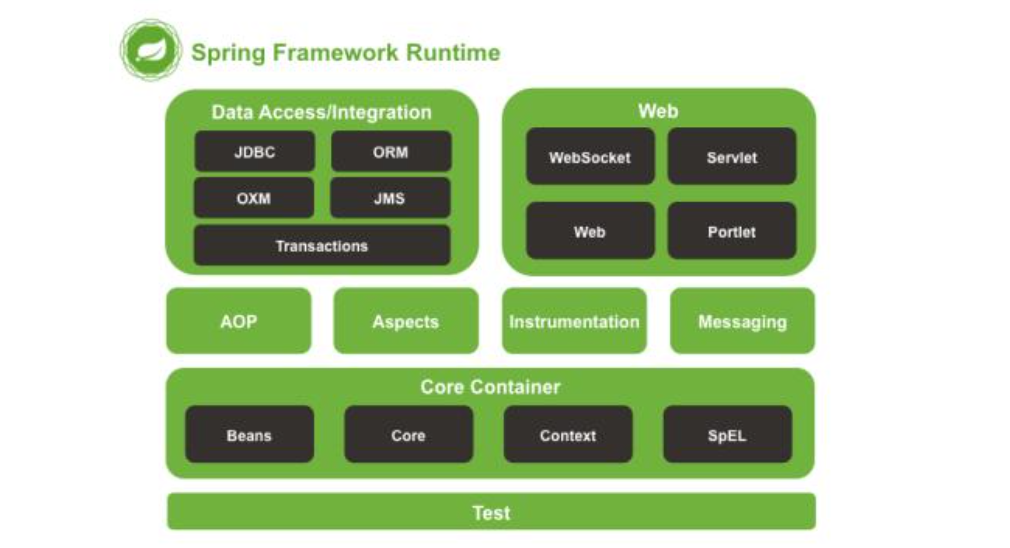
1.4.1 Core Container
Spring容器组件,用于完成实例的创建和管理
- core
- beans 实例管理
- context 容器上下文
1.4.2 AOP、Aspects
Spring AOP组件,实现面向切面编程
- aop
- aspects
1.4.3 web
Spring web组件实际指的是SpringMVC框架,实现web项目的MVC控制
- web (Spring对web项目的支持)
- webmvc (SpringMVC组件)
1.4.4 Data Access
Spring数据访问组件,也是一个基于JDBC封装的持久层框架(即使没有mybatis,Spring也可以完成持久化操作)
- tx
1.4.5 Test
Spring的单元测试组件,提供了Spring环境下的单元测试支持
- test
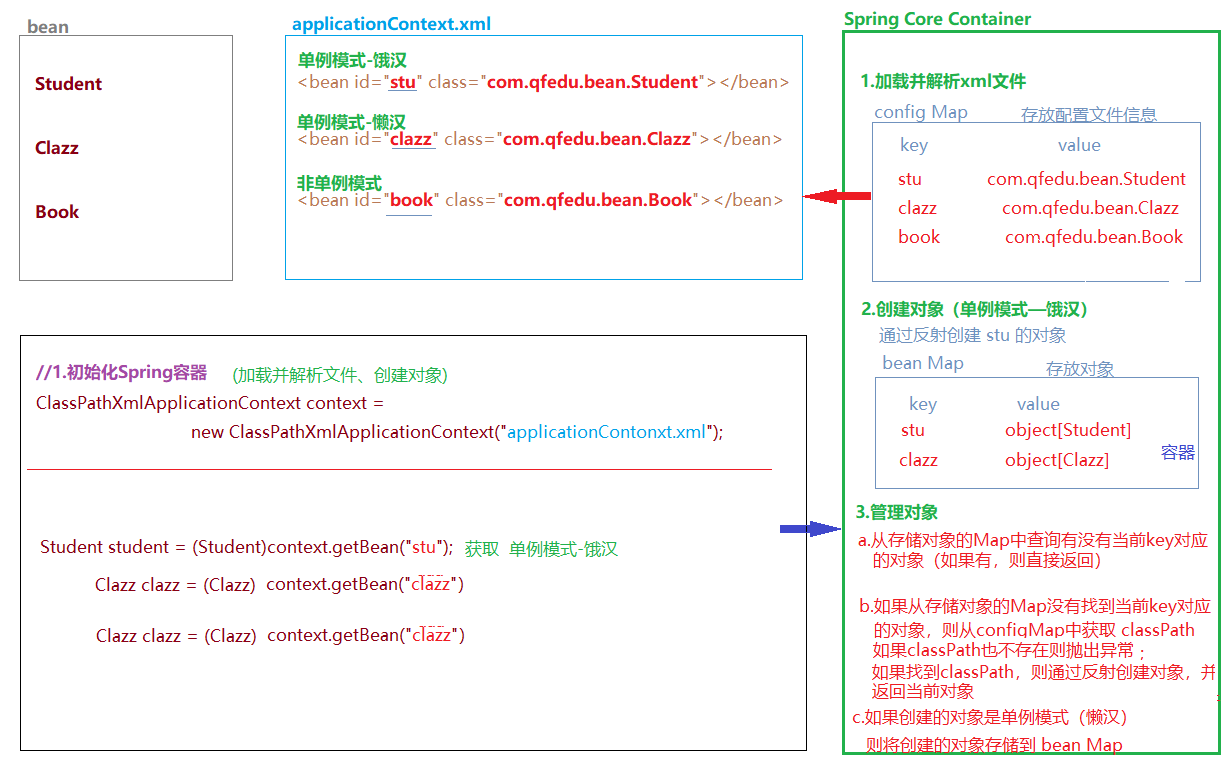
二、Spring IoC — 基于XML
Spring IoC 容器组件,可以完成对象的创建、对象属性赋值、对象管理
2.1 Spring框架部署(IoC)
2.1.1 创建Maven工程
- Java
- Web
2.1.2 添加SpringIoC依赖
- core
- beans
- aop
- expression
context
<dependency>
    <groupId>org.springframework</groupId>
    <artifactId>spring-context</artifactId>
    <version>5.2.13.RELEASE</version>
</dependency>
2.1.3 创建Spring配置文件
通过配置文件"告诉"Spring容器创建什么对象,给对象属性赋什么值
- 在resources目录下创建名为
appicationContext.xml的文件(文件名是可以自定义的)
<?xml version="1.0" encoding="UTF-8"?>
<beans xmlns="http://www.springframework.org/schema/beans"
       xmlns:xsi="http://www.w3.org/2001/XMLSchema-instance"
       xsi:schemaLocation="http://www.springframework.org/schema/beans
       http://www.springframework.org/schema/beans/spring-beans.xsd">
        <!--  对于一个xml文件如果作为框架的配置文件,需要遵守框架的配置规则  -->
        <!--  通常一个框架为了让开发者能够正确的配置,都会提供xml的规范文件(dtd\xsd)  -->

</beans>
2.2 SpringIoC使用
使用 SpringIoC组件创建并管理对象
2.2.1 创建一个实体类
public class Student {

    private String stuNum;
    private String stuName;
    private String stuGender;
    private int stuAge;
    private Date enterenceTime; //入学日期

}
2.2.2 在Spring配置文件中配置实体类
<?xml version="1.0" encoding="UTF-8"?>
<beans xmlns="http://www.springframework.org/schema/beans"
       xmlns:xsi="http://www.w3.org/2001/XMLSchema-instance"
       xsi:schemaLocation="http://www.springframework.org/schema/beans
       http://www.springframework.org/schema/beans/spring-beans.xsd">

        <!--通过bean将实体类配置给Spring进行管理,id表示实体类的唯一表示-->
        <bean id="stu" class="com.qfedu.ioc.bean.Student">
                <property name="stuNum" value="10002"/>
                <property name="stuName" value="李斯"/>
                <property name="stuGender" value="女"/>
                <property name="stuAge" value="20"/>
        </bean>

</beans>
2.2.3 初始化Spring对象工厂,获取对象
- ClassPathXMLApplicationContext
//1.初始化Spring容器,加载Spring配置文件
ClassPathXmlApplicationContext context = new ClassPathXmlApplicationContext("applicationContext.xml");
//2.通过Spring容器获取Student对象
Student student2 = (Student) context.getBean("stu");
2.3 IoC和DI
- IoC (Inverse of Control) 控制反转,通过Spring对象工厂完成对象的创建
- DI (Dependency Injection)依赖注入,在Spring完成对象创建的同时依赖Spring容器完成对象属性的赋值
2.3.1 IoC
当我们需要通过Spring对象工厂创建某个类的对象时候,需要将这个交给Spring管理——通过bean标签配置
<!--通过bean将实体类配置给Spring进行管理,id表示实体类的唯一表示-->
<bean id="stu" class="com.qfedu.ioc.bean.Student"></bean>

<bean id="book" class="com.qfedu.ioc.bean.Book"></bean>
2.3.2 DI
通过Spring容器给创建的对象属性赋值
<bean id="clazz" class="com.qfedu.ioc.bean.Clazz"></bean>

<!--通过bean将实体类配置给Spring进行管理,id表示实体类的唯一表示-->
<bean id="stu" class="com.qfedu.ioc.bean.Student" autowire="byName">
    <property name="stuNum" value="10001"/>
</bean>
2.4 DI依赖注入
2.4.1 依赖注入三种方式
Spring容器加载配置文件之后,通过
反射创建类的对象,并给属性赋值;Spring容器通过反射实现属性注入有三种方式:
- set方法注入
- 构造器注入
- 接口注入(不常用)
2.4.2 set方法注入
在bean标签中通过配置property标签给属性属性赋值,实际上就是通过反射调用set方法完成属性的注入
简单类型及字符串
- 直接通过property标签的value属性赋值
<!--通过bean将实体类配置给Spring进行管理,id表示实体类的唯一表示-->
<bean id="stu" class="com.qfedu.ioc.bean.Student" autowire="byName">
    <!--    简单类型    -->
    <property name="stuNum" value="10001"/>
    <property name="stuAge" value="12"/>
    <!--    字符串类型-->
    <property name="weight" value="62.3"/>
</bean>
日期类型
- 方式1:在property标签中通过ref引用Spring容器中的一个对象
<bean id="date" class="java.util.Date"></bean>

<bean id="stu" class="com.qfedu.ioc.bean.Student" >
    <!--    日期类型-->
    <property name="enterenceTime" ref="date"/>
</bean>- 方式2:在property标签中添加子标签bean来指定对象
<bean id="stu" class="com.qfedu.ioc.bean.Student" >
    <!--    日期类型-->
    <property name="enterenceTime">
        <bean class="java.util.Date"/>
    </property>
</bean>
自定义类对象属性
- 方式1:
<bean id="cla" class="com.qfedu.ioc.bean.Clazz">
    <property name="classId" value="2010"/>
    <property name="className" value="Java2010"/>
</bean>

<bean id="stu" class="com.qfedu.ioc.bean.Student">
    <!--  自定义对象类型-->
    <property name="clazz" ref="cla"/>
</bean>- 方式2
<bean id="stu" class="com.qfedu.ioc.bean.Student">
    <!--  自定义对象类型-->
    <property name="clazz">
        <bean class="com.qfedu.ioc.bean.Clazz">
            <property name="classId" value="2010"/>
            <property name="className" value="Java2010"/>
        </bean>
    </property>
</bean>
集合类型
-
List
- List List中的元素是字符串或者简单类型的封装类
<property name="hobbies" value="旅游,电影"/><property name="hobbies" > <list> <value>旅游</value> <value>电影</value> <value>Java</value> </list> </property>- List
<property name="hobbies" >
    <list>
        <bean class="com.qfedu.ioc.bean.Book"/>
        <bean class="com.qfedu.ioc.bean.Book"/>
        <bean class="com.qfedu.ioc.bean.Book"/>
        <bean class="com.qfedu.ioc.bean.Book"/>
    </list>
</property>
<property name="hobbies" > <list> <ref bean="book"></ref> <!--引用容器中的备案--> <ref bean="book"></ref> </list> </property> -
Set
<property name="sets"> <set> <!--和list元素注入方式相同--> </set> </property> -
Map
<property name="maps"> <map> <entry> <key> <value>k1</value> </key> <value>123</value> </entry> <entry> <key> <value>k2</value> </key> <value>456</value> </entry> </map> </property> -
Properties
<property name="properties">
    <props>
        <prop key="k1">aaa</prop>
        <prop key="k2">bbb</prop>
    </props>
</property>
2.4.3 构造器注入
简单类型、字符串、对象
public class Student {

    private String stuNum;
    private String stuName;
    private String stuGender;
    private int stuAge;
    private double weight;
    private Date enterenceTime; //入学日期
    private Clazz clazz;

    public Student(String stuNum, String stuName, String stuGender, int stuAge, double weight, Date enterenceTime, Clazz clazz) {
        this.stuNum = stuNum;
        this.stuName = stuName;
        this.stuGender = stuGender;
        this.stuAge = stuAge;
        this.weight = weight;
        this.enterenceTime = enterenceTime;
        this.clazz = clazz;
    }
}
<bean id="date" class="java.util.Date"></bean> <bean id="stu" class="com.qfedu.ioc.bean.Student"> <constructor-arg index="0" value="10001"/> <!--字符串类型--> <constructor-arg index="2" value="女"/> <constructor-arg index="1" value="张三"/> <constructor-arg index="3" value="21"/> <!--简单类型--> <constructor-arg index="4" value="62.5"/> <constructor-arg index="5" ref="date"/> <!--对象类型--> <constructor-arg index="6"> <!--对象类型--> <bean class="com.qfedu.ioc.bean.Clazz"></bean> </constructor-arg> </bean>集合类型属性
public class Student{
    private List<String> hobbies;
    private Set<String> sets;
    private Map<String,Object> maps;
    private Properties properties;

    public Student(List<String> hobbies, Set<String> sets, Map<String, Object> maps, Properties properties) {
        this.hobbies = hobbies;
        this.sets = sets;
        this.maps = maps;
        this.properties = properties;
    }
}
<bean id="stu1" class="com.qfedu.ioc.bean.Student"> <constructor-arg index="0"> <list> <value>11</value> <value>22</value> <value>33</value> </list> </constructor-arg> <constructor-arg index="1"> <set> <value>aa</value> <value>bb</value> <value>cc</value> </set> </constructor-arg> <constructor-arg index="2"> <map> <entry> <key><value>key1</value></key> <value>value1</value> </entry> <entry> <key><value>key2</value></key> <value>value2</value> </entry> </map> </constructor-arg> <constructor-arg index="3"> <props> <prop key="k1">v1</prop> <prop key="k2">v2</prop> </props> </constructor-arg> </bean>2.5 Bean的作用域
在bean标签可以通过scope属性指定对象的的作用域
- scope="singleton" 表示当前bean是单例模式(默认饿汉模式,Spring容器初始化阶段就会完成此对象的创建;当在bean标签中设置 lazy-init="true"变为懒汉模式)
- scope="prototype" 表示当前bean为非单例模式,每次通过Spring容器获取此bean的对象时都会创建一个新的对象
- 单例
<bean id="book" class="com.qfedu.ioc.bean.Book" scope="singleton" lazy-init="true"></bean>- 多例
<bean id="book" class="com.qfedu.ioc.bean.Book" scope="prototype"></bean>2.6 Bean的声明周期方法
在bean标签中通过init-method属性指定当前bean的初始化方法,初始化方法在构造器执行之后执行,通过destroy-method属性指定当前bean的销毁方法,销毁方法在对象销毁之前执行-->
-
Bean类
public class Book { private int bookId; private String bookName; //初始化方法:在创建当前类对象时调用的方法,进行一些资源准备工作 public void init(){ System.out.println("-------init"); } //销毁方法:在Spring容器销毁对象时调用此方法,进行一些资源回收性的操作 public void destory(){ System.out.println("-------destory"); } } -
Spring配置文件
<bean id="book" class="com.qfedu.ioc.bean.Book" scope="prototype"init-method="init" destroy-method="destory" ></bean>
2.7 自动装配
自动装配:Spring在实例化当前bean的时候从Spring容器中找到匹配的实例赋值给当前bean的属性
自动装配策略有两种:
- byName 根据当前Bean的属性名在Spring容器中寻找匹配的对象 ,如果根据name找打了bean但是类型不匹配则抛出异常
- byType 根据当前Bean的属性类型在Spring容器中寻找匹配的对象,如果根据类型找到了多个bean也会抛出异常
- byName
<bean id="clazz" class="com.qfedu.ioc.bean.Clazz"></bean> <bean id="stu2" class="com.qfedu.ioc.bean.Student" autowire="byName"></bean>- byType
<bean id="clazz2" class="com.qfedu.ioc.bean.Clazz"></bean>

<bean id="stu2" class="com.qfedu.ioc.bean.Student" autowire="byType"></bean>
2.8 SpringIoC 工作原理
三、Spring IoC — 基于注解
SpringIoc的使用,需要我们通过XML将类声明给Spring容器进行管理,从而通过Spring工厂完成对象的创建及属性值的注入;
Spring除了提供基于XML的配置方式,同时提供了基于注解的配置:直接在实体类中添加注解声明给Spring容器管理,以简化开发步骤。
3.1 Spring框架部署
3.1.1 创建Maven项目
3.2.2 添加SpringIoC依赖
<dependency>
    <groupId>org.springframework</groupId>
    <artifactId>spring-context</artifactId>
    <version>5.2.13.RELEASE</version>
</dependency>
3.2.3 创建Spring配置文件
- 因为Spring容器初始化时,只会加载applicationContext.xml文件,那么我们在实体类中添加的注解就不会被Spring扫描,所以我们需要
在applicationContext.xml声明Spring的扫描范围,以达到Spring初始化时扫描带有注解的实体类并完成初始化工作
<?xml version="1.0" encoding="UTF-8"?>
<beans xmlns="http://www.springframework.org/schema/beans"
       xmlns:xsi="http://www.w3.org/2001/XMLSchema-instance"
       xmlns:context="http://www.springframework.org/schema/context"
       xsi:schemaLocation="http://www.springframework.org/schema/beans
       http://www.springframework.org/schema/beans/spring-beans.xsd
        http://www.springframework.org/schema/context
        http://www.springframework.org/schema/context/spring-context.xsd">

    <!-- 声明使用注解配置 -->
    <context:annotation-config/>

    <!-- 声明Spring工厂注解的扫描范围 -->
    <context:component-scan base-package="com.qfedu.beans"/>

</beans>
3.2 IoC常用注解
3.2.1
@Component- 类注解,声明此类被Spring容器进行管理,相当于bean标签的作用
@Component(value="stu")value属性用于指定当前bean的id,相当于bean标签的id属性;value属性也可以省略,如果省略当前类的id默认为类名首字母改小写- 除了@Component之外 @Service、@Controller、@Repository这三个注解也可以将类声明给Spring管理,他们主要是语义上的区别
- @Controller 注解主要声明将控制器类配置给Spring管理,例如Servlet
- @Service 注解主要声明业务处理类配置Spring管理,Service接口的实现类
- @Repository 直接主要声明持久化类配置给Spring管理,DAO接口
- @Component 除了控制器、servcie和DAO之外的类一律使用此注解声明
3.2.2
@Scope- 类注解,用于声明当前类单例模式还是 非单例模式,相当于bean标签的scope属性
- @Scope("prototype") 表示声明当前类为非单例模式(默认单例模式)
3.2.3
@Lazy- 类注解,用于声明一个单例模式的Bean是否为懒汉模式
- @Lazy(true) 表示声明为懒汉模式,默认为饿汉模式
3.2.4
@PostConstruct- 方法注解,声明一个方法为当前类的初始化方法(在构造器之后执行),相当于bean标签的init-method属性
3.2.5
@PreDestroy- 方法注解,声明一个方法为当前类的销毁方法(在对象从容器中释放之前执行),相当于bean标签的destory-method属性
3.2.6
@Autowired-
属性注解、方法注解(set方法),声明当前属性自动装配,默认byType
-
@Autowired(required = false) 通过requried属性设置当前自动装配是否为必须(默认必须——如果没有找到类型与属性类型匹配的bean则抛出异常)
-
byType
-
ref引用
-
@Autowired
public void setClazz(@Qualifier("c2") Clazz clazz) {
    this.clazz = clazz;
}
3.2.7
@Resource- 属性注解,也用于声明属性自动装配
- 默认装配方式为byName,如果根据byName没有找到对应的bean,则继续根据byType寻找对应的bean,根据byType如果依然没有找到Bean或者找到不止一个类型匹配的bean,则抛出异常。
四、代理设计模式
4.1 生活中的代理
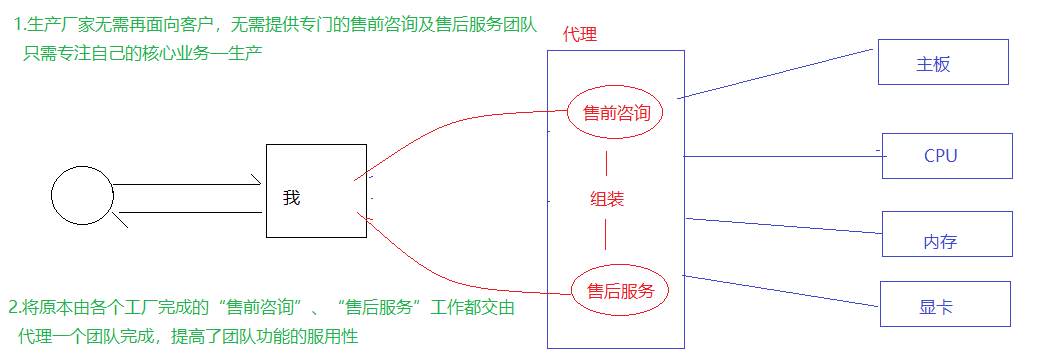
代理设计模式的优点:将通用性的工作都交给代理对象完成,被代理对象只需专注自己的核心业务。
4.2 静态代理
静态代理,代理类只能够为特定的类生产代理对象,不能代理任意类

使用代理的好处
1.被代理类中只用关注核心业务的实现,将通用的管理型逻辑(事务管理、日志管理)和业务逻辑分离
2.将通用的代码放在代理类中实现,提供了代码的复用性
3.通过在代理类添加业务逻辑,实现对原有业务逻辑的扩展(增强)
4.3 动态代理
动态代理,几乎可以为所有的类产生代理对象
动态代理的实现方式有2种:
- JDK动态代理
- CGLib动态大力
4.3.1 JDK动态代理
- JDK动态代理类实现:
/*** * JDK动态代理:是通过被代理对象实现的接口产生其代理对象的 * 1.创建一个类,实现InvocationHandler接口,重写invoke方法 * 2.在类种定义一个Object类型的变量,并提供这个变量的有参构造器,用于将被代理对象传递进来 * 3.定义getProxy方法,用于创建并返回代理对象 */ public class JDKDynamicProxy implements InvocationHandler { //被代理对象 private Object obj; public JDKDynamicProxy(Object obj) { this.obj = obj; } //产生代理对象,返回代理对象 public Object getProxy(){ //1.获取被代理对象的类加载器 ClassLoader classLoader = obj.getClass().getClassLoader(); //2.获取被代理对象的类实现的接口 Class<?>[] interfaces = obj.getClass().getInterfaces(); //3.产生代理对象(通过被代理对象的类加载器及实现的接口) //第一个参数:被代理对象的类加载器 //第二个参数:被代理对象实现的接口 //第三个参数:使用产生代理对象调用方法时,用于拦截方法执行的处理器 Object proxy = Proxy.newProxyInstance(classLoader, interfaces,this); return proxy; } public Object invoke(Object proxy, Method method, Object[] args) throws Throwable { begin(); Object returnValue = method.invoke(obj,args); //执行method方法(insert) commit(); return returnValue; } public void begin(){ System.out.println("----------开启事务"); } public void commit(){ System.out.println("----------提交事务"); } }- 测试
//创建被代理对象
BookDAOImpl bookDAO = new BookDAOImpl();
StudentDAOImpl studentDAO = new StudentDAOImpl();

//创建动态代理类对象,并将被代理对象传递到代理类中赋值给obj
JDKDynamicProxy jdkDynamicProxy = new JDKDynamicProxy(studentDAO);

//proxy就是产生的代理对象:产生的代理对象可以强转成被代理对象实现的接口类型
GenaralDAO proxy = (GenaralDAO)jdkDynamicProxy.getProxy();

//使用代理对象调用方法,并不会执行调用的方法,而是进入到创建代理对象时指定的InvocationHandler类种的invoke方法
//调用的方法作为一个Method参数,传递给了invoke方法
proxy.insert(student);
4.3.2 CGLib动态代理
由于JDK动态代理是通过被代理类实现的接口来创建代理对象的,因此JDK动态代理只能代理实现了接口的类的对象。如果一个类没有实现任何接口,该如何产生代理对象呢?
CGLib动态代理,是通过创建被代理类的子类来创建代理对象的,因此即使没有实现任何接口的类也可以通过CGLib产生代理对象
CGLib动态代理不能为final类创建代理对象
- 添加CGLib的依赖
<!-- https://mvnrepository.com/artifact/cglib/cglib --> <dependency> <groupId>cglib</groupId> <artifactId>cglib</artifactId> <version>3.3.0</version> </dependency>- CGLib动态代理实现:
/** * 1.添加cglib依赖 * 2.创建一个类,实现MethodInterceptor接口,同时实现接口中的intercept方法 * 3.在类中定义一个Object类型的变量,并提供这个变量的有参构造器,用于传递被代理对象 * 4.定义getProxy方法创建并返回代理对象(代理对象是通过创建被代理类的子类来创建的) */ public class CGLibDynamicProxy implements MethodInterceptor { private Object obj; public CGLibDynamicProxy(Object obj) { this.obj = obj; } public Object getProxy(){ Enhancer enhancer = new Enhancer(); enhancer.setSuperclass(obj.getClass()); enhancer.setCallback(this); Object proxy = enhancer.create(); return proxy; } public Object intercept(Object o, Method method, Object[] objects, MethodProxy methodProxy) throws Throwable { begin(); Object returnValue = method.invoke(obj,objects); //通过反射调用被代理类的方法 commit(); return returnValue; } public void begin(){ System.out.println("----------开启事务"); } public void commit(){ System.out.println("----------提交事务"); } }- 测试
//创建被代理对象
BookDAOImpl bookDAO = new BookDAOImpl();
StudentDAOImpl studentDAO = new StudentDAOImpl();

//通过cglib动态代理类创建代理对象
CGLibDynamicProxy cgLibDynamicProxy = new CGLibDynamicProxy(bookDAO);
//代理对象实际上是被代理对象子类,因此代理对象可直接强转为被代理类类型
BookDAOImpl proxy = (BookDAOImpl) cgLibDynamicProxy.getProxy();

//使用对象调用方法,实际上并没有执行这个方法,而是执行了代理类中的intercept方法,将当前调用的方法以及方法中的参数传递到intercept方法
proxy.update();
五、Spring AOP
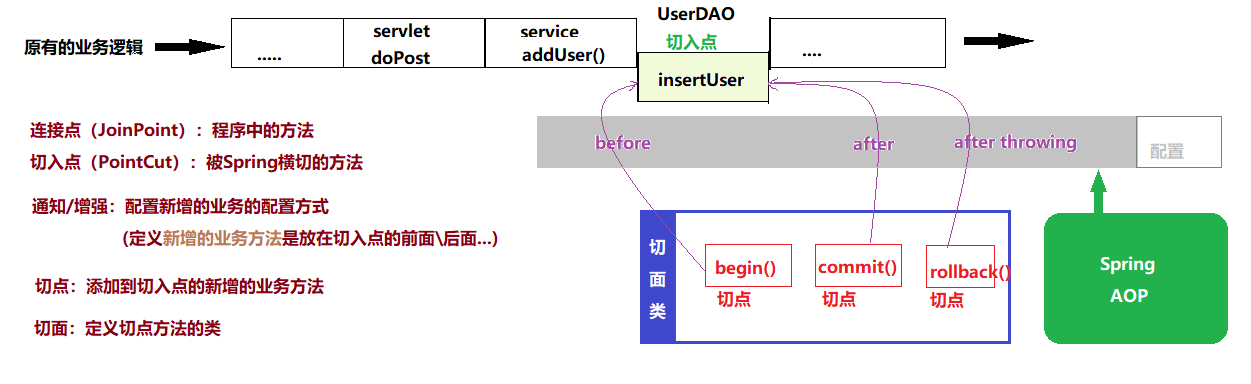
5.1 AOP 概念
Aspect Oriented Programming 面向切面编程,是一种利用“横切”的技术(底层实现就是动态代理),对原有的业务逻辑进行拦截,并且可以在这个拦截的横切面上添加特定的业务逻辑,对原有的业务进行增强。
基于动态代理实现在不改变原有业务的情况下对业务逻辑进行增强
5.2 Spring AOP框架部署
5.2.1 创建Maven项目
5.2.2 添加依赖
- context
- aspects
<dependency>
    <groupId>org.springframework</groupId>
    <artifactId>spring-context</artifactId>
    <version>5.2.13.RELEASE</version>
</dependency>

<dependency>
    <groupId>org.springframework</groupId>
    <artifactId>spring-aspects</artifactId>
    <version>5.2.13.RELEASE</version>
</dependency>
5.2.3 创建spring配置文件
- 需要引入aop的命名空间
<?xml version="1.0" encoding="UTF-8"?>
<beans xmlns="http://www.springframework.org/schema/beans"
       xmlns:xsi="http://www.w3.org/2001/XMLSchema-instance"
       xmlns:aop="http://www.springframework.org/schema/aop"
       xsi:schemaLocation="http://www.springframework.org/schema/beans
       http://www.springframework.org/schema/beans/spring-beans.xsd
        http://www.springframework.org/schema/aop
        http://www.springframework.org/schema/aop/spring-aop.xsd">


</beans>
5.3 AOP配置—基于XML
在DAO的方法添加开启事务和提交事务的逻辑
5.3.1 创建一个类,定义要添加的业务逻辑
public class TxManager {

    public void begin(){
        System.out.println("-----------开启事务");
    }

    public void commit(){
        System.out.println("-----------提交事务");
    }

}
5.3.2 配置aop
<?xml version="1.0" encoding="UTF-8"?> <beans xmlns="http://www.springframework.org/schema/beans" xmlns:xsi="http://www.w3.org/2001/XMLSchema-instance" xmlns:aop="http://www.springframework.org/schema/aop" xsi:schemaLocation="http://www.springframework.org/schema/beans http://www.springframework.org/schema/beans/spring-beans.xsd http://www.springframework.org/schema/aop http://www.springframework.org/schema/aop/spring-aop.xsd"> <bean id="bookDAO" class="com.qfedu.dao.BookDAOImpl"></bean> <bean id="studentDAO" class="com.qfedu.dao.StudentDAOImpl"></bean> <!----> <bean id="txManager" class="com.qfedu.utils.TxManager"></bean> <aop:config> <!--声明切入点--> <aop:pointcut id="book_all" expression="execution(* com.qfedu.dao.*.*(..))"/> <!--声明txManager为切面类--> <aop:aspect ref="txManager"> <!--通知--> <aop:before method="begin" pointcut-ref="book_all"/> <aop:after method="commit" pointcut-ref="book_all"/> </aop:aspect> </aop:config> </beans>AOP开发步骤:1.创建切面类,在切面类定义切点方法
2.将切面类配置给Spring容器
3.声明切入点
4.配置AOP的通知策略
5.4 切入点的声明
5.4.1 各种切入点声明方式
<!--使用aop:pointcut标签声明切入点:切入点可以是一个方法-->
<aop:pointcut id="book_insert" expression="execution(* com.qfedu.dao.BookDAOImpl.insert())"/>

<!--BookDAOImpl类中所有无参数无返回值的方法-->
<aop:pointcut id="book_pc1" expression="execution(void com.qfedu.dao.BookDAOImpl.*())"/>

<!--BookDAOImpl类中所有无返回值的方法-->
<aop:pointcut id="book_pc2" expression="execution(void com.qfedu.dao.BookDAOImpl.*(..))"/>

<!--BookDAOImpl类中所有无参数的方法-->
<aop:pointcut id="book_pc3" expression="execution(* com.qfedu.dao.BookDAOImpl.*())"/>

<!--BookDAOImpl类中所有方法-->
<aop:pointcut id="book_pc4" expression="execution(* com.qfedu.dao.BookDAOImpl.*(..))"/>

<!--dao包中所有类中的所有方法-->
<aop:pointcut id="pc5" expression="execution(* com.qfedu.dao.*.*(..))"/>

<!--dao包中所有类中的insert方法-->
<aop:pointcut id="pc6" expression="execution(* com.qfedu.dao.*.insert(..))"/>

<!--dao包中所有类中的insert方法-->
<aop:pointcut id="pc7" expression="execution(* *(..))"/>
5.4.2 AOP使用注意事项
//如果要使用Spring aop面向切面编程,调用切入点方法的对象必须通过Spring容器获取
//如果一个类中的方法被声明为切入点并且织入了切点之后,通过Spring容器获取该类对象,实则获取到的是一个代理对象
//如果一个类中的方法没有被声明为切入点,通过Spring容器获取的就是这个类真实创建的对象
//BookServiceImpl bookService = new BookServiceImpl();
BookServiceImpl bookService = (BookServiceImpl) context.getBean("bookServiceImpl");
bookService.addBook();
5.5 AOP通知策略
AOP通知策略:就是声明将切面类中的切点方法如何织入到切入点
- before
- after
- after-throwing
- after-returning
- around
5.5.1 定义切面类
public class MyAspect {

    public void method1(){
        System.out.println("~~~~~~~method1");
    }
    public void method2(){
        System.out.println("~~~~~~~method2");
    }
    public void method3(){
        System.out.println("~~~~~~~method3");
    }
    public void method4(){
        System.out.println("~~~~~~~method4");
    }

    //环绕通知的切点方法,必须准守如下的定义规则:
    //1.必须带有一个ProceedingJoinPoint类型的参数
    //2.必须有Object类型的返回值
    //3.在前后增强的业务逻辑之间执行Object v = point.proceed();
    //4.方法最后返回v
    public Object method5(ProceedingJoinPoint point) throws Throwable {
        System.out.println("~~~~~~~method5---before");
        //此代码的执行,就表示切入点方法的执行
        Object v = point.proceed();
        System.out.println("~~~~~~~method5---after");
        return v;
    }

}
5.5.2 配置切面类
<bean id="myAspect" class="com.qfedu.utils.MyAspect"></bean>
<aop:config>
    <!--使用aop:pointcut标签声明切入点:切入点可以是一个方法-->
    <aop:pointcut id="book_insert" expression="execution(* com.qfedu.dao.BookDAOImpl.insert())"/>

    <aop:aspect ref="myAspect">
        <!--aop:before 前置通知,切入到指定切入点之前-->
        <aop:before method="method1" pointcut-ref="book_insert"/>
        <!--aop:after 后置通知,切入到指定切入点之后-->
        <aop:after method="method2" pointcut-ref="book_insert"/>
        <!--aop:after-throwing 异常通知,切入点抛出异常之后-->
        <aop:after-throwing method="method3" pointcut-ref="book_insert"/>
        <!--aop:after-returning 方法返回值返回之后,对于一个Java方法而言return返回值也是方法的一部分
             因此“方法返回值返回之后”和“方法执行结束”是同一个时间点,随意after 和 after-returning根据配置
             的顺序决定执行顺序-->
        <aop:after-returning method="method4" pointcut-ref="book_insert"/>
        <aop:around method="method5" pointcut-ref="book_insert"/>
    </aop:aspect>

</aop:config>
六、Spring AOP 注解配置
6.1 Spring AOP 注解配置框架部署
6.1.1 创建Maven工程
6.1.2 添加Spring依赖
- context
- aspects
6.1.3 Spring配置文件
<?xml version="1.0" encoding="UTF-8"?>
<beans xmlns="http://www.springframework.org/schema/beans"
       xmlns:xsi="http://www.w3.org/2001/XMLSchema-instance"
       xmlns:context="http://www.springframework.org/schema/context"
       xmlns:aop="http://www.springframework.org/schema/aop"
       xsi:schemaLocation="http://www.springframework.org/schema/beans
       http://www.springframework.org/schema/beans/spring-beans.xsd
       http://www.springframework.org/schema/context
        http://www.springframework.org/schema/context/spring-context.xsd
        http://www.springframework.org/schema/aop
        http://www.springframework.org/schema/aop/spring-aop.xsd">

    <context:annotation-config></context:annotation-config>
    <context:component-scan base-package="com.qfedu"></context:component-scan>

    <!--  基于注解配置的aop代理  -->
    <aop:aspectj-autoproxy></aop:aspectj-autoproxy>

</beans>
6.2 AOP注解配置案例
@Component @Aspect public class TransactionManager { @Pointcut("execution(* com.qfedu.dao.*.*(..))") public void pc1(){} @Before("pc1()") public void begin(){ System.out.println("~~~~开启事务"); } @After("pc1()") public void commit(){ System.out.println("~~~~提交事务"); } @Around("pc1()") public Object printExecuteTime(ProceedingJoinPoint point) throws Throwable { long time1 = System.currentTimeMillis(); Object v = point.proceed(); long time2 = System.currentTimeMillis(); System.out.println("----time:"+(time2-time1)); return v; } }注意:注解使用虽然方便,但是只能在源码上添加注解,因此我们的自定义类提倡使用注解配置;但如果如果使用到第三方提供的类则需要通过xml配置形式完成配置。七、Spring整合MyBatis
Spring两大核心思想:IoC 和 AOP
IoC : 控制反转,Spring容器可以完成对象的创建、属性注入、对象管理等工作
AOP : 面向切面,在不修改原有业务逻辑的情况下,实现原有业务的增强
7.1 Spring可以对MyBatis提供哪些支持?
-
IoC支持 SpringIoC 可以为MyBatis完成DataSource、SqlSessionFactory、SqlSession以及DAO对象的创建
-
AOP支持使用Spring提供的事务管理切面类完成对MyBatis数据库操作中的事务管理
7.2 Spring整合MyBatis准备工作
7.2.1 创建Maven工程
7.2.2 部署MyBatis框架
- 添加依赖
- Mysql驱动
- mybatis
<!-- https://mvnrepository.com/artifact/mysql/mysql-connector-java --> <dependency> <groupId>mysql</groupId> <artifactId>mysql-connector-java</artifactId> <version>5.1.47</version> </dependency> <!-- https://mvnrepository.com/artifact/org.mybatis/mybatis --> <dependency> <groupId>org.mybatis</groupId> <artifactId>mybatis</artifactId> <version>3.4.6</version> </dependency>- 创建MyBatis配置文件(创建配置文件之后无需进行任何配置)
7.2.3 部署Spring框架<?xml version="1.0" encoding="UTF-8" ?> <!DOCTYPE configuration PUBLIC "-//mybatis.org//DTD Config 3.0//EN" "http://mybatis.org/dtd/mybatis-3-config.dtd"> <configuration> </configuration>- 添加依赖
<dependency> <groupId>org.springframework</groupId> <artifactId>spring-context</artifactId> <version>5.2.13.RELEASE</version> </dependency> <dependency> <groupId>org.springframework</groupId> <artifactId>spring-aspects</artifactId> <version>5.2.13.RELEASE</version> </dependency> <dependency> <groupId>org.springframework</groupId> <artifactId>spring-jdbc</artifactId> <version>5.2.13.RELEASE</version> </dependency>- 创建Spring配置文件:applicationContext.xml
<?xml version="1.0" encoding="UTF-8"?>
<beans xmlns="http://www.springframework.org/schema/beans"
       xmlns:xsi="http://www.w3.org/2001/XMLSchema-instance"
       xmlns:context="http://www.springframework.org/schema/context"
       xmlns:aop="http://www.springframework.org/schema/aop"
       xsi:schemaLocation="http://www.springframework.org/schema/beans
       http://www.springframework.org/schema/beans/spring-beans.xsd
       http://www.springframework.org/schema/context
        http://www.springframework.org/schema/context/spring-context.xsd
        http://www.springframework.org/schema/aop
        http://www.springframework.org/schema/aop/spring-aop.xsd">


</beans>
7.2.4 添加Spring整合MyBatis的依赖
- mybatis-spring 就是mybatis提供的兼容Spring的补丁
<!-- https://mvnrepository.com/artifact/org.mybatis/mybatis-spring -->
<dependency>
    <groupId>org.mybatis</groupId>
    <artifactId>mybatis-spring</artifactId>
    <version>1.3.2</version>
</dependency>
7.3 Spring整合MyBatis整合IoC配置
7.3.1 整合Druid连接池
- 添加druid的依赖
<dependency> <groupId>com.alibaba</groupId> <artifactId>druid</artifactId> <version>1.1.10</version> </dependency>- 创建druid.properties属性文件
druid.driver=com.mysql.jdbc.Driver druid.url=jdbc:mysql://localhost:3306/db_2010_mybatis?characterEncoding=utf-8 druid.username=root druid.password=admin123 ## 连接池参数 druid.pool.init=1 druid.pool.minIdle=3 druid.pool.maxActive=20 druid.pool.timeout=30000- 在applicationContext.xml中配置DruidDataSource
<!--加载druid.properties属性文件-->
<context:property-placeholder location="classpath:druid.properties"/>

<!--依赖Spring容器完成数据源DataSource的创建-->
<bean id="druidDataSource" class="com.alibaba.druid.pool.DruidDataSource">
    <property name="driverClassName" value="${druid.driver}"/>
    <property name="url" value="${druid.url}"/>
    <property name="username" value="${druid.username}"/>
    <property name="password" value="${druid.password}"/>

    <property name="initialSize" value="${druid.pool.init}"/>
    <property name="minIdle" value="${druid.pool.minIdle}"/>
    <property name="maxActive" value="${druid.pool.maxActive}"/>
    <property name="maxWait" value="${druid.pool.timeout}"/>
</bean>
7.3.2 整合MyBatis—创建SqlSessionFactory
依赖Spring容器创建MyBatis的SqlSessionFactory对象
<!--依赖Spring容器完成MyBatis的SqlSessionFactory对象的创建-->
<bean id="sqlSessionFactory" class="org.mybatis.spring.SqlSessionFactoryBean" >
    <!--配置数据源-->
    <property name="dataSource" ref="druidDataSource"/>
    <!--配置mapper文件的路径-->
    <property name="mapperLocations" value="classpath:mappers/*Mapper.xml"/>
    <!--配置需要定义别名的实体类的包-->
    <property name="typeAliasesPackage" value="com.qfedu.pojo"/>
    <!--可选:配置MyBatis的主配置文件-->
    <property name="configLocation" value="classpath:mybatis-config.xml"/>
</bean>
7.3.3 整合MyBatis-创建Mapper
<!--加载dao包中的所有DAO接口,通过sqlSessionFactory获取SqlSession,然后创建所有的DAO接口对象,存储在Spring容器-->
<bean class="org.mybatis.spring.mapper.MapperScannerConfigurer">
    <property name="sqlSessionFactoryBeanName" value="sqlSessionFactory"/>
    <property name="basePackage" value="com.qfedu.dao"/>
</bean>
7.4 Spring整合MyBatis整合AOP配置
使用Spring提供的事务管理切面类 完成DAO中增删改操作的事务管理
7.4.1 事务的隔离级别
isolation 设置事务隔离级别:READ_UNCOMMITTED ,READ_COMMITTED , REPEATABLE_READ , SERIALIZABLE

7.4.2 事务的传播机制

propagation 设置事务的传播机制
-
REQUIRED 如果上层方法没有事务,则创建一个新的事务;如果已经存在事务,则加入到事务中。
-
SUPPORTS 如果上层方法没有事务,则以非事务方式执行;如果已经存在事务,则加入到事务中。
-
REQUIRES_NEW 如果上层方法没有事务,则创建一个新的事务;如果已经存在事务,则将当前事务挂起。
-
NOT_SUPPORTED 如果上层方法没有事务,则以非事务方式执行;如果已经存在事务,则将当前事务挂起。
-
NEVER 如果上层方法没有事务,则以非事务方式执行;如果已经存在事务,则抛出异常。
-
MANDATORY 如果上层方法已经存在事务,则加入到事务中执行;如果不存在事务则抛出异常。
-
NESTED 如果上层方法没有事务,则创建一个新的事务;如果已经存在事务,则嵌套到当前事务中。
7.4.3 Spring AOP事务管理配置—XML配置
<!--1.将Spring提供的事务管理配置配置给Spring容器-->
<bean id="transactionManager" class="org.springframework.jdbc.datasource.DataSourceTransactionManager">
    <property name="dataSource" ref="druidDataSource"/>
</bean>

<!--2.通过Spring jdbc提供的 tx标签,声明事务管理策略-->
<tx:advice id="txAdvice" transaction-manager="transactionManager">
    <tx:attributes>
        <tx:method name="insert*" isolation="REPEATABLE_READ" propagation="REQUIRED"/>
        <tx:method name="delete*" isolation="REPEATABLE_READ" propagation="REQUIRED"/>
        <tx:method name="update*" isolation="REPEATABLE_READ" propagation="REQUIRED"/>
        <tx:method name="query*" isolation="REPEATABLE_READ" propagation="SUPPORTS"/>
    </tx:attributes>
</tx:advice>

<!--3.将事务管理策略以AOP配置 应用于DAO操作方法-->
<aop:config>
    <aop:pointcut id="crud" expression="execution(* com.qfedu.service.*.*(..))"/>
    <aop:advisor advice-ref="txAdvice" pointcut-ref="crud"/>
</aop:config>
7.4.4 Spring AOP事务管理配置—注解配置
- 在applicationContext.xml中配置事务管理,声明使用注解方式进行事务配置
<!--使用注解进行事务管理前提是 IoC需要进行注解配置--> <context:annotation-config/> <context:component-scan base-package="com.qfedu"/> <!--1.将Spring提供的事务管理配置配置给Spring容器--> <bean id="transactionManager" class="org.springframework.jdbc.datasource.DataSourceTransactionManager"> <property name="dataSource" ref="druidDataSource"/> </bean> <!--2.声明使用注解完成事务配置--> <tx:annotation-driven transaction-manager="transactionManager"/>- 在需要Spring进行事务管理的方法上添加
@Transactional注解
@Transactional(isolation = Isolation.REPEATABLE_READ ,propagation = Propagation.SUPPORTS )
public List<User> listUsers() {
    return userDAO.queryUsers();
}
八、基于Spring的单元测试
如果想要使用Spring容器实现属性注入、实现AOP面向切面编程,对象必须通过Spring容器获取;为了便于Spring环境下的测试,Spring提供了test组件,专门针对Spring环境进行单元测试。
8.1 添加依赖
<dependency>
     <groupId>junit</groupId>
     <artifactId>junit</artifactId>
     <version>4.12</version>
     <scope>test</scope>
</dependency>
<dependency>
    <groupId>org.springframework</groupId>
    <artifactId>spring-test</artifactId>
    <version>5.2.13.RELEASE</version>
</dependency>
8.2 编写单元测试类
8.2.1 创建一个单元测试类
8.2.2 添加注解
//1.通过@RunWith 声明当前测试类位于Spring容器环境(被Spring容器管理)
@RunWith(SpringJUnit4ClassRunner.class)
//2.通过@ContextConfiguration 声明当前测试环境的Spring容器运行时加载的配置文件
@ContextConfiguration("classpath:applicationContext.xml")
public class UserServiceImplTest {

    //因为当前测试类是基于Spring容器运行的,当前测试类的对象是通过Spring容器创建的
    //因此可以通过Spring容器实现属性的注入
    @Resource
    private UserService userServiceImpl2;
    @Resource
    private UserService userServiceImpl;

    @Test
    public void test(){
        List<User> users = userServiceImpl.listUsers();
        System.out.println(users);
    }

}

 浙公网安备 33010602011771号