5.异常 常用类
异常
异常:Exception:在程序的运行过程中,发生了不正常的现象,阻止了程序的运行,我们称之为发生异常。
【1】异常处理机制:“异常三连” try-catch-finally
【2】异常出现了以后怎么看:

【3】捕获异常: try-catch
对应代码:
public class Test2 {
    public static void main(String[] args) {
        //实现一个功能:键盘录入两个数,求商:
        try{
            Scanner sc = new Scanner(System.in);
            System.out.println("请录入第一个数:");
            int num1 = sc.nextInt();
            System.out.println("请录入第二个数:");
            int num2 = sc.nextInt();
            System.out.println("商:"+num1/num2);
        }catch(Exception ex){
            System.out.println("对不起,程序出现异常!");
        }
        System.out.println("----谢谢你使用计算器111");
        System.out.println("----谢谢你使用计算器222");
        System.out.println("----谢谢你使用计算器333");
        System.out.println("----谢谢你使用计算器444");
        System.out.println("----谢谢你使用计算器555");
        System.out.println("----谢谢你使用计算器666");
    }
}
原理:
把可能出现异常的代码放入try代码块中,然后将异常封装为对象,被catch后面的()中的那个异常对象接收,接收以后:执行catch后面的{}里面的代码,然后try-catch后面的代码,该怎么执行就怎么执行。
详细说一下:
(1)try中没有异常,catch中代码不执行。
(2)try中有异常,catch进行捕获:
如果catch中异常类型和你出的异常类型匹配的话:走catch中的代码--》进行捕获
如果catch中异常类型和你出的异常类型不匹配的话:不走catch中的代码--》没有捕获成功,程序相当于遇到异常了,中断了,后续代码不执行
注意:
(1)try中如果出现异常,然后用catch捕获成功的话,那么try中后续的代码是不会执行的。
(2)如果catch捕获异常成功,那么try-catch后面的代码该执行还是执行没有影响。
catch中如何处理异常
public class Test3 {
    public static void main(String[] args) {
        //实现一个功能:键盘录入两个数,求商:
        try{
            Scanner sc = new Scanner(System.in);
            System.out.println("请录入第一个数:");
            int num1 = sc.nextInt();
            System.out.println("请录入第二个数:");
            int num2 = sc.nextInt();
            System.out.println("商:"+num1/num2);
        }catch(Exception ex){
            //第一种处理:什么都不写,什么都不做
            //第二种处理:输出自定义异常信息
            //System.out.println("对不起,你的代码有问题!");
            //第三种处理:打印异常信息:
            /*(1)调用toString方法,显示异常的类名(全限定路径)*/
            /*System.out.println(ex);
            System.out.println(ex.toString());*/
            /*(2)显示异常描述信息对应的字符串,如果没有就显示null
            System.out.println(ex.getMessage());*/
            /*(3)显示异常的堆栈信息:将异常信息捕获以后,在控制台将异常的效果给我们展示出来,方便我们查看异常*/
           /* ex.printStackTrace();*/
            //第四种处理:抛出异常:
            throw ex;
        }
        System.out.println("----谢谢你使用计算器111");
    }
}
try-catch-finally
【1】在什么情况下,try-catch后面的代码不执行?
(1)throw抛出异常的情况
(2)catch中没有正常的进行异常捕获
(3)在try中遇到return
【2】怎么样才可以将 try-catch后面的代码 必须执行?
只要将必须执行的代码放入finally中,那么这个代码无论如何一定执行。
【3】return和finally执行顺序?
先执行finally最后执行return
【4】什么代码会放在finally中呢?
关闭数据库资源,关闭IO流资源,关闭socket资源。
【5】有一句话代码很厉害,它可以让finally中代码不执行!
System.exit(0);//终止当前的虚拟机执行
public class Test3 {
    public static void main(String[] args) {
        //实现一个功能:键盘录入两个数,求商:
        try{
            Scanner sc = new Scanner(System.in);
            System.out.println("请录入第一个数:");
            int num1 = sc.nextInt();
            System.out.println("请录入第二个数:");
            int num2 = sc.nextInt();
            System.out.println("商:"+num1/num2);
            System.exit(0);//终止当前的虚拟机执行
            return;
        }catch(ArithmeticException ex){
            //throw ex;
        }finally {
            System.out.println("----谢谢你使用计算器111");
        }
    }
}
多重catch
【1】try中出现异常以后,将异常类型跟catch后面的类型依次比较,按照代码的顺序进行比对,执行第一个与异常类型匹配的catch语句
【2】一旦执行其中一条catch语句之后,后面的catch语句就会被忽略了!
【3】在安排catch语句的顺序的时候,一般会将特殊异常放在前面(并列),一般化的异常放在后面。
先写子类异常,再写父类异常。
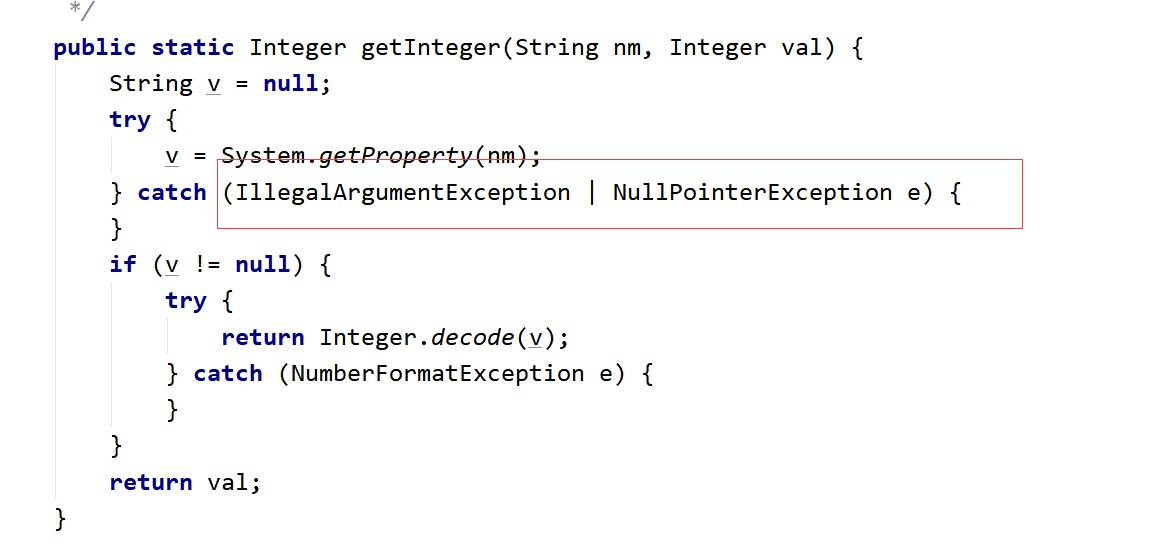
【4】在JDK1.7以后,异常新处理方式:可以并列用|符号连接:
public class Test4 {
    public static void main(String[] args) {
        Integer
        //实现一个功能:键盘录入两个数,求商:
        try{
            Scanner sc = new Scanner(System.in);
            System.out.println("请录入第一个数:");
            int num1 = sc.nextInt();
            System.out.println("请录入第二个数:");
            int num2 = sc.nextInt();
            System.out.println("商:"+num1/num2);
        }catch(ArithmeticException ex){
            System.out.println("对不起,除数不可以为0");
        }catch(InputMismatchException ex){
            System.out.println("对不起,你录入的数据不是int类型的数据");
        }catch(Exception ex){
            System.out.println("对不起,你的程序出现异常");
        }finally {
            System.out.println("----谢谢你使用计算器111");
        }
    }
}
异常的分类
【1】层次结构:
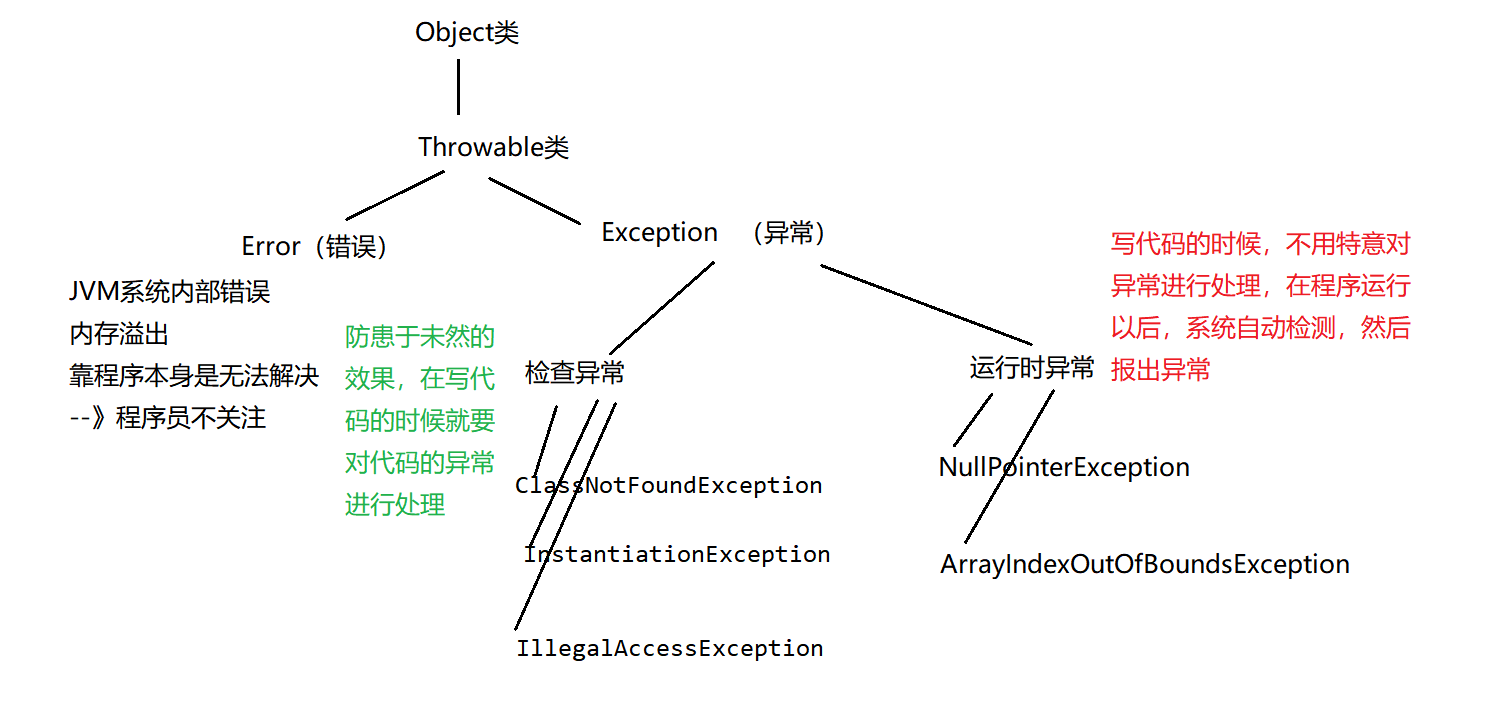
注意:程序中语法错误,逻辑错误 都不属于上面的Error,Exception
【2】运行时异常:
public class Test5 {
    //这是一个main方法,是程序的入口:
    public static void main(String[] args) {
        //运行时异常:
        int[] arr = {1,2,3};
        System.out.println(arr.length);
        /*int[] arr2 = null;
        System.out.println(arr2.length);*/
        System.out.println(arr[10]);
    }
}
【3】检查异常:
处理方式1:try-catch嵌套try-catch
public class Test6 {
    //这是一个main方法,是程序的入口:
    public static void main(String[] args) {
        //检查异常:
        try {
            try {
                Class.forName("com.msb.test01.Test").newInstance();
            } catch (InstantiationException e) {
                e.printStackTrace();
            } catch (IllegalAccessException e) {
                e.printStackTrace();
            }
        } catch (ClassNotFoundException e) {
            e.printStackTrace();
        }
    }
}
处理方式2:多重catch
public class Test6 {
    //这是一个main方法,是程序的入口:
    public static void main(String[] args) {
        //检查异常:
        try {
            Class.forName("com.msb.test01.Test").newInstance();
        } catch (ClassNotFoundException | InstantiationException | IllegalAccessException e) {
            e.printStackTrace();
        }
    }
}
处理方式3:throws
public class Test6 {
    //这是一个main方法,是程序的入口:
    public static void main(String[] args) throws ClassNotFoundException, IllegalAccessException, InstantiationException {
        //检查异常:
        Class.forName("com.msb.test01.Test").newInstance();
    }
}
throw和throws的区别
public class Test7 {
    //这是一个main方法,是程序的入口:
    public static void main(String[] args) throws Exception {
        //实现一个功能:两个数相除,当除数为0的时候,程序出现异常。
        /*try {
            devide();
        } catch (Exception e) {
            e.printStackTrace();
        }*/
        devide();
    }
    public static void devide() throws Exception {
        Scanner sc = new Scanner(System.in);
        System.out.println("请录入第一个数:");
        int num1 = sc.nextInt();
        System.out.println("请录入第二个数:");
        int num2 = sc.nextInt();
        if(num2 == 0 ){//除数为0 ,制造异常。
            //制造运行时异常:
            /*throw new RuntimeException();*/
            //制造检查异常:
            /*try {
                throw new Exception();
            } catch (Exception e) {
                e.printStackTrace();
            }*/
            throw new Exception();
        }else{
            System.out.println("商:"+num1/num2);
        }
    }
}
总结:
throw和throws的区别:
(1)位置不同:
throw:方法内部
throws: 方法的签名处,方法的声明处
(2)内容不同:
throw+异常对象(检查异常,运行时异常)
throws+异常的类型(可以多个类型,用,拼接)
(3)作用不同:
throw:异常出现的源头,制造异常。
throws:在方法的声明处,告诉方法的调用者,这个方法中可能会出现我声明的这些异常。然后调用者对这个异常进行处理:
要么自己处理要么再继续向外抛出异常
自定义异常
自定义的异常可以继承:运行时异常
public class MyException extends RuntimeException {

    static final long serialVersionUID = -70348971907L;

    public MyException(){
    }
    public MyException(String msg){
        super(msg);
    }
}
也可以继承检查异常:
public class MyException extends Exception {
    static final long serialVersionUID = -70348971907L;
    public MyException(){
    }
    public MyException(String msg){
        super(msg);
    }
}
如果继承的是运行时异常,那么在使用的时候无需额外处理
如果继承的是检查异常,那么使用的时候需要try-catch捕获或者throws向上抛
常用类
包装类
【1】什么是包装类:
以前定义变量,经常使用基本数据类型,
对于基本数据类型来说,它就是一个数,加点属性,加点方法,加点构造器,
将基本数据类型对应进行了一个封装,产生了一个新的类,---》包装类。
int,byte.....--->基本数据类型
包装类--->引用数据类型
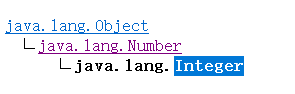
【2】对应关系:
基本数据类型 对应的包装类 继承关系
byte Byte     ---》Number---》Object
short Short   ---》Number---》Object
int Integer   ---》Number---》Object
long Long     ---》Number---》Object
float Float   ---》Number---》Object
double Double ---》Number---》Object
char             Character   Object
boolean          Boolean     Object
【3】已经有基本数据类型了,为什么要封装为包装类?
(1)java语言 面向对象的语言,最擅长的操作各种各样的类。
(2)以前学习装数据的---》数组,int[] String[] double[] Student[]
以后学习的装数据的---》集合,有一个特点,只能装引用数据类型的数据
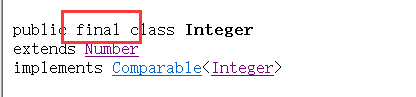
Integer
【1】直接使用,无需导包:
【2】类的继承关系:
【3】实现接口:
![]()
【4】这个类被final修饰,那么这个类不能有子类,不能被继承:
【5】包装类是对基本数据类型的封装: 对int类型封装产生了Integer
![]()
【6】类的历史:
![]()
【7】属性:
//属性:
        System.out.println(Integer.MAX_VALUE);
        System.out.println(Integer.MIN_VALUE);
        //“物极必反”原理:
        System.out.println(Integer.MAX_VALUE+1);
        System.out.println(Integer.MIN_VALUE-1);
【8】构造器(发现没有空参构造器)
(1)int类型作为构造器的参数:
Integer i1 = new Integer(12);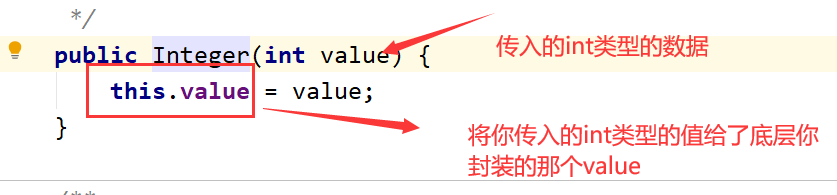
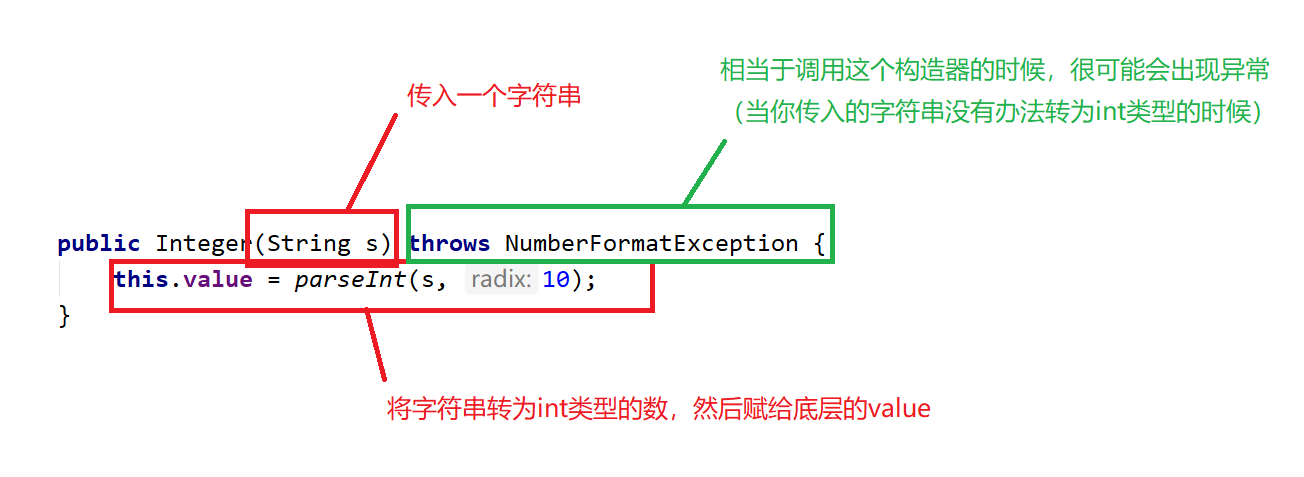
(2)String类型作为构造器的参数:
Integer i2 = new Integer("12");
Integer i3 = new Integer("abcdef");
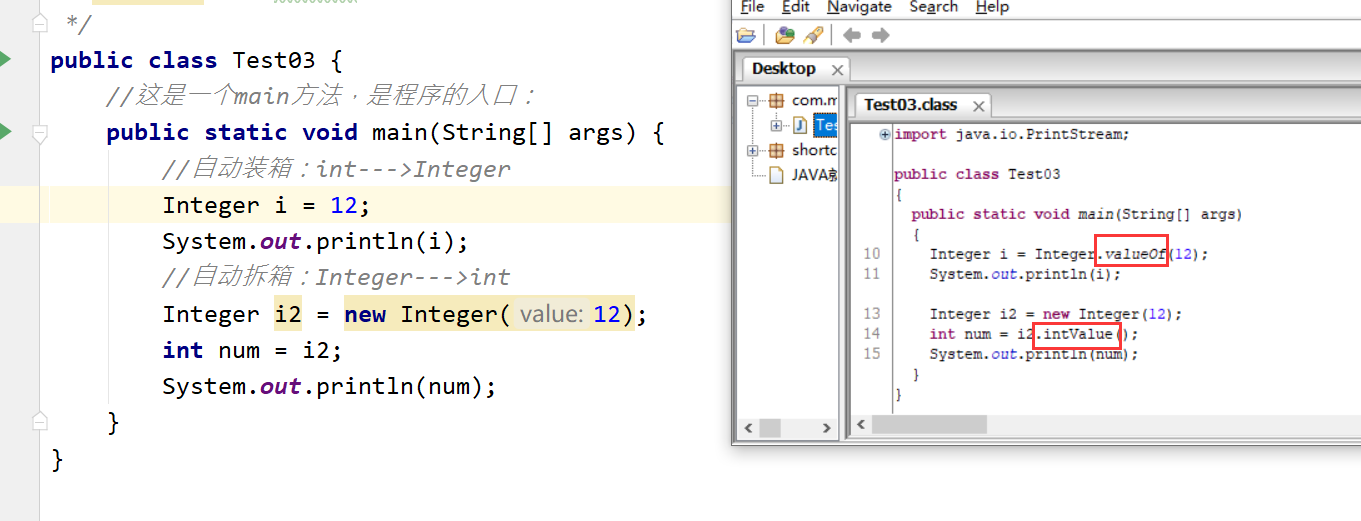
【9】包装类特有的机制:自动装箱 自动拆箱:
//自动装箱:int--->Integer
        Integer i = 12;
        System.out.println(i);
        //自动拆箱:Integer--->int
        Integer i2 = new Integer(12);
        int num = i2;
        System.out.println(num);
(1)自动装箱 自动拆箱 是从JDK1.5以后新出的特性
(2)自动装箱 自动拆箱 :将基本数据类型和包装类进行快速的类型转换。
验证:
可以自定打断点测试是否走入valueOf方法中:
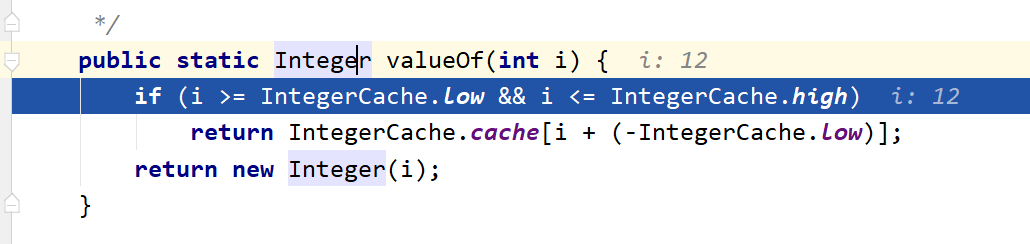
【10】常用方法:
valueOf方法的底层:
public class Test04 {
//这是一个main方法,是程序的入口:
public static void main(String[] args) {
//compareTo:只返回三个值:要么是0,-1,1
Integer i1 = new Integer(6);
Integer i2 = new Integer(12);
System.out.println(i1.compareTo(i2));// return (x < y) ? -1 : ((x == y) ? 0 : 1);
//equals:Integer对Object中的equals方法进行了重写,比较的是底层封装的那个value的值。
//Integer对象是通过new关键字创建的对象:
Integer i3 = new Integer(12);
Integer i4 = new Integer(12);
System.out.println(i3 == i4);//false 因为==比较的是两个对象的地址
boolean flag = i3.equals(i4);
System.out.println(flag);
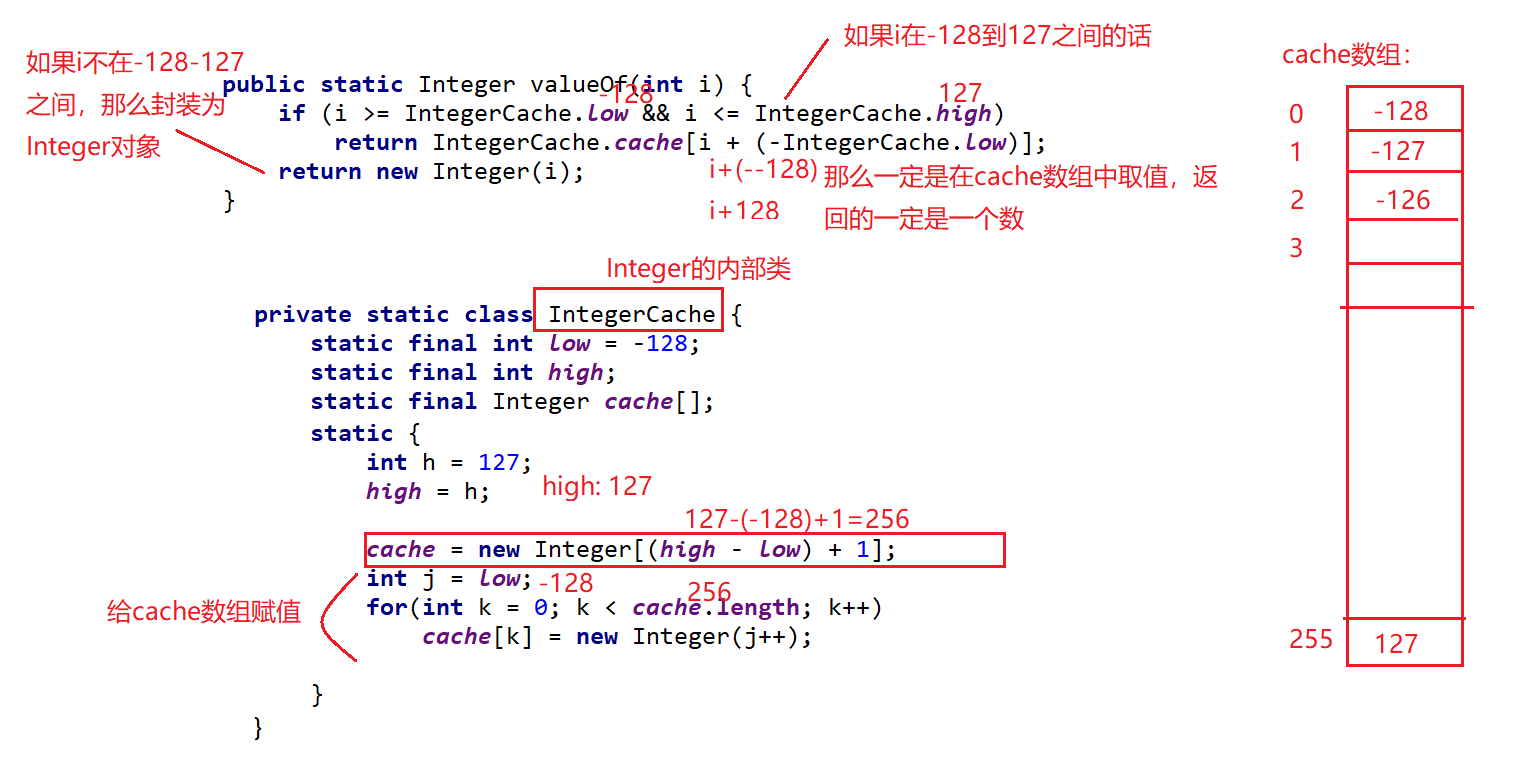
//Integer对象通过自动装箱来完成:
Integer i5 = 130;
Integer i6 = 130;
System.out.println(i5.equals(i6));//true
System.out.println(i5 == i6);
/*
如果自动装箱值在-128~127之间,那么比较的就是具体的数值
否在,比较的就是对象的地址
*/
//intValue() :作用将Integer--->int
Integer i7 = 130;
int i = i7.intValue();
System.out.println(i);
//parseInt(String s) :String--->int:
int i8 = Integer.parseInt("12");
System.out.println(i8);
//toString:Integer--->String
Integer i10 = 130;
System.out.println(i10.toString());
}
}日期相关类
java.util.Date
public class Test {
    //这是一个main方法,是程序的入口:
    public static void main(String[] args) {
        //java.util.Date:
        Date d = new Date();
        System.out.println(d);
        System.out.println(d.toString());
        System.out.println(d.toGMTString());//过期方法,过时方法,废弃方法。
        System.out.println(d.toLocaleString());
        System.out.println(d.getYear());//120+1900=2020
        System.out.println(d.getMonth());//5 :返回的值在 0 和 11 之间,值 0 表示 1 月。
        //返回自 1970 年 1 月 1 日 00:00:00 GMT 以来此 Date 对象表示的毫秒数。
        System.out.println(d.getTime());//1592055964263
        System.out.println(System.currentTimeMillis());
        /*
        (1)疑问:以后获取时间差用:getTime()还是currentTimeMillis()
        答案:currentTimeMillis()--》因为这个方法是静态的,可以类名.方法名直接调用
        (2)public static native long currentTimeMillis();
        本地方法
        为什么没有方法体?因为这个方法的具体实现不是通过java写的。
        (3)这个方法的作用:
        一般会去衡量一些算法所用的时间
         */
        long startTime = System.currentTimeMillis();
        for (int i = 0; i < 100000; i++) {
            System.out.println(i);
        }
        long endTime = System.currentTimeMillis();
        System.out.println(endTime-startTime);
    }
}
java.sql.Date
public class Test02 {
    //这是一个main方法,是程序的入口:
    public static void main(String[] args) {
        //java.sql.Date:
        Date d = new Date(1592055964263L);
        System.out.println(d);
        /*
        (1)java.sql.Date和java.util.Date的区别:
        java.util.Date:年月日  时分秒
        java.sql.Date:年月日
        (2)java.sql.Date和java.util.Date的联系:
        java.sql.Date(子类) extends java.util.Date (父类)
         */
        //java.sql.Date和java.util.Date相互转换:
        //【1】util--->sql:
        java.util.Date date = new Date(1592055964263L);//创建util.Date的对象
        //方式1:向下转型
        Date date1 = (Date) date;
        /*
        父类:Animal 子类:Dog
        Animal an = new Dog();
        Dog d = (Dog)an;
         */
        //方式2:利用构造器
        Date date2 = new Date(date.getTime());
        //【2】sql-->util:
        java.util.Date date3 = d;
        //[3]String--->sql.Date:
        Date date4 =  Date.valueOf("2019-3-8");
    }
}
SimpleDateFormat
【1】String---》java.util.Date 类型转换:
分解:
(1)String--->java.sql.Date
(2)java.sql.Date--->java.util.Date
public class Test04 {
    //这是一个main方法,是程序的入口:
    public static void main(String[] args) {
        //(1)String--->java.sql.Date
        java.sql.Date date = java.sql.Date.valueOf("2015-9-24");
        //(2)java.sql.Date--->java.util.Date
        java.util.Date date2 = date;
        System.out.println(date2.toString());
    }
}
上面的代码有局限性,字符串的格式只能是年-月-日拼接的形式,换成其它类型,就会出现异常:

【2】引入新的类:SimpleDateFormat
public class Test05 {
//这是一个main方法,是程序的入口:
public static void main(String[] args) {
//日期转换:
//SimpleDateFormat(子类) extends DateFormat(父类是一个抽象类)
//格式化的标准已经定义好了:
DateFormat df = new SimpleDateFormat("yyyy-MM-dd HH:mm:ss");
//String--->Date
try {
Date d = df.parse("2019-4-6 12:23:54");
System.out.println(d);
} catch (ParseException e) {
e.printStackTrace();
}
//Date--->String
String format = df.format(new Date());
System.out.println(format);
Date date = new Date();
System.out.println(date.toString());
System.out.println(date.toGMTString());
System.out.println(date.toLocaleString());
}
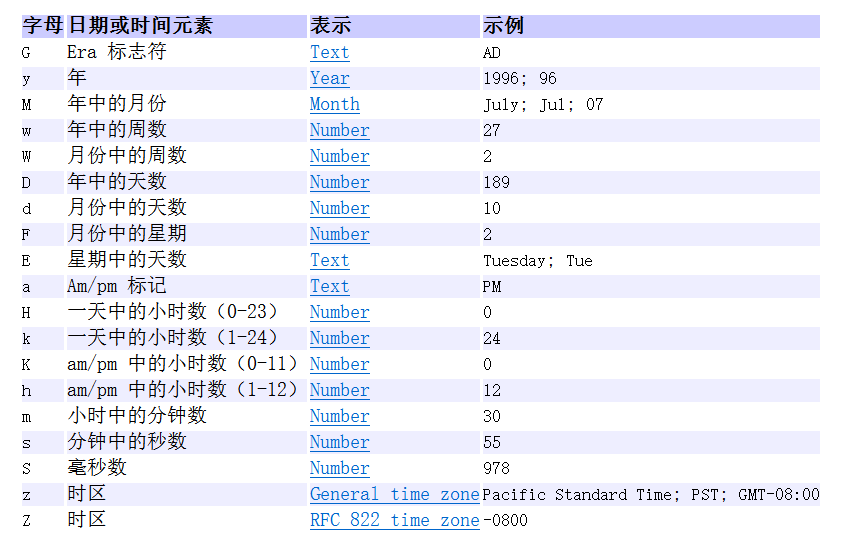
}【3】日期格式:
Calendar
public class Test06 {
    //这是一个main方法,是程序的入口:
    public static void main(String[] args) {
        //Calendar是一个抽象类,不可以直接创建对象
        //GregorianCalendar()子类 extends Calendar(父类是一个抽象类)
        Calendar cal = new GregorianCalendar();
        Calendar cal2 = Calendar.getInstance();
        System.out.println(cal);
        //常用的方法:
        // get方法,传入参数:Calendar中定义的常量
        System.out.println(cal.get(Calendar.YEAR));
        System.out.println(cal.get(Calendar.MONTH));
        System.out.println(cal.get(Calendar.DATE));
        System.out.println(cal.get(Calendar.DAY_OF_WEEK));
        System.out.println(cal.getActualMaximum(Calendar.DATE));//获取当月日期的最大天数
        System.out.println(cal.getActualMinimum(Calendar.DATE));//获取当月日期的最小天数
        // set方法:可以改变Calendar中的内容
        cal.set(Calendar.YEAR,1990);
        cal.set(Calendar.MONTH,3);
        cal.set(Calendar.DATE,16);
        System.out.println(cal);
        //String--->Calendar:
        //分解:
        //String--->java.sql.Date:
        java.sql.Date date = java.sql.Date.valueOf("2020-4-5");
        //java.sql.Date-->Calendar:
        cal.setTime(date);
        System.out.println(cal);
    }
}
练习:
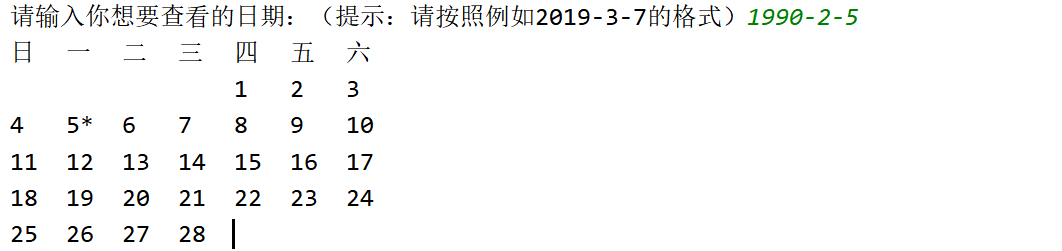
public class Test08 {
    //这是一个main方法,是程序的入口:
    public static void main(String[] args) {
        //录入日期的String:
        Scanner sc = new Scanner(System.in);
        System.out.print("请输入你想要查看的日期:(提示:请按照例如2012-5-6的格式书写)");
        String strDate = sc.next();
        /*System.out.println(strDate);*/
        //String--->Calendar:
        //String-->Date:
        java.sql.Date date = java.sql.Date.valueOf(strDate);
        //Date--->Calendar:
        Calendar cal = Calendar.getInstance();
        cal.setTime(date);
        //后续操作:
        //星期提示:
        System.out.println("日\t一\t二\t三\t四\t五\t六\t");
        //获取本月的最大天数:
        int maxDay = cal.getActualMaximum(Calendar.DATE);
        //获取当前日期中的日:
        int nowDay = cal.get(Calendar.DATE);
        //将日期调为本月的1号:
        cal.set(Calendar.DATE,1);
        //获取这个一号是本周的第几天:
        int num = cal.get(Calendar.DAY_OF_WEEK);
        /*System.out.println(num);*/
        //前面空出来的天数为:
        int day = num - 1;
        //引入一个计数器:
        int count = 0;//计数器最开始值为0
        //在日期前将空格打印出来:
        for (int i = 1; i <= day; i++) {
            System.out.print("\t");
        }
        //空出来的日子也要放入计数器:
        count = count + day;
        //遍历:从1号开始到maxDay号进行遍历:
        for (int i = 1; i <= maxDay ; i++) {
            if(i == nowDay){//如果遍历的i和当前日子一样的话,后面多拼一个*
                System.out.print(i+"*"+"\t");
            }else{
                System.out.print(i+"\t");
            }
            count++;//每在控制台输出一个数字,计数器做加1操作
            if(count%7 == 0){//当计数器的个数是7的倍数的时候,就换行操作
                System.out.println();
            }
        }
    }
}
JDK1.8新增日期时间API
JDK1.0中使用java.util.Date类 --》第一批日期时间API
JDK1.1引入Calendar类 --》第二批日期时间API
缺陷:
可变性 : 像日期和时间这样的类应该是不可变的。
偏移性 : Date中 的年份是从1900开始的,而月份都从0开始。
格式化 : 格式化只对Date有用,Calendar则不行。
JDK1.8新增日期时间API --》第三批日期时间API
LocalDate/LocalTime/LocalDateTime
public class Test09 {
    //这是一个main方法,是程序的入口:
    public static void main(String[] args) {
        //1.完成实例化:
        //方法1:now()--获取当前的日期,时间,日期+时间
        LocalDate localDate = LocalDate.now();
        System.out.println(localDate);
        LocalTime localTime = LocalTime.now();
        System.out.println(localTime);
        LocalDateTime localDateTime = LocalDateTime.now();
        System.out.println(localDateTime);
        //方法2:of()--设置指定的日期,时间,日期+时间
        LocalDate of = LocalDate.of(2010, 5, 6);
        System.out.println(of);
        LocalTime of1 = LocalTime.of(12, 35, 56);
        System.out.println(of1);
        LocalDateTime of2 = LocalDateTime.of(1890, 12, 23, 13, 24, 15);
        System.out.println(of2);
        //LocalDate,LocalTime用的不如LocalDateTime多
        //下面讲解用LocalDateTime:
        //一些列常用的get***
        System.out.println(localDateTime.getYear());//2020
        System.out.println(localDateTime.getMonth());//JUNE
        System.out.println(localDateTime.getMonthValue());//6
        System.out.println(localDateTime.getDayOfMonth());//14
        System.out.println(localDateTime.getDayOfWeek());//SUNDAY
        System.out.println(localDateTime.getHour());//22
        System.out.println(localDateTime.getMinute());//22
        System.out.println(localDateTime.getSecond());//6
        //不是set方法,叫with
        //体会:不可变性
        LocalDateTime localDateTime2 = localDateTime.withMonth(8);
        System.out.println(localDateTime);
        System.out.println(localDateTime2);
        //提供了加减的操作:
        //加:
        LocalDateTime localDateTime1 = localDateTime.plusMonths(4);
        System.out.println(localDateTime);
        System.out.println(localDateTime1);
        //减:
        LocalDateTime localDateTime3 = localDateTime.minusMonths(5);
        System.out.println(localDateTime);
        System.out.println(localDateTime3);
    }
}
DateTimeFormatter
public class Test10 {
    //这是一个main方法,是程序的入口:
    public static void main(String[] args) {
        //格式化类:DateTimeFormatter
        //方式一:预定义的标准格式。如: ISO_LOCAL_DATE_TIME;ISO_LOCAL_DATE;IS0_LOCAL_TIME
        DateTimeFormatter df1 = DateTimeFormatter.ISO_LOCAL_DATE_TIME;
        //df1就可以帮我们完成LocalDateTime和String之间的相互转换:
        //LocalDateTime-->String:
        LocalDateTime now = LocalDateTime.now();
        String str = df1.format(now);
        System.out.println(str);//2020-06-15T15:02:51.29
        //String--->LocalDateTime
        TemporalAccessor parse = df1.parse("2020-06-15T15:02:51.29");
        System.out.println(parse);
        //方式二:本地化相关的格式。如: oflocalizedDateTime()
        //参数:FormatStyle.LONG / FormatStyle.MEDIUM / FormatStyle.SHORT
        //FormatStyle.LONG :2020年6月15日 下午03时17分13秒
        //FormatStyle.MEDIUM: 2020-6-15 15:17:42
        //FormatStyle.SHORT:20-6-15 下午3:18
        DateTimeFormatter df2 = DateTimeFormatter.ofLocalizedDateTime(FormatStyle.SHORT);
        //LocalDateTime-->String:
        LocalDateTime now1 = LocalDateTime.now();
        String str2 = df2.format(now1);
        System.out.println(str2);
        //String--->LocalDateTime
        TemporalAccessor parse1 = df2.parse("20-6-15 下午3:18");
        System.out.println(parse1);
        //方式三: 自定义的格式。如: ofPattern( "yyyy-MM-dd hh:mm:ss") ---》重点,以后常用
        DateTimeFormatter df3 = DateTimeFormatter.ofPattern("yyyy-MM-dd hh:mm:ss");
        //LocalDateTime-->String:
        LocalDateTime now2 = LocalDateTime.now();
        String format = df3.format(now2);
        System.out.println(format);//2020-06-15 03:22:03
        //String--->LocalDateTime
        TemporalAccessor parse2 = df3.parse("2020-06-15 03:22:03");
        System.out.println(parse2);
    }
}
Math类
【1】直接使用,无需导包:
【2】final修饰类,这个类不能被继承:
【3】构造器私有化,不能创建Math类的对象: 不能new Math()
【4】Math内部的所有的属性,方法都被static修饰:类名.直接调用,无需创建对象:
【5】常用方法:
public class Test01 {
//这是一个main方法,是程序的入口:
public static void main(String[] args) {
//常用属性:
System.out.println(Math.PI);
//常用方法:
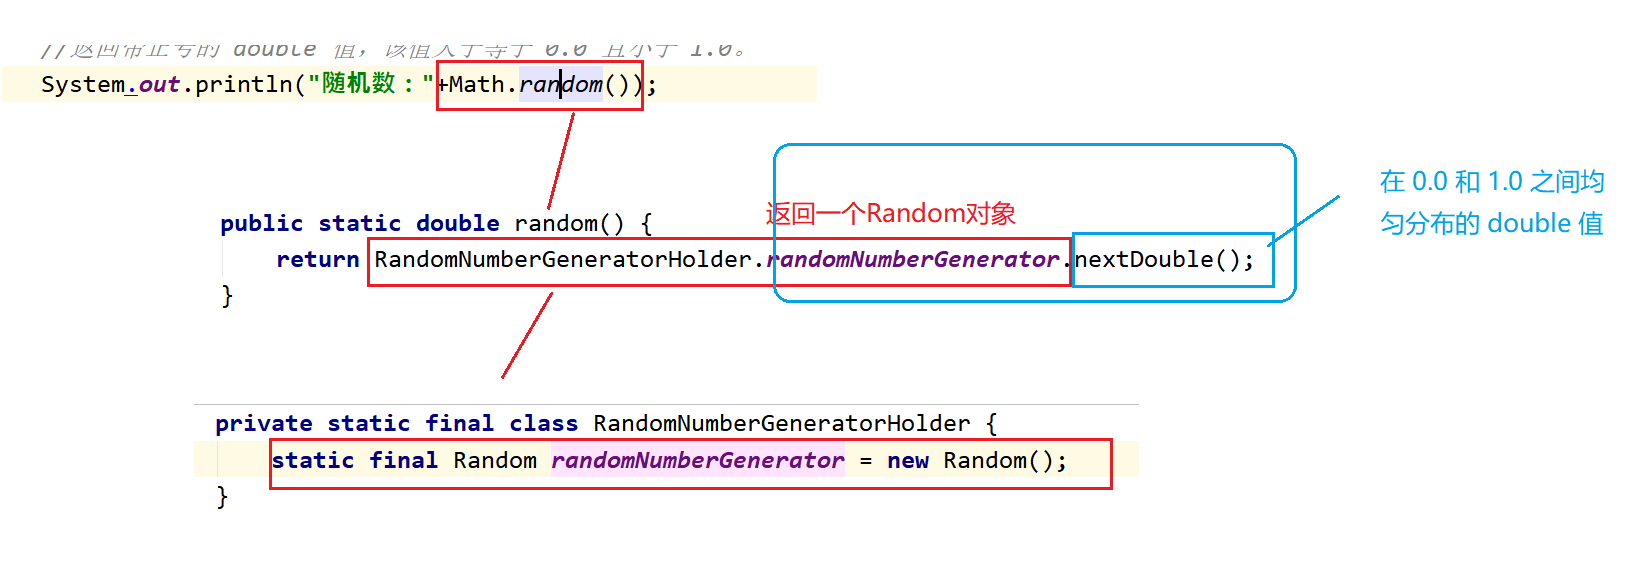
System.out.println("随机数:"+Math.random());//[0.0,1.0)
System.out.println("绝对值:"+Math.abs(-80));
System.out.println("向上取值:"+Math.ceil(9.1));
System.out.println("向下取值:"+Math.floor(9.9));
System.out.println("四舍五入:"+Math.round(3.5));
System.out.println("取大的那个值:"+Math.max(3, 6));
System.out.println("取小的那个值:"+Math.min(3, 6));
}
}【6】静态导入:
//静态导入:
import static java.lang.Math.*;
public class Test01 {
    //这是一个main方法,是程序的入口:
    public static void main(String[] args) {
        //常用属性:
        System.out.println(PI);
        //常用方法:
        System.out.println("随机数:"+random());//[0.0,1.0)
        System.out.println("绝对值:"+abs(-80));
        System.out.println("向上取值:"+ceil(9.1));
        System.out.println("向下取值:"+floor(9.9));
        System.out.println("四舍五入:"+round(3.5));
        System.out.println("取大的那个值:"+max(3, 6));
        System.out.println("取小的那个值:"+min(3, 6));
    }
    //如果跟Math中方法重复了,那么会优先走本类中的方法(就近原则)
    public static int random(){
        return 100;
    }
}
Random类
public class Test02 {
    //这是一个main方法,是程序的入口:
    public static void main(String[] args) {
        //返回带正号的 double 值,该值大于等于 0.0 且小于 1.0。
        System.out.println("随机数:"+Math.random());
        //学习Random类
        //(1)利用带参数的构造器创建对象:
        Random r1 = new Random(System.currentTimeMillis());
        int i = r1.nextInt();
        System.out.println(i);
        //(2)利用空参构造器创建对象:
        Random r2 = new Random();//表面是在调用无参数构造器,实际底层还是调用了带参构造器
        System.out.println(r2.nextInt(10));//在 0(包括)和指定值(不包括)之间均匀分布的 int 值。
        System.out.println(r2.nextDouble());//在 0.0 和 1.0 之间均匀分布的 double 值。
    }
}
String类
常用方法
【1】构造器:底层就是给对象底层的value数组进行赋值操作。
 //通过构造器来创建对象:
        String s1 = new String();
        String s2 = new String("abc");
        String s3 = new String(new char[]{'a','b','c'});
【2】常用方法:
String s4 = "abc";
        System.out.println("字符串的长度为:"+s4.length());
        String s5 = new SZtring("abc");
        System.out.println("字符串是否为空:"+s5.isEmpty());
        System.out.println("获取字符串的下标对应的字符为:"+s5.charAt(1));
【3】equals:
     String s6 = new String("abc");
        String s7 = new String("abc");
System.out.println(s6.equals(s7)); 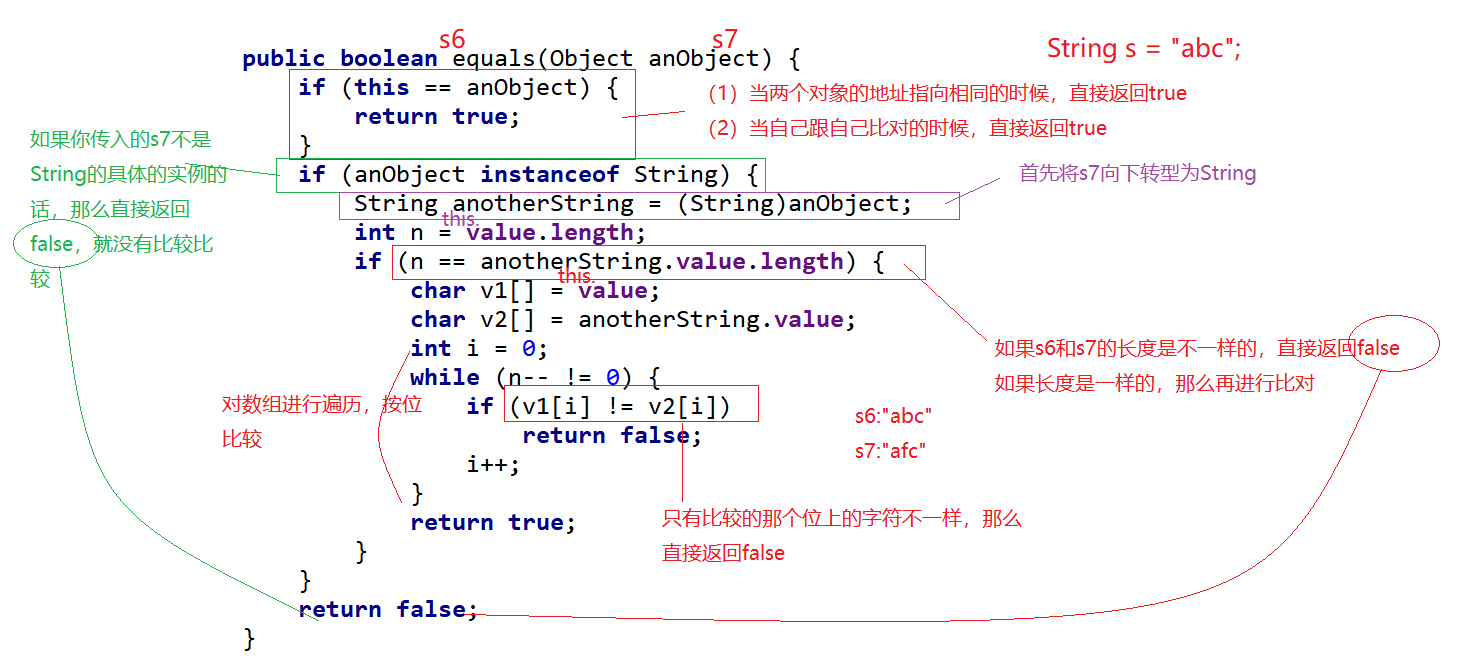
【4】String类实现了Comparable,里面有一个抽象方法叫compareTo,所以String中一定要对这个方法进行重写:4
     String s8 = new String("abc");
        String s9 = new String("abc");
        System.out.println(s8.compareTo(s9));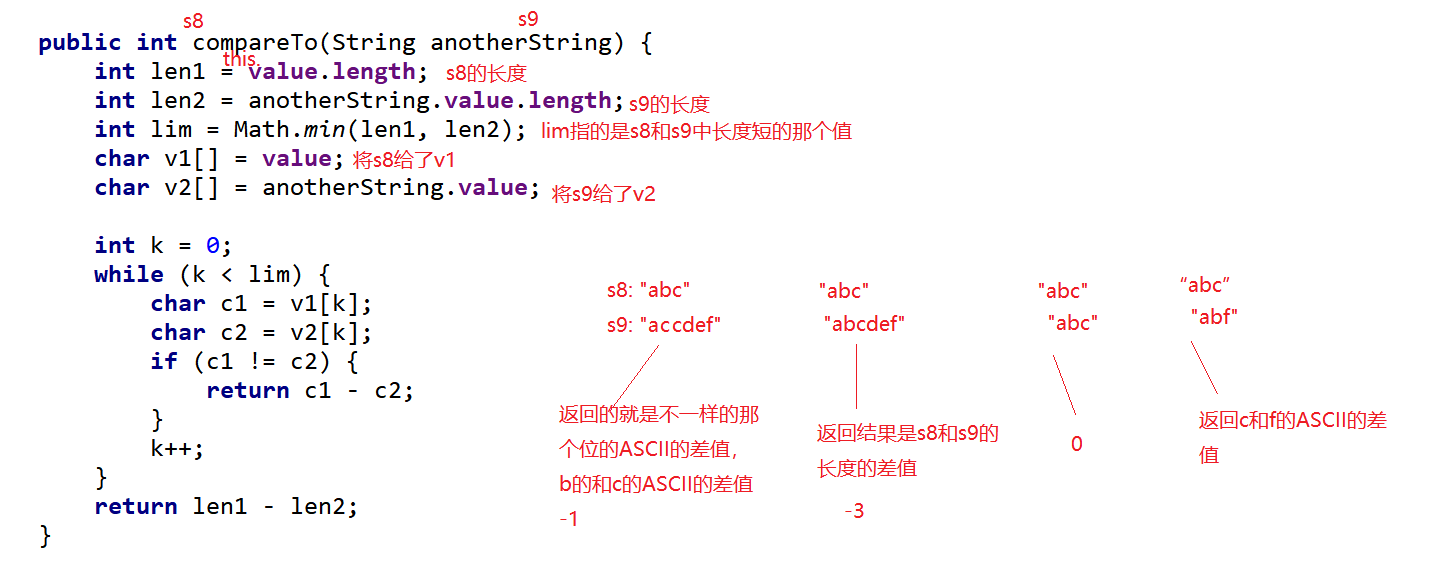
【5】常用方法:
//字符串的截取:
        String s10 = "abcdefhijk";
        System.out.println(s10.substring(3));
        System.out.println(s10.substring(3, 6));//[3,6)
        //字符串的合并/拼接操作:
        System.out.println(s10.concat("pppp"));
        //字符串中的字符的替换:
        String s11 = "abcdeahija";
        System.out.println(s11.replace('a', 'u'));
        //按照指定的字符串进行分裂为数组的形式:
        String s12 = "a-b-c-d-e-f";
        String[] strs = s12.split("-");
        System.out.println(Arrays.toString(strs));
        //转大小写的方法:
        String s13 = "abc";
        System.out.println(s13.toUpperCase());
        System.out.println(s13.toUpperCase().toLowerCase());
        //去除收尾空格:
        String s14 = "    a  b  c    ";
        System.out.println(s14.trim());
        //toString()
        String s15 = "abc";
        System.out.println(s15.toString());
        //转换为String类型:
        System.out.println(String.valueOf(false));
String内存分析
【1】字符串拼接:
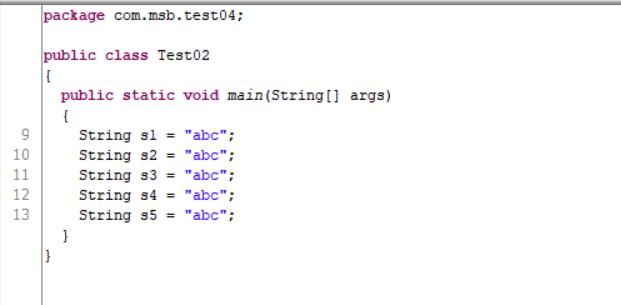
public class Test02 {
    //这是一个main方法,是程序的入口:
    public static void main(String[] args) {
        String s1 = "a"+"b"+"c";
        String s2 = "ab"+"c";
        String s3 = "a"+"bc";
        String s4 = "abc";
        String s5 = "abc"+"";
    }
}
上面的字符串,会进行编译器优化,直接合并成为完整的字符串,我们可以反编译验证:
然后在常量池中,常量池的特点是第一次如果没有这个字符串,就放进去,如果有这个字符串,就直接从常量池中取:
内存:
【2】new关键字创建对象:
String s6 = new String("abc");
内存:开辟两个空间(1.字符串常量池中的字符串 2.堆中的开辟的空间)
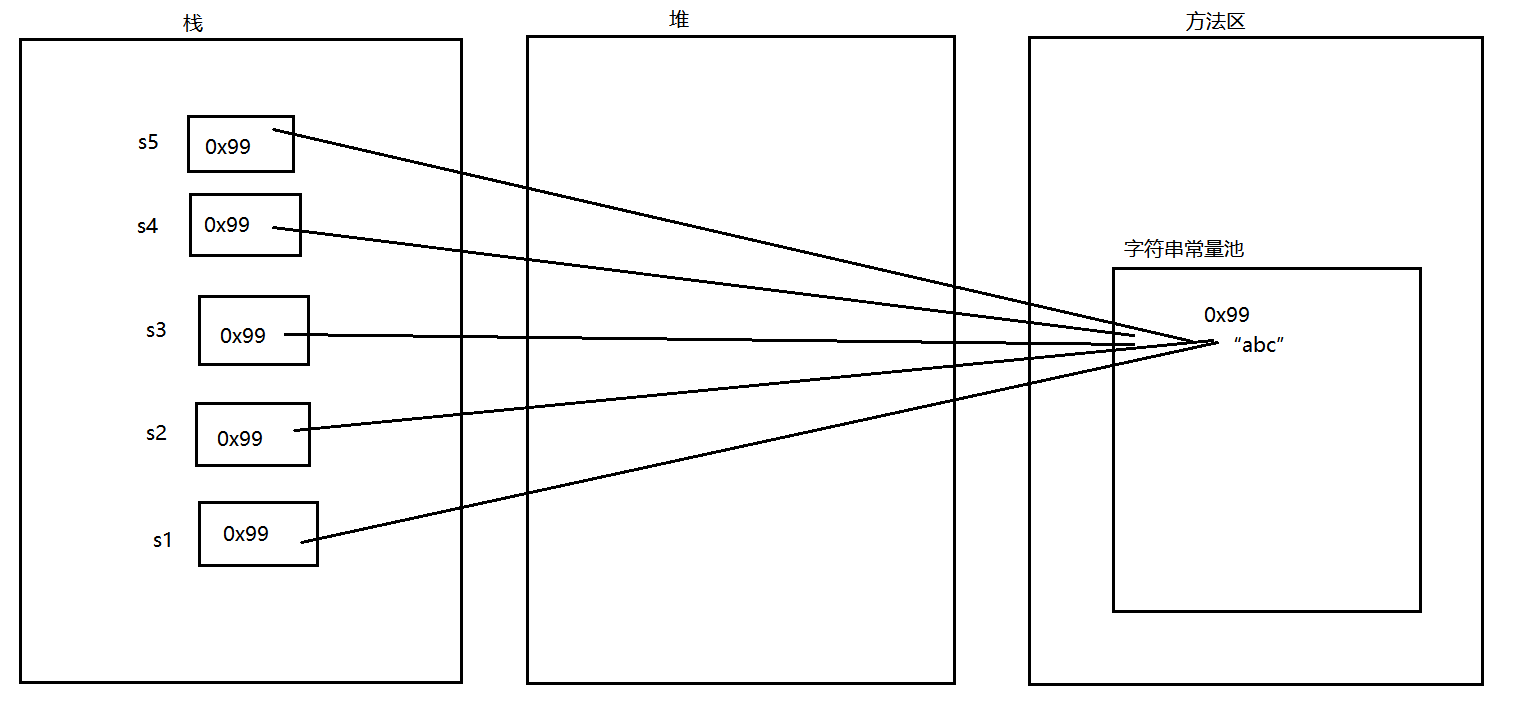
【3】有变量参与的字符串拼接:
public class Test03 {
    //这是一个main方法,是程序的入口:
    public static void main(String[] args) {
        String a = "abc";
        String b = a + "def";
        System.out.println(b);
    }
}
a变量在编译的时候不知道a是“abc”字符串,所以不会进行编译期优化,不会直接合并为“abcdef”
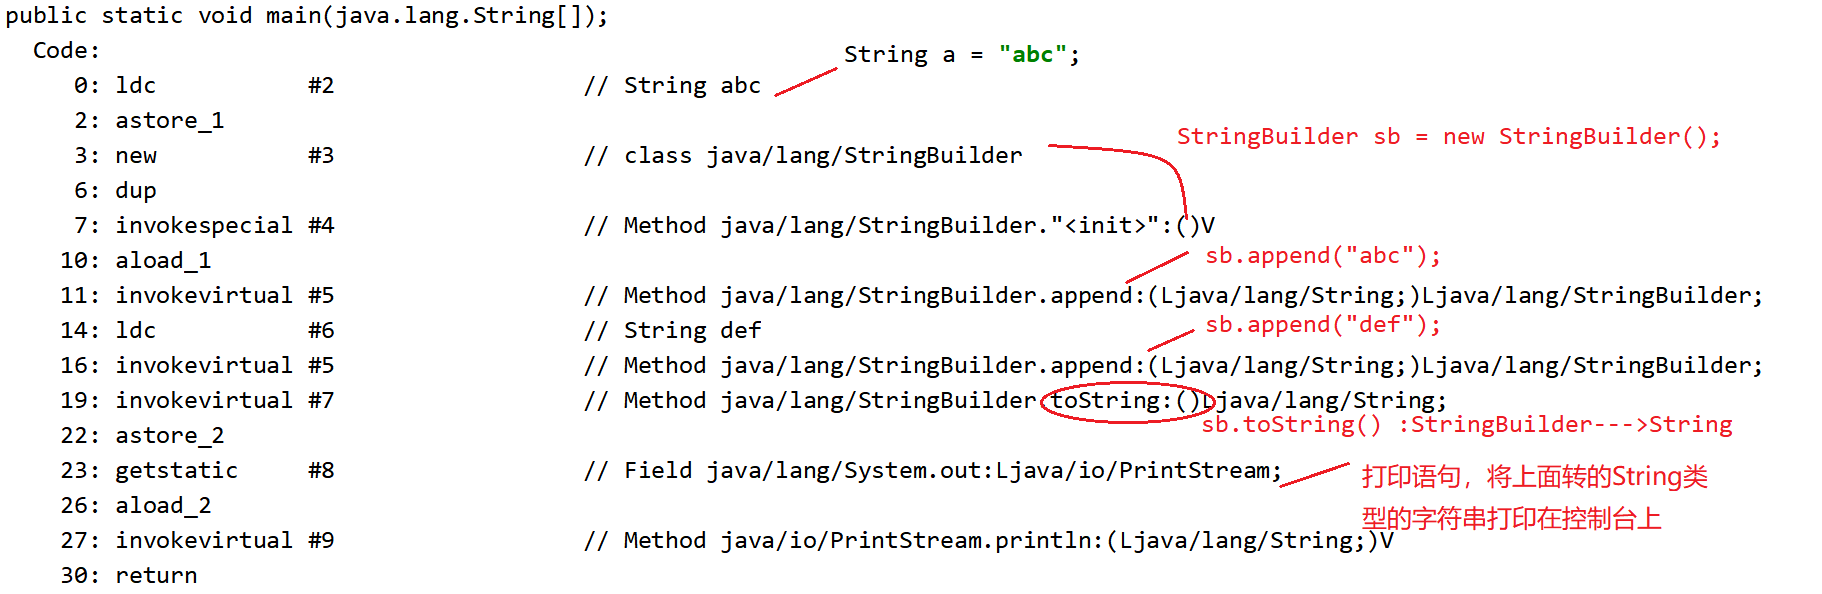
反汇编过程:为了更好的帮我分析字节码文件是如何进行解析的:
利用IDEA中的控制台:

StringBuilder类
【1】字符串的分类:
(1)不可变字符串:String
(2)可变字符串:StringBuilder,StringBuffer
疑问:
(1)可变不可变??
(2)本节课重点:StringBuilder -----》√
(3)StringBuilder和StringBuffer区别 ??
【2】StringBuilder底层:非常重要的两个属性:
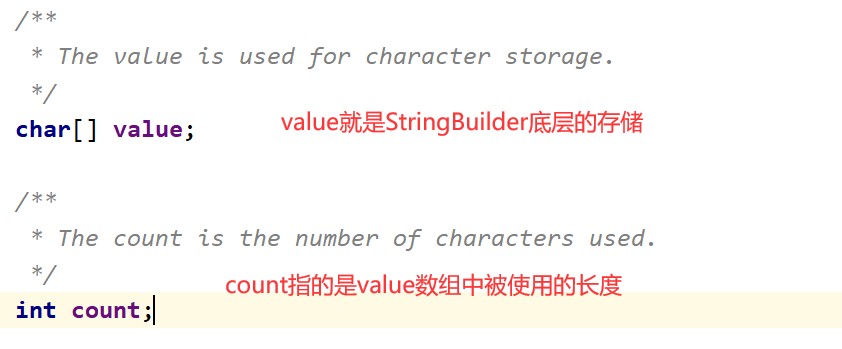
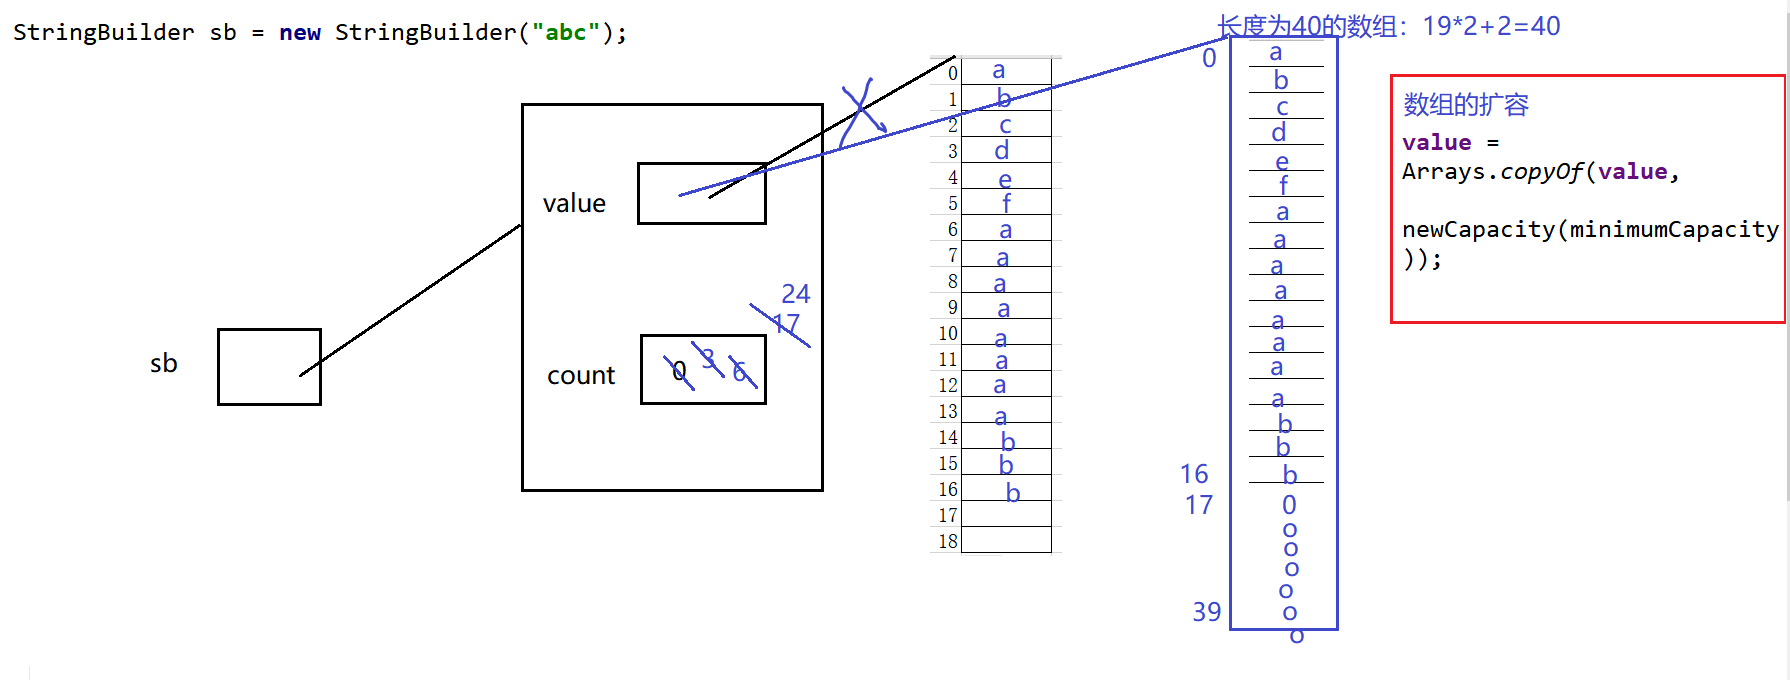
【3】对应内存分析:
public class Test01 {
    //这是一个main方法,是程序的入口:
    public static void main(String[] args) {
        //创建StringBuilder的对象:
        StringBuilder sb3 = new StringBuilder();
        //表面上调用StringBuilder的空构造器,实际底层是对value数组进行初始化,长度为16
        StringBuilder sb2 = new StringBuilder(3);
        //表面上调用StringBuilder的有参构造器,传入一个int类型的数,实际底层就是对value数组进行初始化,长度为你传入的数字
        StringBuilder sb = new StringBuilder("abc");
        System.out.println(sb.append("def").append("aaaaaaaa").append("bbb").append("ooooooo").toString());;//链式调用方式:return this
    }
}
解释可变和不可变字符串
【1】String---》不可变
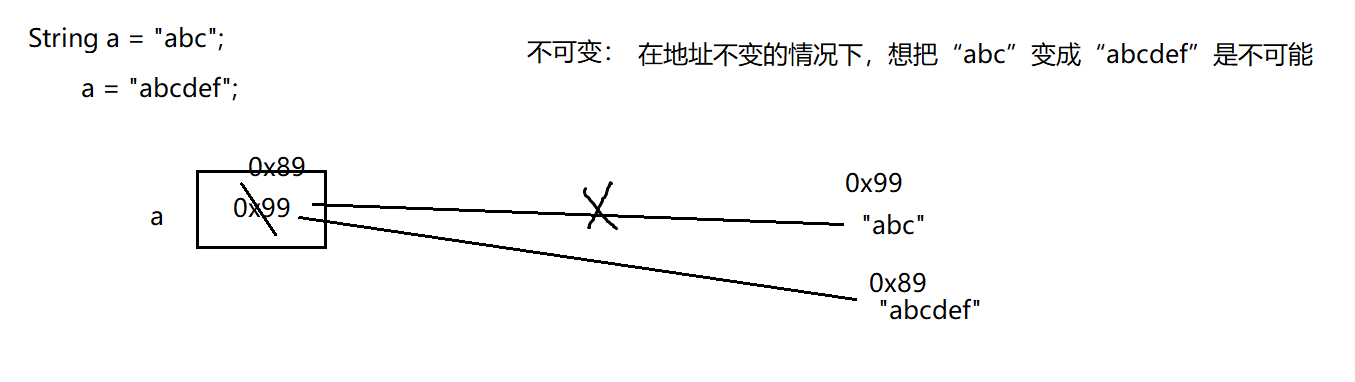
【2】StringBuilder---》可变
可变,在StringBuilder这个对象的地址不变的情况下,想把“abc”变成“abcdef”是可能的,直接追加即可
public class Test02 {
    //这是一个main方法,是程序的入口:
    public static void main(String[] args) {
        StringBuilder sb = new StringBuilder();
        System.out.println(sb.append("abc")==sb.append("def"));//true
    }
}
常用方法
【1】StringBuilder常用方法:
public class Test03 {
    //这是一个main方法,是程序的入口:
    public static void main(String[] args) {
        StringBuilder sb=new StringBuilder("nihaojavawodeshijie");
        //增
        sb.append("这是梦想");
        System.out.println(sb);//nihaojavawodeshijie这是梦想
        //删
        sb.delete(3, 6);//删除位置在[3,6)上的字符
        System.out.println(sb);//nihavawodeshijie这是梦想
        sb.deleteCharAt(16);//删除位置在16上的字符
        System.out.println(sb);//nihavawodeshijie是梦想
        //改-->插入
        StringBuilder sb1=new StringBuilder("$23445980947");
        sb1.insert(3, ",");//在下标为3的位置上插入 ,
        System.out.println(sb1);
        StringBuilder sb2=new StringBuilder("$2你好吗5980947");
        //改-->替换
        sb2.replace(3, 5, "我好累");//在下标[3,5)位置上插入字符串
        System.out.println(sb2);
        sb.setCharAt(3, '!');
        System.out.println(sb);
        //查
        StringBuilder sb3=new StringBuilder("asdfa");
        for (int i = 0; i < sb3.length(); i++) {
            System.out.print(sb3.charAt(i)+"\t");
        }
        System.out.println();
        //截取
        String str=sb3.substring(2,4);//截取[2,4)返回的是一个新的String,对StringBuilder没有影响
        System.out.println(str);
        System.out.println(sb3);
    }
}
【2】StringBuffer常用方法:
public class Test03 {
    //这是一个main方法,是程序的入口:
    public static void main(String[] args) {
        StringBuffer sb=new StringBuffer("nihaojavawodeshijie");
        //增
        sb.append("这是梦想");
        System.out.println(sb);//nihaojavawodeshijie这是梦想
        //删
        sb.delete(3, 6);//删除位置在[3,6)上的字符
        System.out.println(sb);//nihavawodeshijie这是梦想
        sb.deleteCharAt(16);//删除位置在16上的字符
        System.out.println(sb);//nihavawodeshijie是梦想
        //改-->插入
        StringBuilder sb1=new StringBuilder("$23445980947");
        sb1.insert(3, ",");//在下标为3的位置上插入 ,
        System.out.println(sb1);
        StringBuilder sb2=new StringBuilder("$2你好吗5980947");
        //改-->替换
        sb2.replace(3, 5, "我好累");//在下标[3,5)位置上插入字符串
        System.out.println(sb2);
        sb.setCharAt(3, '!');
        System.out.println(sb);
        //查
        StringBuilder sb3=new StringBuilder("asdfa");
        for (int i = 0; i < sb3.length(); i++) {
            System.out.print(sb3.charAt(i)+"\t");
        }
        System.out.println();
        //截取
        String str=sb3.substring(2,4);//截取[2,4)返回的是一个新的String,对StringBuilder没有影响
        System.out.println(str);
        System.out.println(sb3);
    }
}
面试题:String,StringBuilder,StringBuffer区别和联系
String、StringBuffer、StringBuilder区别与联系
1. String类是不可变类,即一旦一个String对象被创建后,包含在这个对象中的字符序列是不可改变的,直至这个对象销毁。
2. StringBuffer类则代表一个字符序列可变的字符串,可以通过append、insert、reverse、setChartAt、setLength等方法改变其内容。一旦生成了最终的字符串,调用toString方法将其转变为String
3. JDK1.5新增了一个StringBuilder类,与StringBuffer相似,构造方法和方法基本相同。不同是StringBuffer是线程安全的,而StringBuilder是线程不安全的,所以性能略高。通常情况下,创建一个内容可变的字符串,应该优先考虑使用StringBuilder
StringBuilder:JDK1.5开始 效率高 线程不安全
StringBuffer:JDK1.0开始 效率低 线程安全

 浙公网安备 33010602011771号