

知乎用户信息的爬取
上一次爬取了知乎问题和答案,这一次来爬取知乎用户的信息
一 构造url
首先构造用户信息的url
知乎用户信息都是放在一个json文件中,我们找到存放这个json文件的url,就可以请求这个json文件,得到我们的数据.
url="https://www.zhihu.com/api/v4/members/liu-qian-chi-24?include=locations,employments,gender,educations,business,voteup_count,thanked_Count,follower_count,following_count,cover_url,following_topic_count,following_question_count,following_favlists_count,following_columns_count,answer_count,articles_count,pins_count,question_count,commercial_question_count,favorite_count,favorited_count,logs_count,marked_answers_count,marked_answers_text,message_thread_token,account_status,is_active,is_force_renamed,is_bind_sina,sina_weibo_url,sina_weibo_name,show_sina_weibo,is_blocking,is_blocked,is_following,is_followed,mutual_followees_count,vote_to_count,vote_from_count,thank_to_count,thank_from_count,thanked_count,description,hosted_live_count,participated_live_count,allow_message,industry_category,org_name,org_homepage,badge[?(type=best_answerer)].topics",
这是我的知乎的url,前面加颜色的部分是用户名,后面一部分你要请求的内容,这个内容当然不是我手写的,是浏览在请求时对应的参数.
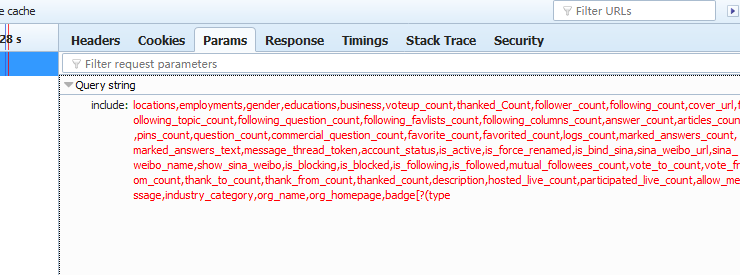
可以看到,这就是请求用户信息时,include后面所包含的内容,由些,用户信息的url构成为
user_url = 'https://www.zhihu.com/api/v4/members/{user}?include={include}'
include参数如下:
user_query = 'locations,employments,gender,educations,business,voteup_count,thanked_Count,follower_count,following_count,cover_url,following_topic_count,following_question_count,following_favlists_count,following_columns_count,answer_count,articles_count,pins_count,question_count,commercial_question_count,favorite_count,favorited_count,logs_count,marked_answers_count,marked_answers_text,message_thread_token,account_status,is_active,is_force_renamed,is_bind_sina,sina_weibo_url,sina_weibo_name,show_sina_weibo,is_blocking,is_blocked,is_following,is_followed,mutual_followees_count,vote_to_count,vote_from_count,thank_to_count,thank_from_count,thanked_count,description,hosted_live_count,participated_live_count,allow_message,industry_category,org_name,org_homepage,badge[?(type=best_answerer)].topics'
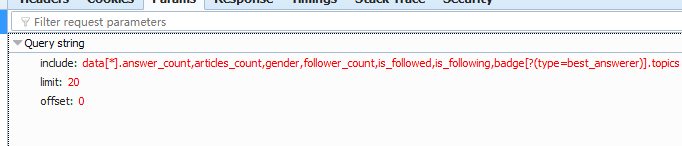
接下来 构造关注我的人 的url:
可以通过浏览器看到 关注我的人 的url是 https://www.zhihu.com/api/v4/members/liu-qian-chi-24/followees?include=data%5B%2A%5D.
answer_count%2Carticles_count%2Cgender%2Cfollower_count%2Cis_followed%2Cis_following%2Cbadge%5B%3F%28type%3Dbest
_answerer%29%5D.topics&limit=20&offset=0

我们要构造这四部分,可以看到初次请时的参数:
这里有三个参数了 liu-qian-chi-24 是用户名,加上用户名后就可以构成了关注他的人 信息的url,了,构成如下
followed_url = "https://www.zhihu.com/api/v4/members/{user}/followers?include={include}&limit={limit}&offset={offset}"
include参数如下:
followed_query = "data[*].answer_count,articles_count,gender,follower_count,is_followed,is_following,badge[?(type=best_answerer)].topics"
接下来 构造我关注的人的url:
以同样的方法可以构造 我关注的人 的信息url. 浏览器中参数如下:
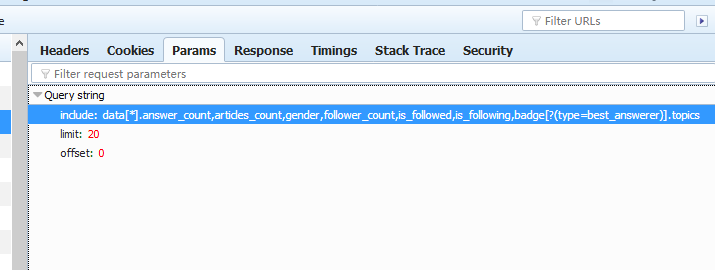
由此把我关注的人的url 构造出来:
following_url = "https://www.zhihu.com/api/v4/members/{user}/followees?include={include}&limit={limit}&offset={offset}"
include参数如下:
following_query = "data[*].answer_count,articles_count,gender,follower_count,is_followed,is_following,badge[?(type=best_answerer)].topics"
二 模拟知乎登录
因为知乎在没有登录情况下是不能访问的,所以一定要模拟登录,登录过程中会出现输入验证码的情况 ,我没有使用云打码的方式,这次我把验证码下载到本地,通过手工输入,
代码如下:
    def start_requests(self):
        """请求登录页面"""
        return [scrapy.Request(url="https://www.zhihu.com/signup", callback=self.get_captcha)]

    def get_captcha(self, response):
        """这一步主要是获取验证码"""
        post_data = {
            "email": "lq574343028@126.com",
            "password": "lq534293223",
            "captcha": "",  # 先把验证码设为空,这样知乎就会提示输入验证码
        }
        t = str(int(time.time() * 1000))
        #  这里是关键,这也是我找了好久才找到的方法,这就是知乎每次的验证码图片的url
        captcha_url = "https://www.zhihu.com/captcha.gif?r={0}&type=login".format(t)
        return [scrapy.FormRequest(url=captcha_url, meta={"post_data": post_data}, callback=self.after_get_captcha)]

    def after_get_captcha(self, response):
        """把验证码存放到本地,手工输入"""
        with open("E:/outback/zhihu/zhihu/utils/captcha.png", "wb") as f:
            f.write(response.body)
        try:
            # 这一句就是让程序自动打打图片
            img = Image.open("E:/outback/zhihu/zhihu/utils/captcha.png")
            img.show()
        except:
            pass
        captcha = input("input captcha")
        post_data = response.meta.get("post_data", {})
        post_data["captcha"] = captcha
        post_url = "https://www.zhihu.com/login/email"
        return [scrapy.FormRequest(url=post_url, formdata=post_data,
                                   callback=self.check_login)]

    def check_login(self, response):
        """验证是否登录成功"""
        text_json = json.loads(response.text)
        if "msg" in text_json and text_json["msg"] == "登录成功":
            yield scrapy.Request("https://www.zhihu.com/", dont_filter=True, callback=self.start_get_info)
        else:
            # 如果不成功就再登录一次
            return [scrapy.Request(url="https://www.zhihu.com/signup", callback=self.get_captcha)]

    def start_get_info(self, response):
        """登录成功后就可以去请求用户信息"""
        yield scrapy.Request(url=self.user_url.format(user="liu-qian-chi-24", include=self.user_query),
                             callback=self.parse_user)
三 处理处理请求用户信息url所得到的response
可以看到用户信息就是一个json文件,我们解析这个json文件就行:
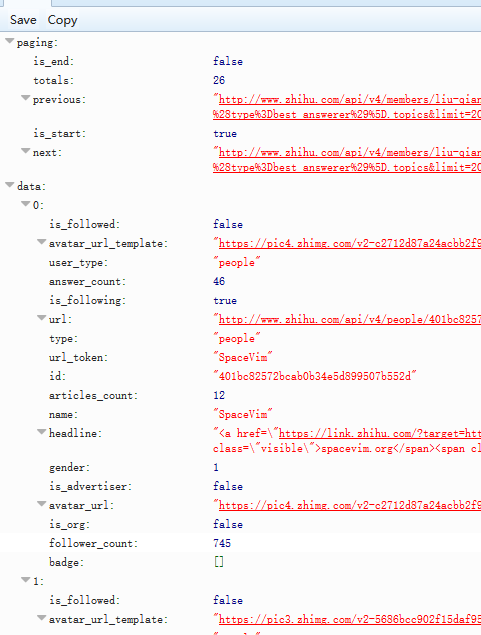
只是一点要注意 : is_end 意思是 是否还有下一页,注意 这里不能用 next 是否能打开来判断,因为无论怎么样都能打开,
user_token 就是网页中的用户名,我们用这个用户名加上其他参数来构造关注他,和他关注的url 信息.代码如下:
    def parse_user(self, response):
        user_data = json.loads(response.text)
        zhihu_item = ZhihuUserItem()
        # 解析这个json文件,如果这个key在item中,就存出item,这里用字典的get()方法,即使字典中没有这个值也不会出错
        for field in zhihu_item.fields:
            if field in user_data.keys():
                zhihu_item[field] = user_data.get(field)
        yield zhihu_item
        # 通过url_token信息把followed_url yield出去
        yield scrapy.Request(
            url=self.followed_url.format(user=user_data.get('url_token'), include=self.followed_query, limit=20,offset=0,
                                         ),
            callback=self.parse_followed)
        # 通过url_token信息把following_url yield出去
        yield scrapy.Request(
            url=self.following_url.format(user=user_data.get('url_token'), include=self.following_query,limit=20, offset=0,
                                          ), callback=self.parse_following)
四 分别解析following_url 和 followed_url
接下来就是分别解析following_url 和 followed_url 解析方法和解析user_url一下,这里就不详细说明了,代码如下:
    def parse_following(self, response):
        user_data = json.loads(response.text)
        zhihu_item = ZhihuUserItem()
        # 请求下一个页面
        if "paging" in user_data.keys() and user_data.get("paging").get("next") == "false":
            next_url = user_data.get("paging").get("next")
            yield scrapy.Request(url=next_url, callback=self.parse_following)

        if "data" in user_data.keys():
            for result in user_data.get("data"):
                url_token = result.get("url_token")
                yield scrapy.Request(url=self.user_url.format(user=url_token, include=self.user_query),
                                     callback=self.parse_user)

    def parse_followed(self, response):
        user_data = json.loads(response.text)
        zhihu_item = ZhihuUserItem()
        # 请求下一个页面
        if "paging" in user_data.keys() and user_data.get("paging").get("next") == "false":
            next_url = user_data.get("paging").get("next")
            yield scrapy.Request(url=next_url, callback=self.parse_followed)

        if "data" in user_data.keys():
            for result in user_data.get("data"):
                url_token = result.get("url_token")
                yield scrapy.Request(url=self.user_url.format(user=url_token, include=self.user_query),
                                     callback=self.parse_user)
至些 spider 中主要的逻辑结束.接下来我们来把数据存入到mongodb 中
五 pipleline 存入mongodb
class ZhihuUserMongoPipeline(object):
    collection_name = 'scrapy_items'

    def __init__(self, mongo_uri, mongo_db):
        self.mongo_uri = mongo_uri
        self.mongo_db = mongo_db

    @classmethod
    def from_crawler(cls, crawler):
        return cls(
            mongo_uri=crawler.settings.get('MONGO_URI'),
            mongo_db=crawler.settings.get('MONGO_DATABASE', 'items')
        )

    def open_spider(self, spider):
        self.client = pymongo.MongoClient(self.mongo_uri)
        self.db = self.client[self.mongo_db]

    def close_spider(self, spider):
        self.client.close()

    def process_item(self, item, spider):
        # self.db[self.collection_name].insert_one(dict(item))
        # 为了使用数据不重复,我们这里以ID为准进行更新
        self.db[self.collection_name].update({'id': item['id']}, dict(item), True)
        return item
六 配置好settings
ROBOTSTXT_OBEY = False
DOWNLOAD_DELAY = 3

DEFAULT_REQUEST_HEADERS = {
    'Accept': 'text/html,application/xhtml+xml,application/xml;q=0.9,*/*;q=0.8',
    'Accept-Language': 'en',
    "HOST": "www.zhihu.com",
    "Referer": "https://www.zhizhu.com",
    "User-Agent": "Mozilla/5.0 (Windows NT 10.0; Win64; x64; rv:58.0) Gecko/20100101 Firefox/58.0",
}

ITEM_PIPELINES = {
   # 'zhihu.pipelines.ZhihuPipeline': 300,
   'zhihu.pipelines.ZhihuUserMongoPipeline': 300,
}
MONGO_URI="127.0.0.1:27017"
MONGO_DATABASE="outback"
七 编写item
编写item非常简单,因为我这次是把数据存入mongodb中,所以我尽量多抓取数据,我们在请求那三个url时,每个url都有一个include, 这个就是知乎的所有字段,我们去重就行
following_query = "data[*].answer_count,articles_count,gender,follower_count,is_followed,is_following,badge[?(type=best_answerer)].topics"

followed_query = "data[*].answer_count,articles_count,gender,follower_count,is_followed,is_following,badge[?(type=best_answerer)].topics"

user_query = 'locations,employments,gender,educations,business,voteup_count,thanked_Count,follower_count,following_count,cover_url,following_topic_count,following_question_count,following_favlists_count,following_columns_count,answer_count,articles_count,pins_count,question_count,commercial_question_count,favorite_count,favorited_count,logs_count,marked_answers_count,marked_answers_text,message_thread_token,account_status,is_active,is_force_renamed,is_bind_sina,sina_weibo_url,sina_weibo_name,show_sina_weibo,is_blocking,is_blocked,is_following,is_followed,mutual_followees_count,vote_to_count,vote_from_count,thank_to_count,thank_from_count,thanked_count,description,hosted_live_count,participated_live_count,allow_message,industry_category,org_name,org_homepage,badge[?(type=best_answerer)].topics'
item 代码如下:


class ZhihuUserItem(scrapy.Item):
    # url info item 这几个字段构成了url
    answer_count = scrapy.Field()
    articles_count = scrapy.Field()
    gender = scrapy.Field()
    follower_count = scrapy.Field()
    is_followed = scrapy.Field()
    is_following = scrapy.Field()
    badge = scrapy.Field()
    id = scrapy.Field()

    # 其他我们需要的信息
    locations = scrapy.Field()
    employments = scrapy.Field()
    educations = scrapy.Field()
    business = scrapy.Field()
    voteup_count = scrapy.Field()
    thanked_Count = scrapy.Field()
    following_count = scrapy.Field()
    cover_url = scrapy.Field()
    following_topic_count = scrapy.Field()
    following_question_count = scrapy.Field()
    following_favlists_count = scrapy.Field()
    following_columns_count = scrapy.Field()
    pins_count = scrapy.Field()
    question_count = scrapy.Field()
    commercial_question_count= scrapy.Field()
    favorite_count = scrapy.Field()
    favorited_count = scrapy.Field()
    logs_count = scrapy.Field()
    marked_answers_count = scrapy.Field()
    marked_answers_text = scrapy.Field()
    message_thread_token = scrapy.Field()
    account_status = scrapy.Field()
    is_active = scrapy.Field()
    is_force_renamed = scrapy.Field()
    is_bind_sina = scrapy.Field()
    sina_weibo_urlsina_weibo_name = scrapy.Field()
    show_sina_weibo = scrapy.Field()
    is_blocking = scrapy.Field()
    is_blocked = scrapy.Field()
    mutual_followees_count = scrapy.Field()
    vote_to_count = scrapy.Field()
    vote_from_count = scrapy.Field()
    thank_to_count = scrapy.Field()
    thank_from_count = scrapy.Field()
    thanked_count = scrapy.Field()
    description = scrapy.Field()
    hosted_live_count = scrapy.Field()
    participated_live_count = scrapy.Field()
    allow_message = scrapy.Field()
    industry_category = scrapy.Field()
    org_name = scrapy.Field()
    org_homepage = scrapy.Field()
八 mian()函数
当然,为了边写边调试,我们还少不了一个mian()函数,这样方便打断点调试
from scrapy.cmdline import execute

import sys
import os
sys.path.insert(0,os.path.dirname(os.path.abspath(__file__)))
print(os.path.dirname(os.path.abspath(__file__)))

execute(["scrapy", "crawl", "zhihu_user"])
到此项目完成,照例把完整的spider代码写在这里:
# -*- coding: utf-8 -*-
import scrapy
import time
from PIL import Image
import json
from zhihu.items import ZhihuUserItem


class ZhihuUserSpider(scrapy.Spider):
    name = 'zhihu_user'
    allowed_domains = ['zhihu.com']
    start_urls = ["liu-qian-chi-24"]

    custom_settings = {
        "COOKIES_ENABLED": True
    }

    # 他关注的人的url
    following_url = "https://www.zhihu.com/api/v4/members/{user}/followees?include={include}&limit={limit}&offset={offset}"

    # 关注他的人的url
    followed_url = "https://www.zhihu.com/api/v4/members/{user}/followers?include={include}&limit={limit}&offset={offset}"

    # 用户信息url
    user_url = 'https://www.zhihu.com/api/v4/members/{user}?include={include}'

    # 他关注的人的url构成参数
    following_query = "data[*].answer_count,articles_count,gender,follower_count,is_followed,is_following,badge[?(type=best_answerer)].topics"

    # 关于他的人的url构成参数
    followed_query = "data[*].answer_count,articles_count,gender,follower_count,is_followed,is_following,badge[?(type=best_answerer)].topics"

    # 用户信息url构成参数信息
    user_query = 'locations,employments,gender,educations,business,voteup_count,thanked_Count,follower_count,following_count,cover_url,following_topic_count,following_question_count,following_favlists_count,following_columns_count,answer_count,articles_count,pins_count,question_count,commercial_question_count,favorite_count,favorited_count,logs_count,marked_answers_count,marked_answers_text,message_thread_token,account_status,is_active,is_force_renamed,is_bind_sina,sina_weibo_url,sina_weibo_name,show_sina_weibo,is_blocking,is_blocked,is_following,is_followed,mutual_followees_count,vote_to_count,vote_from_count,thank_to_count,thank_from_count,thanked_count,description,hosted_live_count,participated_live_count,allow_message,industry_category,org_name,org_homepage,badge[?(type=best_answerer)].topics'

    def start_requests(self):
        """请求登录页面"""
        return [scrapy.Request(url="https://www.zhihu.com/signup", callback=self.get_captcha)]

    def get_captcha(self, response):
        """这一步主要是获取验证码"""
        post_data = {
            "email": "lq573320328@126.com",
            "password": "lq132435",
            "captcha": "",  # 先把验证码设为空,这样知乎就会提示输入验证码
        }
        t = str(int(time.time() * 1000))
        #  这里是关键,这也是我找了好久才找到的方法,这就是知乎每次的验证码图片的url
        captcha_url = "https://www.zhihu.com/captcha.gif?r={0}&type=login".format(t)
        return [scrapy.FormRequest(url=captcha_url, meta={"post_data": post_data}, callback=self.after_get_captcha)]

    def after_get_captcha(self, response):
        """把验证码存放到本地,手工输入"""
        with open("E:/outback/zhihu/zhihu/utils/captcha.png", "wb") as f:
            f.write(response.body)
        try:
            # 这一句就是让程序自动打打图片
            img = Image.open("E:/outback/zhihu/zhihu/utils/captcha.png")
            img.show()
        except:
            pass
        captcha = input("input captcha")
        post_data = response.meta.get("post_data", {})
        post_data["captcha"] = captcha
        post_url = "https://www.zhihu.com/login/email"
        return [scrapy.FormRequest(url=post_url, formdata=post_data,
                                   callback=self.check_login)]

    def check_login(self, response):
        """验证是否登录成功"""
        text_json = json.loads(response.text)
        if "msg" in text_json and text_json["msg"] == "登录成功":
            yield scrapy.Request("https://www.zhihu.com/", dont_filter=True, callback=self.start_get_info)
        else:
            # 如果不成功就再登录一次
            return [scrapy.Request(url="https://www.zhihu.com/signup", callback=self.get_captcha)]

    def start_get_info(self, response):
        """登录成功后就可以去请求用户信息"""
        yield scrapy.Request(url=self.user_url.format(user="liu-qian-chi-24", include=self.user_query),
                             callback=self.parse_user)

    def parse_user(self, response):
        user_data = json.loads(response.text)
        zhihu_item = ZhihuUserItem()
        # 解析这个json文件,如果这个key在item中,就存出item,这里用字典的get()方法,即使字典中没有这个值也不会出错
        for field in zhihu_item.fields:
            if field in user_data.keys():
                zhihu_item[field] = user_data.get(field)
        yield zhihu_item
        # 通过url_token信息把followed_url yield出去
        yield scrapy.Request(
            url=self.followed_url.format(user=user_data.get('url_token'), include=self.followed_query, limit=20,offset=0,
                                         ),
            callback=self.parse_followed)
        # 通过url_token信息把following_url yield出去
        yield scrapy.Request(
            url=self.following_url.format(user=user_data.get('url_token'), include=self.following_query,limit=20, offset=0,
                                          ), callback=self.parse_following)

    def parse_following(self, response):
        user_data = json.loads(response.text)
        zhihu_item = ZhihuUserItem()
        # 请求下一个页面
        if "paging" in user_data.keys() and user_data.get("paging").get("next") == "false":
            next_url = user_data.get("paging").get("next")
            yield scrapy.Request(url=next_url, callback=self.parse_following)

        if "data" in user_data.keys():
            for result in user_data.get("data"):
                url_token = result.get("url_token")
                yield scrapy.Request(url=self.user_url.format(user=url_token, include=self.user_query),
                                     callback=self.parse_user)

    def parse_followed(self, response):
        user_data = json.loads(response.text)
        zhihu_item = ZhihuUserItem()
        # 请求下一个页面
        if "paging" in user_data.keys() and user_data.get("paging").get("next") == "false":
            next_url = user_data.get("paging").get("next")
            yield scrapy.Request(url=next_url, callback=self.parse_followed)

        if "data" in user_data.keys():
            for result in user_data.get("data"):
                url_token = result.get("url_token")
                yield scrapy.Request(url=self.user_url.format(user=url_token, include=self.user_query),
                                     callback=self.parse_user)
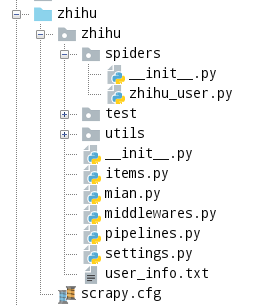
项目结构如下:
九 总结
项目还有一些不足的地方
1, 应该把存入mongdo的函数写在Item类中,在Pipeline 统一调用这个类的接口就行.这样如果项目中用很多个爬虫的话,就可以共用这个类,
2.不是每个user的所有字段都有值,应该在存入数据前把没有值的字段过滤了.
3.没有加异常处理机制,我在跑这个爬虫的过程中没有出现异常,所以也就没有加异常处理机制.
4,没有做成分步式.
github https://github.com/573320328/zhihu.git 记得点start哦

 浙公网安备 33010602011771号