Core篇——初探IdentityServer4(客户端模式,密码模式)
Core篇——初探IdentityServer4(客户端模式,密码模式)
目录
1、Oatuth2协议的客户端模式介绍
2、IdentityServer4客户端模式实现
3、Oatuth2协议的密码模式介绍
4、IdentityServer4密码模式实现
Oatuth2协议的客户端模式介绍
-
Client Credentials Grant (客户端模式)是Oauth2.0协议中,四种模式自建单的一种。它由两部分构成,客户端和认证服务器。认证服务器确认客户端无误后返回一个token,客户端请求带着token访问资源。(一般使用场景是在一个安全的环境下,例如我的同一个系统中,一个api请求另外一个api)。
-
这里借用下阮一峰老师画的图(博客地址=》http://www.ruanyifeng.com/blog/2014/05/oauth_2_0.html)

IdentityServer4客户端模式实现
- 首先我们创建一个core的api项目作为认证服务器,添加nuget程序包IdentityServer4,将启动端口设置为5000。
- 接下来添加一个类,取名字叫做Config,我们用它来初始化Identityserver(配置要保护的资源和可以访问该API的客户端服务器)。
代码如下:
/// <summary>
    /// Idnetity配置,初始化Identityserver
    /// </summary>
    public class Config
    {
        //定义要保护的资源(webapi)
        public static IEnumerable<ApiResource> GetApiResources()
        {
            return new List<ApiResource>
            {
                new ApiResource("api1", "My API")
            };
        }
        //定义可以访问该API的客户端
        public static IEnumerable<Client> GetClients()
        {
            return new List<Client>
            {
                new Client()
                {
                    ClientId = "client",
                    AllowedGrantTypes = GrantTypes.ClientCredentials,  //设置模式,客户端模式
                    ClientSecrets =
                    {
                        new Secret("secret".Sha256())
                    },
                    AllowedScopes = { "api1" }
                }
            };
        }
    }
- 接下来配置startup,将资源和客户端的初始信息服务加入到DI容器,同时引用IdentityServer中间件。代码如下所示:
        public void ConfigureServices(IServiceCollection services)
        {
            services.AddIdentityServer()
                .AddDeveloperSigningCredential()
                .AddInMemoryApiResources(Config.GetApiResources())  //配置资源
                .AddInMemoryClients(Config.GetClients());        //配置客户端
            services.AddMvc();
        }
        public void Configure(IApplicationBuilder app, IHostingEnvironment env)
        {
            if (env.IsDevelopment())
            {
                app.UseDeveloperExceptionPage();
            }
            //使用identityserver中间件
            app.UseIdentityServer();
            app.UseMvc();
        }
- 再添加一个webapi项目,作为我们的资源服务器。添加nuget包,IdentityServer4.AccessTokenValidation,将启动端口设置为5001。
- 2、配置startup,添加认证服务器地址,和apiname &&引用中间件,代码如下:
        public void ConfigureServices(IServiceCollection services)
        {
            services.AddAuthentication("Bearer")
                .AddIdentityServerAuthentication(options =>
                {
                    options.Authority = "http://localhost:5000";    //配置Identityserver的授权地址
                    options.RequireHttpsMetadata = false;           //不需要https
                    options.ApiName = "api1";                        //api的name,需要和config的名称相同
                });
            services.AddMvc();
        }
        public void Configure(IApplicationBuilder app, IHostingEnvironment env)
        {
            if (env.IsDevelopment())
            {
                app.UseDeveloperExceptionPage();
            }
            app.UseAuthentication();// 添加认证中间件
            app.UseMvc();
        }
- 将受保护资源controller添加[Authorize]。(因为资源服务器AddIdentityServerAuthentication 方法的参数和返回值都是AuthenticationBuilder(类似于一个中间件),所以可以多次调用AddIdentityServerAuthentication方法来控制这个api 资源可以让谁访问到。)
- 最开始我们直接访问资源服务器的api,返回401,因为我们的资源被保护了。

- 这时候来到IdentityServer4的官网,官网给出了这么一个地址=》

- 我们访问这个地址时候,它会返回我们的Config配置=》
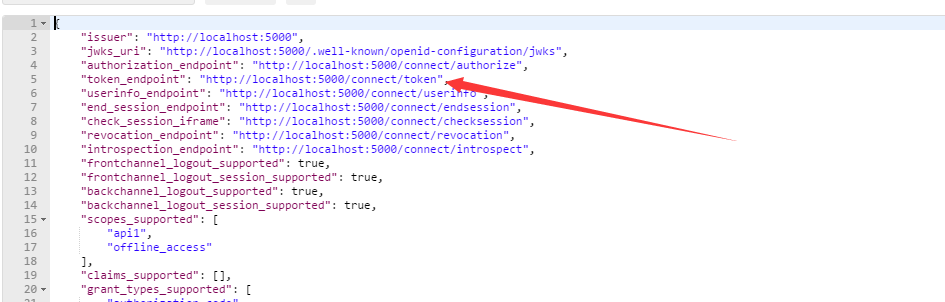
- 其中有一个token_endpoint的url地址,我们带着Client的配置来访问它=》

- 此时拿到Token,再带着token去访问我们的资源,争取获取到资源数据=》

Oatuth2协议的密码模式介绍
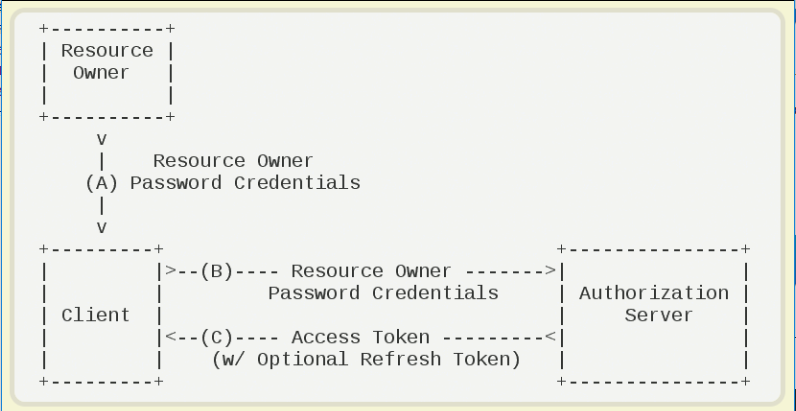
- 用户会将用户名,密码给予客户端,但是客户端不保存此信息,客户端带着用户的密码请求认证服务器,认证服务器密码验证通过后后将token返回给客户端。
- 这里借用下阮一峰老师画的图(博客地址=》http://www.ruanyifeng.com/blog/2014/05/oauth_2_0.html)
IdentityServer4密码模式实现
- 我们不需要修改资源服务器,我们在客户端模式下的认证服务器的Config配置中,添加一个Client,允许我们使用密码模式访问授权服务器获取token,再添加一个测试用户。同时修改我们的startup,在ConfigureServices方法中配置测试用户,代码如下所示:
 //定义可以访问该API的客户端
        public static IEnumerable<Client> GetClients()
        {
            return new List<Client>
            {
                new Client()
                {
                    ClientId = "client",
                    AllowedGrantTypes = GrantTypes.ClientCredentials,  //设置模式,客户端模式
                    ClientSecrets =
                    {
                        new Secret("secret".Sha256())
                    },
                    AllowedScopes = { "api1" }
                },
                new Client()
                {
                    ClientId="pwdClient",
                    AllowedGrantTypes=GrantTypes.ResourceOwnerPassword, //密码模式
                    ClientSecrets= {new Secret("secret".Sha256()) },
                    AllowedScopes= { "api1" }
                }
            };
        }
        public static List<TestUser> GetTestUsers()
        {
            return new List<TestUser>
            {
                new TestUser
                {
                    SubjectId="1",
                    Username="lmc",
                    Password="123456"
                }
            };
        }
        public void ConfigureServices(IServiceCollection services)
        {
            services.AddIdentityServer()
                .AddDeveloperSigningCredential()
                .AddInMemoryApiResources(Config.GetApiResources())  //配置资源
                .AddInMemoryClients(Config.GetClients())            //配置客户端
                .AddTestUsers(Config.GetTestUsers());            //配置测试用户
            services.AddMvc();
        }
此时我们使用我们定义的用户名和密码来访问我们的授权服务器(这里使用postman 要注意body的数据格式为x-www-form-urlencoded)=》

带着我们拿到的token,去访问资源=》


 浙公网安备 33010602011771号