
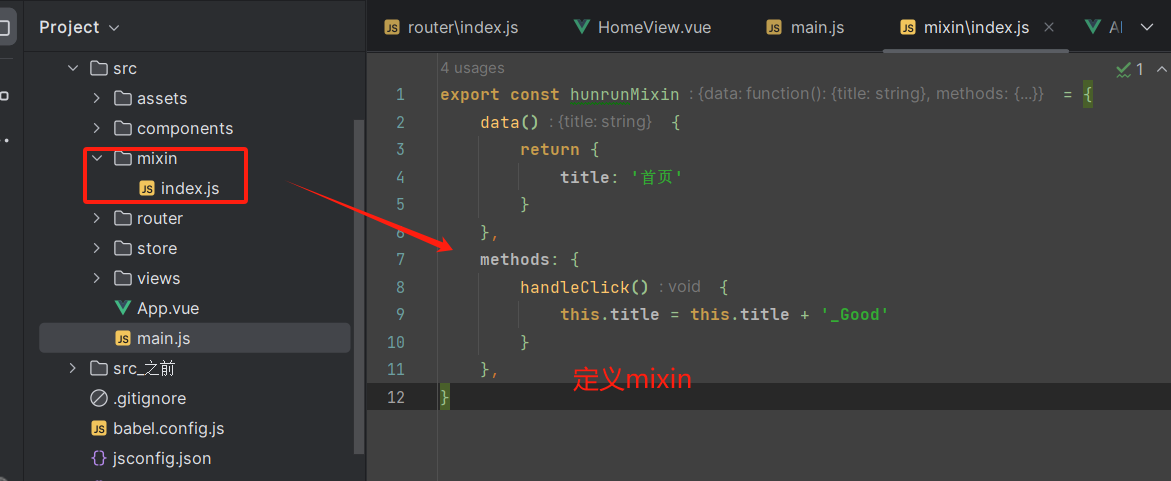
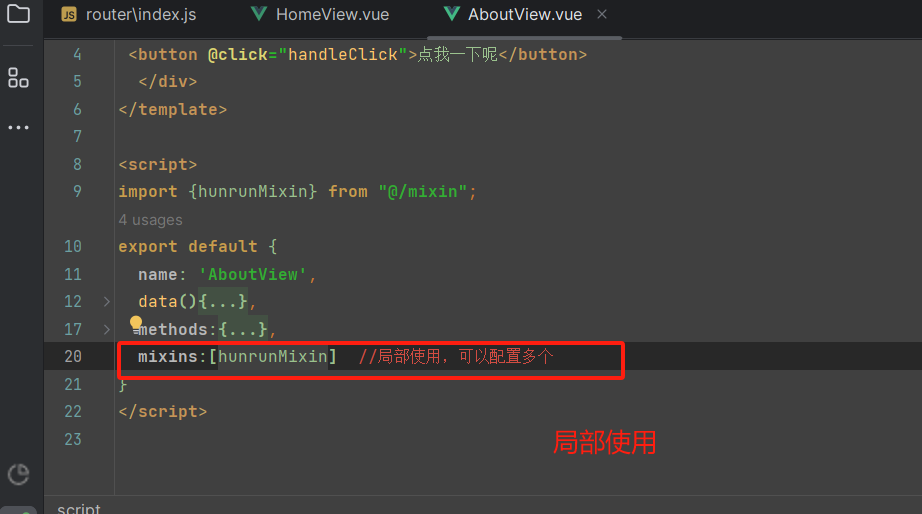
【混入】
# mixin(混入)
功能:可以把多个组件共用的配置提取成一个混入对象,不需要在每个组件中都写了
使用步骤

。
。
。
【插件】
 1 # 1 写plugins/index.js
 2 import Vue from "vue";
 3 import axios from "axios";
 4 import hunru from "@/mixin";
 5 export default {
 6     install(a,name) {
 7         console.log('----------',name)
 8
 9         // 1 定义全局变量,放到原型中
10         // prototype 原型链,一般定义在原型中的变量,都用 $ 开头,防止污染---》对象中可以定义同名属性,冲突
11         Vue.prototype.$axios = axios
12         // Vue.prototype.$BASE_URL='http://127.0.0.1:8000/'
13
14
15         // 2  定义指令  自定义指令
16         //定义全局指令:跟v-bind一样,获取焦点
17         Vue.directive("fbind", {
18             //指令与元素成功绑定时(一上来)
19             bind(element, binding) {
20                 element.value = binding.value;
21             },
22             //指令所在元素被插入页面时
23             inserted(element, binding) {
24                 element.focus();
25             },
26             //指令所在的模板被重新解析时
27             update(element, binding) {
28                 element.value = binding.value;
29             },
30         });
31
32         // 3 使用混入
33         Vue.mixin(hunru)
34         // 4 定义全局组件--》elementui
35     }
36 }
1 # 3 在main.js中使用,可以传参数
2 # 1 使用自定义插件
3 import my from '@/plugins'
4 Vue.use(my,'lqz') // 内部本质会执行install

==========================================
	-有些第三方插件,用了以后,增强了vue功能
    -this.$router
    -全局组件 :el-button
    -this.$message--->
    -this.$http.get
。
。
。
【插槽】
 1 # 1 新建组件,定义插槽
 2 <template>
 3   <div class="helloworld">
 4     <h2>我是hello world</h2>
 5     <slot name="a"></slot>
 6     <h2>结束了</h2>
 7     <slot name="b"></slot>
 8
 9   </div>
10
11 </template>
12 ============================================
13 # 2 使用组件,使用插槽
14 <template>
15   <div class="home">
16     <h1>首页</h1>
17     <HelloWorld>
18       <template v-slot:a>
19         <div>html结构2</div>
20       </template>
21
22       <template v-slot:b>
23         <img src="@/assets/logo.png" alt="">
24       </template>
25
26     </HelloWorld>
27
28   </div>
29 </template>
。
。
。
【vuex】
# 1 vuex 在vue2中,大量使用
# 2 vue3中,Pinia 或 vuex
# 3 作用:集中式状态管理--》组件有自己的数据--》放在组件中---》有了状态管理器,多个组件可以共同操作这个状态管理器---》实现了组件间通信--》跨组件
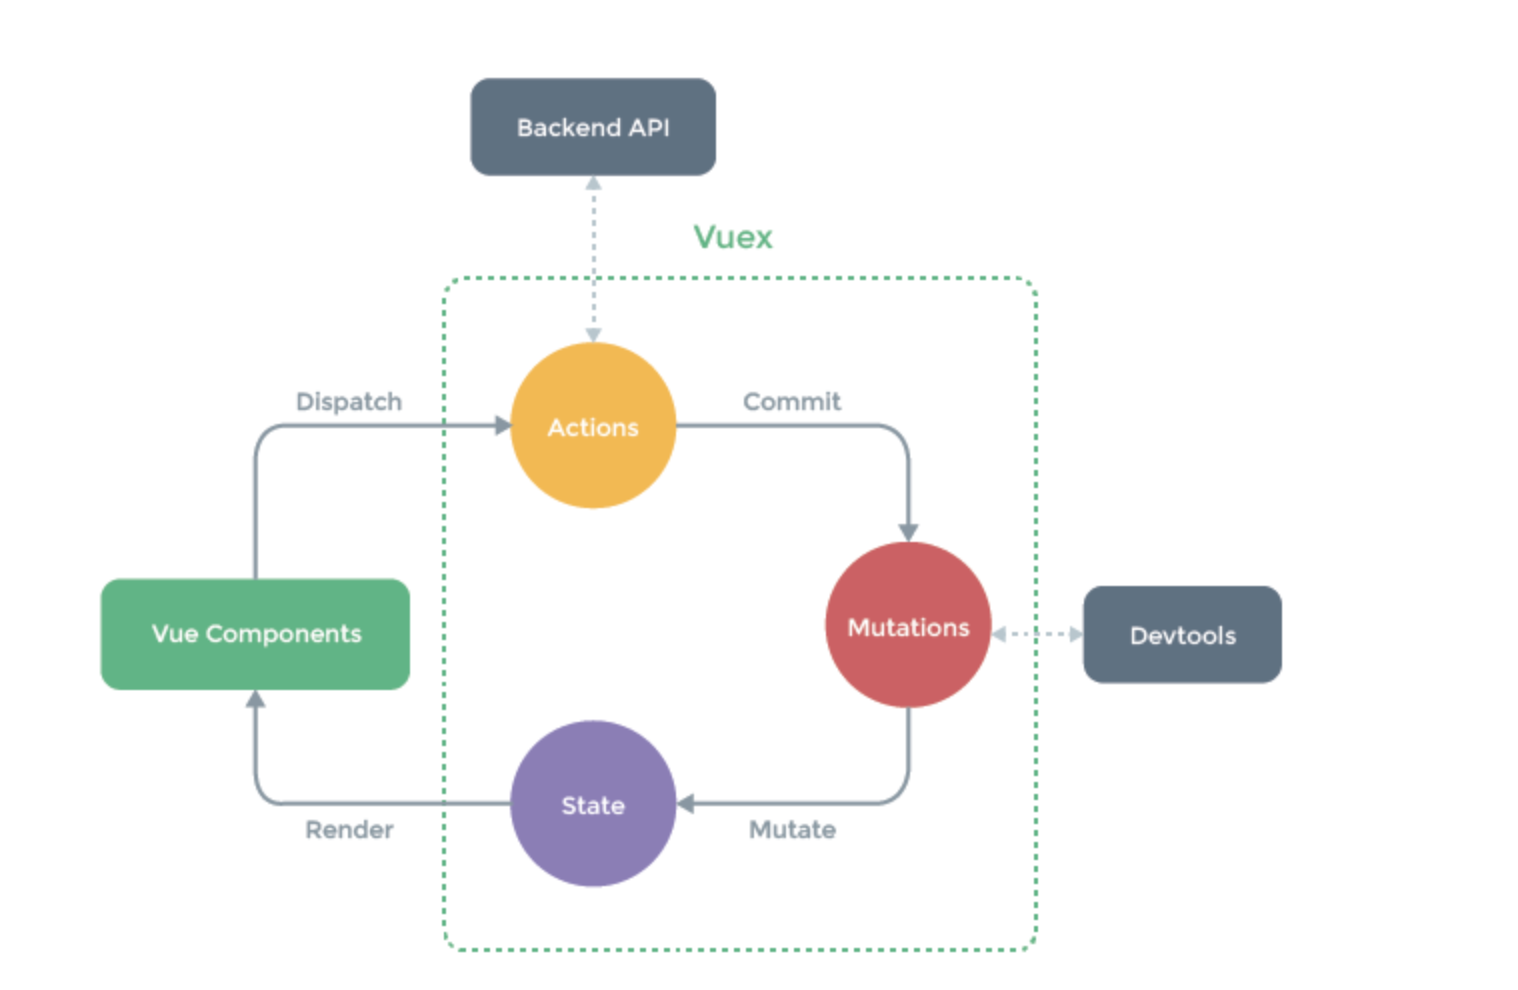
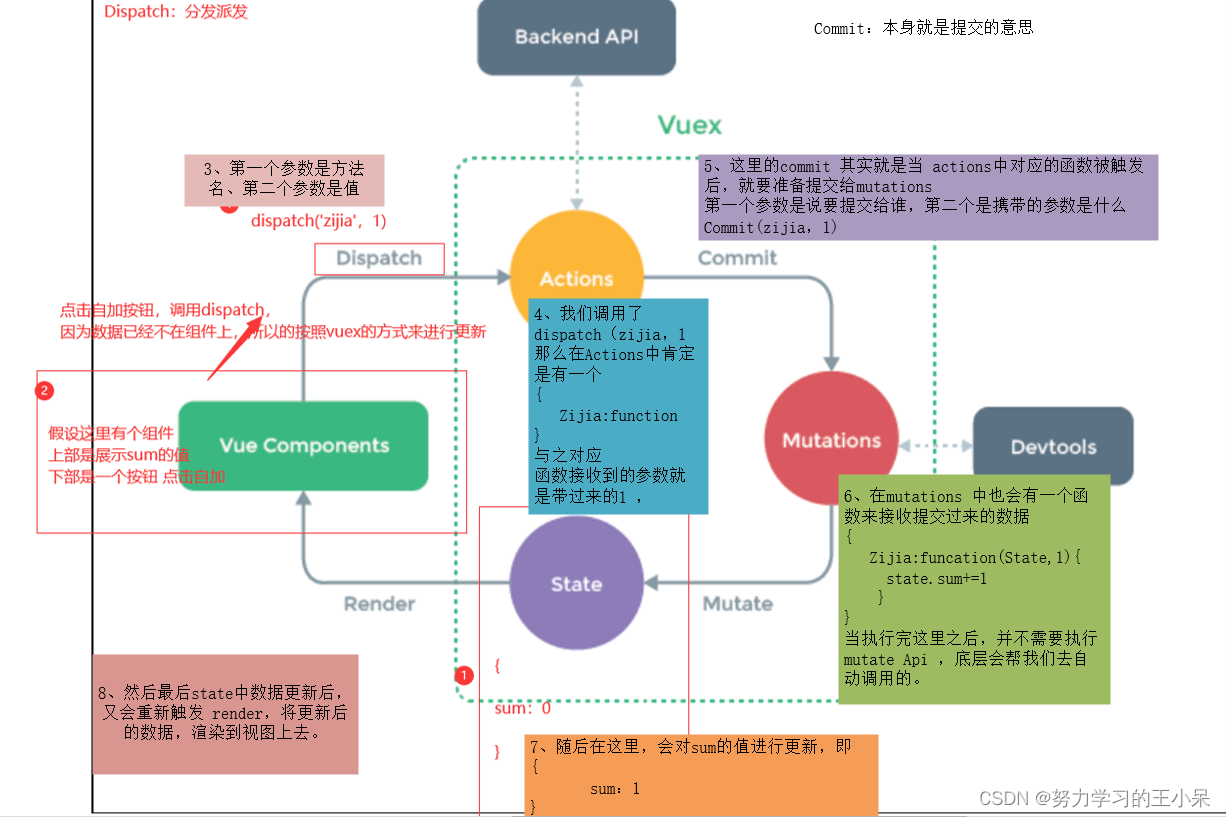
 1 # 1 安装 cnpm instlal vuex -S
 2 # 2 新建 store/index.js,写入代码
 3 import Vue from 'vue'
 4 import Vuex from 'vuex'
 5 Vue.use(Vuex)
 6 export default new Vuex.Store({
 7   state: {
 8   },
 9   getters: {
10   },
11   mutations: {
12   },
13   actions: {
14   },
15   modules: {
16   }
17 })
18
19 # 3 在main.js 导入
20 import store from './store'
21 new Vue({
22   store,
23 }
24
25
26 # 4 在store/index.js写代码
27 import Vue from 'vue'
28 import Vuex from 'vuex'
29
30 Vue.use(Vuex)
31 // import moduleA from './a'
32 // import moduleB from './b'
33 export default new Vuex.Store({
34     state: {
35         //  定义一些变量
36         count: 0
37     },
38     getters: {
39         getCount (state) {
40             return state.count+100
41         }
42     },
43     mutations: {
44         addOne(state, num) {
45             console.log(state)
46             state.count += num
47
48         }
49     },
50     actions: {
51         addCount(store, num) {
52             // 发送ajax请求--》数据库加入购物车--》返回成功---》本地数量再加1
53             console.log(store)
54             console.log(num)
55             store.commit('addOne', num + 1)
56             // 直接操作 :store.state.count++
57             //store.dispatch('actions中的方法')
58
59             }
60         },
61
62
63
64     modules: {
65         // a: moduleA,
66         // b: moduleB
67     }
68 })
69
70
71
72 # 5 在组件中使用 (拿变量)
73     js:this.$store.state.count
74     html:$store.state.count
75
76 # 6 修改变量
77     js中:
78         1 this.$store.dispatch('actions定义的函数名',参数)
79         2 this.$store.commit('mutations定义的函数名',参数)
80         3 this.$store.state.count++
81        所有组件中使用到的位置,都会变量
82 # 7 为什么经过 actions和mutations
83     -可以跟后端交互,可以做数据验证
84
85 # 8 getters:
86         可以通过getters获取数据--》对state中的数据,再做处理
87
88 # 9 modules:
89         分到不同模块中,不同模块有自己的state,actions

----------------------------------------------------------
HomeView
<template>
  <div class="home">
    <GoodList/>
    <hr>
    <ShoppingCar/>
  </div>

</template>

<script>
import GoodList from "@/components/GoodList.vue";
import ShoppingCar from "@/components/ShoppingCar.vue";

export default {
  name: 'HomeView',
  components: {
    GoodList,ShoppingCar
  }
}
</script>

---------------------------------------------------------
GoodList
<template>
<div class="good">
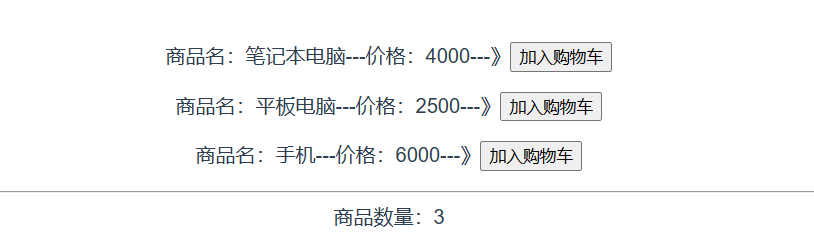
<p>商品名:笔记本电脑---价格:4000---》<button @click="handleAdd">加入购物车</button></p>
<p>商品名:平板电脑---价格:2500---》<button @click="handleAdd">加入购物车</button></p>
<p>商品名:手机---价格:6000---》<button @click="handleAdd">加入购物车</button></p>
</div>
</template>
<script>
export default {
name: 'GoodList',
methods:{
handleAdd(){
//1.直接操作变量
// this.$store.state.count++
//2.借助于action,触发dispatch方法
// this.$store.dispatch('addCount',1)
//3.借助于mutation,触发commit方法,用这个
this.$store.commit('addOne',1)
}
}
}
</script>
------------------------------------------
ShoppingCar
<template>
  <div class="shoppingcar">
    <div>
      <span>商品数量:{{$store.state.count}}</span>
    </div>
  </div>

</template>


<script>

export default {
  name: 'ShoppingCar',

}
</script>
。
。
。
【vue-router】
# 1 安装
    cnpm install -S vue-router

# 2 写router/index.js
    import Vue from 'vue'
    import VueRouter from 'vue-router'
    import HomeView from '../views/HomeView.vue'
    Vue.use(VueRouter) # 使用插件

    const routes = [
      {
        path: '/',
        name: 'home',
        component: HomeView
      },


    ]

    const router = new VueRouter({
      mode: 'history',
      base: process.env.BASE_URL,
      routes
    })

    export default router
# 3 使用了vue-router插件后
    -html:全局组件:
        -<router-view></router-view>  # 显示页面组件
        -<router-link></router-link>  # 路由跳转【相当于a标签】
    -js中:
        this.$router  # 路由对象,路由跳转
        this.$route   # 当前路由对象,跳转携带数据,从这里取出来

# 4 如果访问某个路径,显示某个组件
    # App.vue中
      <div id="app">
        <router-view></router-view>
      </div>
       # router/index.js的routes注册路由
1 <template> 2 <div class="home"> 3 <h1>Home</h1> 4 <!-- 方式一--> 5 <button @click="handleTo">点我跳转到about--js跳转</button> 6 <hr> 7 <!-- 方式二:路由跳--> 8 <!-- <router-link to="/about">--> 9 <!-- <button >点我跳转到about--js跳转</button>--> 10 <!-- </router-link>--> 11 12 <!-- 方式三:变量--> 13 <router-link :to="{name:'about'}"> 14 <button >点我跳转到about--js跳转</button> 15 </router-link> 16 17 </div> 18 19 </template> 20 21 <script> 22 23 export default { 24 name: 'HomeView', 25 methods:{ 26 handleTo(){ 27 console.log(this.$router) 28 //1 路径 29 // this.$router.push('/about') 30 //2 对象:根据名字或是路径 31 // this.$router.push({name:'about'}) 32 this.$router.push({path:'/about'}) 33 } 34 } 35 } 36 </script>
【本地存储】
# 登录成功---》token存储 cookie:登录信息放这里,有过期事件,一旦过期,就没了
sessionStorage:当前浏览器生效---》关闭浏览器,数据就没了
localStorage:永久生效,除非代码删除或清空浏览器缓存 -未登录,加购物车
# cookie 需要下载 cnpm install vue-cookies -S
 1 <template>
 2   <div class="home">
 3     <h1>首页</h1>
 4     <h2>localStorage的使用</h2>
 5     <button @click="handleSaveLocalStorage">存储到localStorage</button>
 6     <button @click="handleGetLocalStorage">从localStorage取出</button>
 7     <button @click="handleDeleteLocalStorage">删除localStorage</button>
 8
 9     <h2>sessionStorage使用</h2>
10     <button @click="handleSavesessionStorage">存储到sessionStorage</button>
11     <button @click="handleGetsessionStorage">从sessionStorage取出</button>
12     <button @click="handleDeletesessionStorage">删除sessionStorage</button>
13     <h2>cookie使用</h2>
14     <!--    -->
15     <button @click="handleSaveCookie">存储到cookie</button>
16     <button @click="handleGetCookie">从cookie取出</button>
17     <button @click="handleDeleteCookie">删除cookie</button>
18
19   </div>
20 </template>
21
22 <script>
23 export default {
24   name: 'HomeView',
25   methods: {
26     handleSaveLocalStorage() {
27       localStorage.setItem("name", 'wxx')
28       let user = {
29         name: 'xxx',
30         age: 19
31       }
32       localStorage.setItem("user", JSON.stringify(user)) // 不要放对象
33
34     },
35     handleGetLocalStorage() {
36       let name = localStorage.getItem("name")
37       let user = localStorage.getItem('user')
38       console.log(name)
39       console.log(user)
40       console.log(typeof user)
41
42     },
43     handleDeleteLocalStorage() {
44       localStorage.removeItem('name')
45       localStorage.clear()
46
47     },
48
49
50     handleSavesessionStorage() {
51       sessionStorage.setItem("name", '彭于晏')
52     },
53     handleGetsessionStorage() {
54       let name = sessionStorage.getItem('name')
55       console.log(name)
56     },
57     handleDeletesessionStorage() {
58       sessionStorage.removeItem('name')
59       sessionStorage.clear()
60     },
61
62     handleSaveCookie() {
63       this.$cookies.set('name', 'zzzz', '1h')
64     },
65     handleGetCookie() {
66       let name = this.$cookies.get('name')
67       console.log(name)
68     },
69     handleDeleteCookie() {
70       this.$cookies.remove('name')
71
72     },
73   }
74 }
75 </script>

 浙公网安备 33010602011771号