Linux 9 自动化部署 NFS 服务
NFS 是 Network File System (网络文件系统) 的简称,它是一种分布式文件系统,用于在 Linux 主机之间共享文件。通过 TCP/IP 协议,可以将 NFS Server 提供的共享目录挂载为本地目录,客户端在使用时,就像操作本地文件一样。
NFS 有近 40 年的历史,运行稳定、使用简单,是常见的基础服务之一。本文将演示 NFS 服务的自动化安装与配置,以及客户端自动化挂载 NFS 服务提供的磁盘到本地。
本文包含以下主题:
- 部署环境介绍
- 部署 NFS 服务
- 客户端挂载 NFS
- 总结
30.1 部署环境介绍
NFS Server 节点用来部署 NFS 服务,提供共享目录。Ansible 控制节点既用来执行 Ansible Playbook 实现 NFS 的自动化安装与配置,又作为客户端节点,演示如何自动化挂载 NFS Server 提供的共享目录。
30.1.1 节点信息
两个节点分别为 2 核 CPU、2G 内存的虚拟机。
Ansible (NFS Client) 节点信息:
# IP:10.211.55.18
# 主机名:automate-host.aiops.red
# 系统版本:Rocky Linux release 9.0
Ansible Inventory hosts:
[nfs]
nfs1-host.aiops.red

[nfsclient]
automate-host.aiops.red
NFS Server 节点信息:
# IP:10.211.55.21
# 主机名:nfs1-host.aiops.red
# 系统版本:Rocky Linux release 9.0
30.1.2 节点要求
Ansible 控制节点能够通过主机名 ”nfs1-host.aiops.red“ 免密访问 NFS Server,并有免密执行 sudo 权限。该配置过程,可以参考前两篇文章。
30.2 部署 NFS 服务
在 Rocky Linux 9 上自动化部署并配置 NFS 服务并不复杂,以下是详细步骤。
30.2.1 安装 NFS 服务
使用 Ansible dnf 模块安装 NFS 服务,任务内容如下:
- name: install NFS service and dependencies task
  ansible.builtin.dnf:
    name: nfs-utils
    state: present
nfs-utils 包包含了 NFS 相关命令与控制脚本;安装该软件包,dnf 会自动化安装依赖,比如 rpcbind 包。
30.2.2 启动 NFS 服务
启动 NFS 服务和 rpcbind 服务:
- name: start NFS and rpcbind services task
  ansible.builtin.systemd:
    name: "{{ item }}"
    state: started
    enabled: true
  with_items:
    - rpcbind.service
    - nfs-server.service
rpcbind 管理 RPC 连接,为 NFS 服务分配动态端口,如果 rpcbind 不启动,NFS 服务也将无法启动。
30.2.3 修改防火墙
为了使客户端能够访问 NFS 服务,需要在 NFS 服务器上,开启 firewalld NFS 相关服务。 Ansible 任务如下:
- name: turn on NFS service in the firewalld task
  ansible.builtin.firewalld:
    service: "{{ item }}"
    permanent: true
    immediate: true
    state: enabled
  with_items:
    - nfs
    - mountd
    - rpc-bind
30.2.4 配置共享目录
创建用于共享的目录,该目录被客户端远程挂载到本地。Ansible 任务如下:
- name: create a directory for sharing task
  ansible.builtin.file:
    path: /nfs1
    state: directory
    mode: 01777
NFS 服务的配置文件为 /etc/exports,默认为空。将创建的共享目录的路径、允许访问的客户端、访问权限添加到该文件。
创建 files/exports 文件,内容如下:
/nfs1 *(rw,sync)
通常,一个 NFS 服务可能提供多个共享目录。可以在 Playbook 中设置名为 share_dirs 的列表类型变量,在 file.path 中使用该变量。删除 files/exports 文件,创建模板文件 templates/exports.j2,通过渲染生成配置文件。内容如下:
{% for share_dir in share_dirs -%}
{{ share_dir }} *(rw,sync)
{% endfor -%}
为 template 任务设置 notify,当 /etc/exports 变化时,通知 handlers 重启 nfs-server 和 rpcbind 服务:
- name: generate configuration files task
  ansible.builtin.template:
    src: exports.j2
    dest: /etc/exports
  notify: restart NFS and rpcbind services handler
30.2.5 创建 Handlers
“restart NFS and rpcbind services handler” 用于在 “generate configuration files task” 任务改变配置文件时,重启 NFS 相关服务,内容如下:
- name: restart NFS and rpcbind services handler
  ansible.builtin.systemd:
    name: "{{ item }}"
    state: restarted
  with_items:
    - rpcbind.service
    - nfs-server.service
30.2.6 完整的 Playbook
最终,部署 NFS 服务的 deploy_nfs.yaml Playbook 文件内容如下:
#!/usr/bin/env ansible-playbook
---
- name: install nfs service play
  hosts: nfs
  become: true
  gather_facts: false

  vars:
    share_dirs:
      - /nfs1

  roles:
    - role: upgrade_packages
      tags: upgrade_packages

  handlers:
    - name: restart NFS and rpcbind services handler
      ansible.builtin.systemd:
        name: "{{ item }}"
        state: restarted
      with_items:
        - rpcbind.service
        - nfs-server.service

  tasks:
    - name: install NFS service and dependencies task
      dnf:
        name: nfs-utils
        state: present

    - name: start NFS and rpcbind services task
      systemd:
        name: "{{ item }}"
        state: started
        enabled: true
      with_items:
        - rpcbind.service
        - nfs-server.service

    - name: turn on NFS service in the firewalld task
      ansible.builtin.firewalld:
        service: "{{ item }}"
        permanent: true
        immediate: true
        state: enabled
      with_items:
        - nfs
        - mountd
        - rpc-bind

    - name: create a directory for sharing task
      ansible.builtin.file:
        path: "{{ item }}"
        state: directory
        mode: 01777
      with_items: "{{ share_dirs }}"

    - name: generate configuration files task
      ansible.builtin.template:
        src: exports.j2
        dest: /etc/exports
      notify: restart NFS and rpcbind services handler
...
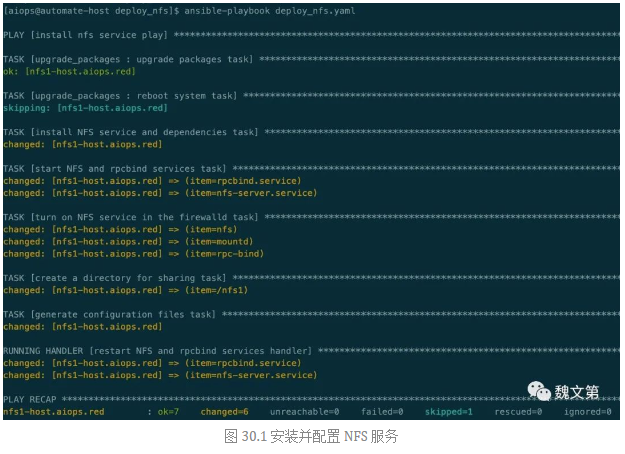
执行 deploy_nfs.yaml Playbook,完成 NFS 服务的安装与配置:
ansible-playbook deploy_nfs.yaml
要验证部署是否成功,可以在 Ansible 控制节点上,远程执行命令,查看 NFS 服务的远程共享信息:
ssh nfs1-host.aiops.red showmount -e
/nfs 共享目录已配置成功,接下来在客户端上挂载该目录。
要共享多个目录,可以在
share_dirs列表变量中添加目录,示例:vars: share_dirs: - /nfs1 - /nfs2 - ...roles 定义使用
upgrade_packages角色,更新 dnf 软件包,并在有软件包更新后,重启操作系统。该角色的相关介绍和内容,可以在上篇文章查看。也可以把 roles 相关的内容删除,不更新软件包。
30.3 客户端挂载 NFS
在客户端上挂载 NFS 共享的目录,需要执行四个步骤:
1、安装 nfs-utils 包:
sudo dnf install nfs-utils
2、创建挂载路径:
sudo mkdir /aiops
3、使用 mount 命令在客户端上挂载 NFS 服务提供的共享目录。比如将 /nfs1 共享目录挂载为客户端的 /aiops 路径,在客户端执行命令:
sudo mount -t nfs -o rw nfs1-host.aiops.red:nfs1 /aiops
4、将挂载信息添加进 /etc/fstab 文件,实现持久化挂载
以上四步,可以通过 Ansible Playbook 自动完成。mount_nfs.yaml Playbook 文件内容如下:
#!/usr/bin/env ansible-playbook
---
- name: install nfs service play
  hosts: nfsclient
  become: true
  gather_facts: false

  tasks:
    - name: install NFS service and dependencies task
      dnf:
        name: nfs-utils
        state: present

    - name: mount share dirs to local dirs task
      ansible.posix.mount:
        fstype: nfs
        state: mounted
        src: nfs1-host.aiops.red:{{ item.src }}
        path: "{{ item.path }}"
      with_items:
        - { src: "nfs1", path: "/aiops" }
在 Play 中定义了两个任务:安装 nfs-utils 包、挂载 NFS 目录。在挂载过程中,Ansible 会自动创建本地目录,并将挂载信息写入 /etc/fstab 文件,在客户端重启后,仍能正常使用挂载的 NFS 共享目录。
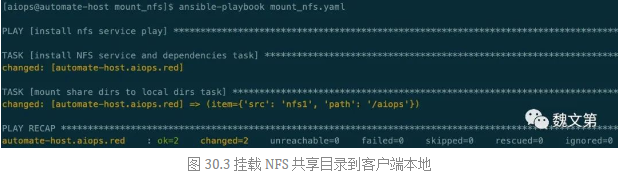
执行 mount_nfs.yaml Playbook:
ansible-playbook mount_nfs.yaml
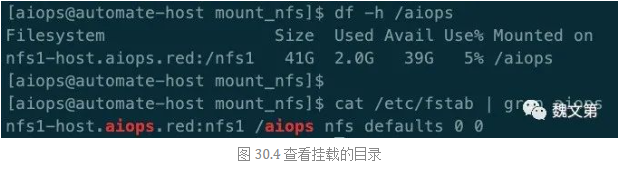
查看挂载目录:
df -h /aiops
cat /etc/fstab | grep aiops
向 /aiops/ 目录写入数据,验证 NFS 目录的可用性:
echo 'NFS Shareding directory' > /aiops/README.md
cat /aiops/README.md

30.4 总结
本文介绍了在 Rocky Linux 9 及其他基于 RPM 的 Linux 发行版上,使用 Ansible 自动化安装并配置 NFS 服务,以及在客户端自动化挂载 NFS 服务提供的共享目录。

 浙公网安备 33010602011771号