kuberentes 1.18 安装及指南
一、整体说明
1.1、背景说明
当前微服务架构有多种模式,需要对其选型进行集成及实施:
-
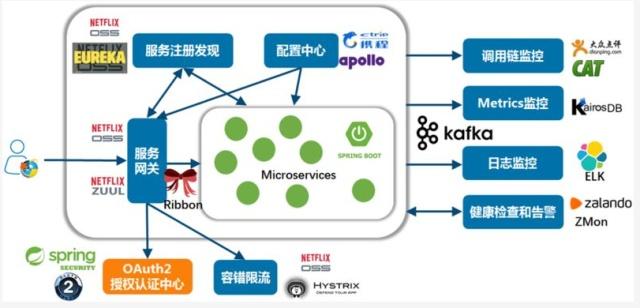
方案一:Java世界的微服务Spring Cloud
在Java世界里SpringCloud,已经成为微服务开发的主流技术栈,其核心组件如下图所示。
![]()
缺点是和java的绑定关系太强,我们的系统有多种语言,基本上不适合。
-
方案二:微软云Service Fabric
如果你是基于微软云构建系统,那么恭喜你,你直接选择Service Fabric,可以为你节省半年到1年的架构开发工作!
缺点是如果你不是基于微软云构建的系统,那么,则很难对其进行实施
-
方案三:自研
微服务的注册和发现 :集成诸如Zookeeper之类的服务
微服务的部署和弹性伸缩: docker + Kubernetes
微服务间的通讯:Http WebApi
微服务间通讯的效率:低,有级联崩溃的可能性
微服务间的事务性(ACID):CAP或异步通讯+人工处理
微服务的对外网关、限流熔断:nginx/Kubernetes/IIS/自己轻量包装
微服务的全局配置:DB/Redis/zookeeper
微服务的认证授权(OAuth2):IdentityServer
微服务间的异步通讯、消息:RabbitMq等类似组件
微服务的日志: log4net /Rabbitmq
微服务的监控:HealthCheck接口
缺点是落地及开发实施较难,周期较长,且质量无从把控
-
方案四:kubernets+istio方案
这里不作过多阐述,推存文章:
https://blog.csdn.net/gui951753/article/details/81543545
最终我们选定了此种方案
1.2、整体架构
如下图所示:
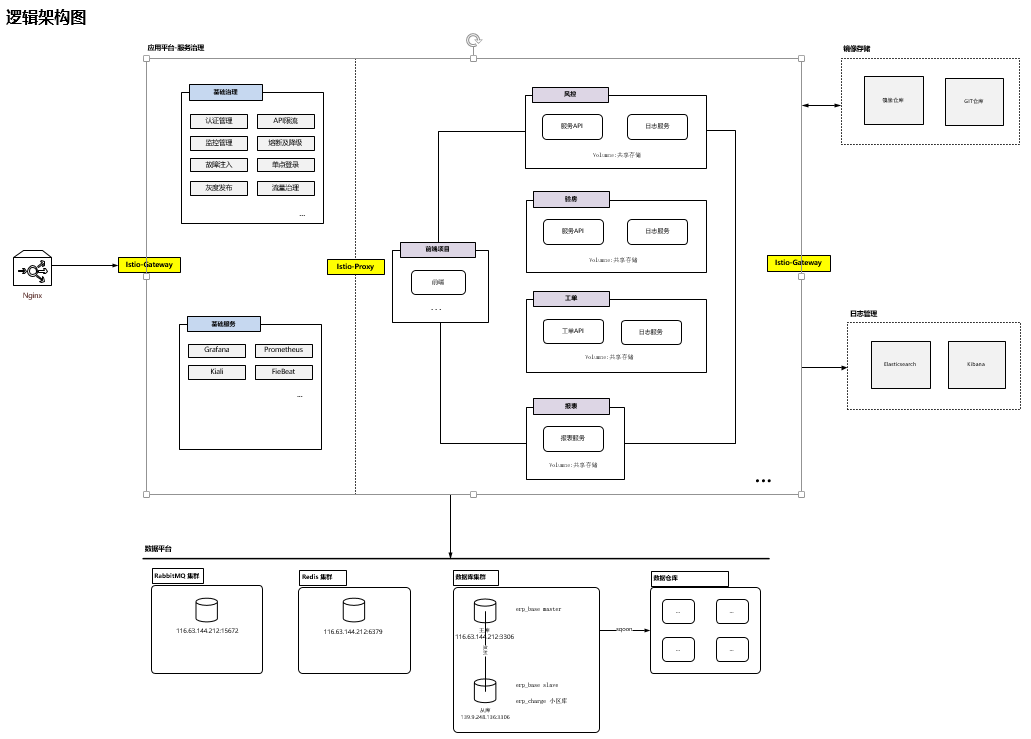
如图所示,接下来会一步一步将架构进行落地实施。
二、Kubernetes安装与配置
首先准备两台CentOS8.0服务器,首先在主服务器进行配置安装(作为Master节点运行)
2.1、安装docker
yum install -y yum-utils device-mapper-persistent-data lvm2

yum-config-manager --add-repo http://download.docker.com/linux/centos/docker-ce.repo(中央仓库)

#可以查看所有仓库中所有docker版本,并选择特定版本安装
yum list docker-ce --showduplicates | sort -r

#安装docker
wget https://download.docker.com/linux/centos/7/x86_64/stable/Packages/containerd.io-1.2.13-3.1.el7.x86_64.rpm

yum -y install ./containerd.io-1.2.13-3.1.el7.x86_64.rpm

yum -y install docker-ce-3:19.03.13-3.el8

#启动Docker,然后加入开机启动
systemctl start docker
systemctl enable docker
docker login
修改默认路径
输入 docker info

查看 Docker Root Dir

最简单粗暴的办法,当然就是直接把数据盘挂载到/var/lib/docker 目录下,不过这样对整体影响太大,其他程序需要使用数据盘时很不方便,所以还是从 Docker 端的修改入手。

官方文档的修改办法是编辑 /etc/docker/daemon.json 文件:

vim /etc/docker/daemon.json

默认情况下这个配置文件是没有的,这里实际也就是新建一个,然后写入以下内容:

{
"data-root": "/data/docker"
}

保存退出,然后重启 docker 服务:

systemctl restart docker
再次查看 docker 信息,可以看到目录已经变成了设定的/data/docker:
2.2、安装dotnet
sudo rpm -Uvh https://packages.microsoft.com/config/centos/8/packages-microsoft-prod.rpm

sudo yum install dotnet-sdk-3.1

#解决图片字体的依赖包
sudo yum install https://download-ib01.fedoraproject.org/pub/epel/8/Everything/x86_64/Packages/l/libgdiplus-6.0.4-3.el8.x86_64.rpm
其它问题
A fatal error occurred.
A fatal error occurred. The required library libhostfxr.so could not be found.
or
A fatal error occurred. The folder [/usr/share/dotnet/host/fxr] does not exist.
or
A fatal error occurred, the folder [/usr/share/dotnet/host/fxr] does not contain any version-numbered child folders.
What's going on?
This generally happens when two Linux package repositories provide .NET packages. While Microsoft provides a Linux package repository to source .NET packages, some Linux distributions also provide .NET packages, such as:
Arch
CentOS
Fedora
RHEL
Mixing .NET packages from two different sources will most likely lead to issues since the packages may place things at different paths, and may be compiled differently.
解决办法:
sudo dnf remove packages-microsoft-prod
sudo dnf remove 'dotnet*' 'aspnet*' 'netstandard*'
检查安装是否正确
dotnet --verion
2.3、安装java
yum安装:
yum -y remove java-1.8.0-openjdk*

yum -y remove tzdata-java.noarch

yum -y list java*

yum -y install java-1.8.0-openjdk

java -version
离线安装:
wget https://download.oracle.com/otn/java/jdk/8u281-b09/89d678f2be164786b292527658ca1605/jdk-8u281-linux-x64.tar.gz?AuthParam=1618390354_4042a0e96e56c4c30460d13052d6756a

tar -zxvf jdk-8u281-linux-x64.tar.gz

vim /etc/profile

export JAVA_HOME=/data/jdk1.8.0_281
export JRE_HOME=${JAVA_HOME}/jre
export CLASSPATH=.:${JAVA_HOME}/lib:${JRE_HOME}/lib
export PATH=${JAVA_HOME}/bin:$PATH

ln -s /data/jdk1.8.0_281/bin/java /usr/bin/java
2.4、编译成docker,发布到镜像仓库
首先需要在docker.io上面申请一个账号,以.net core应用程序为例,进行docker镜像的打包,后面会给出github用action编译后自动推送到docker.io上。
libgdiplus在打包时最好尽量装上,否则会报一些莫名其妙的错误,类似于:
System.DllNotFoundException: Unable to load shared library 'libgdiplus' or one of its dependencies. In order to help diagnose loading problems, consider setting the LD_DEBUG environment variable: liblibgdiplus: cannot open shared object file: No such file or directory
的错误。
vim Dockerfile
FROM mcr.microsoft.com/dotnet/core/aspnet:3.1-buster-slim AS base
RUN apt-get update
RUN apt-get -y install libgdiplus
RUN apt-get -y install vim
RUN apt-get -y install net-tools
RUN apt-get -y install iputils-ping
RUN apt-get -y install telnet
RUN apt-get -y install procps
WORKDIR /app
COPY . .
EXPOSE 8000
ENTRYPOINT ["dotnet", "RoadFlow.WebApi.dll"]
开始打包并推送到仓库:
docker build -t littlewrong/tw.bpm:v1.0.0 .
docker push littlewrong/tw.bpm:v1.0.0
此文件必须放在打包所在的项目文件夹中
2.5、安装k8s_Master
修改主机名
hostnamectl set-hostname testname
#关闭防火墙
systemctl stop firewalld
systemctl disable firewalld
iptables -F
iptables -X
iptables -P INPUT ACCEPT
iptables -P OUTPUT ACCEPT
iptables -P FORWARD ACCEPT
vim /etc/selinux/config
SELINUX=disabled

lsmod |grep -E "ip_tables|iptable_filter"
modprobe ip_tables
modprobe iptable_filter
lsmod |grep -E "ip_tables|iptable_filter"
[root@k8s-node02 ~]# cat /etc/sysconfig/modules/iptables.modules
modprobe -- ip_tables
modprobe -- iptable_filter
[root@k8s-node02 ~]# chmod 755 /etc/sysconfig/modules/iptables.modules   #设置权限
[root@k8s-node02 ~]# sh /etc/sysconfig/modules/iptables.modules          #临时生效,重启后也会生效

#修改 sysctl 配置
vim /etc/sysctl.conf
net.bridge.bridge-nf-call-ip6tables = 1
net.bridge.bridge-nf-call-iptables = 1
net.ipv4.ip_forward = 1

sysctl --system

#关闭 swap
swapoff -a
vim /etc/fstab
#/dev/mapper/centos-swap swap swap defaults 0 0

#kubernetes yum源

vim /etc/yum.repos.d/kubernetes.repo
[kubernetes]
name=Kubernetes
baseurl=https://mirrors.aliyun.com/kubernetes/yum/repos/kubernetes-el7-x86_64/
enabled=1
gpgcheck=0

#指定安装Kubernetes的版本(一定安装1.18.0版本的)

yum -y install epel-release
yum clean all
yum makecache
yum install -y kubeadm-1.18.0-0 kubectl-1.18.0-0 kubelet-1.18.0-0

#拉取k8s的docker镜像

kubeadm config images list

#编辑镜像文件:
set ff=unix //设置为unix格式
./get_image_docker.sh 拉取镜像

#初始化kubernetes
#pod-network 的IP千万不要和局域网的IP重合,否则会造成pod内网不通外网的情况,一定切记切记
#另外特别注意--pod-network-cidr的网段必须和kube-flannel的网段地址要保持一样,否则也会造成pod内部IP不通的情况,最好设成默认的10.244.0.0/16

kubeadm init --kubernetes-version=v1.18.0 --service-cidr=10.1.0.0/16 --pod-network-cidr=10.244.0.0/16 --image-repository=registry.aliyuncs.com/google_containers --ignore-preflight-errors=all

#单机版kubernetes为了运行Pod.需要删除主机上的Train.允许master执行Pod.
kubectl taint nodes --all node-role.kubernetes.io/master-
kubectl taint nodes iz2vcf9v41doxowbcqr492z node-role.kubernetes.io/master=:NoSchedule


error: no configuration has been provided, try setting KUBERNETES_MASTER environment variable
vim /etc/profile
export KUBECONFIG=/etc/kubernetes/admin.conf
#立即生效
source /etc/profile

#部署flannel网络,否则节点无法运行
wget https://raw.githubusercontent.com/coreos/flannel/master/Documentation/kube-flannel.yml
docker pull quay.io/coreos/flannel:v0.12.0-amd64
kubectl apply -f kube-flannel.yml
kubectl get nodes

#配置访问集群的,同时好需要执行如下命令:
mkdir -p $HOME/.kube
sudo cp -i /etc/kubernetes/admin.conf $HOME/.kube/config
sudo chown $(id -u):$(id -g) $HOME/.kube/config

#查询执行错误
journalctl -f -u kubelet
docker images|grep flannel
systemctl restart kubelet

#卸载服务
kubeadm reset
2.6、安装k8s_Node
修改主机名
hostnamectl set-hostname testname
#关闭防火墙
systemctl stop firewalld
systemctl disable firewalld
iptables -F
iptables -X
iptables -P INPUT ACCEPT
iptables -P OUTPUT ACCEPT
iptables -P FORWARD ACCEPT
vim /etc/selinux/config
SELINUX=disabled

lsmod |grep -E "ip_tables|iptable_filter"
modprobe ip_tables
modprobe iptable_filter
lsmod |grep -E "ip_tables|iptable_filter"
[root@k8s-node02 ~]# vim /etc/sysconfig/modules/iptables.modules
modprobe -- ip_tables
modprobe -- iptable_filter
[root@k8s-node02 ~]# chmod 755 /etc/sysconfig/modules/iptables.modules   #设置权限
[root@k8s-node02 ~]# sh /etc/sysconfig/modules/iptables.modules          #临时生效,重启后也会生效

#修改 sysctl 配置
vim /etc/sysctl.conf
net.bridge.bridge-nf-call-ip6tables = 1
net.bridge.bridge-nf-call-iptables = 1
net.ipv4.ip_forward = 1

sysctl --system

#关闭 swap
swapoff -a
vim /etc/fstab
#/dev/mapper/centos-swap swap swap defaults 0 0

#kubernetes yum源

vim /etc/yum.repos.d/kubernetes.repo
[kubernetes]
name=Kubernetes
baseurl=https://mirrors.aliyun.com/kubernetes/yum/repos/kubernetes-el7-x86_64/
enabled=1
gpgcheck=0

#指定安装Kubernetes的版本(安装1.18.0版本的)

yum -y install epel-release
yum clean all
yum makecache
yum install -y kubeadm-1.18.0-0 kubectl-1.18.0-0 kubelet-1.18.0-0

#拉取k8s的docker镜像

kubeadm config images list

set ff=unix //设置为unix格式
./get_image_docker.sh 拉取镜像

#创建token,加入集群
kubeadm token create --print-join-command

kubeadm join 192.168.0.120:6443 --token 382ywp.0k7ey52c7mombi20 \
    --discovery-token-ca-cert-hash sha256:65c07b4f4e04484fffbc237eb00d5256a042346ce608cafd29c1425b197131cf

vim /etc/profile
export KUBECONFIG=/etc/kubernetes/admin.conf

source /etc/profile

#部署flannel网络。
wget https://raw.githubusercontent.com/coreos/flannel/master/Documentation/kube-flannel.yml

docker pull quay.io/coreos/flannel:v0.12.0-amd64

kubectl apply -f kube-flannel.yml

#查看节点的运行状态
kubectl get nodes -o wide

#node节点执行:
mkdir -p $HOME/.kube
scp 192.168.0.120:/root/.kube/config $HOME/.kube/config

#查询执行错误
journalctl -f -u kubelet
docker images|grep flannel
systemctl restart kubelet

#卸载服务
kubeadm reset
2.7、安装k8s web管理面板
#执行yaml文件直接部署
wget https://raw.githubusercontent.com/kubernetes/dashboard/v2.0.0-beta8/aio/deploy/recommended.yaml

#修改image镜像源

image: registry.cn-hangzhou.aliyuncs.com/google_containers/dashboard:v2.0.0-beta8
imagePullPolicy: IfNotPresent

image: registry.cn-hangzhou.aliyuncs.com/google_containers/metrics-scraper:v1.0.1
imagePullPolicy: IfNotPresent

#修改servcie部分

kind: Service
apiVersion: v1
metadata:
  labels:
    k8s-app: kubernetes-dashboard
  name: kubernetes-dashboard
  namespace: kubernetes-dashboard
spec:
  type: NodePort #修改为NodePort,映射到外部
  ports:
    - port: 443
      targetPort: 8443
      nodePort: 30443 #NodePort端口号
  selector:
    k8s-app: kubernetes-dashboard

#创建dashboard-adminuser.yaml:
apiVersion: v1
kind: ServiceAccount
metadata:
  name: admin-user
  namespace: kubernetes-dashboard

---
apiVersion: rbac.authorization.k8s.io/v1
kind: ClusterRoleBinding
metadata:
  name: admin-user
roleRef:
  apiGroup: rbac.authorization.k8s.io
  kind: ClusterRole
  name: cluster-admin
subjects:
- kind: ServiceAccount
  name: admin-user
  namespace: kubernetes-dashboard


--创建命名空间

kubectl create namespace kubernetes-dashboard

--创建secret

kubectl create secret generic kubernetes-dashboard-certs --from-file=./dashboard.key --from-file=./dashboard.crt -n kubernetes-dashboard

--创建servicecount和role

kubectl apply -f dashboard-adminuser.yaml

--应用配置及拉取镜像

kubectl apply -f recommended.yaml

--获陬token登录码

kubectl -n kubernetes-dashboard describe secret $(kubectl -n kubernetes-dashboard get secret | grep admin-user | awk '{print $1}')

#登录dashboard

https://<any_node_ip>:30443
三、istio安装与配置
Istio 使用功能强大的 Envoy 服务代理扩展了 Kubernetes,以建立一个可编程的、可感知的应用程序网络。Istio 与 Kubernetes 和传统工作负载一起使用,为复杂的部署带来了标准的通用流量管理、遥测和安全性。
3.1、安装istio
#下载istio:
https://github.com/istio/istio/releases/tag/1.8.6

#转到istio包目录
cd istio-1.8.6

#安装目录包含:
#samples/ 目录下的示例应用程序
#bin/ 目录下的 istioctl 客户端二进制文件

#将 istioctl 客户端加入搜索路径(Linux or macOS)
export PATH=$PWD/bin:$PATH

#安装istio,这里注用自已创建的阿里云仓库
istioctl install --set profile=default --set values.global.hub=registry.cn-chengdu.aliyuncs.com/tw369 -y

#确保配置文件没有问题
istioctl analyze
✔ No validation issues found when analyzing namespace: default.

#设置网关入站端口
export PATH=/config/istio/istio-1.8.6/bin:$PATH
export INGRESS_PORT=$(kubectl -n istio-system get service istio-ingressgateway -o jsonpath='{.spec.ports[?(@.name=="http2")].nodePort}')
export SECURE_INGRESS_PORT=$(kubectl -n istio-system get service istio-ingressgateway -o jsonpath='{.spec.ports[?(@.name=="https")].nodePort}')
export INGRESS_HOST=$(kubectl get po -l istio=ingressgateway -n istio-system -o jsonpath='{.items[0].status.hostIP}')
export GATEWAY_URL=$INGRESS_HOST:$INGRESS_PORT
echo INGRESS_HOST=$INGRESS_HOST, INGRESS_PORT=$INGRESS_PORT

#确保 IP 地址和端口均成功的赋值给了环境变量
echo "$GATEWAY_URL"

# 运行下面命令,获取 Bookinfo 应用的外部访问地址
echo "http://$GATEWAY_URL/productpage"

#把上面命令的输出地址复制粘贴到浏览器并访问,确认 Bookinfo 应用的产品页面是否可以打开。
3.2、安装kiali网格可视化管理
kubectl apply -f crd.yaml
kubectl apply -f kiali.yaml

---
# Source: crds/crds.yaml
---
apiVersion: apiextensions.k8s.io/v1beta1
kind: CustomResourceDefinition
metadata:
  name: monitoringdashboards.monitoring.kiali.io
spec:
  group: monitoring.kiali.io
  names:
    kind: MonitoringDashboard
    listKind: MonitoringDashboardList
    plural: monitoringdashboards
    singular: monitoringdashboard
  scope: Namespaced
  versions:
  - name: v1alpha1
    served: true
    storage: true

#访问 Kiali 仪表板,同时需要修改Service的类别为NodePort,以支持外网访问
istioctl dashboard kiali

修改kiali 访问模式由anonymous策略修改为token
config.yaml: |
    auth:
      openid: {}
      openshift:
        client_id_prefix: kiali
      strategy: token
    deployment:
      accessible_namespaces:

查看kiali证书
kubectl get secrets -n istio-system
kubectl describe secrets -n istio-system kiali-token-2fz92

3.3、安装jaeger性能采集指标监控
#如前面安装可以忽略此步
kubectl apply -f samples/addons
kubectl rollout status deployment/kiali -n istio-system

#访问仪表盘,同时需要修改Service的类别为NodePort,以支持外网访问
istioctl dashboard jaeger
3.4、安装Prometheus及Grafana应用程序指标监控
#如前面安装可以忽略此步
kubectl apply -f samples/addons
kubectl rollout status deployment/kiali -n istio-system
#验证 prometheus 服务正在集群中运行
kubectl -n istio-system get svc prometheus
NAME CLUSTER-IP EXTERNAL-IP PORT(S) AGE
prometheus 10.59.241.54 <none> 9090/TCP 2m
#验证 Grafana 服务正在集群中运行
kubectl -n istio-system get svc grafana
NAME CLUSTER-IP EXTERNAL-IP PORT(S) AGE
grafana 10.59.247.103 <none> 3000/TCP 2m
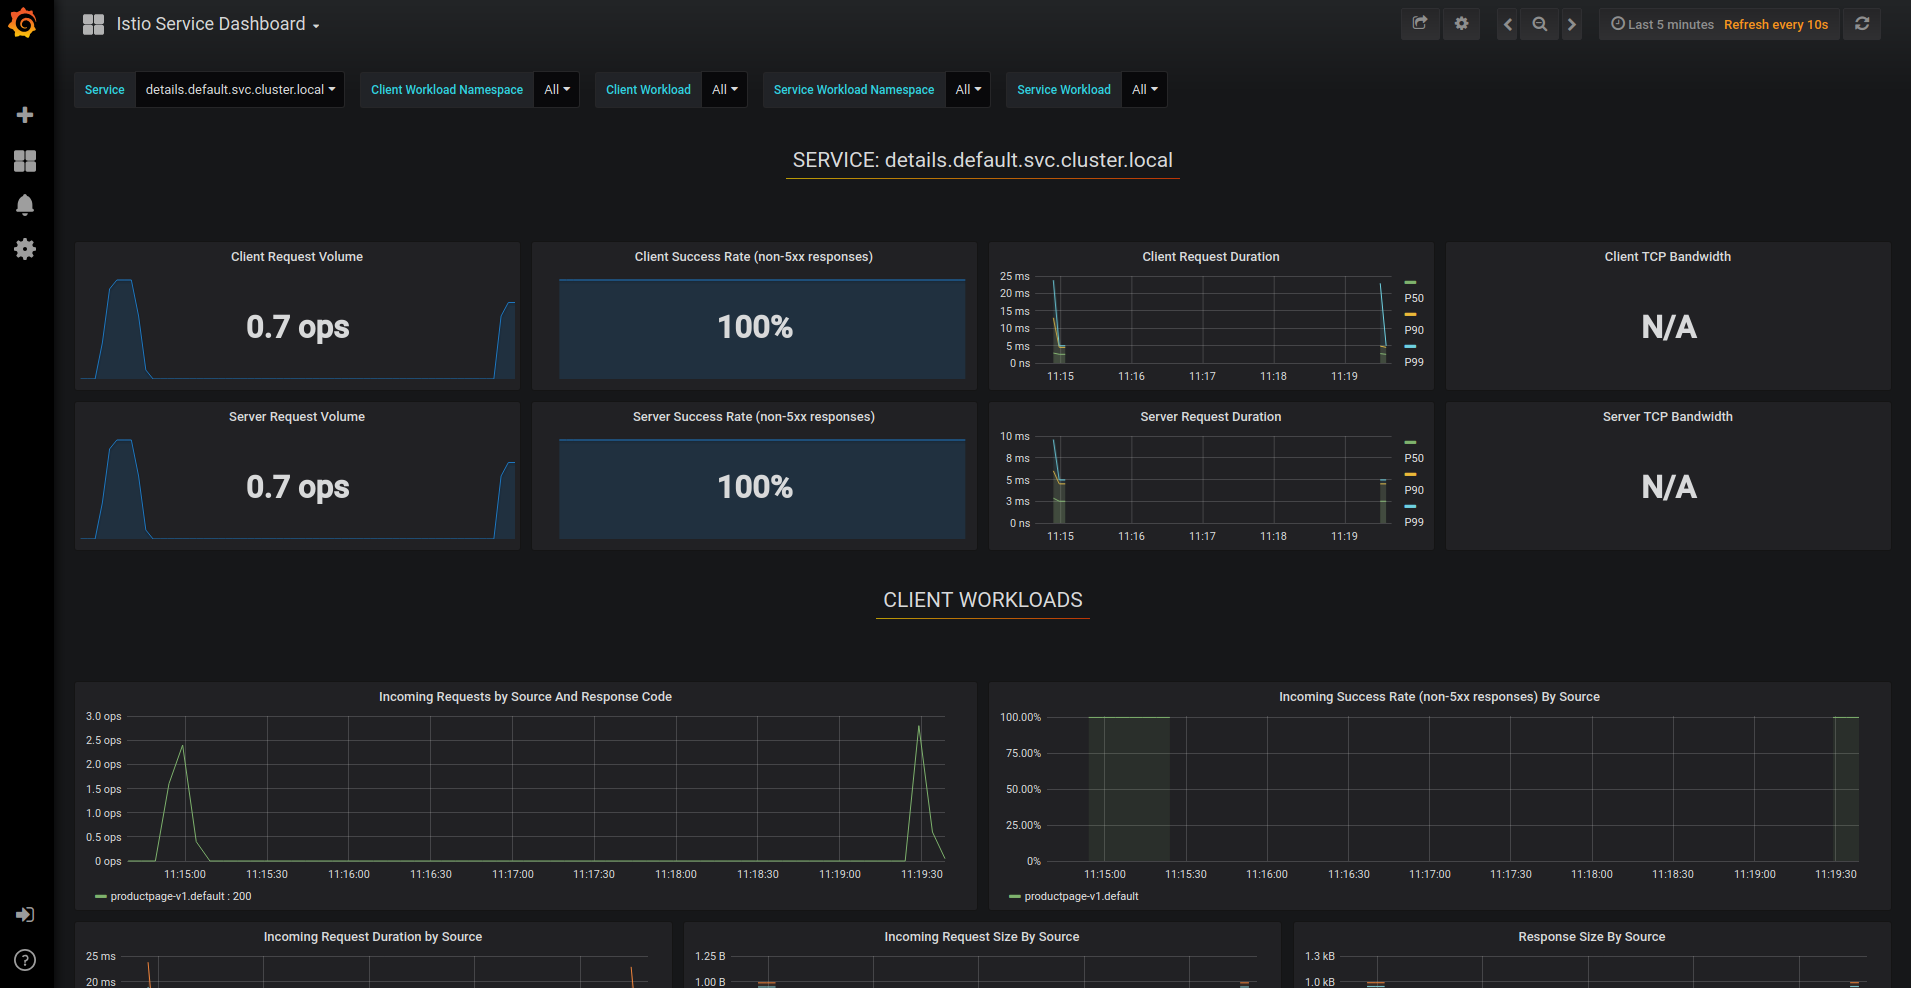
#通过 Grafana UI 打开 Istio Dashboard,同时需要修改Service的类别为NodePort,以支持外网访问
kubectl -n istio-system port-forward $(kubectl -n istio-system get pod -l app=grafana -o jsonpath='{.items[0].metadata.name}') 3000:3000 &
在浏览器中访问 http://localhost:3000/dashboard/db/istio-mesh-dashboard 。

四、对接Samba&CIFS文件共享存储
当应用服务打包成镜像后,其会话状态及文件存储不能在单节点中进行存储,需要由统一的服务进行接管,kubernetes提供CSI驱动将外部存储提供给pod中使用,例如我们可以通过CSI驱动对接Samba/CIFS共享文件存储,以达到文件共享访问的目的。
首先需要安装samba
#安装samba(全安装)
sudo dnf install samba samba-common samba-client

#客户端安装
yum install -y samba-client

#查看版本号
smbd -V

#编辑配置文件
vim /etc/samba/smb.conf

[global]
workgroup = WORKGROUP
server string = Samba Server %v
netbios name = centos-8
security = user
map to guest = bad user
dns proxy = no

[public]
path = /share
browsable =yes
writable = yes
guest ok = yes
read only = no

#运行测试命令
testparm

#启动samba
sudo systemctl start smb
sudo systemctl enable smb
systemctl restart smb
systemctl status smb

chmod 777 /share

#客户端连接
smbclient //192.168.0.120/public -U root
ls //查看文件
get xxx.xxx //下载文件
put xxx.xxx //上传文件

#挂载目录,在指定服务器上执行
mount -t cifs //192.168.0.120/public /share -o username=root,password=xxxxxx
在 Kubernetes 中挂载 cifs 网络文件共享协议的卷
Kubernetes提供了Flexvolume,这是一种插件机制,使用户可以编写自己的驱动程序。
Kubernetes 在默认的情况下在 /usr/libexec/kubernetes/kubelet-plugins/volume/exec/ 下搜索第三方插件。在该目录下创建文件夹 fstab~cifs, 把 cifs 文件放到该文件夹下。fstab~cifs 将被映射为名为 fstab/cifs 的 flexvolume 插件。
VOLUME_PLUGIN_DIR="/usr/libexec/kubernetes/kubelet-plugins/volume/exec"
mkdir -p "$VOLUME_PLUGIN_DIR/fstab~cifs"
cd "$VOLUME_PLUGIN_DIR/fstab~cifs"
curl -L -O https://raw.githubusercontent.com/fstab/cifs/master/cifs
chmod 755 cifs
集群各节点都需要有以下 packages 环境:
yum install -y cifs-utils
yum install -y jq
yum install -y util-linux
yum install -y coreutils
mount.cifs:在 ubuntu 上 sudo apt install cifs-utils
jq:在ubuntu 上 sudo apt install jq
mountpoint:在ubuntu 上sudo apt install util-linux
base64: 在 ubuntu 上 sudo apt install coreutils (大多已默认安装)
可以执行一下刚刚复制到
/usr/libexec/kubernetes/kubelet-plugins/volume/exec/fstab~cifs
看是否安装成功:./cifs init,成功会显示“status”: "Success"。
echo -n username | base64
echo -n password | base64

#创建 cifs-secret.yml 文件:
apiVersion: v1
kind: Secret
metadata:
  name: cifs-secret
  namespace: default
type: fstab/cifs
data:
  username: 'ZXhhbXBsZQ=='
  password: 'bXktc2VjcmV0LXBhc3N3b3Jk'

#创建 Secret 资源
kubectl apply -f cifs-secret.yaml
#使用命令 kubectl describe secret cifs-secret 检测是否创建成功。

#最后在pod中挂载硬盘,创建twbpm.yml
apiVersion: apps/v1
kind: Deployment # 定义Kubernetes资源的类型为Deployment
metadata:
  name: tw.bpm # 定义资源的名称
  namespace: application
  labels:
    app: tw.bpm
spec:  # 定义资源的状态。
  replicas: 2 # 定义我们想运行多少个Pod,在这里我们希望运行2个
  selector:
    matchLabels: # 定义该部署匹配哪些Pod
      app: tw.bpm
  minReadySeconds: 5 # 可选,指定Pod可以变成可用状态的最小秒数,默认是0
  strategy: # 指定更新版本时,部署使用的策略
    type: RollingUpdate # 策略类型,使用RollingUpdate可以保证部署期间服务不间断
    rollingUpdate:
      maxUnavailable: 1 # 部署时最大允许停止的Pod数量(与replicas相比)
      maxSurge: 1 # 部署时最大允许创建的Pod数量(与replicas相比)
  template: # 用来指定Pod的模板,与Pod的定义类似
    metadata:
      labels: # 根据模板创建的Pod会被贴上该标签,与上面的matchLabels对应
        app: tw.bpm
    spec:
      containers:
        - name: web
          image: littlewrong/tw.bpm:1.0.20
          imagePullPolicy: Always # 默认是IfNotPresent,如果设置成Always,则每一次部署都会重新拉取容器映像(否则,如果本地存在指定的镜像版本,就不会再去拉取)
          ports:
            - containerPort: 8000
          volumeMounts:
            - name: twbpmshare
              mountPath: /share
            - name: app-bpmlogs
              mountPath: /logs
        - name: filebeat
          image: littlewrong/filebeat:6.2.4
          volumeMounts:
            - name: app-bpmlogs
              mountPath: /logs
      volumes:
        - name: twbpmshare
          flexVolume:
            driver: "fstab/cifs"
            fsType: "cifs"
            secretRef:
              name: "cifs-secret"
            options:
              networkPath: "//192.168.0.120/public"
              mountOptions: "dir_mode=0755,file_mode=0644,noperm"
        - name: app-bpmlogs
          emptyDir: {}

#flexVolume 为挂载的网络硬盘,app-bpmlogs挂载的本pod的日志卷,这里可以忽略。
Pod 创建成功后,在 Pod 中启动一个shell 查看网络硬盘是否挂载成功。
kubectl exec -ti PodId /bin/sh
ls /share
五、日志搜索及管理
通常的方案有三种
- 每个app的镜像中都集成日志收集组件
优点:部署方便,kubernetes的yaml文件无须特别配置,可以为每个app自定义日志收集配置
缺点:强耦合,不方便应用和日志收集组件升级和维护且会导致镜像过大
- 单独创建一个日志收集组件跟app的容器一起运行在同一个pod中
优点:低耦合,扩展性强,方便维护和升级
缺点:需要对kubernetes的yaml文件进行单独配置,略显繁琐
- 将所有的Pod的日志都挂载到宿主机上,每台主机上单独起一个日志收集Pod
优点:完全解耦,性能最高,管理起来最方便
缺点:需要统一日志收集规则,目录和输出方式
综合以上优缺点,我们选择使用方案二
架构图如下:
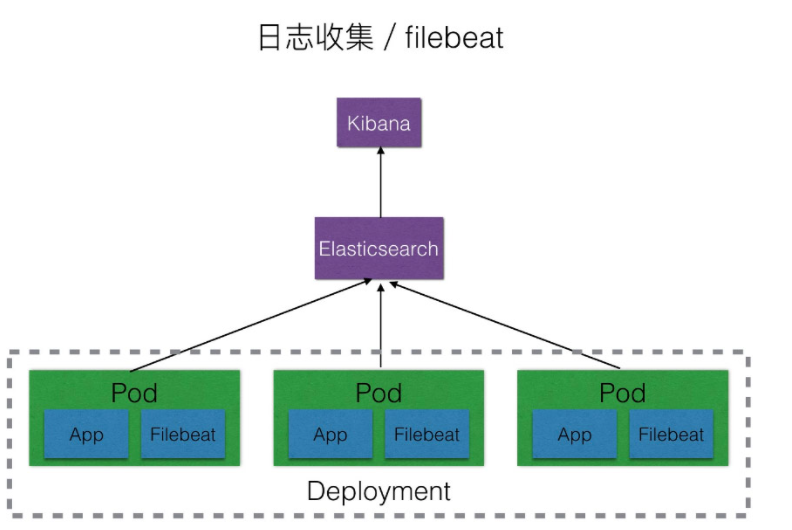
我们在部署时,将Elasticsearch及kibana部署在k8s集群之外。
安装Elasticsearch
wget https://artifacts.elastic.co/downloads/elasticsearch/elasticsearch-6.2.4.tar.gz

tar -zxvf elasticsearch-6.2.4.tar.gz

vi config/elasticsearch.yml

#添加以下配置,或者将对应的配置注释取消修改
network.host: 0.0.0.0
http.port: 9200

由于Elasticsearch不能使用root用户打开,所以需要专门创建一个用户来启动Elasticsearch

$ adduser elastic
#设置密码
$ passwd elastic
#需要输入2次密码
#授权
$ chmod -R 777 /usr/local/elasticsearch-6.2.4
#切换用户
$ su elastic

#创建的用户名为elastic,其中/usr/local/elasticsearch-6.2.4为解压出来的Elasticsearch主目录

#启动Elasticsearch

./bin/elasticsearch

#如果遇到错误:max file descriptors [65535] for elasticsearch process is too low, increase to at least [65536]

vi /etc/security/limits.conf

#如果有 * soft nofile 65535 * hard nofile 65535 则将65535修改为65536,如果没有则在后面添加,注意此处的65535对应descriptors [65535]中的65535,修改后的值65536对应increase to at least [65536],所以当提示不一致时,需要根据具体的错误提示具体修改

#如果遇到错误: max virtual memory areas vm.max_map_count [65530] is too low, increase to at least [262144]

vi /etc/sysctl.conf
vm.max_map_count=262144
sysctl -p

#以上2个修改需要在root用户权限修改,如果是使用xshell开两个窗口的话修改完成之后一定要断开重新登录一下,启动成功用执行命令

curl 127.0.0.1:9200

#会得到类似以下json
{
  "name" : "dQIO4Ad",
  "cluster_name" : "elasticsearch",
  "cluster_uuid" : "P8KtmO3vQdactRW1jX9JnQ",
  "version" : {
    "number" : "6.2.4",
    "build_hash" : "ccec39f",
    "build_date" : "2018-04-12T20:37:28.497551Z",
    "build_snapshot" : false,
    "lucene_version" : "7.2.1",
    "minimum_wire_compatibility_version" : "5.6.0",
    "minimum_index_compatibility_version" : "5.0.0"
  },
  "tagline" : "You Know, for Search"
}
安装Kibana
wget https://artifacts.elastic.co/downloads/kibana/kibana-6.2.4-linux-x86_64.tar.gz

tar -zxvf kibana-6.2.4-linux-x86_64.tar.gz

vi config/kibana.yml

#添加以下配置或者取消注释并修改

elasticsearch.url: "http://localhost:9200"
server.host: "0.0.0.0"
kibana.index: ".kibana"

#其中elasticsearch.url为Elasticsearch的地址,server.host默认是localhost,如果只是本地访问可以默认localhost,如果需要外网访问,可以设置为0.0.0.0
启动Kibana

./bin/kibana
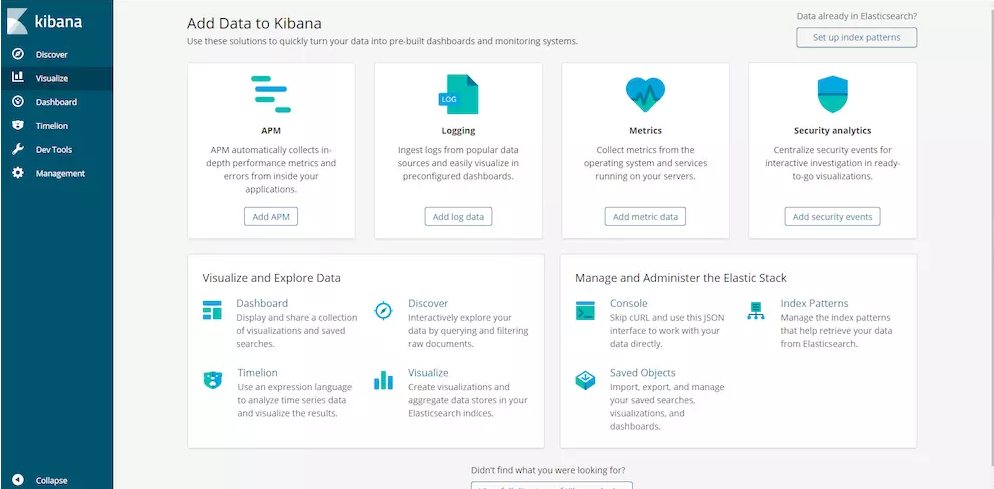
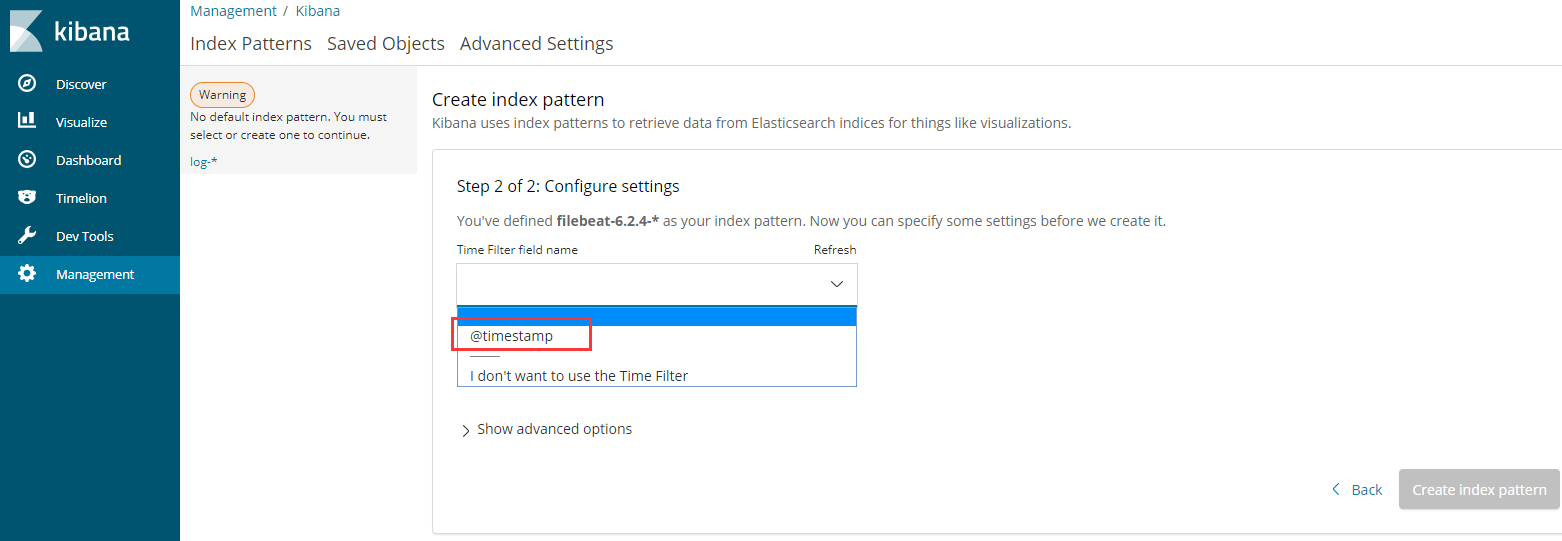
打开浏览器进入 http://127.0.0.1:5601 ,会出现如下页面
使用Filebeat收集Kubernetes的应用日志并发送到es
#制作docker镜像

#filebeat.yml
filebeat.prospectors:
- type: log
  enabled: true
  paths:
    - /logs/*.log #这里为读取日志目录的路径,应用程序也需要配置成相应的目录
  multiline:
    pattern: ^[0-9]{4}
    negate: true
    match: after
    timeout: 3s
filebeat.config.modules:
  path: ${path.config}/modules.d/*.yml
  reload.enabled: false
setup.template.settings:
  index.number_of_shards: 3
setup.kibana:
  host: "192.168.0.233:5601"
output.elasticsearch:
  hosts: ["192.168.0.233:9200"]

#自定义索引,配置关闭 ILM 即可解决Index Pattern不生效的问题
#setup.ilm.enabled: false
#setup.template.name: "nginx"
#setup.template.pattern: "nginx-*"

#Dockerfile
FROM elastic/filebeat:6.2.4
COPY ./filebeat.yml /usr/share/filebeat/filebeat.yml
USER root
RUN chown root:filebeat /usr/share/filebeat/filebeat.yml
USER filebeat

#执行命令
docker build --rm -t littlewrong/filebeat:6.2.4 .
docker push littlewrong/filebeat:6.2.4
创建pod,以应用filebeat进行日志收集
#twbpm.yml
apiVersion: apps/v1
kind: Deployment # 定义Kubernetes资源的类型为Deployment
metadata:
  name: tw.bpm # 定义资源的名称
  namespace: application
  labels:
    app: tw.bpm
spec:  # 定义资源的状态。
  replicas: 2 # 定义我们想运行多少个Pod,在这里我们希望运行2个
  selector:
    matchLabels: # 定义该部署匹配哪些Pod
      app: tw.bpm
  minReadySeconds: 5 # 可选,指定Pod可以变成可用状态的最小秒数,默认是0
  strategy: # 指定更新版本时,部署使用的策略
    type: RollingUpdate # 策略类型,使用RollingUpdate可以保证部署期间服务不间断
    rollingUpdate:
      maxUnavailable: 1 # 部署时最大允许停止的Pod数量(与replicas相比)
      maxSurge: 1 # 部署时最大允许创建的Pod数量(与replicas相比)
  template: # 用来指定Pod的模板,与Pod的定义类似
    metadata:
      labels: # 根据模板创建的Pod会被贴上该标签,与上面的matchLabels对应
        app: tw.bpm
    spec:
      containers:
        - name: web
          image: littlewrong/tw.bpm:1.0.20
          imagePullPolicy: Always # 默认是IfNotPresent,如果设置成Always,则每一次部署都会重新拉取容器映像(否则,如果本地存在指定的镜像版本,就不会再去拉取)
          ports:
            - containerPort: 8000
          volumeMounts:
            - name: twbpmshare
              mountPath: /share
            - name: app-bpmlogs
              mountPath: /logs
        - name: filebeat
          image: littlewrong/filebeat:6.2.4
          volumeMounts:
            - name: app-bpmlogs
              mountPath: /logs
      volumes:
        - name: twbpmshare
          flexVolume:
            driver: "fstab/cifs"
            fsType: "cifs"
            secretRef:
              name: "cifs-secret"
            options:
              networkPath: "//192.168.0.120/public"
              mountOptions: "dir_mode=0755,file_mode=0644,noperm"
        - name: app-bpmlogs
          emptyDir: {}
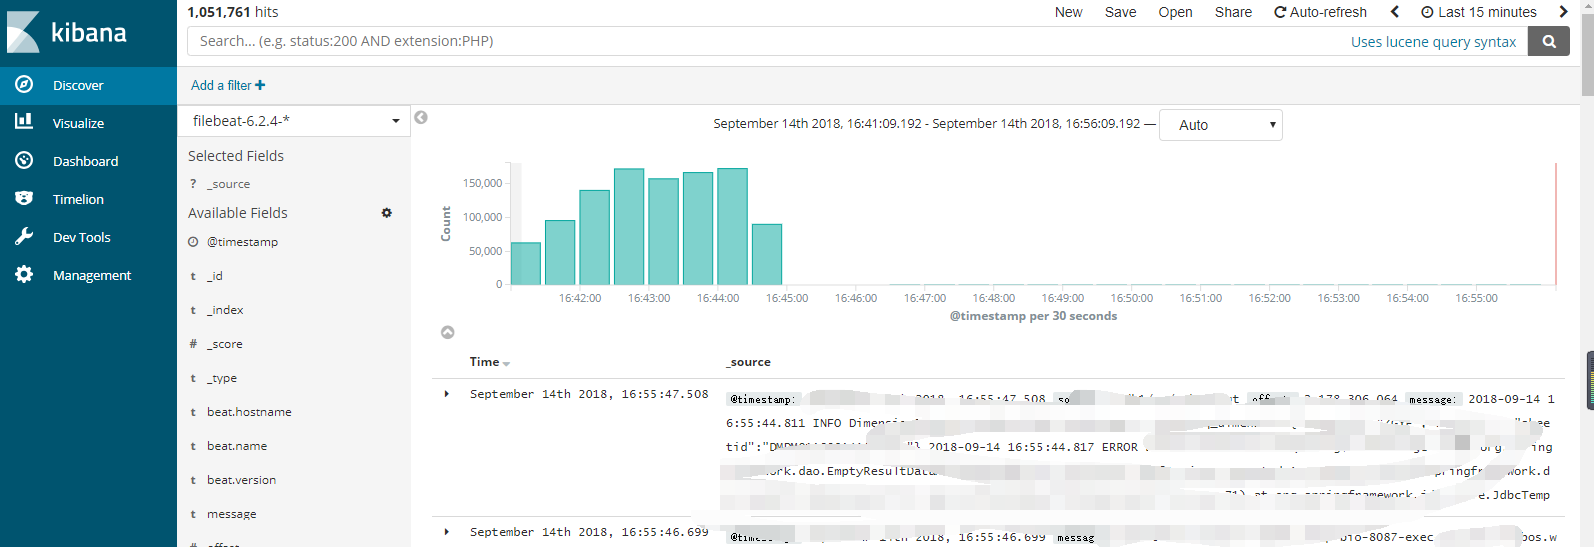
最后进入kibana中查看日志

六、常见场景
6.1、自动打包发布镜像
通过github的action可以实现代码的自动编译,打包,及发送到镜像仓库,流程如下图所示:

流程文件如下,当上传版本有tag为v开头的,则自动编译并上传到镜像仓库,最后由k8s进行编排更新。
name: Docker

# Controls when the workflow will run
on:
  # Triggers the workflow on push or pull request events but only for the master branch
  push:
    tags:
      - v*
env:
  # 设置 docker 镜像名
  IMAGE_NAME: tw.bpm

# A workflow run is made up of one or more jobs that can run sequentially or in parallel
jobs:
  # This workflow contains a single job called "build"
  push:
    runs-on: ubuntu-latest
    steps:
      - uses: actions/checkout@v2
      # 构建镜像,指定镜像名
      - name: Build image
        run: docker build . --file Dockerfile --tag $IMAGE_NAME
      # 登录到 dockerhub,使用 GitHub secrets 传入账号密码,密码被加密存储在 GitHub 服务器,添加方法见下图。
      - name: Log into registry
        run: echo "${{ secrets.ACCESS_TOKEN }}" | docker login --username ${{ secrets.ACCESS_TOKEN_NAME }} --password-stdin
      # 推送镜像
      - name: Push image
        run: |
          # 拼接镜像 id,这个镜像 id 就是在使用 docker 镜像时 pull 后面的名字。
          IMAGE_ID=${{ secrets.ACCESS_TOKEN_NAME }}/$IMAGE_NAME
          # 将所有的大写字母转为小写
          IMAGE_ID=$(echo $IMAGE_ID | tr '[A-Z]' '[a-z]')
          # 从 GitHub.ref 中取出版本
          VERSION=$(echo "${{ github.ref }}" | sed -e 's,.*/\(.*\),\1,')
          # 从 tag 名字中替换 v 字符
          [[ "${{ github.ref }}" == "refs/tags/"* ]] && VERSION=$(echo $VERSION | sed -e 's/^v//')
          # Use Docker `latest` tag convention
          [ "$VERSION" == "master" ] && VERSION=latest
          echo IMAGE_ID=$IMAGE_ID
          echo VERSION=$VERSION
          # 设置镜像 id 和版本号
          docker tag $IMAGE_NAME $IMAGE_ID:$VERSION
          # 进行 push
          docker push $IMAGE_ID:$VERSION
Dockerfile如下:
# 拉去3.1的SDK作为打包环境
FROM mcr.microsoft.com/dotnet/sdk:3.1 AS DOTNETCORE_BUILD
RUN apt-get update
RUN apt-get -y install libgdiplus
RUN apt-get -y install vim
RUN apt-get -y install net-tools
RUN apt-get -y install iputils-ping
RUN apt-get -y install telnet
RUN apt-get -y install procps
WORKDIR /build
# 将所有内容添加build目录
COPY . /build
# 执行打包
RUN dotnet publish -c Release -o /build/publish
EXPOSE 8000
WORKDIR /build/publish/
ENTRYPOINT ["dotnet","RoadFlow.WebApi.dll"]
七、安装与配置问题排查
7.1、docker常用命令
#进入容器
docker exec -ti 206b03a2d012 /bin/bash
1、删除容器

1)首先需要停止所有的容器
docker stop $(docker ps -a -q)
2)删除所有的容器(只删除单个时把后面的变量改为image id即可)
docker rm $(docker ps -a -q)
2、删除镜像
1)查看host中的镜像
docker images
2)删除指定id的镜像
docker rmi <image id>
想要删除untagged images,也就是那些id为的image的话可以用
docker rmi $(docker images | grep "^" | awk "{print $3}")
3)删除全部的images
docker rmi $(docker images -q)
3、当要删除的iamges和其他的镜像有关联而无法删除时

可通过 -f 参数强制删除
docker rmi -f $(docker images -q)

#编辑docker容器中的文件
一般docker中没有VI或者其它相应的文本编辑器,为了写个东西安装个vi就可以解决问题,除此之外还有别的办法
登陆docker中找到需要编辑的文件的位置
sudo docker ps -a
sudo docker exec -it xxx /bin/bash
通过docker cp把这个文件拷贝出来
docker cp 1f6009256500:/etc/apt/sources.list /
再拷贝回去
docker cp /sources.list 1f6009256500:/etc/apt/sources.list
docker cp /daemon.json 1f6009256500:/etc/docker/daemon.json
apt-get install vim

打tag
docker tag bookingapi localhost:8888/bookingapi
推送
docker push localhost:8888/bookingapi

编译运行:
docker build -t littlewrong/bpmapi .
docker run --name=bpmapi -p 8009:8000 -d  littlewrong/bpmapi

镜象搜索:
docker search Kubernetes-dashboard
docker iamges
docker ps -all-namespaces
7.2、kubernetes常用命令
查看错误:
kubectl describe pod istio-ingressgateway -n application
journalctl -f -u kubelet
kubectl logs tw.bpm-9588885ff --namespace=application

常用问题重启:
systemctl restart kubelet
systemctl restart docker

kubectl get pods --all-namespaces
kubectl get services --all-namespaces
kubectl create -f kubernetes-dashboard.yaml
kubectl delete -f kubernetes-dashboard.yamlping
kubectl delete pod bookingapi-deployment-666979889-5b9lk -n

systemctl restart kube-apiserver
systemctl restart etcd
systemctl restart kube-apiserver
systemctl restart kube-controller-manager
systemctl restart kube-scheduler
systemctl restart kube-proxy
systemctl daemon-reload
systemctl restart docker.service

systemctl restart kubelet
systemctl restart docker

进入pod容器:
kubectl exec -it tw.charge-565fdd6c77-qq4d2 -n application -- /bin/bash
kubectl exec -ti tw.charge-565fdd6c77-qq4d2 -n application -- /bin/sh
docker exec -ti 26e371e71f45 /bin/bash
apt-get update
apt-get install vim


强制删除pod:
kubectl delete pod bookingapi-5f96b5cbbb-29ghv  -n default --grace-period=0 --force
kubectl delete -f your_file.yaml -n istio-system --grace-period=0 --force


查看错误:
journalctl -f -u kubelet.service
journalctl -f -u kubelet
kubectl describe pod bpmapi-5b6ff5dc4c-56dq4 -n application
kubectl logs bpmapi-5b6ff5dc4c-56dq4 --namespace=application
7.3、istio常用命令
#安装指定插件
istioctl manifest apply --set addonComponents.egressGateways.enabled=true

istioctl manifest apply --set addonComponents.kiali.enabled=true

istioctl manifest apply --set values.pilot.traceSampling=0.1

istioctl install --set values.pilot.traceSampling=0.1

#打上注入标签
kubectl label namespace default istio-injection=enabled
#删除代理
kubectl label namespace default istio-injection-

istioctl kube-inject -f bookingapi-deployment.yaml | kubectl apply -f -
7.4、常见问题
发包后,读取生产环境的appsetting.json失败
FROM mcr.microsoft.com/dotnet/core/aspnet:3.1-buster-slim AS base
RUN apt-get update
RUN apt-get -y install libgdiplus
RUN apt-get -y install vim
RUN apt-get -y install net-tools
RUN apt-get -y install iputils-ping
RUN apt-get -y install telnet
RUN apt-get -y install procps
WORKDIR /app
COPY . .
EXPOSE 8000
ENTRYPOINT ["dotnet", "RoadFlow.WebApi.dll"]
#注意ENTRYPOINT的WORKDIR及当前目录
pod内部无法ping通或者访问外网或者外部服务
初始化kubernetes pod-network的IP千万不要和局域网的IP重合,否则会造成pod内网不通外网的情况,一定切记切记
另外特别注意--pod-network-cidr的网段必须和kube-flannel的网段地址要保持一样,否则也会造成pod内部IP不通的情况,最好设成默认的10.244.0.0/16
kubeadm init --kubernetes-version=v1.18.0 --service-cidr=10.1.0.0/16 --pod-network-cidr=10.244.0.0/16 --image-repository=registry.aliyuncs.com/google_containers --ignore-preflight-errors=all

另外需要注意防火墙需要关闭,因为防火墙的问题造成pod和pod,pod和外网之间的网络不通

iptables -F
iptables -X
iptables -P INPUT ACCEPT
iptables -P OUTPUT ACCEPT
iptables -P FORWARD ACCEPT

#永久生效
yum install iptables-services
service iptables save
istio init CrashLoopBackOff 和 istio-proxy CrashLoopBackOff 解决方法
kubectl logs tw.signalr-d898f9994-g7jgb istio-init
查看报误
[root@k8s-master ~]# lsmod |grep -E "ip_tables|iptable_filter"
iptable_filter         16384  0
ip_tables              28672  2 iptable_filter,iptable_nat

[root@k8s-master ~]# modprobe ip_tables
[root@k8s-master ~]# modprobe iptable_filter

[root@k8s-master ~]# lsmod |grep -E "ip_tables|iptable_filter"
iptable_filter         16384  0
ip_tables              28672  2 iptable_filter,iptable_nat
kubernetes configmap目录覆盖
k8s在对目录进行挂载后,其挂载的目录里的所有文件会被覆盖,需要指定 subPath 参数值。
.net core docker 镜像差8个小时,时区问题,增加以下两句话
ENV TZ=Asia/Shanghai
RUN ln -snf /usr/share/zoneinfo/$TZ /etc/localtime && echo $TZ > /etc/timezone
.net core 的语言包本地化设置,默认情况下,dotnet并没有任何语言包,在Dockerfile里增加以下两句话
RUN apt-get -y install locales locales-all
ENV LANG zh_CN.UTF-8
Unable to connect to the server: x509: certificate has expired or is not yet valid
1、备份
cp -r /etc/kubernetes/pki /etc/kubernetes/pki.backup
2、备份配置文件
mkdir -p /etc/kubernetes/back &&  cp *.conf   /etc/kubernetes/back
3、检查证书到期时间
kubeadm alpha certs check-expiration
4、更新证书
kubeadm alpha certs renew all
5、再次检查证书到期时间
kubeadm alpha certs check-expiration
6、更新用户凭证
cp /etc/kubernetes/admin.conf  ~/.kube/config
7、node节点凭证更新
把master /etc/kubernetes/admin.conf复制到node节点/etc/kubernetes/admin.conf,否则也会提示。
NetworkReady=false reason:NetworkPluginNotReady message:docker: network plugin is not ready: cni config uninitialized 或者报错:Unable to update cni config: no valid networks found in /etc/cni/net.d
执行ls /opt/cni/bin/命令,看是否有flannel这个文件,如果没有,就是有问题的,
手工复制flannel到/opt/cni/bin/文件夹,并添加执行权限 chmod +x /opt/cni/bin/flannel
八、结论
kubernetes+istio给我们提供了一个开箱即用的与开发语言无关的容器服务管理及治理平台,得益于强大的功能,使服务治理、运维及开发可以以一种较简单协调的方式落地实施。
九、参考文档
https://blog.csdn.net/hunyxv/article/details/92786490
https://blog.csdn.net/twingao/article/details/105382305
https://blog.csdn.net/codeex/article/details/86749817
https://istio.io/latest/zh/
https://kubernetes.io/zh/docs/home/
https://www.kubernetes.org.cn/2011.html
https://www.cnblogs.com/ajianboke/p/11275943.htmlwget https://artifacts.elastic.co/downloads/elasticsearch/elasticsearch-6.2.4.tar.gz

 浙公网安备 33010602011771号