OpenCV实战 | 手机镜头目标提取、缺陷检测与图像畸变校正
前两天参加了北师的数学建模校赛,B题是一道图像处理的题,于是趁机练习了一下OpenCV,现在把做的东西移植过来。
(2020.5.31补充:此方法在竞赛中取得二等奖。这次的参赛论文的确存在一些问题,例如没有对结果进行量化评估、对处理方式的具体细节叙述得不够明确、参考文献不够丰富(好吧,其实没有引用参考文献)等。)
题目大意
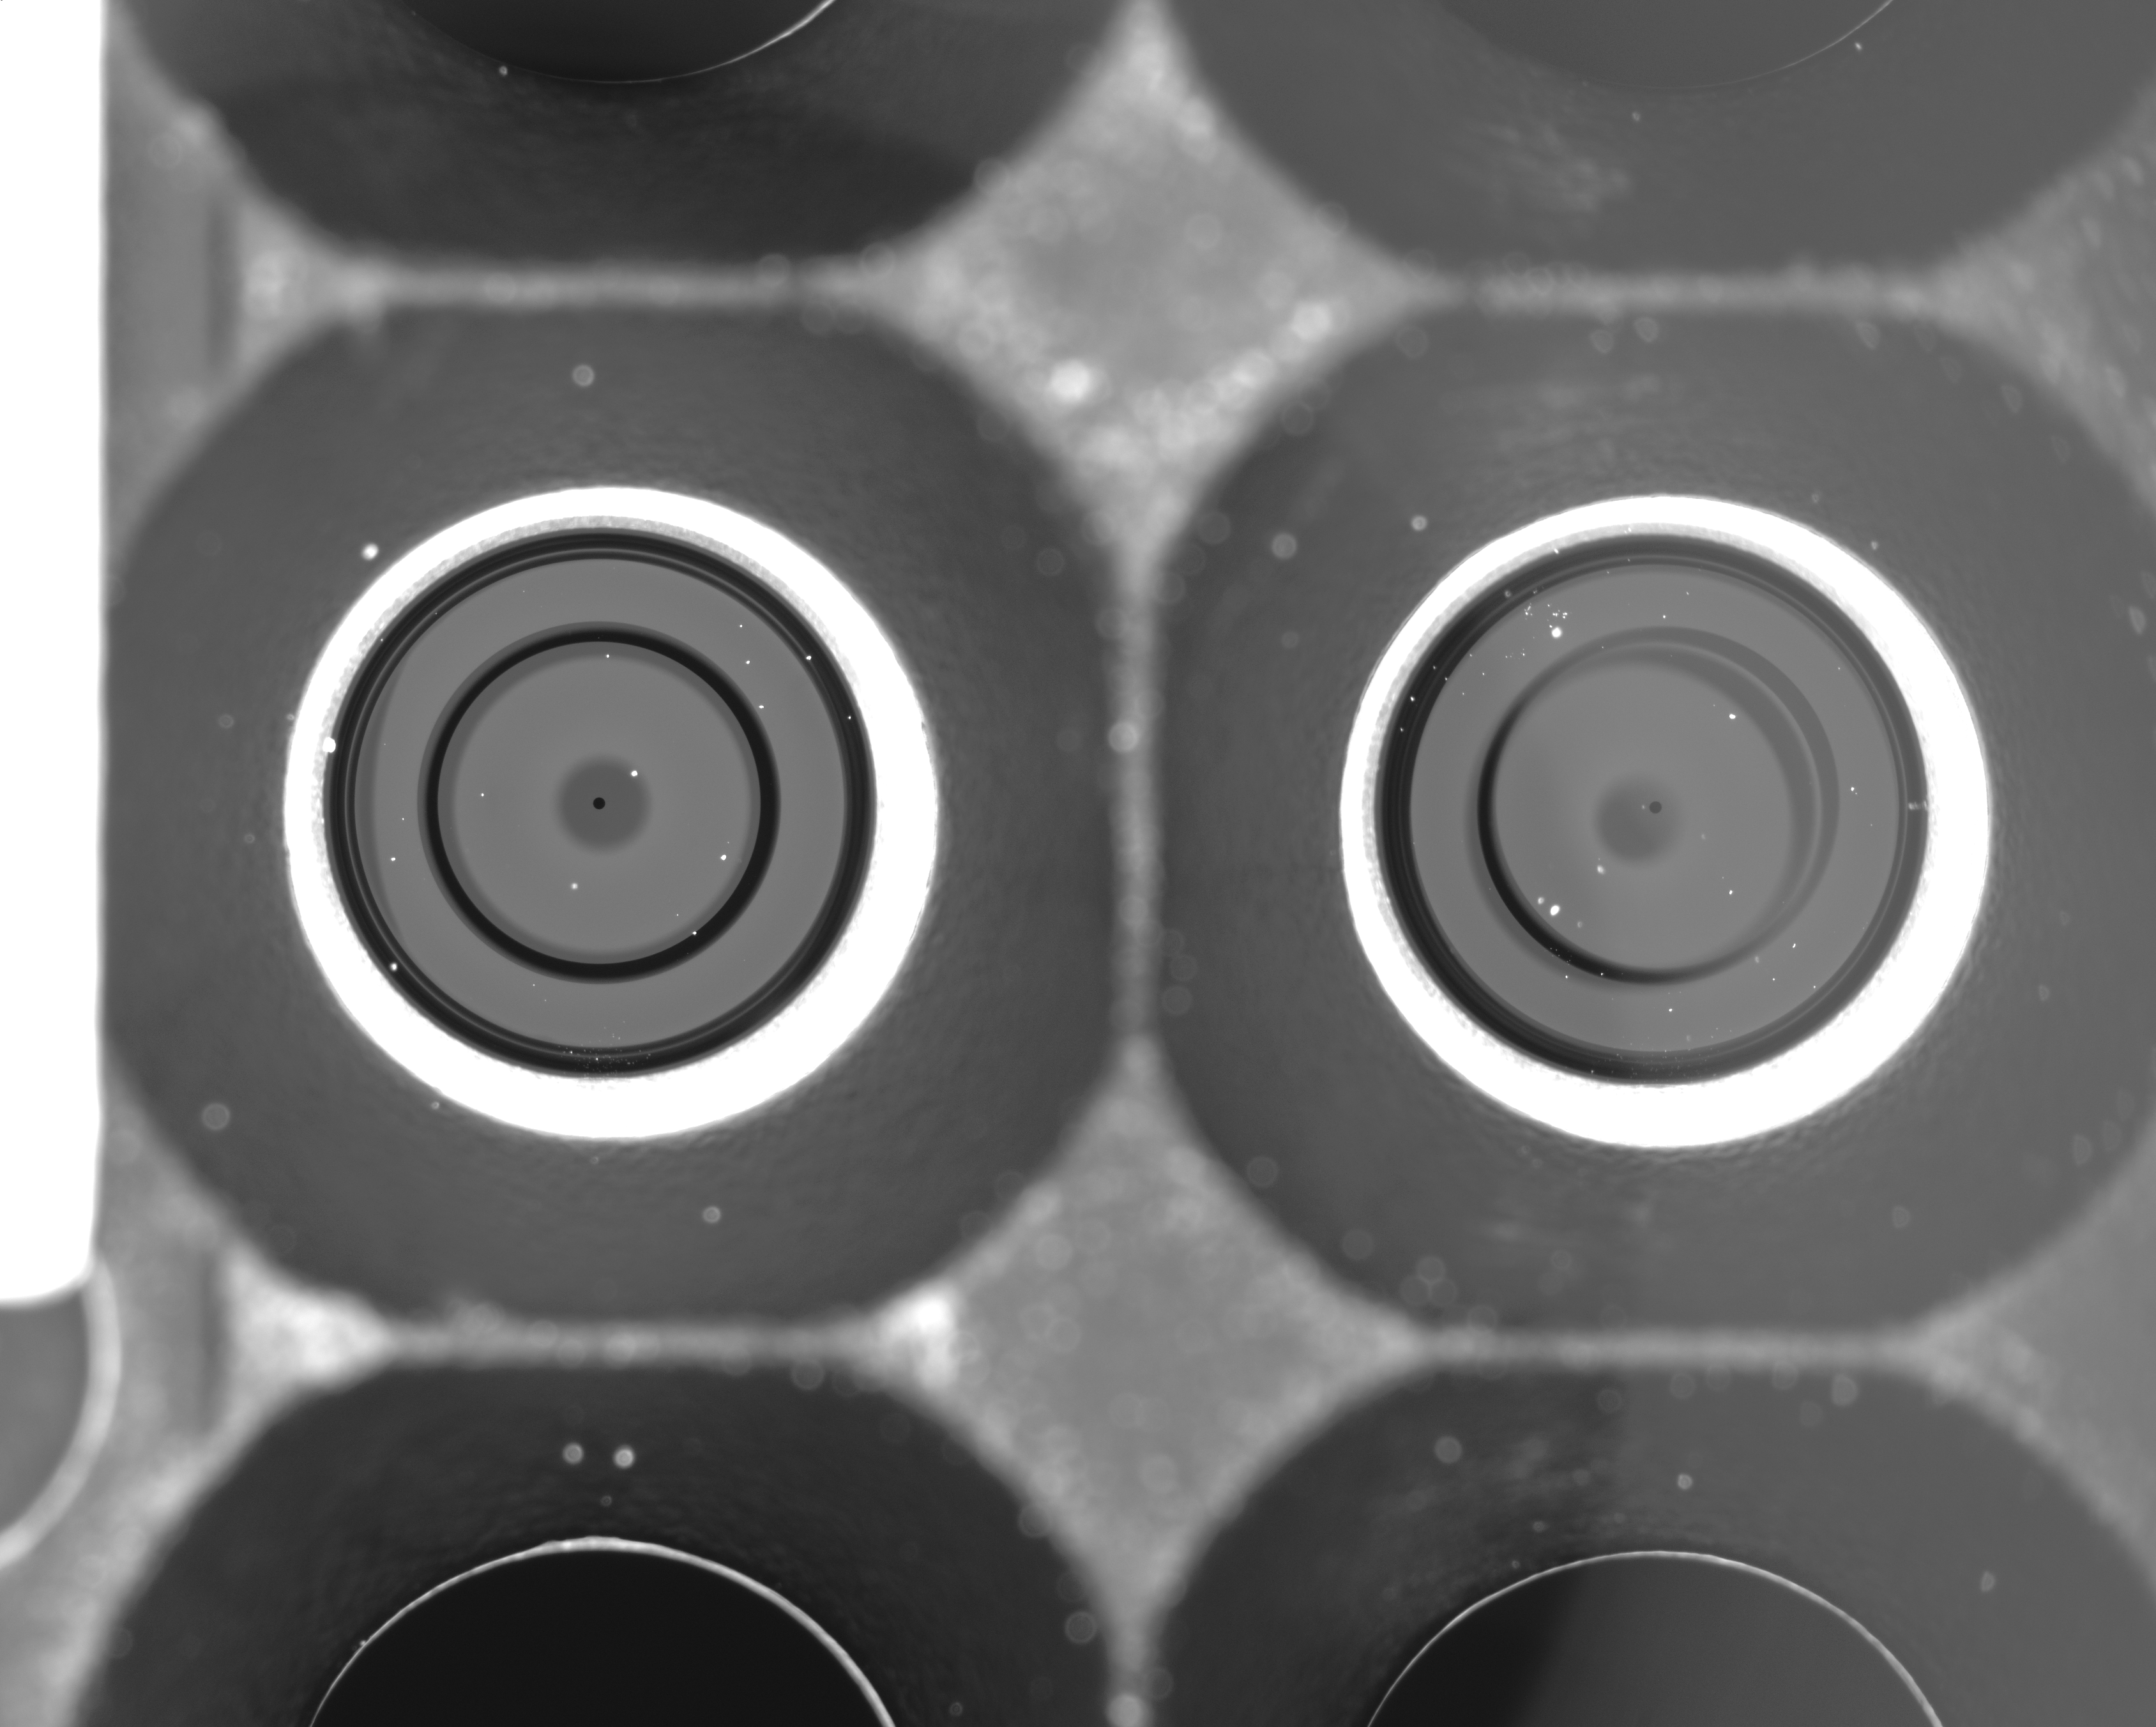
给出一张生产线上拍摄的手机镜头的图像(如下),要求解决三个问题:
- 建立模型构造出一种分割方法,可以将左右两个镜头的待测区域(白色环形内区域)准确地分离出来。
- 建立模型构造一种检测方法,自动地在待测区域之内将所有缺陷点找出,缺陷点为人眼可识别的白点,最小可为一个像素点。要求给出缺陷点的数学描述,并根据该描述建立检测模型,自动确定每个缺陷点的位置和像素大小。给出右侧镜头中按像素大小排序的最大的前五个缺陷点的位置坐标。
- 由于在实际拍照中镜头可能会在模具中抖动,所以拍摄的图片可能并不是正对镜头的,此为图像的偏心现象。比如图中左侧图像就是正对的情况,右侧就是不正对(偏心)的情况。建立模型构造一种校正方法,校正右侧图像的偏心现象。呈现校正效果,并给出第2问所求五个缺陷点校正后的位置坐标。
问题求解
问题一
这个问题是目标检测,并且需求十分明确:提取出白色圆环中的区域的图像。观察图像可以发现图中白色的部分几乎只有需要检测的白色圆环,其他的白色区域基本上都是不规则图形以及一些噪点。一种比较简单的处理方式是直接选取一个合适的阈值二值化,把除了需要的白色圆环之外的区域全部置位黑色。不过为了鲁棒性我们并没有使用这种简单粗暴的方式。
我们的预处理方法是二值化去除多余细节👉开运算去除噪点👉高斯滤波减小像素间梯度,完成预处理后再进行轮廓搜索。二值化采取了全局二值化,主要是在最大类间方差法(OTSU法)与三角形法两者之间进行选取,实验发现后者会使黑白区域边界模糊且曲折,并且很多白色噪点(第二问要检测)受到了干扰,因此选择了前者作为二值化方法。开运算的卷积核为20×20矩形卷积核,进行了一次效果就很好了。高斯滤波的直径(严格来说并不能叫做直径)经验性地确定为了5。预处理后的效果如下图所示。

预处理结束之后直接使用OpenCV内置的findContours()寻找边界,这个函数非常方便的一点是它可以根据轮廓之间的嵌套关系,对各个轮廓构造层次关系,函数原型为:
cv2.findContours(image, mode, method[, contours[, hierarchy[, offset ]]])其中的必要参数为:
- image:输入的图像
- mode:轮廓的检索模式,共有四种取值。
- cv2.RETR_EXTERNAL:只检索外轮廓。
- cv2.RETR_LIST:检索轮廓不建立层次关系。
- cv2.RETR_CCOMP:建立两层的层次关系(即父子关系),父轮廓为外轮廓,子轮廓为相应内孔。若内孔中还有内孔,则下一层的内孔作为另一个父轮廓。
- cv2.RETR_TREE:对轮廓建立等级树的层次关系。
- method:轮廓的逼近方法,共有四种取值。
- cv2.CHAIN_APPROX_NONE:储存所有轮廓点,相邻两个点的横纵坐标之差均不超过1。
- cv2.CHAIN_APPROX_SIMPLE:压缩水平方向,垂直方向,对角线方向的元素,只保留该方向的终点坐标,例如一个矩形轮廓只需4个点来保存轮廓信息。
- cv2.CHAIN_APPROX_TC89_L1和cv2.CHAIN_APPROX_TC89_KCOS都是使用teh-Chinl chain近似算法。
对于圆环来说直接选取CCOMP模式,图中的所有轮廓中只有圆环的外轮廓有子轮廓,从而找出所有的目标边界。根据此边界创建遮罩,再将遮罩与原图做按位与即可分割出目标图像。最后做出来的结果相当不错。(就不放在这里了,有兴趣的可以自己拿原图跑一下代码)


 1 '''
 2 * detection.py
 3 Runtime environment:
 4     python = 3.7.4
 5     opencv-python = 4.1.1.26
 6     numpy = 1.17.2
 7 '''
 8
 9 from cv2 import imread, IMREAD_GRAYSCALE, threshold, THRESH_BINARY, THRESH_OTSU,\
10     getStructuringElement, MORPH_RECT, erode, dilate, GaussianBlur, findContours,\
11     RETR_CCOMP, CHAIN_APPROX_SIMPLE, IMREAD_COLOR, drawContours, bitwise_and,\
12     imwrite
13 from numpy import zeros, shape, uint8
14
15 def detection():
16     original = imread('Original.png', IMREAD_GRAYSCALE)
17     _, binary = threshold(original, 0, 255, THRESH_BINARY | THRESH_OTSU)
18     imwrite('problem1_binary.png', binary)
19     kernel = getStructuringElement(MORPH_RECT, (20, 20))
20     eroded = erode(binary, kernel)
21     dilated = dilate(eroded, kernel)
22     blur = GaussianBlur(dilated, (5, 5), 0)
23     imwrite('problem1_preprocess.png', blur)
24     contours, hierarchies = findContours(blur, RETR_CCOMP, CHAIN_APPROX_SIMPLE)
25     chromatic = imread('Original.png', IMREAD_COLOR)
26     drawContours(chromatic, contours, -1, (0, 0, 255), 10)
27     imwrite('problem1_contours.png', chromatic)
28     chromatic = imread('Original.png', IMREAD_COLOR)
29     for hierarchy in hierarchies[0, :]:
30         if hierarchy[2] != -1:
31             drawContours(chromatic, contours, hierarchy[2], (255, 0, 255), 15)
32     imwrite('problem1_target_contours.png', chromatic)
33     chromatic = imread('Original.png', IMREAD_COLOR)
34     count = 0
35     for hierarchy in hierarchies[0, :]:
36         if hierarchy[2] != -1:
37             mask = zeros(shape(chromatic), dtype = uint8)
38             drawContours(mask, contours, hierarchy[2], (255, 255, 255), -1)
39             imwrite('mask' + str(count) + '.png', mask)
40             imwrite('detection' + str(count) + '.png', bitwise_and(chromatic, mask))
41             count += 1
42
43 if __name__ == '__main__':
44     detection()
问题二
检测缺陷点还要计算大小,这很明显是一个图搜索问题。把问题一预处理第一步,也就是二值化得到的图像与遮罩叠加,所需要搜索的缺陷点就都显现出来了。需要做的只是遍历图像中所有点,然后对每个点进行广度优先搜索就可以了。这个问题也比较顺利地解决了,唯一的缺点是遍历广搜运行起来有一点慢,要运行数十秒才能得到结果。
 1 '''
 2 Runtime environment:
 3     python = 3.7.4
 4     opencv-python = 4.1.1.26
 5     numpy = 1.17.2
 6 '''
 7
 8 from cv2 import imread, IMREAD_GRAYSCALE, threshold, THRESH_BINARY, THRESH_OTSU,\
 9     imwrite, bitwise_and, IMREAD_COLOR, circle
10 from numpy import shape, zeros, uint8
11
12 def findDefect():
13     original = imread('Original.png', IMREAD_GRAYSCALE)
14     _, binary = threshold(original, 0, 255, THRESH_BINARY | THRESH_OTSU)
15     mask = imread('mask0.png', IMREAD_GRAYSCALE)
16     target = bitwise_and(binary, mask)
17     imwrite('problem2_target.png', target)
18     flag = zeros(shape(target), dtype = uint8)
19     defects = []
20     for i in range(shape(target)[0]):
21         for j in range(shape(target)[1]):
22             if target[i][j] == 255 and flag[i][j] == 0:
23                 queue = []
24                 head, tail= 0, 0
25                 x, y = i, j
26                 queue.append(None)
27                 queue[head] = (x, y)
28                 flag[x][y] = 1
29                 head += 1
30                 while head > tail:
31                     if x > 0 and target[x - 1][y] == 255 and flag[x - 1][y] == 0:
32                         queue.append(None)
33                         queue[head] = (x - 1, y)
34                         flag[x - 1][y] = 1
35                         head += 1
36                     if y > 0 and target[x][y - 1] == 255 and flag[x][y - 1] == 0:
37                         queue.append(None)
38                         queue[head] = (x, y - 1)
39                         flag[x][y - 1] = 1
40                         head += 1
41                     if x < shape(target)[0] - 1 and target[x + 1][y] == 255 and flag[x + 1][y] == 0:
42                         queue.append(None)
43                         queue[head] = (x + 1, y)
44                         flag[x + 1][y] = 1
45                         head += 1
46                     if y < shape(target)[1] - 1 and target[x][y + 1] == 255 and flag[x][y + 1] == 0:
47                         queue.append(None)
48                         queue[head] = (x, y + 1)
49                         flag[x][y + 1] = 1
50                         head += 1
51                     (x, y) = queue[tail]
52                     tail = tail + 1
53                 size = len(queue)
54                 xsum, ysum = 0, 0
55                 for (x, y) in queue:
56                     xsum += x
57                     ysum += y
58                 defects.append((size, xsum // size, ysum // size))
59     defects.sort()
60     print(defects[::-1], len(defects))
61     print(defects[-5:])
62     return defects[-5:]
63
64 def visualize(defects):
65     original = imread('Original.png', IMREAD_COLOR)
66     for defect in defects:
67         circle(original, (defect[2], defect[1]), 10, (0, 0, 255), -1)
68     imwrite('defects.png', original)
69
70 if __name__ == '__main__':
71     defects = findDefect()
72     visualize(defects)
最后得到了116个缺陷点,虽然大多数都只有1~2个像素但不得不吐槽这个镜头的加工技术确实不太行。
问题三
这个问题是对镜头在模具内抖动造成的偏心畸变进行修正,再重新计算缺陷点坐标。修正畸变是本次各个问题中最为棘手的一个部分。查找了一下资料,偏心畸变是由于图像中目标的光轴与摄像机的光轴不重合造成的,这也是偏心畸变在英文中被称为decentering distortion的原因。在本问题中,大概是这样:
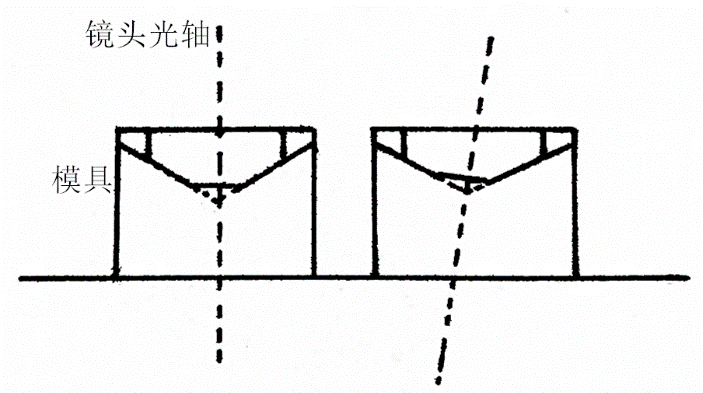
如果把镜头内表面看做圆锥面的话,偏心畸变的产生原因就是这个圆锥稍微“倒下”了一点。想要从几何上对齐进行修正,就要将这个圆锥“扶正”,具体方式是将圆锥面上的每个点都映射到另一个正立的圆锥上,使得其在母线上的位置比例关系不变。

如上图,这是从圆锥的底面看向顶点的视图。目标是将红色的圆锥母线映射到蓝色的圆锥母线上,在左图看来,就是对于圆O内任意一点P,连接O'P并延长交圆O于Q,连接OQ,在OQ上找到一点P'使得O'P/O'Q=OP'/OQ,P'即为所求。具体的公式推导就不推了,主要过程就是先将原坐标系中的坐标映射到这个圆O的坐标系中,得到目标点的坐标后再映射回去(因为线性代数很多都忘记了所以数学推导十分受苦QAQ)。最后的修正效果如下:
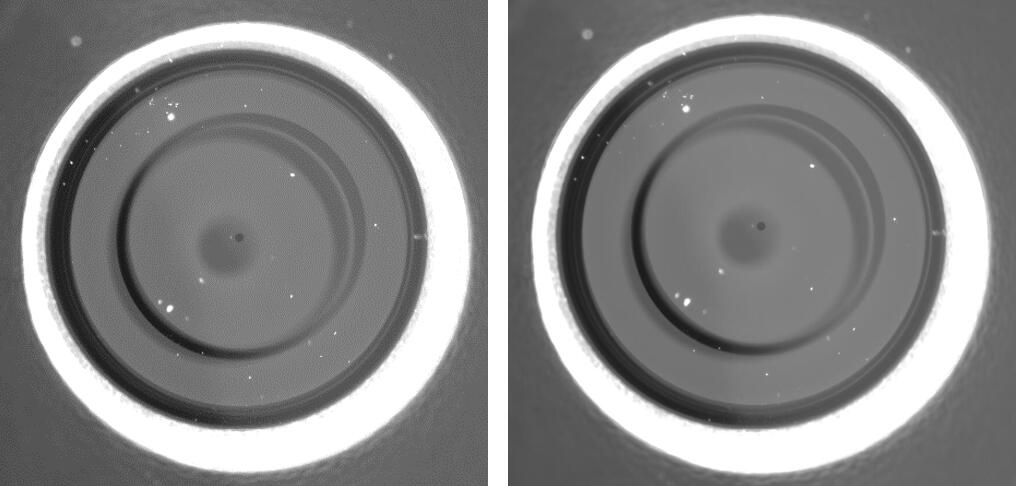
左图是修正前的原图,右图是修正后的图像。虽然直观上看并没有太大变化,但仔细观察中间的深色原点以及深灰色圆形阴影的位置,就可以看出整幅图像得到了一个从左下到右上的校正。最后的总体效果还是比较令人满意的,在新的图像上重复问题一、二的算法,问题即得解。
问题三的代码如下,主要有两部分,第一部分是求中间小的深色圆形阴影位置的代码,第二部分是进行畸变校正的代码(实现比较暴力,相应地运行效率也比较低)。
 1 '''
 2 * locating.py
 3 Runtime environment:
 4     python = 3.7.4
 5     opencv-python = 4.1.1.26
 6     numpy = 1.17.2
 7 '''
 8
 9 from cv2 import imread, IMREAD_GRAYSCALE, threshold, THRESH_OTSU, THRESH_BINARY,\
10     imshow, waitKey, imwrite, THRESH_TRIANGLE, adaptiveThreshold, ADAPTIVE_THRESH_MEAN_C,\
11     ADAPTIVE_THRESH_GAUSSIAN_C, HoughCircles, HOUGH_GRADIENT, circle,\
12     getStructuringElement, MORPH_RECT, erode, dilate, medianBlur, GaussianBlur,\
13     Canny, findContours, RETR_CCOMP, CHAIN_APPROX_SIMPLE, drawContours,\
14     IMREAD_COLOR, RETR_TREE, minEnclosingCircle
15 from numpy import uint16
16
17 if __name__ == '__main__':
18     original = imread('detection0.png', IMREAD_GRAYSCALE) # read original image as grayscale image
19     kernel = getStructuringElement(MORPH_RECT, (20, 20))
20     eroded = erode(original, kernel)
21     dilated = dilate(eroded, kernel)
22     dilated = dilate(dilated, kernel)
23     eroded = erode(dilated, kernel)
24     blur = GaussianBlur(eroded, (5, 5), 0)
25     original = blur
26     binary = adaptiveThreshold(original, 255, ADAPTIVE_THRESH_MEAN_C, THRESH_BINARY, 99, 2)
27     imwrite('adaptive_mean.png', binary) # save image adaptive mean method(loc.)
28     origin = imread('adaptive_mean.png', IMREAD_GRAYSCALE)
29     kernel = getStructuringElement(MORPH_RECT, (40, 40))
30     eroded = erode(origin, kernel)
31     dilated = dilate(eroded, kernel)
32     blur = GaussianBlur(dilated, (5, 5), 0)
33     origin = blur
34     contours, hierarchies = findContours(origin, RETR_TREE, CHAIN_APPROX_SIMPLE)
35     print(hierarchies)
36     chromatic = imread('Original.png', IMREAD_COLOR)
37     for i in range(len(hierarchies[0])):
38         if hierarchies[0][i][2] == -1:
39             break
40     length = len(contours[i])
41     (x0, y0), r = minEnclosingCircle(contours[i])
42     sum = [0, 0]
43     for k in contours[i]:
44         sum = sum + k
45     print(sum // length)
46     x, y = tuple(sum[0] // length)
47     circle(chromatic, (int(x0), int(y0)), 5, (0, 255, 0), -1)
48     circle(chromatic, (int(x0), int(y0)), int(r), (0, 255, 0), 10)
49     X, Y, R = (2585, 1270, 433)
50     circle(chromatic, (X, Y), 5, (0, 0, 255), -1)
51     circle(chromatic, (X, Y), R, (0, 0, 255), 10)
52     print(int(x0), int(y0), int(r))
53     print(X, Y, R)
54     imwrite('contours.png', chromatic)
 1 """
 2 * calibrate.py
 3 Runtime environment:
 4     python = 3.7.4
 5     opencv-python = 4.1.1.26
 6     numpy = 1.17.2
 7 """
 8
 9 from math import sqrt
10 from cv2 import imread, IMREAD_GRAYSCALE, imwrite, medianBlur
11 from numpy import shape
12
13
14 def dist(p1, p2):
15     r = (float(p1[0] - p2[0]) ** 2 + float(p1[1] - p2[1]) ** 2) ** 0.5
16     return r
17
18
19 def calibrate():
20     x, y, r = 2567.0, 1289.0, 63.0
21     x0, y0, r0 = 2585.0, 1270.0, 433.0
22     dist0 = dist((x, y), (x0, y0))
23     input_img = imread('Original.png', IMREAD_GRAYSCALE)
24     output = imread('Original.png', IMREAD_GRAYSCALE)
25     tan_theta = float(y - y0) / float(x0 - x)
26     sin_theta = tan_theta / sqrt(1 + tan_theta * tan_theta)
27     cos_theta = 1 / sqrt(1 + tan_theta * tan_theta)
28     sin_theta, cos_theta = sin_theta.real, cos_theta.real
29     for i in range(shape(input_img)[1]):
30         for j in range(shape(input_img)[0]):
31             original = (i, j)
32             if dist(original, (x0, y0)) < r0:
33                 neo = (cos_theta * float(i - x0) - sin_theta * float(j - y0),
34                        -sin_theta * float(i - x0) - cos_theta * float(j - y0))
35                 a = float(neo[1]) ** 2 + (float(neo[0]) + dist0) ** 2
36                 b = -2.0 * float(neo[1]) * dist0 * (float(neo[0]) + dist0)
37                 c = float(neo[1]) ** 2 * (dist0 ** 2 - r0 ** 2)
38                 delta = b ** 2 - 4 * a * c
39                 if delta < 0 or a == 0 or float(neo[1]) == 0:
40                     continue
41                 yr = (sqrt(delta) - b) / (2 * a)
42                 if (yr * float(neo[1])) < 0:
43                     yr = (0 - b - sqrt(delta)) / (2 * a)
44                 xr = ((float(neo[0]) + dist0) * yr / float(neo[1])) - dist0
45                 x2, y2 = xr / yr * float(neo[1]), float(neo[1])
46                 real = (cos_theta * x2 - sin_theta * y2 + x0, -sin_theta * x2 - cos_theta * y2 + y0)
47                 output[int(real[1])][int(real[0])] = input_img[int(original[1])][int(original[0])]
48     imwrite('problem3_after_mapping.png', output)
49     medianed = medianBlur(output, 3)
50     imwrite('Result3.png', medianed)
51
52
53 if __name__ == '__main__':
54     calibrate()
总结
虽然之前处理过一些图像处理问题但从来没有像这次一样完整地做一次题目,也没有深入地了解过各个运算的内在原理。这次的图像处理问题前两个比较基础,最后一个比较有挑战性,感觉对于学习OpenCV还是很有帮助的。

 浙公网安备 33010602011771号