

ansible之数据提取与Juniper实例演示
一、Ansible列表两种表达方式
基于YAML的列表
my_list:
    - a
    - b
    - c
    - d
基于Json格式的列表
{"my_list":[
    "a",
    "b",
    "c",
  ]
}
二、Ansible列表数据的提取方式
正向列表索引取值
每个列表里的元素,都存在位置,即索引号,可根据列表变量名[索引号]提取,如:my_list[2],取第3个元素,索引号从0开始
反向列表索引取值
每个列表里的元素,都存在位置,即索引号,反向取值可根据列表变量名[-索引号]提取,如:my_list[-2],取倒数第2个元素,反向索引号从-1开始,即代表最后一个元素
正反向切片取值
根据my_list[索引1:索引2],可取到索引1到索引2范围的元素,索引1不填则表示从索引0开始;索引2不填则默认取到最后一个元素
如:my_list=['a','b','c','d','e']
my_list[2:3]  #结果:['c','d'],从第3个元素开始,到第4个元素结尾,不包含第4个元素
my_list[:2]    #结果:['a','b','c'],从第1个元素开始,到第3个元素,不包含第3个元素
my_list[2:]    #结果:['c','d','e'],从第3个元素开始,到最后一个元素,包含最后一个元素
my_list[2:-1]    #结果:['c','d','e'],从第3个元素开始,到最后一个元素,不包含最后一个元素
三、Ansible字符串数据提取方式
字符串提取方法与上面列表一样
四、playbook两种方法输出dict字典内容
基于Jinja2格式输出
my_dict.key,    如my_dict={"a":'a1',"b":"b1"}
my_dict.a      #输出a1值
基于Python格式输出
my_dict[key],    如my_dict={"a":'a1',"b":"b1"}
my_dict["a"]    #输出值a1
五、案例
5.1 Juniper收集设备信息以及数据处理
 1.juniper初始化配置
2.ansible主控端:nano group_vars/junos.yaml
---
ansible_connection: local
ansible_network_os: junos
ansible_user: admin
ansible_ssh_pass: juniper123
3.ansible主控端:nano test_host文件
[junos]
junipervsrx junos_host=192.168.xx.xx
4.ansible主控端: nano 3_8_3_filter_junos_facts.yaml剧本
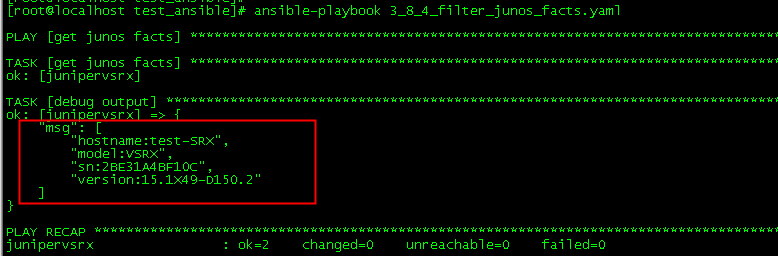
---

- name: get junos facts
  hosts: junipervsrx
  gather_facts: no
  roles:
    - Juniper.junos

  tasks:

   - name: get junos facts
     juniper_junos_facts:
       host: "{{junos_host}}"
     register: facts_result

   - name: debug output
     debug:
       msg: "hostname:{{ facts_result.ansible_facts.junos.hostname }},
            model:{{ facts_result.ansible_facts.junos.model }},
            sn:{{ facts_result.ansible_facts.junos.serialnumber }},
            version:{{ facts_result.ansible_facts.junos.version }}"
结果:


   - name: debug output
     debug:
       msg:
       - "hostname:{{ facts_result.ansible_facts.junos.hostname }}"
       - "model:{{ facts_result.ansible_facts.junos.model }}"
       - "sn:{{ facts_result.ansible_facts.junos.serialnumber }}"
       - "version:{{ facts_result.ansible_facts.junos.version }}"
结果2:
5.2 Juniper路由表信息收集
juniper初始化配置:
1.root%界面下输入cli
2.root>界面下输入configure,进入配置模式
3.root#界面下输入如下配置
  delete system autoinstallation
  set system host-name test-SRX
  set system root-authentication plain-text-password回车  #设置root密码
  输入密码juniper123
  set system login user admin class super-user  #新增用户admin,并具有所有权限
  set system login user admin authentication plain-text-password
  输入密码juniper123
  set system services ssh root-login allow  #开启ssh服务
  set system services netconf ssh port 830  #开启netconf服务承载在ssh,端口830
  set interfaces fxp0 unit 0 family inet address 192.168.3.20/24  #配置带外管理口fxp0地址
  commit  #提交变更
2.ansible主控端:nano group_vars/junos.yaml
---
ansible_connection: local
ansible_network_os: junos
ansible_user: admin
ansible_ssh_pass: juniper123
3.ansible主控端:nano test_host文件
[junos]
junipervsrx junos_host=192.168.xx.xx
4.ansible主控端: nano 3_8_3_filter_junos_facts.yaml剧本
---
- name: get junos routing table
  hosts: junos
  gather_facts: no
  roles:
    - Juniper.junos

  tasks:
    - name: get junos routes
      juniper_junos_command:
        commands:
          - "show route table inet.0"
        host: "{{junos_host}}"
      register: route_result

    - name: debug output
      debug:
        msg: "The subnet is {{route_result.stdout_lines[5][0:15]}},
             and the host route is: {{route_result.stdout_lines[7][0:16]}}"

 浙公网安备 33010602011771号