Spring基础知识
一 概述
1 使用Spring的好处
- Spring使开发人员能够使用POJO开发企业级应用程序(相对于EJB)
- Spring采用模块化方式组织。(需要哪些模块则引入即可)
- 使用Spring编写的应用程序很简单(因为依赖于环境的代码被移动到此框架中)
- Spring MVC是一个设计良好的Web MVC框架(用于替换Struts )
- Spring提供了一个方便的API,用于将特定于技术的异常(例如,JDBC,Hibernate或JDO抛出)转换为一致的,未经检查的异常。
- 轻量级IoC容器,有利于在具有有限内存和CPU资源的计算机上开发和部署应用程序。
- Spring提供了一致的事务管理接口.
2 依赖注入(DI)
- 依赖注入是控制反转的一个实现,控制反转是一种设计模式,减少代码之间的耦合。
- 依赖注入有三种方式
- 构造器注入
- 接口注入
- setter注入
- A依赖B,B注入A
classA{
    AInterface a;

    A(){}

    //一个方法
    AMethod() {
        a = new AInterfaceImp();
    }
}

// 当AInterface有一个新的实现希望使用,那么需要改变classA的代码

// 构造器注入
classA{
    AInterface a;

    A(AInterface a){
        this.a = a;
    }
}

// setter注入
classA{
    AInterface a;

    A(){}

    public void setA(AInterface a){
        this.a = a;
    }
}
3 面向切面编程(AOP)
- 跨越应用程序多个点的功能称为跨领域问题,这些跨领域问题在概念上与应用程序的业务逻辑分离。 各方面有各种常见的良好示例,包括日志记录,声明式事务,安全性,缓存等。
- OOP中模块化的关键单元是类,而在AOP中,模块化单元是方面。
- DI帮助您将应用程序对象彼此分离,而AOP可帮助您将交叉问题与它们所影响的对象分离。
- Spring Framework的AOP模块提供了面向方面的编程实现,允许您定义方法拦截器和切入点,以便干净地解耦实现应该分离的功能的代码。
二 架构
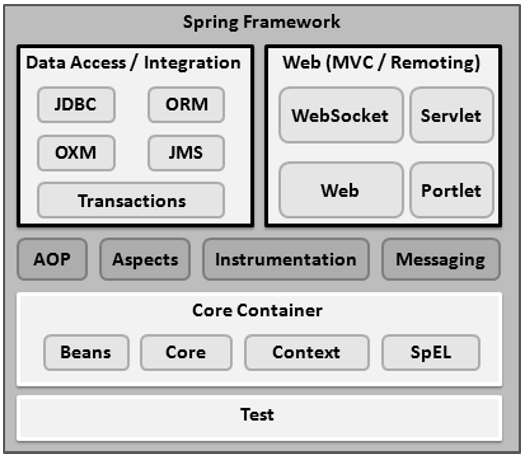
1 核心容器
-
Core模块提供了框架的基本部分,包括IoC和依赖注入功能。
-
Bean模块提供BeanFactory,它是工厂模式的复杂实现
-
Context模块建立在Core和Beans模块提供的坚实基础之上,它是访问定义和配置的任何对象的媒介。 ApplicationContext接口是Context模块的焦点。
-
SpEL模块提供了一种强大的表达式语言,用于在运行时查询和操作对象图。
2 数据访问/集成
- JDBC:提供了JDBC抽象层,无需冗长的JDBC相关编码
- ORM:为流行的对象关系映射API提供集成层,包括JPA,JDO,Hibernate和MyBatis。
- JMS:用于生成和使用消息的功能。
- Transaction:支持对实现特殊接口和所有POJO的类进行编程和声明式事务管理
3 Web
- Web模块提供基本的面向Web的集成功能,例如多部分文件上载功能以及使用servlet侦听器和面向Web的应用程序上下文初始化IoC容器。
- Web-MVC模块包含用于Web应用程序的Spring的模型 - 视图 - 控制器(MVC)实现。
- Web-Socket模块支持Web应用程序中客户端和服务器之间基于WebSocket的双向通信。
4 其余
- AOP模块提供面向方面的编程实现,允许您定义方法拦截器和切入点,以干净地解耦实现应该分离的功能的代码。
- Aspects模块提供与AspectJ的集成,后者又是一个功能强大且成熟的AOP框架。
- Instrumentation模块提供了在某些应用程序服务器中使用的类检测支持和类加载器实现。
- Messaging模块提供对STOMP的支持,作为在应用程序中使用的WebSocket子协议。它还支持用于从WebSocket客户端路由和处理STOMP消息的注释编程模型。
- Test模块支持使用JUnit或TestNG框架测试Spring组件。
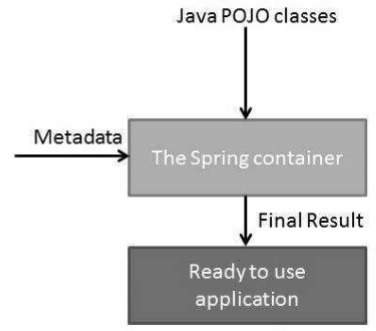
三 IOC容器
Spring容器是Spring Framework的核心。 容器将创建对象,将它们连接在一起,配置它们,并管理从创建到销毁的整个生命周期。 Spring容器使用DI来管理组成应用程序的组件。
容器通过读取提供的配置元数据来获取有关要实例化,配置和组装的对象的指令。 配置元数据可以由XML,Java注释或Java代码表示。Spring IoC容器利用Java POJO类和配置元数据来生成完全配置和可执行的系统或应用程序。
Spring提供两种不同的容器
| No | 容器和描述 |
|---|---|
| 1 | 这是提供DI基本支持的最简单容器,由org.springframework.beans.factory.BeanFactory接口定义。 BeanFactory和相关的接口,如BeanFactoryAware,InitializingBean,DisposableBean,仍然存在于Spring中,目的是向后兼容与Spring集成的大量第三方框架 |
| 2 | 此容器添加了更多特定于企业的功能,例如从属性文件解析文本消息的功能以及将应用程序事件发布到感兴趣的事件侦听器的功能。 此容器由org.springframework.context.ApplicationContext接口定义。 |
注:ApplicationContext包含BeanFactory的所有功能。
四 Bean定义
1 概述
构成应用程序主干并由Spring IoC容器管理的对象称为bean。 bean是一个由Spring IoC容器实例化,组装和管理的对象。 这些bean是使用您提供给容器的配置元数据创建的。
| No | 配置和描述 |
|---|---|
| 1 | class 此属性是必需的,并指定创建的bean类型 |
| 2 | name 此属性唯一地指定bean标识符 |
| 3 | scope 指定bean的作用范围,默认为singleton、prototype..... |
| 4 | constructor-arg 用于注入依赖项 |
| 5 | properties 用于注入依赖项 |
| 6 | autowiring mode 用于注入依赖项 |
| 7 | lazy-initialization mode 在第一次请求时创建bean实例,不是在启动时创建 |
| 8 | initialization method 在容器设置了bean之后所有必要属性之后调用的回调。 |
| 9 | destruction method 当包含bean的容器被销毁时使用的回调。 |
2 Spring元配置格式
- XML方式
- 注解方式
- Java类方式
<?xml version = "1.0" encoding = "UTF-8"?>

<beans xmlns = "http://www.springframework.org/schema/beans"
   xmlns:xsi = "http://www.w3.org/2001/XMLSchema-instance"
   xsi:schemaLocation = "http://www.springframework.org/schema/beans
   http://www.springframework.org/schema/beans/spring-beans-3.0.xsd">

   <!-- 简单类定义 -->
   <bean id = "..." class = "...">
      <!-- 这个bean的协作者和配置就在这里 -->
   </bean>

   <!-- 懒加载模式 -->
   <bean id = "..." class = "..." lazy-init = "true">
      <!-- 这个bean的协作者和配置就在这里 -->
   </bean>

   <!-- 配置初始化方法 -->
   <bean id = "..." class = "..." init-method = "...">
      <!-- 这个bean的协作者和配置就在这里 -->
   </bean>

   <!-- 配置销毁方法 -->
   <bean id = "..." class = "..." destroy-method = "...">
      <!-- 这个bean的协作者和配置就在这里 -->
   </bean>
</beans>
五 Bean的作用域
| No | 作用域与描述 |
|---|---|
| 1 | singlton 单例(默认) |
| 2 | prototype 多例 |
| 3 | request HTTP请求。(web) |
| 4 | session HTTP会话。(web) |
| 5 | global-session 全局HTTP会话(web) |
(1)单例
@Component
public class SingletonBean {
    private String message;

    public void setMessage(String msg) {
        this.message = msg;
    }

    public void print() {
        System.out.println(message);
    }
}

@Component
public class SpringContextUtil implements ApplicationContextAware {
    private static ApplicationContext context = null;

    @Override
    public void setApplicationContext(ApplicationContext applicationContext)
            throws BeansException {
        this.context = applicationContext;
    }

    public static <T> T getBean(String beanName) {
        return (T) context.getBean(beanName);
    }
}

@SpringBootApplication
public class MainApplication {
    public static void main(String[] args) {
        SpringApplication.run(MainApplication.class, args);
         SingletonBean singletonBean = SpringContextUtil.getBean("singletonBean");
        singletonBean.setMessage("singleton");
        singletonBean.print(); // singleton
        SingletonBean singletonBean2 = SpringContextUtil.getBean("singletonBean");
        singletonBean2.print();// singleton
    }
}
(2)多例
@Component
@Scope("prototype")
public class PrototypeBean {
    private String message;

    public void setMessage(String msg) {
        this.message = msg;
    }

    public void print() {
        System.out.println(message);
    }
}

@SpringBootApplication
public class MainApplication {
    public static void main(String[] args) {
        SpringApplication.run(MainApplication.class, args);
        PrototypeBean prototypeBean = SpringContextUtil.getBean("prototypeBean");
        prototypeBean.setMessage("prototype");
        prototypeBean.print();// prototype
        PrototypeBean prototypeBean2 = SpringContextUtil.getBean("prototypeBean");
        prototypeBean2.print();// null
    }
}
六 Bean的生命周期
Spring bean的生命周期很容易理解。 实例化bean时,可能需要执行一些初始化以使其进入可用状态。 类似地,当不再需要bean并将其从容器中移除时,可能需要进行一些清理。
@Component
public class LifeCycleBean implements InitializingBean,DisposableBean {
    @Value("${lifecycle.message}")
    private String message;  // 构造方法后message才有值

    public void print() {
        System.out.println(message);
    }

	// 1
    public LifeCycleBean() {
        System.out.println("Constructor");
    }

    // 2
    @PostConstruct
    public void init(){
        System.out.println("@PostConstruct");
    }

    // 3
    @Override
    public void afterPropertiesSet() throws Exception {
        System.out.println("implements InitializingBean");
    }

    // 4
    @PreDestroy
    public void preDestory(){
        System.out.println("@PreDestroy");
    }

    // 5
    @Override
    public void destroy() throws Exception {
        System.out.println("implements DisposableBean");
    }
}
七 Bean后处理器
(1)概述
BeanPostProcessor接口定义了您可以实现的回调方法,以提供您自己的实例化逻辑,依赖关系解析逻辑等。您还可以在Spring容器通过插入一个或多个实例化,配置和初始化bean之后实现一些自定义逻辑 BeanPostProcessor实现。
您可以配置多个BeanPostProcessor接口,您可以通过设置订单属性来控制这些BeanPostProcessor接口的执行顺序,前提是BeanPostProcessor实现了Ordered接口。
BeanPostProcessors在bean(或对象)实例上运行,这意味着Spring IoC容器实例化一个bean实例,然后BeanPostProcessor接口完成它们的工作。
ApplicationContext自动检测使用BeanPostProcessor接口的实现定义的任何bean,并将这些bean注册为后处理器,然后在创建bean时由容器适当调用。
// 注意该类作用于所有的Spring Bean
@Component
public class BeanPostProcessors implements BeanPostProcessor,Ordered  {
    // 2
    @Override
    public Object postProcessBeforeInitialization(Object bean, String beanName) throws BeansException {
        if (beanName.equals("lifeCycleBean"))
            System.out.println("postProcessBeforeInitialization " + beanName);
        return bean;
    }

    // 5
    @Override
    public Object postProcessAfterInitialization(Object bean, String beanName) throws BeansException {
        if (beanName.equals("lifeCycleBean"))
            System.out.println("postProcessAfterInitialization " + beanName);
        return bean;
    }

    @Override
    public int getOrder() { return 1; }
}

@Component
public class LifeCycleBean implements InitializingBean,DisposableBean {
    @Value("${lifecycle.message}")
    private String message;  // 构造方法后message才有值

    public void print() {
        System.out.println(message);
    }

	// 1
    public LifeCycleBean() {
        System.out.println("Constructor");
    }

    // 3
    @PostConstruct
    public void init(){
        System.out.println("@PostConstruct");
    }

    //4
    @Override
    public void afterPropertiesSet() throws Exception {
        System.out.println("implements InitializingBean");
    }

    // 6
    @PreDestroy
    public void preDestory(){
        System.out.println("@PreDestroy");
    }

    // 7
    @Override
    public void destroy() throws Exception {
        System.out.println("implements DisposableBean");
    }
}
(2)加上BeanPostProcessor后的整体顺序:
- Construtor
- BeanPostProcessor.postProcessBeforeInitialization()
- @PostConstrutor
- InitializingBean.afterPropertiesSet()
- BeanPostProcessor.postProcessAfterInitialization()
- DisposableBean.destory()
(3)多个BeanPostProcessor顺序
实现Ordered并设定顺序值
@Component
public class BeanPostProcessors2 implements BeanPostProcessor,Ordered {
    @Override
    public Object postProcessBeforeInitialization(Object bean, String beanName) throws BeansException {
        if (beanName.equals("lifeCycleBean"))
            System.out.println("postProcessBeforeInitialization2 " + beanName);
        return bean;
    }

    @Override
    public Object postProcessAfterInitialization(Object bean, String beanName) throws BeansException {
        if (beanName.equals("lifeCycleBean"))
            System.out.println("postProcessAfterInitialization2 " + beanName);
        return bean;
    }

    @Override
    public int getOrder() { return 2; }
}
八 Bean定义继承
bean定义可以包含许多配置信息,包括构造函数参数,属性值和特定于容器的信息,例如初始化方法,静态工厂方法名称等。
子类bean定义从父定义继承配置数据。子定义可以根据需要覆盖某些值或添加其他值。
Spring Bean定义继承与Java类继承无关,但继承概念是相同的。 您可以将父bean定义定义为模板,其他子bean可以从父bean继承所需的配置。
使用基于XML的配置元数据时,可以使用parent属性指定子bean定义,并将父bean指定为此属性的值。
<!-- app-conf-1.xml -->
<?xml version="1.0" encoding="UTF-8"?>
<beans xmlns="http://www.springframework.org/schema/beans"
    xmlns:xsi="http://www.w3.org/2001/XMLSchema-instance"
    xsi:schemaLocation="http://www.springframework.org/schema/beans
        http://www.springframework.org/schema/beans/spring-beans.xsd">

    <bean id="animal" class="com.concretepage.Animal" init-method="initA">
    	<property name="name" value="Hathi"/>
    	<property name="age" value="20"/>
    </bean>

    <bean id="elephant" class="com.concretepage.Elephant" parent="animal" init-method="initE">
    	<property name="age" value="30"/>
    	<property name="location" value="Varanasi"/>
    </bean>
</beans>
<!-- 注意目前不知道如何使用注解替代:parent 和 abstract -->
public class Animal {
	private String name;
	private Integer age;
	public void initA() {
		System.out.println("Inside initA()");
	}
	public Integer getAge() {
		return age;
	}
	public void setAge(Integer age) {
		this.age = age;
	}
	public String getName() {
		return name;
	}
	public void setName(String name) {
		this.name = name;
	}
}

public class Elephant extends Animal {
	private String location;
	public void initE() {
		System.out.println("Inside initE()");
	}
	public String getLocation() {
		return location;
	}
	public void setLocation(String location) {
		this.location = location;
	}
}

public class SpringDemo {
	public static void main(String[] args) {
		AbstractApplicationContext  context = new ClassPathXmlApplicationContext("app-conf-1.xml");
		Elephant elephant=(Elephant)context.getBean("elephant");
		System.out.println(elephant.getLocation()); // Varanasi
		System.out.println(elephant.getName()); // Hathi
		System.out.println(elephant.getAge()); // 30
    	context.registerShutdownHook();
	}
}
九 依赖注入
(1)构造器注入和Setter注入
public class TextEditor {
   private SpellChecker spellChecker;

   public TextEditor(SpellChecker spellChecker) {
      this.spellChecker = spellChecker;
   }

   public void setSpellChecker(SpellChecker spellChecker) {
      this.spellChecker = spellChecker;
   }
}

@Configuration
@Import(ConfigA.class) // 注入
public class Config{
    // 方式1:构造器注入
    @Bean
    public TextEditor textEditor(){
        return new TextEditor(spellChecker());
    }

    // 方式2:setter注入
    @Scope("prototype")
    @Bean(initMethod = "init", destroyMethod = "cleanup")
    public TextEditor textEditor(){
        TextEditor textEditor = new TextEditor();
        textEditor.setSpellChecker(spellChecker());
        return textEditor;
    }

    @Bean
    public SpellChecker spellChecker(){
        return new SpellChecker();
    }
}
(2)自动注入
// 默认第一种方式最简单,无需写构造器和setter方法
@Component
public class TextEditor {
   @Autowired // 方式一
   private SpellChecker spellChecker;

   @Autowired // 方式二
   @Qualifier("spellChecker") // 根据名称指定
   public TextEditor(SpellChecker spellChecker) {
      this.spellChecker = spellChecker;
   }

   // 方式二 JSR-250
   @Resource(name = "spellChecker")
   public TextEditor(SpellChecker spellChecker) {
      this.spellChecker = spellChecker;
   }

   @Autowired // 方式三
   public void setSpellChecker(SpellChecker spellChecker) {
      this.spellChecker = spellChecker;
   }
}
十 注入集合
// 数组
@Value("${name.list}")
private String[] names;

// 列表
@Value("#{T(java.util.Arrays).asList('${name.list:a,b,c}')}")
private List<String> list;

// 列表
@Value("${name.list}")
private List<String> names;

// Set
@Value("${name.list}")
private Set<String> names; // LinkedHashSet

// map
@Value("#{${valuesMap}}")
private Map<String, Integer> valuesMap;

// map.get(key):key不存在时报错
@Value("#{${valuesMap}.key1}")
private Integer valuesMapKey1;

// 安全方式不会报错,设置为null(默认值)
@Value("#{${valuesMap}['unknownKey']}")
private Integer unknownMapKey;

// 设置默认值
@Value("#{${unknownMap : {key1: '1', key2: '2'}}}")
private Map<String, Integer> unknownMap;

@Value("#{${valuesMap}['unknownKey'] ?: 5}")
private Integer unknownMapKeyWithDefaultValue;

// 过滤
@Value("#{${valuesMap}.?[value>'1']}")
private Map<String, Integer> valuesMapFiltered;

@Value("#{systemProperties}")
private Map<String, String> systemPropertiesMap;

// application.properties
name.list=d,e,f
valuesMap={key1: '1', key2: '2', key3: '3'}
十一 Spring的事件处理
您已经在所有章节中看到Spring的核心是ApplicationContext,它管理bean的完整生命周期。 ApplicationContext在加载bean时发布某些类型的事件。 例如,在启动上下文时发布ContextStartedEvent,并在上下文停止时发布ContextStoppedEvent。
ApplicationContext中的事件处理是通过ApplicationEvent类和ApplicationListener接口提供的。 因此,如果bean实现了ApplicationListener,那么每次将ApplicationEvent发布到ApplicationContext时,都会通知该bean。
| No | Spring内置事件 |
|---|---|
| 1 | ContextRefreshedEvent 在初始化或刷新ApplicationContext时发布此事件。这也可以使用ConfigurableApplicationContext接口上的refresh()方法引发。 |
| 2 | ContextStartedEvent 使用ConfigurableApplicationContext接口上的start()方法启动ApplicationContext时,将发布此事件。您可以轮询数据库,也可以在收到此事件后重新启动任何已停止的应用程序。 |
| 3 | ContextStoppedEvent 使用ConfigurableApplicationContext接口上的stop()方法停止ApplicationContext时,将发布此事件。收到此活动后,您可以进行必要的清理工作。 |
| 4 | ContextClosedEvent 使用ConfigurableApplicationContext接口上的close()方法关闭ApplicationContext时,将发布此事件。封闭的环境达到其生命的终点;它无法刷新或重新启动。 |
| 5 | RequestHandledEvent 这是一个特定于Web的事件,告诉所有bean已经为HTTP请求提供服务。 |
public static void main(String[] args) {
        ConfigurableApplicationContext context = SpringApplication.run(MainApplication.class, args);
        context.start(); // 发出ContextStartedEvent事件
        context.stop(); // 发出ContextStoppedEvent事件
}

@Component
public class SpringEventListener {
    // 1
    @EventListener
    public void contextRefreshedEvent(ContextRefreshedEvent event) {
        System.out.println("ContextRefreshedEvent "+event);
    }
    // 2
    @EventListener
    public void contextStartedEvent (ContextStartedEvent event) {
        System.out.println("ContextStartedEvent  "+event);
    }
    // 3
    @EventListener
    public void contextStoppedEvent (ContextStoppedEvent event) {
        System.out.println("ContextStoppedEvent  "+event);
    }
    // 4
    @EventListener
    public void contextClosedEvent (ContextClosedEvent event) {
        System.out.println("ContextClosedEvent  "+event);
    }
}
十二 自定义Spring事件
public class CustomEvent extends ApplicationEvent {
    public CustomEvent(Object source) {
        super(source);
    }

    public String toString(){
        return "My Custom Event";
    }
}

@Component
public class CustomPublisher implements ApplicationEventPublisherAware {
    private ApplicationEventPublisher publisher;

    @Override
    public void setApplicationEventPublisher(ApplicationEventPublisher applicationEventPublisher) {
        this.publisher = applicationEventPublisher;
    }

    public void publish() {
        CustomEvent ce = new CustomEvent(this);
        publisher.publishEvent(ce);
    }
}

// 方式1
@Component
public class CustomEventHandler implements ApplicationListener<CustomEvent> {
    @Override
    public void onApplicationEvent(CustomEvent event) {
        System.out.println(event);
    }
}

// 方式2
@Component
public class CustomEventListener {

    @EventListener
    public void listen(CustomEvent customEvent) {
        System.out.println(customEvent);
    }
}

@SpringBootApplication
public class MainApplication {

     public static void main(String[] args) {
        ConfigurableApplicationContext context = SpringApplication.run(MainApplication.class, args);
        CustomPublisher customPublisher = (CustomPublisher) context.getBean("customPublisher");
        customPublisher.publish();
     }
}
十三 AOP:面向切面编程
面向方面编程需要将程序逻辑分解为称为横切关注点的不同部分。 跨越应用程序多个点的功能称为跨领域问题,这些跨领域问题在概念上与应用程序的业务逻辑分离。 有许多常见的好例子,如日志记录,审计,声明式事务,安全性,缓存等。
OOP中模块化的关键单元是类,而在AOP中,模块化单元是方面。 依赖注入可以帮助您将应用程序对象相互分离,AOP可以帮助您将交叉问题与它们所影响的对象分离。 AOP就像Perl,.NET,Java等编程语言中的触发器。
Spring AOP模块提供拦截器来拦截应用程序。例如,执行方法时,可以在方法执行之前或之后添加额外的功能
(1)术语
| 术语 | 描述 |
|---|---|
| Aspect 切面 | 切面是通知和切点的结合。例如,一个日志模块为了记录日志将被 AOP 方面调用。应用程序可以拥有任意数量的方面,这取决于需求。 |
| Join point 连接点 | 程序执行过程中的某个特定的点,或者说特定的时候。 |
| Advice 通知 | 在 Spring AOP 中,有前置通知、后置通知、异常通知、最终通知、环绕通知 5 种。 |
| Pointcut | 切点是用来匹配定位连接点的。一组一个或多个连接点,通知应该被执行。 |
| Weaving 织入 | 切面应用到连接点中 |
| Introduction 引用 | 引用允许你添加新方法或属性到现有的类中。 |
| Target 目标类 | 被一个或者多个方面所通知的对象,这个对象永远是一个被代理对象。 |
(2)通知的类型
| 通知 | 描述 |
|---|---|
| 前置通知 | 在一个方法执行之前,执行通知。 |
| 后置通知 | 在一个方法执行之后,不考虑其结果,执行通知。 |
| 返回后通知 | 在一个方法执行之后,只有在方法成功完成时,才能执行通知。 |
| 抛出异常后通知 | 在一个方法执行之后,只有在方法退出抛出异常时,才能执行通知。 |
| 环绕通知 | 在建议方法调用之前和之后,执行通知。 |
(3)demo
// Aspect
@Component
@Aspect
public class TimeLoggingAspect {
    // Advice
    @Around("execution(* com.littleevil.autowiredtest.aop.UserService.*(..))") // Pointcut
    public Object userAdvice(ProceedingJoinPoint joinPoint) throws Throwable {
        System.out.println("@Around: Before calculation-" + new Date());
        Object result = joinPoint.proceed();
        System.out.println("@Around: After calculation-" + new Date());
        return result;
    }
}

// Target
@Service
public class UserService {
	public Integer multiply(int a, int b){
		int res = a*b;
		System.out.println(a+ "*" + b +"= " + res);
		return res;
	}
}

@SpringBootApplication
public class MainApplication {

    public static void main(String[] args) {
        ConfigurableApplicationContext context = SpringApplication.run(MainApplication.class, args);
        UserService userService = (UserService) context.getBean("userService");
        Integer res = userService.multiply(1, 3);
        System.out.println(res);
    }

}

 浙公网安备 33010602011771号