
OpenCV入门(19):图像处理之轮廓检测
轮廓检测是图像处理中的重要任务,用于提取图像中物体的边界。OpenCV 提供了强大的轮廓检测功能,可以用于物体识别、形状分析、目标跟踪等应用。以下是 OpenCV 图像轮廓检测的详细说明。
一、轮廓检测的基本概念
- 轮廓: 图像中物体的边界,由一系列点组成。
- 轮廓层次结构: 轮廓之间的嵌套关系,例如一个轮廓是否包含另一个轮廓。
- 轮廓特征: 轮廓的面积、周长、边界矩形、最小外接矩形、最小外接圆等。
findContours() 用于检测轮廓信息和轮廓之间的结构信息。
- 输入二值化图像
- 输出
vector<vector<Point>>类型的轮廓像素坐标和vector<Vec4i>类型的轮廓结构信息。
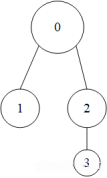
轮廓结构信息:[同层下一个轮廓索引,同层上一个轮廓索引,下一层第一个子轮廓索引,上层父轮廓索引]
0:[-1,-1,1,-1] 1:[2,-1,3,0] 2:[-1,1,,3,0] 3:[-1,-1,-1,2]
轮廓图:

对应的轮廓结构信息图:
二、轮廓检测常用函数
| 函数名称 | 功能描述 |
|---|---|
cv::findContours() |
查找图像中的轮廓 |
cv::drawContours() |
在图像上绘制轮廓 |
cv::contourArea() |
计算轮廓的面积 |
cv::arcLength() |
计算轮廓的周长或弧长 |
cv::boundingRect() |
计算轮廓的边界矩形 |
cv::minAreaRect() |
计算轮廓的最小外接矩形 |
cv::minEnclosingCircle() |
计算轮廓的最小外接圆 |
cv::approxPolyDP() |
对轮廓进行多边形近似 |
三、查找轮廓
3.1 API
findContours() 函数用于在二值图像中查找轮廓。轮廓是图像中具有相同颜色或强度的连续点的曲线。
void findContours( InputArray image, OutputArrayOfArrays contours,
                  OutputArray hierarchy, int mode,
                  int method, Point offset = Point());
参数说明:
-
image:输入的二值图像(通常为经过阈值处理或边缘检测后的图像)。 -
mode:轮廓检索模式,常用的有:cv::RETR_EXTERNAL:只检测最外层轮廓。cv::RETR_LIST:检测所有轮廓,但不建立层次关系。cv::RETR_TREE:检测所有轮廓,并建立完整的层次结构。
-
method:轮廓近似方法,常用的有:cv::CHAIN_APPROX_NONE:存储所有的轮廓点。cv::CHAIN_APPROX_SIMPLE:压缩水平、垂直和对角线段,只保留端点。
-
contours:输出的轮廓列表,每个轮廓是一个点集。 -
hierarchy:输出的层次结构信息。 -
offset:可选参数,轮廓点的偏移量。
返回值:
contours:检测到的轮廓列表。hierarchy:轮廓的层次结构信息。
3.2 示例代码
#include<opencv2/opencv.hpp>
#include<iostream>

using namespace cv;
using namespace std;

int main() {
    // 读取源图像
    Mat img = imread("coin.jpg");
    if (img.empty()) {
        cout << "请确认图像文件名称是否正确" << endl;
        return -1;
    }

    // 自适应二值化
    Mat gary,binary;
    cvtColor(img, gary, COLOR_BGR2GRAY);
    GaussianBlur(gary, gary, Size(9, 9), 2, 2); // 高斯过滤
    threshold(gary, binary, 170, 255, THRESH_BINARY | THRESH_OTSU);

    // 查找轮廓
    vector<vector<Point>> contours;		// 轮廓
    vector<Vec4i> hierarchy;		// 存放轮廓结构变量
    findContours(binary, contours, hierarchy, RETR_TREE, CHAIN_APPROX_SIMPLE, Point());

    // 输出轮廓结构描述
    for (size_t i = 0; i < hierarchy.size(); i++) {
        cout << hierarchy[i] << endl;
    }

    waitKey(0);
    return 0;
}
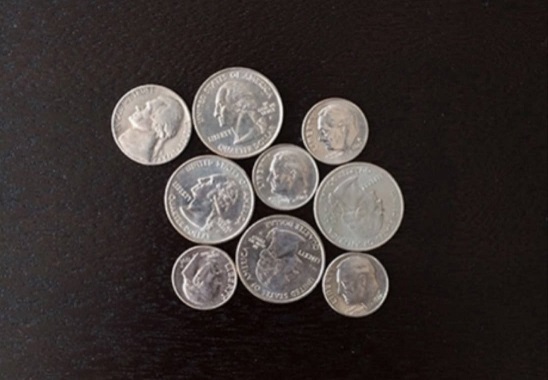
测试原图:
输出结果如下所示:
[-1, -1, 1, -1]
[2, -1, -1, 0]
[3, 1, -1, 0]
[4, 2, -1, 0]
[5, 3, -1, 0]
[6, 4, -1, 0]
[7, 5, -1, 0]
[-1, 6, -1, 0]
四、绘制轮廓
4.1 API
drawContours()用于在图像上绘制检测到的轮廓。
void drawContours( InputOutputArray image, InputArrayOfArrays contours,
                    int contourIdx, const Scalar& color,
                    int thickness = 1, int lineType = LINE_8,
                    InputArray hierarchy = noArray(),
                    int maxLevel = INT_MAX, Point offset = Point() );
参数说明:
image:要绘制轮廓的图像。contours:轮廓列表。contourIdx:要绘制的轮廓索引,如果为负数,则绘制所有轮廓。color:轮廓的颜色。thickness:轮廓线的厚度,如果为负数,则填充轮廓内部。lineType:线型。hierarchy:轮廓的层次结构信息。maxLevel:绘制的最大层次深度。offset:轮廓点的偏移量。
4.2 示例代码
#include<opencv2/opencv.hpp>
#include<iostream>

using namespace cv;
using namespace std;

int main() {
    // 读取源图像
    Mat img = imread("coin.jpg");
    imshow("img", img);
    if (img.empty()) {
        cout << "请确认图像文件名称是否正确" << endl;
        return -1;
    }

    // 自适应二值化
    Mat gary,binary;
    cvtColor(img, gary, COLOR_BGR2GRAY);
    GaussianBlur(gary, gary, Size(9, 9), 2, 2); // 高斯过滤
    threshold(gary, binary, 170, 255, THRESH_BINARY | THRESH_OTSU);

    // 轮廓发现与绘制
    vector<vector<Point>> contours;		// 轮廓
    vector<Vec4i> hierarchy;		// 存放轮廓结构变量
    findContours(binary, contours, hierarchy, RETR_TREE, CHAIN_APPROX_SIMPLE, Point());

    // 绘制轮廓
    for (size_t t = 0; t < contours.size(); t++) {
        drawContours(img, contours, t, Scalar(0, 0, 255), 2, 8);
    }

    // 输出轮廓结构描述
    for (size_t i = 0; i < hierarchy.size(); i++) {
        cout << hierarchy[i] << endl;
    }

    // 显示图像
    imshow("out image", img);

    waitKey(0);
    return 0;
}
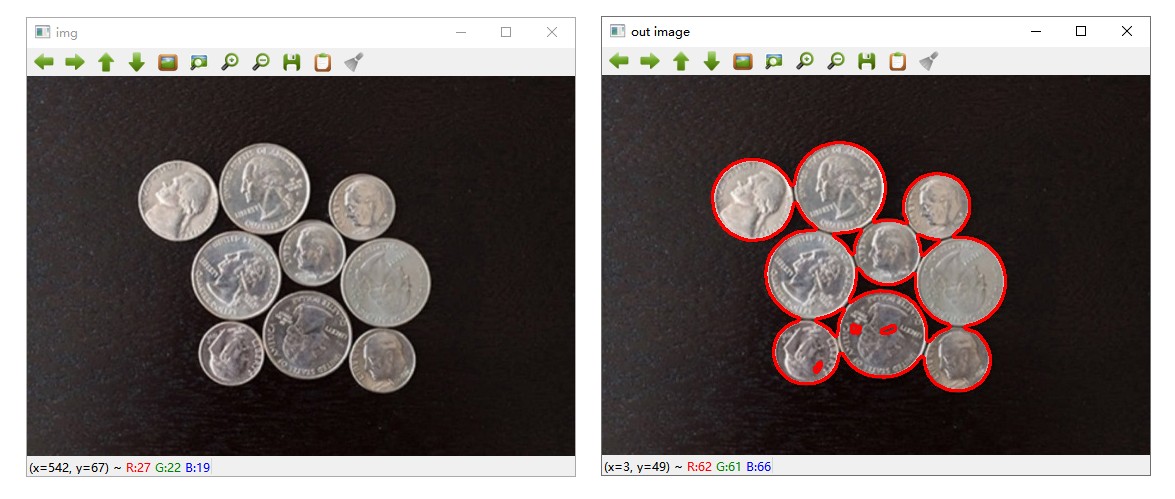
效果图如下所示:
五、计算轮廓面积
5.1 API
contourArea() 用于统计轮廓像素点围成区域的面积,便于区分物体大小、识别物体种类。
double contourArea( InputArray contour, bool oriented = false );
参数说明:
contour:输入的轮廓点集。oriented:可选参数,如果为True,返回有符号的面积。
5.2 示例代码
#include<opencv2/opencv.hpp>
#include<iostream>
using namespace cv;
using namespace std;
int main() {
// 输入的轮廓点集
vector<Point> contour;
contour.push_back(Point2f(0, 0));
contour.push_back(Point2f(10, 0));
contour.push_back(Point2f(10, 10));
contour.push_back(Point2f(5, 5));
double area = contourArea(contour);
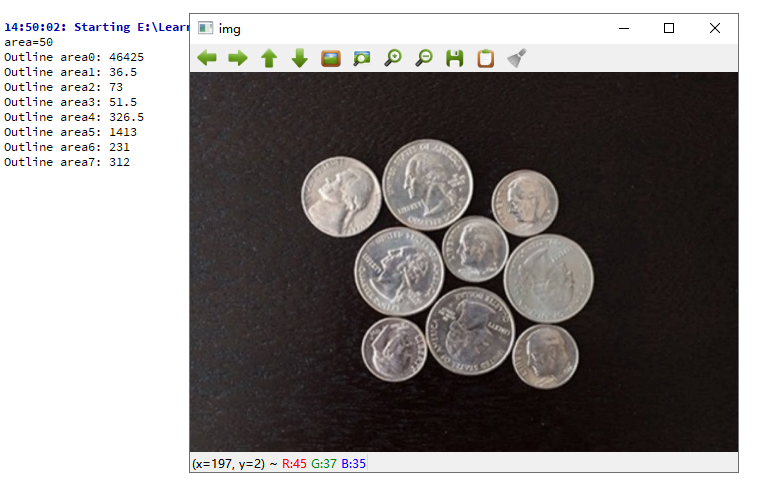
cout << "area=" << area << endl;
// 读取源图像
Mat img = imread("coin.jpg");
imshow("img", img);
if (img.empty()) {
cout << "请确认图像文件名称是否正确" << endl;
return -1;
}
// 自适应二值化
Mat gary,binary;
cvtColor(img, gary, COLOR_BGR2GRAY);
GaussianBlur(gary, gary, Size(9, 9), 2, 2);
threshold(gary, binary, 170, 255, THRESH_BINARY | THRESH_OTSU);
// 查找轮廓
vector<vector<Point>> contours; // 轮廓
vector<Vec4i> hierarchy; // 存放轮廓结构变量
findContours(binary, contours, hierarchy, RETR_TREE, CHAIN_APPROX_SIMPLE, Point());
// 计算并输出轮廓面积
for (size_t t = 0; t < contours.size(); t++) {
double area1 = contourArea(contours[t]);
cout << "Outline area" << t << ":" << area1 << endl;
}
waitKey(0);
return 0;
}
效果图如下所示:
六、计算轮廓周长
6.1 API
arcLength() 用于计算轮廓的周长或弧长。
double arcLength( InputArray curve, bool closed );
参数说明:
curve:输入的轮廓点集。closed:布尔值,表示轮廓是否闭合。true,计算周长;false,计算像素点连线长度。
返回值:
- 轮廓的周长或弧长。
6.2 示例代码
#include<opencv2/opencv.hpp>
#include<iostream>
using namespace cv;
using namespace std;
int main() {
// 输入的轮廓点集
vector<Point> contour;
contour.push_back(Point2f(0, 0));
contour.push_back(Point2f(10, 0));
contour.push_back(Point2f(10, 10));
contour.push_back(Point2f(5, 5));
// 计算轮廓周长
double length0 = arcLength(contour, true);
double length1 = arcLength(contour, false);
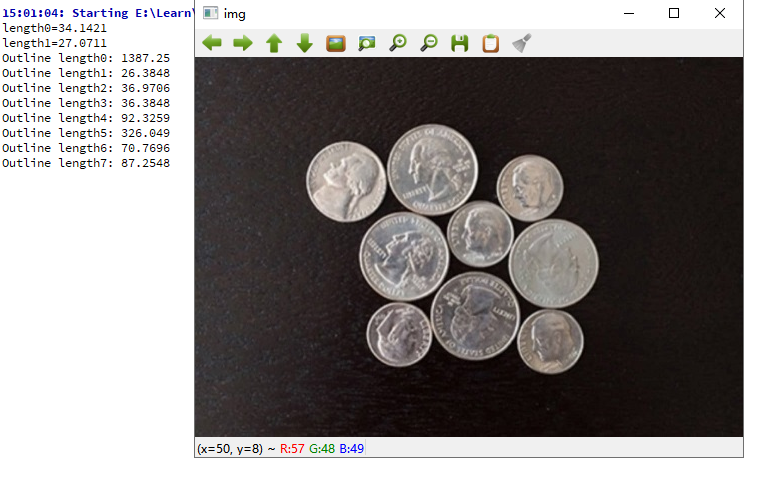
cout << "length0=" << length0 << endl;
cout << "length1=" << length1 << endl;
// 读取源图像
Mat img = imread("coin.jpg");
imshow("img", img);
if (img.empty()) {
cout << "请确认图像文件名称是否正确" << endl;
return -1;
}
// 自适应二值化
Mat gary,binary;
cvtColor(img, gary, COLOR_BGR2GRAY);
GaussianBlur(gary, gary, Size(9, 9), 2, 2);
threshold(gary, binary, 170, 255, THRESH_BINARY | THRESH_OTSU);
// 查找轮廓
vector<vector<Point>> contours; // 轮廓
vector<Vec4i> hierarchy; // 存放轮廓结构变量
findContours(binary, contours, hierarchy, RETR_TREE, CHAIN_APPROX_SIMPLE, Point());
// 输出轮廓长度
for (size_t t = 0; t < contours.size(); t++) {
double length2 = arcLength(contours[t], true);
cout << "Outline length" << t << ":" << length2 << endl;
}
waitKey(0);
return 0;
}
效果图如下所示:
七、计算轮廓外接矩形
7.1 API
boundingRect() 用于计算轮廓的最大外接矩形。
Rect boundingRect( InputArray array );
参数说明:
points:输入的轮廓点集。
返回值:
- 最大外接矩形的左上角坐标
(x, y)和宽度w、高度h。
boundingRect() 用于计算轮廓的最小外接矩形(旋转矩形)。
RotatedRect minAreaRect( InputArray points );
参数说明:
points:输入的轮廓点集。
返回值:
- 返回一个旋转矩形,包含中心点
(x, y)、宽度、高度和旋转角度。
7.2 示例代码
#include<opencv2/opencv.hpp>
#include<iostream>
using namespace cv;
using namespace std;
int main() {
// 读取源图像
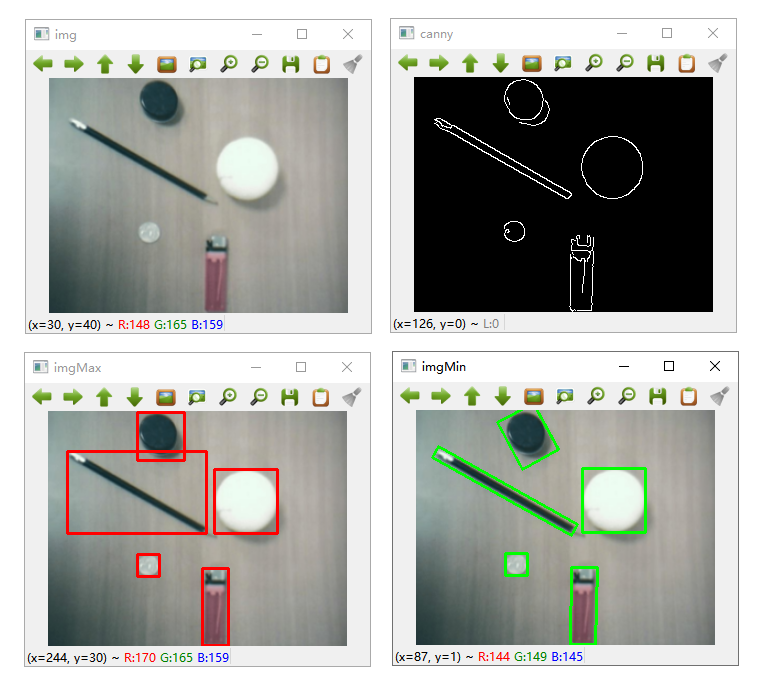
Mat img = imread("rect.jpg");
imshow("img", img);
if (img.empty()) {
cout << "请确认图像文件名称是否正确" << endl;
return -1;
}
Mat imgMax, imgMin;
img.copyTo(imgMax); // 深拷贝用来绘制最大外接矩形
img.copyTo(imgMin); // 深拷贝用来绘制最小外接矩形
// 去噪和二值化
Mat canny;
Canny(img, canny, 80, 160, 3, false);
imshow("canny", canny);
// 膨胀 将细小缝隙填补
Mat kernel = getStructuringElement(0, Size(3, 3));
dilate(canny, canny, kernel);
// 查找轮廓
vector<vector<Point>> contours; // 轮廓
vector<Vec4i> hierarchy; // 存放轮廓结构变量
findContours(canny, contours, hierarchy, 0, 2, Point());
// 计算输出轮廓的外接矩形
for (size_t t = 0; t < contours.size(); t++) {
// 计算最大外接矩形
Rect rect = boundingRect(contours[t]);
rectangle(imgMax, rect, Scalar(0, 0, 255), 2, 8, 0);
// 计算最小外接矩形
RotatedRect rrect = minAreaRect(contours[t]);
Point2f points[4];
rrect.points(points); // 读取最小外接矩形的4个顶点
Point2f cpt = rrect.center; // 最小外接矩形的中心
// 绘制旋转矩形与中心位置
for (int i = 0; i < 4; i++) {
if (i == 3) {
line(imgMin, points[i], points[0], Scalar(0, 255, 0), 2, 8, 0);
break;
}
line(imgMin, points[i], points[i + 1], Scalar(0, 255, 0), 2, 8, 0);
}
// 绘制矩形中心
circle(img, cpt, 2, Scalar(255, 0, 0), 2, 8, 0);
}
// 绘制结果
imshow("imgMax", imgMax);
imshow("imgMin", imgMin);
waitKey(0);
return 0;
}
效果图如下所示:
八、判断轮廓的几何形状
8.1 API
approxPolyDP() 用于对轮廓进行多边形近似。用矩形逼近轮廓也时候会产生较大的误差,寻找逼近轮廓的多边形,多边形围成的面积会更加接近真实形状。
void approxPolyDP( InputArray curve,
                  OutputArray approxCurve,
                  double epsilon, bool closed );
参数说明:
curve:输入的轮廓点集。epsilon:近似精度,值越小,近似越精确。closed:布尔值,表示轮廓是否闭合。
返回值:
- 返回近似后的多边形点集,通过顶点数初步判断轮廓的几何形状。
8.2 示例代码
#include<opencv2/opencv.hpp>
#include<iostream>
using namespace cv;
using namespace std;
// 获取轮廓边界、绘制边界包围盒、形状描述
void getContours(Mat imgDil, Mat img) {
vector<vector<Point>> contours;
vector<Vec4i> hierarchy;
// 从膨胀化的二值图像中检索轮廓
findContours(imgDil, contours, hierarchy, RETR_EXTERNAL, CHAIN_APPROX_SIMPLE);
//drawContours(img, contours, -1, Scalar(255, 0, 255), 2);
vector<vector<Point>> conPoly(contours.size()); // 逼近的多边形曲线,接近contours轮廓多边形
vector<Rect> boundRect(contours.size()); // contours轮廓多边形的边界包围盒
// 遍历每一个轮廓多边形
for (size_t i = 0; i < contours.size(); i++)
{
int area = contourArea(contours[i]); // 计算轮廓的面积
cout << area << endl;
string objectType;
if (area > 1000) // 过滤那些面积特别小的轮廓,消除噪声
{
float peri = arcLength(contours[i], true); // 计算轮廓周长(封闭的或者非封闭的)或曲线长度
approxPolyDP(contours[i], conPoly[i], 0.02 * peri, true); // 以指定精度逼近多边形曲线
cout << conPoly[i].size() << endl;
boundRect[i] = boundingRect(conPoly[i]); // 计算顶点集合或灰度图像的非零像素的右上边界矩形,获取边界包围盒
int objCor = (int)conPoly[i].size(); // 轮廓多边形的角落(顶点)个数
// 根据objCor判断轮廓多边形的形状类型
if (objCor == 3) {
objectType = "Tri"; // 三角形
} else if (objCor == 4) { // 四边形
float aspRatio = (float)boundRect[i].width / (float)boundRect[i].height; // 边界包围盒的宽高比:宽度/高度
cout << aspRatio << endl;
if (aspRatio > 0.95 && aspRatio < 1.05) { // 边界包围盒宽高比大于0.95,或者小于1.05,则认为是正方形
objectType = "Square"; // 正方形
} else {
objectType = "Rect"; // 矩形
}
} else if (objCor > 4) {
objectType = "Circle"; // 圆形
}
drawContours(img, conPoly, i, Scalar(255, 0, 255), 2); // 绘制轮廓或填充轮廓,颜色为粉色
rectangle(img, boundRect[i].tl(), boundRect[i].br(), Scalar(0, 255, 0), 5); // 绘制边界包围盒,颜色为绿色
putText(img, objectType, { boundRect[i].x,boundRect[i].y - 5 }, FONT_HERSHEY_PLAIN, 1, Scalar(0, 69, 255), 2); // 在边界包围盒左上方往上5像素的位置,绘制其形状的描述文字
}
}
}
int main() {
// 读取图像
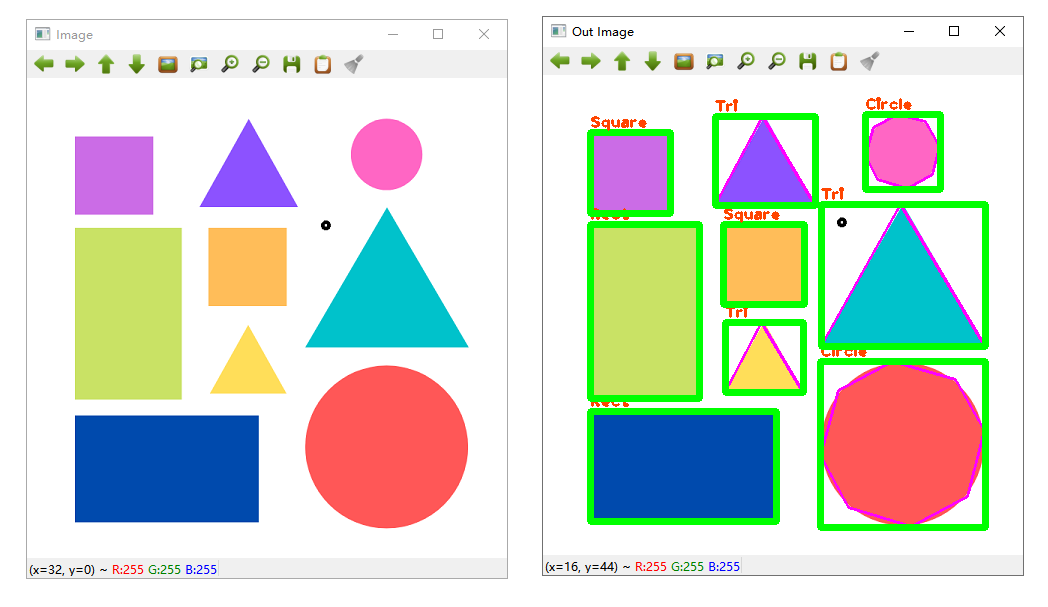
string path = "polygon.jpg";
Mat img = imread(path);
imshow("Image", img); // 显示源图
Mat imgGray, imgBlur, imgCanny, imgDil, imgErode;
// 灰度、过滤等处理
cvtColor(img, imgGray, COLOR_BGR2GRAY); // 灰度图
GaussianBlur(imgGray, imgBlur, Size(3, 3), 3, 0); // 高斯模糊处理
Canny(imgBlur, imgCanny, 25, 75); // Canny边缘检测算法
Mat kernel = getStructuringElement(MORPH_RECT, Size(3, 3));
dilate(imgCanny, imgDil, kernel); // 膨胀图
// 基于膨胀图,在原图上绘制轮廓边界、绘制边界包围盒以及形状描述
getContours(imgDil, img);
// 显示结果图像
imshow("Out Image", img);
//imshow("Image Gray", imgGray);
//imshow("Image Blur", imgBlur);
//imshow("Image Canny", imgCanny);
//imshow("Image Dil", imgDil);
waitKey(0);
return 0;
}
- 首先我们对原始图像进行预处理,将原始图形灰度化、高斯模糊、Canny 边缘检测、膨胀化处理,最后得到一副膨胀的图形
- 基于这幅膨胀的图像,我们调用
findContours函数从膨胀化的二值图像中检索出所有的轮廓,结果放到vector<vector<Point>> contours数组中 - 遍历每一个轮廓多边形,首选计算轮廓面积,过滤那些面积特别小的轮廓(比如面积小于 1000 则不处理,例如上图中的那个黑色的圆点),消除噪声;计算轮廓周长(封闭的或者非封闭的)或曲线长度,以指定精度逼近多边形曲线,计算顶点集合或灰度图像的非零像素的右上边界矩形,获取边界包围盒;然后轮廓多边形的角落(顶点)个数
objCor,根据objCor判断轮廓多边形的形状类型,特别注意矩形和正方形的区别,我们根据轮廓的宽高比来区分,当轮廓宽高比大于 0.95 或者小于 1.05 时我们可以认定轮廓为正方形 - 最后我们在第三步基础上,绘制轮廓或填充轮廓,颜色为粉色;绘制边界包围盒,颜色为绿色;在边界包围盒左上方往上 5 像素的位置,绘制其形状的描述文字
可以看到识别出了各个多边形的具体类型,并绘制了描述文字,效果图如下所示:
九、凸包检测
9.1 API
convexHull() 用于凸包检测,对轮廓进行多边形逼近,但逼近结果一定是凸多边形,将二维平面上的点集最外层的点连接起来构成的凸多边形就是凸包。
void convexHull( InputArray points, OutputArray hull,
                  bool clockwise = false, bool returnPoints = true );
参数说明:
points:输入的二维点集,Mat 类型数据即可hull:输出参数,用于输出函数调用后找到的凸包clockwise:操作方向,当标识符为真时,输出凸包为顺时针方向,否则为逆时针方向。returnPoints:输出数据的类型标志,当参数为 true 时第二个参数输出的结果是凸包顶点的坐标,否则第二个参数输出的结果是凸包顶点的索引。
9.2 示例代码
#include<iostream>
#include<opencv2\opencv.hpp>

using namespace cv;
using namespace std;

// 声明 原始图片,灰度图片,和 canny边缘图片
Mat image, gray_image;

int threshold_value = 180; // OpenCV滑动条值
int threshold_max = 255; // 滑动条最大限制值

void convexhull(int, void*)
{
    RNG rng(12345);
    Mat bin_output;
    vector<vector<Point>>contours;
    vector<Vec4i>hieracy;

    // 转为二值图像(threshold_value为OpenCV滑动条值)
    Mat binary_image;
    threshold(gray_image, binary_image, threshold_value, threshold_max, THRESH_BINARY);

  	// 找到图像全部轮廓点
    findContours(binary_image, contours, hieracy, RETR_TREE, CHAIN_APPROX_SIMPLE, Point(0, 0));
    vector<vector<Point>>convex(contours.size()); // 定义凸包轮廓点并进行初始化

    // 使用凸包 API 从全部轮廓点中找到最优轮廓点
    for (size_t i = 0; i < contours.size(); i++)
    {
        convexHull(contours[i], convex[i], false, true);
    }

    // 连接凸包轮廓点并绘制
    Mat dst = Mat::zeros(image.size(), CV_8UC3); // 图像必须是三通道
    vector<Vec4i>empty(0);
    for (size_t k = 0; k < contours.size(); k++)
    {
        Scalar color = Scalar(rng.uniform(0, 255), rng.uniform(0, 255), rng.uniform(0, 255));
        // 绘制整个图像轮廓
        drawContours(dst, contours, int(k), color, 2, LINE_AA, hieracy, 0, Point(0, 0));

        // 绘制凸包点
        drawContours(dst, convex, (int)k, color, 2, LINE_AA, empty, 0, Point(0, 0));
    }

    imshow("convexHull title", dst);
}

int main()
{
    // 载入图片
    image = imread("hand.jpg");
    // 判断载入图片是否成功
    if (image.empty())
    {
        printf("miss the image\n");
        return -1;
    }

    // 显示源图像
    imshow("image", image);

    // 先将图像转化为灰度图像
    blur(image, image, Size(3, 3), Point(-1, -1), BORDER_DEFAULT);
    cvtColor(image, gray_image, COLOR_BGR2GRAY);

    imshow("gray_image", gray_image);
    namedWindow("convexHull title", WINDOW_AUTOSIZE);   // 不定义窗显示不出来滑块
    createTrackbar("Move", "convexHull title", &threshold_value, threshold_max, convexhull);

    // 凸包检测
    convexhull(0, 0);

    waitKey(0);
    return 0;
}
实现流程:
- 先将图像转化为灰度图像
- 转为二值图像
- 找到图像全部轮廓点
- 使用凸包 API 从全部轮廓点中找到最优轮廓点
- 连接凸包轮廓点
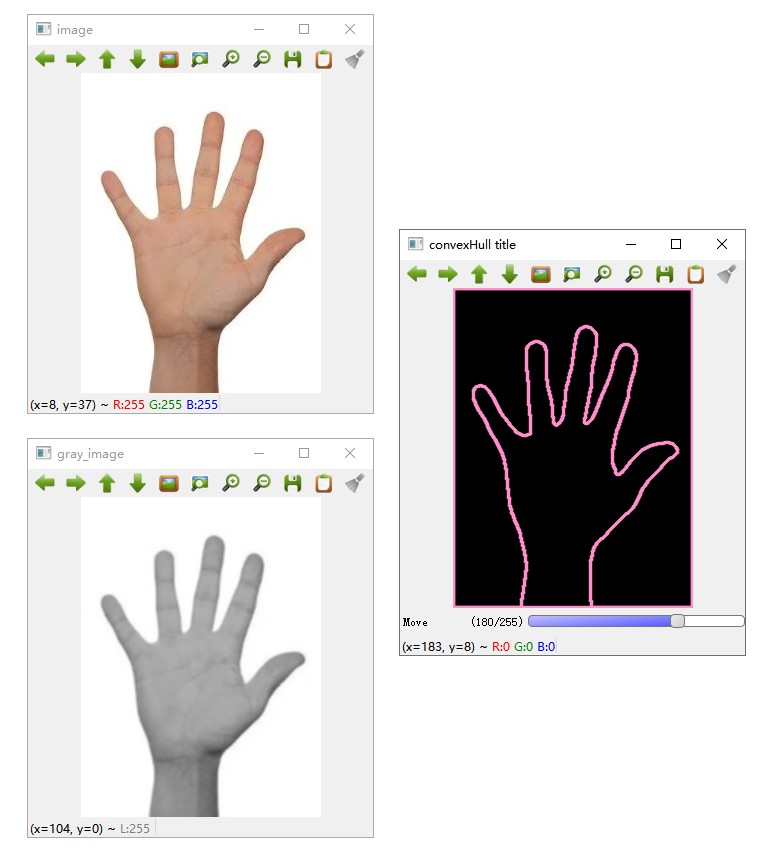
下图中左上为源图,左下为灰度图,右图为凸包检测效果。如下所示:
十、轮廓检测的应用
- 物体识别: 通过轮廓检测可以识别图像中的物体,例如检测圆形、矩形等。
- 形状分析: 通过计算轮廓的特征(如面积、周长、边界矩形等),可以分析物体的形状。
- 目标跟踪: 在视频中,可以通过轮廓检测跟踪运动的目标。
- 图像分割: 通过轮廓检测可以将图像中的物体分割出来。
以下是轮廓检测的主要步骤和函数:
| 步骤 | 函数 | 说明 |
|---|---|---|
| 图像预处理 | cv2::cvtColor() |
将图像转换为灰度图。 |
| 二值化处理 | cv2::threshold() |
将灰度图转换为二值图像。 |
| 查找轮廓 | cv2::findContours() |
查找图像中的轮廓。 |
| 绘制轮廓 | cv2::drawContours() |
绘制检测到的轮廓。 |
| 计算轮廓面积 | cv2::contourArea() |
计算轮廓的面积。 |
| 计算轮廓周长 | cv2::arcLength() |
计算轮廓的周长。 |
| 计算边界矩形 | cv2::boundingRect() |
计算轮廓的边界矩形。 |
| 计算最小外接矩形 | cv2::minAreaRect() |
计算轮廓的最小外接矩形。 |
| 计算最小外接圆 | cv2::minEnclosingCircle() |
计算轮廓的最小外接圆。 |
| 多边形逼近 | cv2::approxPolyDP() |
对轮廓进行多边形逼近。 |
参考:
VC++中使用OpenCV进行形状和轮廓检测-腾讯云开发者社区-腾讯云
OpenCV c++ 轮廓检测_c++ opencv轮廓检测-CSDN博客

 浙公网安备 33010602011771号