LicheePi-zero体验
一. 资源下载
1.1. Lichee官方资料:https://cn.dl.sipeed.com/LICHEE
1.2. uboot github源码:https://github.com/Lichee-Pi/u-boot.git
1.3. kernel github源码:https://github.com/Lichee-Pi/linux.git
1.4. buildroot 源码路径:https://buildroot.org/downloads/buildroot-2017.08.tar.gz
1.5. 交叉编译链工具(6.3-2017.02版本):https://releases.linaro.org/components/toolchain/binaries/
二. 硬件介绍
2.1. 硬件是Lichee Zero,下图是官方介绍图片

三. 配置与编译
3.1. 交叉编译链工具
3.1.1. 下载(如果已下载跳过)
wget https://releases.linaro.org/components/toolchain/binaries/latest/arm-linux-gnueabihf/gcc-linaro-6.3.1-2017.05-x86_64_arm-linux-gnueabihf.tar.xz
3.1.2. 配置
tar xvf gcc-linaro-6.3.1-2017.05-x86_64_arm-linux-gnueabihf.tar.xz
mv gcc-linaro-6.3.1-2017.05-x86_64_arm-linux-gnueabihf /opt/
vim /etc/bash.bashrc
# add: PATH="$PATH:/opt/gcc-linaro-6.3.1-2017.05-x86_64_arm-linux-gnueabihf/bin"
source /etc/bash.bashrc
3.1.3. 查看版本
arm-linux-gnueabihf-gcc -v

3.2. 安装设备树编译器
sudo apt-get install device-tree-compiler
3.3. uboot
3.3.1. 下载(已下载跳过)
git clone https://github.com/Lichee-Pi/u-boot.git -b v3s-current
#or git clone https://github.com/Lichee-Pi/u-boot.git -b v3s-spi-experimental
3.3.2. 修改u-boot/include/configs/sun8i.h文件 加入:
#define CONFIG_BOOTCOMMAND   "setenv bootm_boot_mode sec; " \
                            "load mmc 0:1 0x41000000 zImage; "  \
                            "load mmc 0:1 0x41800000 sun8i-v3s-licheepi-zero.dtb; " \
                            "bootz 0x41000000 - 0x41800000;"

#define CONFIG_BOOTARGS      "console=ttyS0,115200 panic=5 rootwait root=/dev/mmcblk0p2 earlyprintk rw  vt.global_cursor_default=0"
3.3.3. 配置
cd u-boot
make ARCH=arm CROSS_COMPILE=arm-linux-gnueabihf- LicheePi_Zero_defconfig
#or make ARCH=arm CROSS_COMPILE=arm-linux-gnueabihf- LicheePi_Zero_800x480LCD_defconfig
#or make ARCH=arm CROSS_COMPILE=arm-linux-gnueabihf- LicheePi_Zero_480x272LCD_defconfig
make ARCH=arm menuconfig
3.3.4. 编译
time make ARCH=arm CROSS_COMPILE=arm-linux-gnueabihf- 2>&1 | tee build.log
a. 编译完成后,在当前目录下生成了u-boot-sunxi-with-spl.bin,可以烧录到TF卡8K偏移处启动
3.4. kernal
3.4.1. 下载(已下载跳过)
git clone https://github.com/Lichee-Pi/linux.git
3.4.2. 配置
cd linux
make ARCH=arm licheepi_zero_defconfig
make ARCH=arm menuconfig   #add bluethooth, etc.
3.4.3. 编译
make ARCH=arm CROSS_COMPILE=arm-linux-gnueabihf- -j16
a. 编译完成后,zImage在arch/arm/boot/下,dtb在arch/arm/boot/dts/下
3.5. buildroot
3.5.1. 下载
wget https://buildroot.org/downloads/buildroot-2017.08.tar.gz
3.5.2. 配置
3.5.2.1. 首先安装一些依赖,比如linux头文件
apt-get install linux-headers-$(uname -r)
3.5.2.1. buildroot配置
tar xvf buildroot-2017.08.tar.gz
cd buildroot-2017.08/
make menuconfig
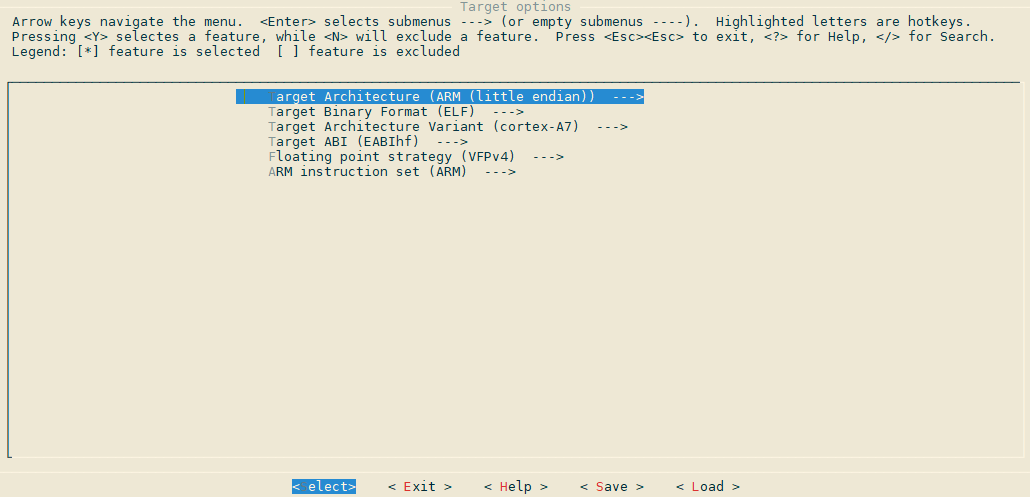
a. target options配置
b. Toolchain配置

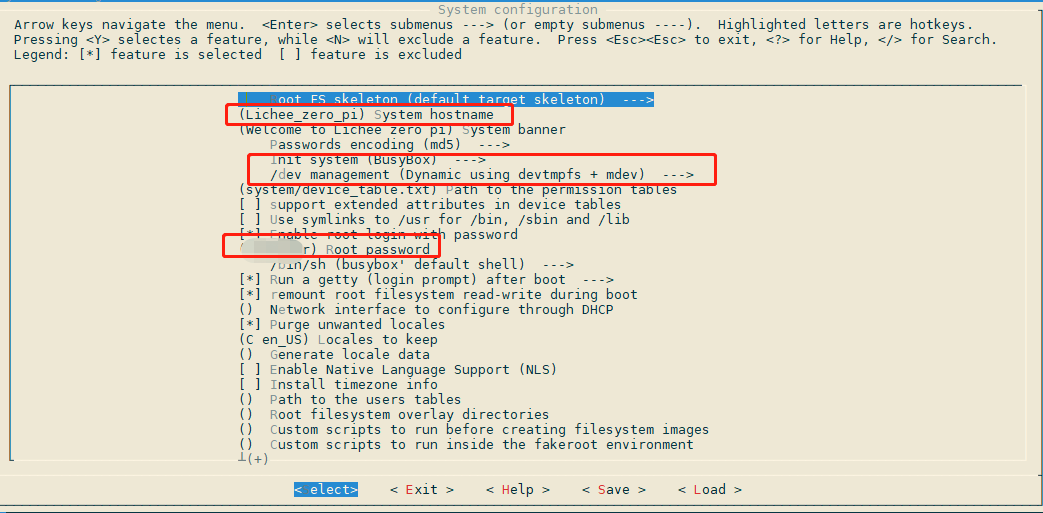
c. System configuretion配置
3.5.3. 编译
make #有时候构建会出现莫名其妙的错误,make clean下会ok?
编译完成后,会生成 output/images/rootfs.tar,此即所需的根文件系统
四. 烧录(TF卡烧录)
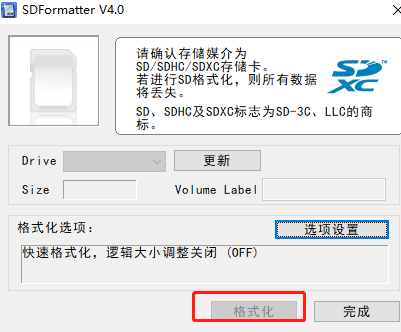
4.1. 使用SDFormatter格式化SD卡(window环境下)
下载路径:https://www.sdcard.org/downloads/formatter/
4.2. ubuntu下分区(TF卡插入ubuntu)
4.2.1. 安装gparted工具
sudo apt-get install gparted
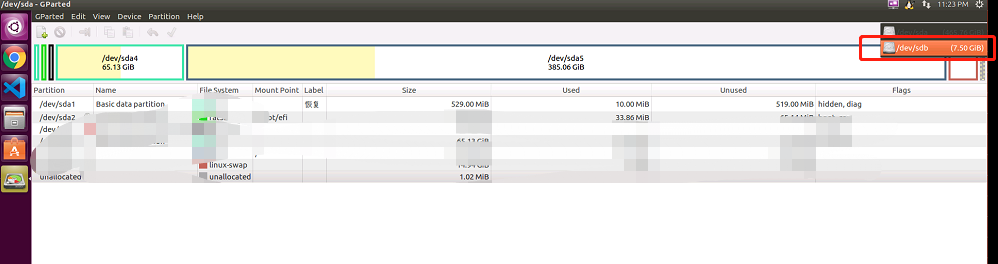
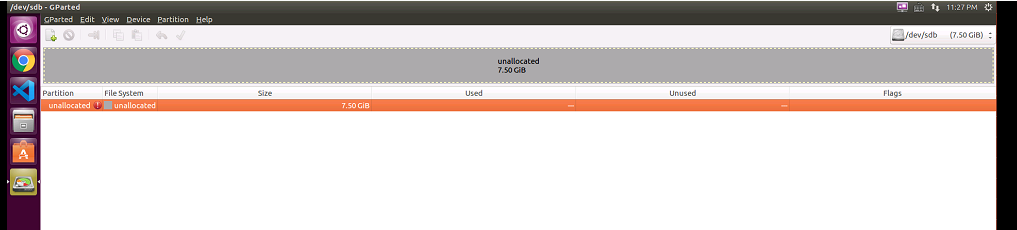
4.2.2. 打开分区工具

4.2.2.1. 选择TF卡
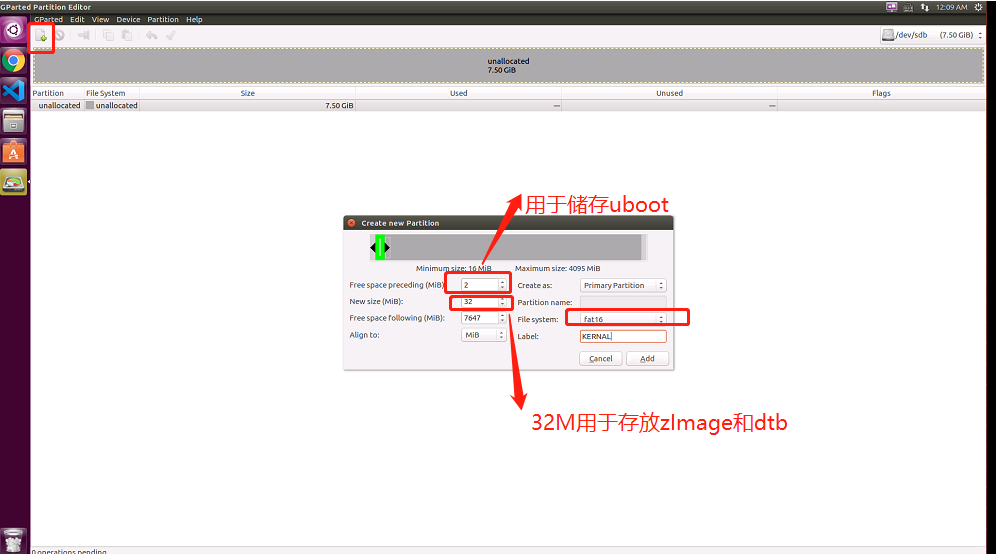
4.2.2.2. 新建分区
a. 软件TF卡上有分区应先删掉分区,方法一:可以使用 4.1. 使用SDFormatter格式化SD卡(window环境下)或者方法二:参考:http://zero.lichee.pro/%E8%B4%A1%E7%8C%AE/article%201.html
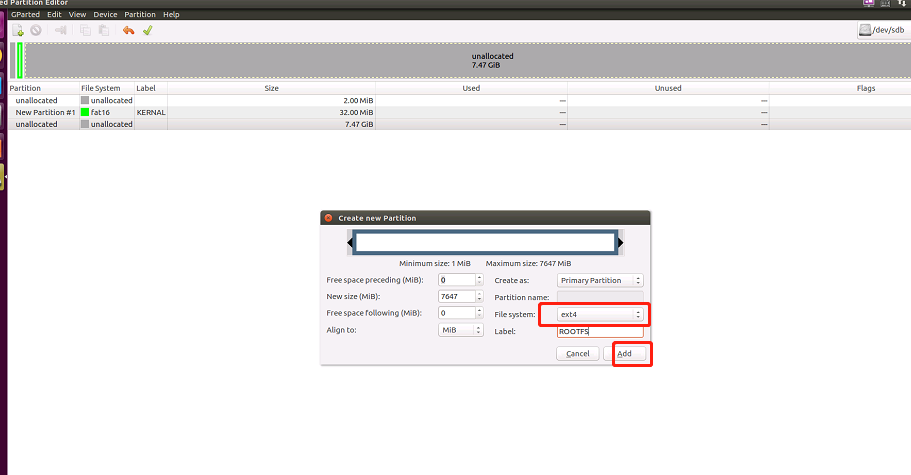
b. 继续新建分区(将属于的全部作为rootfs分区)
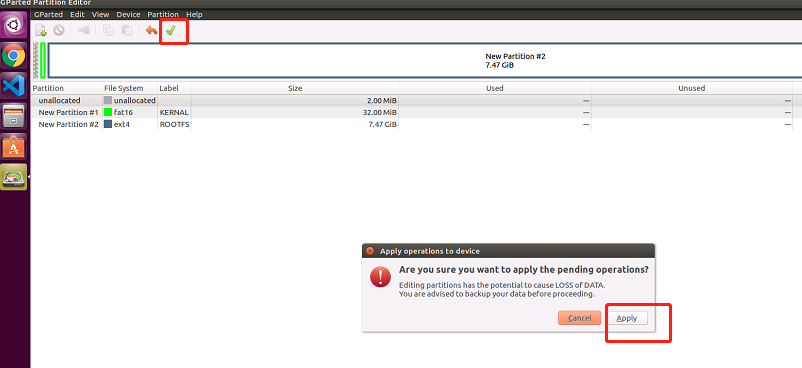
c. apply
4.3. 烧录固件
4.3.1. 烧录uboot
a. sudo fdisk -l查看设备

b. 使用dd命令烧录uboot
cd ./u-boot  #先进入你uboot 的存放路径
sudo dd if=u-boot-sunxi-with-spl.bin of=/dev/sdb bs=1024 seek=8    #如果盘符是sdb,则可直接实用这条指令,不是的话将/dev/sdb 改为实际的即可。
4.3.2 烧录zImage和dtb
a. 把zImage, sun8i-v3s-licheepi-zero.dtb拷贝到第一个分区
sudo mount /dev/sdb1 mnt/                  //挂载sdb1 到mnt
sudo cp arch/arm/boot/zImage mnt/
sudo cp arch/arm/boot/dts/sun8i-v3s-licheepi-zero.dtb mnt/ && sync
sudo umount /dev/sdb1
4.3.3. 烧录rootfs
a. 把buildroot产生的rootfs.tar解压到第二分区
sudo mount /dev/sdb2 mnt
sudo rm -rf mnt/
sudo tar xvf output/images/rootfs.tar -C mnt/  && sync   #解压到分区中
sudo umount /dev/sdb2
五. 测试验证
5.1. 插上串口上电启动
参考资料:http://zero.lichee.pro/%E8%B4%A1%E7%8C%AE/article%201.html
http://zero.lichee.pro/%E7%B3%BB%E7%BB%9F%E5%BC%80%E5%8F%91/buildroot.html
http://zero.lichee.pro/%E7%B3%BB%E7%BB%9F%E5%BC%80%E5%8F%91/uboot_build.html
http://zero.lichee.pro/%E7%B3%BB%E7%BB%9F%E5%BC%80%E5%8F%91/kernel_build.html

 浙公网安备 33010602011771号