
一、继承与派生
什么是继承
继承一种新建类的方式,新建的类称为子类或者派生类,被继承的类称为父类或基类或超类
子类会遗传父类的一系列属性

python支持多继承
注意:
    在python3中,如果没有显式地继承任何类,那默认继承object类
    在python2中,如果没有显式地继承任何类,也不会继承object类

在python中类分为两种:
    python3新式类,广度优先
        但凡继承object的类,以及该类的子类都是新式类
        在python3中所有的类都是新式类
    python2经典类,深度优先
        没有继承object类,以该类的子类都是经典类
        只有在python2中才存在经典类,为何?
        因为在python2中没有没有显式地继承任何类,也不会继承object类
1)继承的示例


class Parent1(object):
    pass

class Parent2(object):
    pass

class Sub1(Parent1):
    pass

class Sub2(Parent1,Parent2):
    pass
#  __bases__ 打印继承关系,没有继承,默认继承object
print(Parent1.__bases__)
print(Parent2.__bases__)

print(Sub1.__bases__)
print(Sub2.__bases__)
2)基于继承减少代码冗余的案例+派生/衍生
import pickle
class OldboyPeople:
    school = 'oldboy'

    def __init__(self,name,age,sex):
        self.name=name
        self.age=age
        self.sex=sex

    def save(self):
        with open('%s' % self.name, 'wb') as f:
            pickle.dump(self, f)

class OldboyStudent(OldboyPeople):
    def choose_course(self,course):
        print('%s is choosing course:%s' %(self.name,course))

class OldboyTeacher(OldboyPeople):
    def __init__(self,name,age,sex,level):
        # self.name = name
        # self.age = age
        # self.sex = sex
        OldboyPeople.__init__(self,name,age,sex)
        self.level=level

    def score(self,stu):
        print('%s is score %s' %(self.name,stu.name))

# stu1=OldboyStudent('alex',38,'male')
# print(stu1.__dict__)
# stu1.save()

tea1=OldboyTeacher('egon',18,'male',10)
print(tea1.name,tea1.level)
# tea1.save()
# print(stu1.school)


# 在子类派生出的新方法中重用父类的功能:
#方式一:指名道姓地访问某一个类的函数,与继承是没有关系的
# OldboyPeople.__init__(self,name,age,sex)
3)单继承的属性查找“:对象自己-》对象的类-》父类-》父类
class Foo:
    def f1(self):
        print('Foo.f1')

    def f2(self): #self=obj
        print('Foo.f2')
        self.f1() #obj.f1()

class Bar(Foo):
    def f1(self):
        print('Bar.f1')

obj=Bar()
obj.f2()
# 执行父类的 f2 代码,发现到了f1 ,仍然先从自己这里开始找
4)(python2和python3一样的)多继承的属性查找“:对象自己-》对象的类-》从左往右一个一个的分支找下去
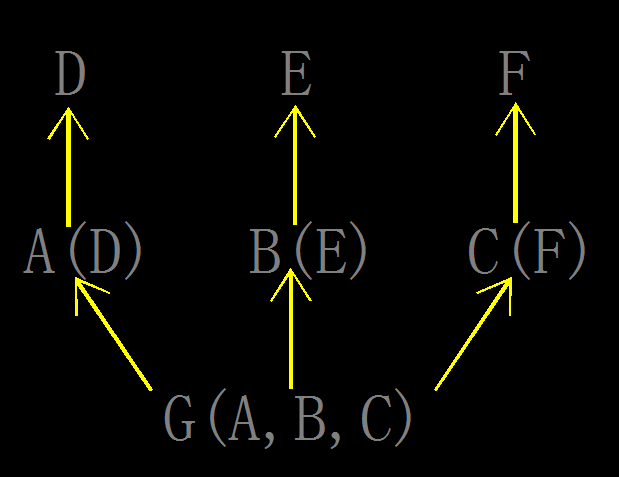
class D:
    # def test(self):
    #     print('D')
    pass
class E:
    def test(self):
        print('E')

class F:
    def test(self):
        print('F')

class A(D):
    # def test(self):
    #     print('A')
    pass

class B(E):
    # def test(self):
    #     print('B')
    pass

class C(F):
    def test(self):
        print('C')

class G(A,B,C):
    # def test(self):
    #     print('G')
    pass

obj=G()
obj.test()
5)python3新式类,广度优先查找,从左到右依次查找。但不先找头,最后才头
print(F.mro()) 方法属性查找顺序
python2经典类,深度优先查找,从左到右依次查找,遇到了头,就找头,再找其他的
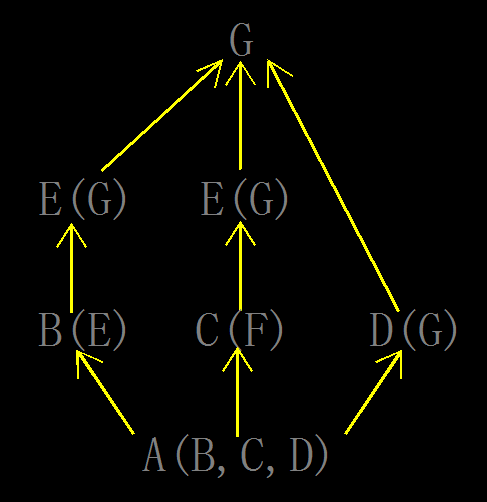
# 新式类:广度优先
class A(object):
    def test(self):
        print('from A')

class B(A):
    # def test(self):
    #     print('from B')
    pass
class C(A):
    # def test(self):
    #     print('from C')
    pass
class D(B):
    # def test(self):
    #     print('from D')
    pass
class E(C):
    # def test(self):
    #     print('from E')
    pass

class F(D,E):
6)在子类派生出的新方法中重用父类的功能
#方式一:指名道姓地访问某一个类的函数,与继承是没有关系的
# OldboyPeople.__init__(self,name,age,sex)

#方式二:super(自己的类名,self).父类中的方法名()
# 调用super会得到一个特殊的对象,该对象是专门用来引用父类中的方法的,
#具体的:该对象会严格按照当前类的MRO列表从当前类的父类中依次查找属性,即这种方式是严格依赖于继承的
#ps:在python3中可以简写为super()

# !!!!!强调:二者使用哪一种都可以,但最好不要混合使用 !!!!
基于2种方式的实现继承父类方法
class OldboyPeople:
    def __init__(self,name,age,sex):
        self.name=name
        self.age=age
        self.sex=sex

class OldboyTeacher(OldboyPeople):
    def __init__(self,name,age,sex,level):
        # OldboyPeople.__init__(self,name,age,sex)    # 方式一,访问的函数
        super(OldboyTeacher,self).__init__(name,age,sex)  # 方式二,访问的方法
        self.level=level

tea1=OldboyTeacher('egon',18,'male',10)
print(tea1.name,tea1.level)
super的应用,无论super定义在哪个位置的方法,都应该当前位置开始查找,查找顺序可以用 mro进行查看
class A:
    def f1(self):
        print('A')
        super().f2() # super()会基于当前所在的查找位置继续往后查找
    def f2(self):
        print('A')
class B:
    def f2(self):
        print('B')

class C(A,B):
    def f2(self):
        print('C')

obj=C()
print(C.mro())
obj.f1()
总结:最好不要用多继承
二、类与类的组合
1)不要组合之前
import pickle
class OldboyPeople:
    school = 'oldboy'
    def __init__(self,name,age,sex):
        self.name=name
        self.age=age
        self.sex=sex
    def save(self):
        with open('%s' % self.name, 'wb') as f:
            pickle.dump(self, f)

class OldboyStudent(OldboyPeople):
    def __init__(self,name,age,sex):
        OldboyPeople.__init__(self,name,age,sex)
        self.courses=[]
    def choose_course(self,course):
        print('%s is choosing course:%s' %(self.name,course))

stu1=OldboyStudent('李三泡',18,'male')
# print(stu1.courses)
stu1.courses.append({'name':'python','price':8000,'period':'5mons'})
stu1.courses.append({'name':'linux','price':10000,'period':'3mons'})
print(stu1.courses)
for course in stu1.courses:
    print("""
    课程名:%s
    价钱:%s
    周期:%s
    """ %(course['name'],course['price'],course['period']))

stu2=OldboyStudent('李二泡',38,'female')
stu2.courses.append({'name':'python','price':8000,'period':'5mons'})
for course in stu2.courses:
    print("""
    课程名:%s
    价钱:%s
    周期:%s
    """ %(course['name'],course['price'],course['period']))
2)组合的使用意义
1、什么是组合
    对象的属性的值是来自于另外一个类的对象,这就叫类的组合使用
2、为何要用组合
    组合是用来减少类与类代码冗余的

    组合vs继承
        只有在类与类之间有从属的关系的时候才能用继承
        否则的话用组合
使用组合之后,代码调整
import pickle
class OldboyPeople:
    school = 'oldboy'
    def __init__(self,name,age,sex):
        self.name=name
        self.age=age
        self.sex=sex
    def save(self):
        with open('%s' % self.name, 'wb') as f:
            pickle.dump(self, f)

class OldboyStudent(OldboyPeople):
    def __init__(self,name,age,sex):
        OldboyPeople.__init__(self,name,age,sex)
        self.courses=[]
    def choose_course(self,course):
        print('%s is choosing course:%s' %(self.name,course))
    def tell_courses_info(self):
        for course in self.courses:
            course.tell_info()

class Course:
    def __init__(self,name,price,period):
        self.name=name
        self.price=price
        self.period=period

    def tell_info(self):
        print("""
            课程名:%s
            价钱:%s
            周期:%s
            """ % (self.name, self.price, self.period))

python=Course('python',8000,'5mons')
linux=Course('linux',10000,'3mons')

stu1=OldboyStudent('李三泡',18,'male')
stu1.courses.append(python)
stu1.courses.append(linux)

stu2=OldboyStudent('李二泡',38,'female')
stu2.courses.append(python)

stu1.tell_courses_info()
stu2.tell_courses_info()
三、多态与多态性
1、什么是多态
    同一种事物的多种形态

2、为何要用多态
    多态性:指的是可以在不用考虑对象具体类型的前提下,直接调用对象的方法
1)多态方法,类似的事物用同样的方法
class Animal:
    def talk(self):
        pass

class People(Animal):
    def talk(self):
        print('say hello')

class Dog(Animal):
    def talk(self):
        print('汪汪汪')

class Pig(Animal):
    def talk(self):
        print('哼哼哼')

peo1=People()
dog1=Dog()
pig1=Pig()
#多态性:
peo1.talk()
dog1.talk()
pig1.talk()
2)函性质的数多态方法
#多态
class People():
    def talk(self):
        print('say hello')

class Dog():
    def talk(self):
        print('汪汪汪')

class Pig():
    def talk(self):
        print('哼哼哼')

peo1=People()
dog1=Dog()
pig1=Pig()
#多态性:
def talk(animal):
    animal.talk()

talk(peo1)
talk(dog1)
talk(pig1)
3)平时统计自动的长度,使用的多态方法
l=list([1,2,3])
s=str('hello')
t=tuple((4,5,6))

l.__len__()
s.__len__()
t.__len__()


def len(obj):
    return obj.__len__()

print(len(l))
print(len(s))
print(len(t))
4)强制让子类使用多态属性,import abc
import abc

class Animal(metaclass=abc.ABCMeta): # 父类存在的意义就是用来定义规范...# 抽象基类不能被实例化
    @abc.abstractmethod
    def talk(self):
        pass

class People(Animal):
    def talk(self):
        print('say hello')

class Dog(Animal):
    def talk(self):
        print('汪汪汪')

class Pig(Animal):
    def talk(self):
        print('哼哼哼')

peo1=People()
dog1=Dog()
pig1=Pig()

peo1.talk()
dog1.talk()
pig1.talk()
四、封装
1、什么是封装
    “装”的意思就往一个容器中放入一系列属性
    “封”的意思就是藏起来,在内部可以看到,但对外部是隐藏的

2、如何用封装
    但凡是双下划线开头(不能是双下划线结尾)的属性,会被隐藏起来,类内部可以直接使用
    而类外部无法直接使用,即封装是对外不对内的

    这种隐藏的特点:
        1、只是一种语法上的变形,会将__开头的属性变形为:_自己的类名__属性名
        2、该变形只在类定义阶段发生一次,在类定义阶段之后新增的__开头的属性并不会发生变形
        3、隐藏是对外不对内的
        4、在继承中,父类如果不想让子类覆盖自己的同名方法,可以将方法定义为私有的
1)访问封装起来的隐藏内容
class Foo:
    __n=1 #_Foo__n=1

    def __init__(self,name):
        self.__name=name #self._Foo__name=name

    def __f1(self): #_Foo__f1
        print('f1')
# __n 和 __f1() 被隐藏起来,无法直接被访问
print(Foo.__dict__)     # 查看名称空间,可知道如何被访问
print(Foo._Foo__n)
print(Foo._Foo__f1)
2)封装的真正使用意义,内部开辟了一个接口来访问隐藏空间
案例一
class Foo:
    __n=1 #_Foo__n=1

    def __init__(self,name):
        self.__name=name #self._Foo__name=name
    def __f1(self): #_Foo__f1
        print('f1')
    def f2(self):
        self.__f1() #self._Foo__f1()
        print(self.__name) #self._Foo__name
        print(self.__n) #self._Foo__n

obj=Foo('egon')
obj.f2()
案例二
class People:
    def __init__(self,name,age):
        self.__name=name
        self.__age=age
    def tell_info(self):
        print('<%s:%s>' %(self.__name,self.__age))
    def set_info(self,name,age):
        '''
        修改名字,年龄
        :param name:
        :param age:
        :return:
        '''
        if type(name) is not str:
            raise TypeError('用户名必须是str类型')
        if type(age) is not int:
            raise TypeError('年龄必须是int类型')
        self.__name=name
        self.__age=age
p=People('egon',18)
p.tell_info()
p.set_info('egon',22)
p.tell_info()
3)封装的意图
1、封装数据属性:将数据数据隐藏起来,从而类的使用者无法直接操作该数据属性
    需要类的设计者在类内部开辟接口,让类的使用者同接口来间接地操作数据,
    类的设计者可以在接口之上附加任意逻辑,从而严格控制类的使用者对属性的操作
2、封装函数属性:隔离复杂度
class ATM:
    def __card(self):
        print('插卡')
    def __auth(self):
        print('用户认证')
    def __input(self):
        print('输入取款金额')
    def __print_bill(self):
        print('打印账单')
    def __take_money(self):
        print('取款')

    def withdraw(self):
        self.__card()
        self.__auth()
        self.__input()
        self.__print_bill()
        self.__take_money()

a=ATM()
a.withdraw()
五、特性(property)
1)类方法,把一个函数伪造成对象的特殊
class People:
    def __init__(self,name,height,weight):
        self.name=name
        self.height=height
        self.weight=weight

    @property
    def bmi(self):
        return self.weight / (self.height ** 2)

# 封装内置函数 property 用法,本该执行函数的用法是 bmi()  变成了 bmi
egon=People('egon',1.80,75)
print(egon.bmi)
2)类方法中 property与setter和deleter的使用
先有 proerty伪装函数,才能有setter修改功能,和删除功能
class People:
    def __init__(self,name):
        self.__name = name

    @property       # 伪装方法成属性
    def name(self):
        return self.__name

    @name.setter    # 修改方法的属性
    def name(self,val):
        # print('=====>准备修改名字的值:',val)
        if type(val) is not str:
            raise TypeError('名字的值必须为str类型')
        self.__name=val

    @name.deleter
    def name(self):
        # del self.__name
        print('删不得')

p = People('egon')
print(p.name)
p.name = 'alex'
print(p.name)
del p.name
六、绑定方法与非绑定办法
1)绑定方法
绑定方法:
    特点:
        绑定给谁,就应该由谁来调用,谁来调用就会将谁当做第一个参数传入

    绑定到对象的方法:
        在类中定义的函数,在没有被任何装饰器装饰的情况下,默认都是绑定给对象的

    绑定到类的方法
        在类中定义的函数,在被装饰器classmethod装饰的情况下,该方法是绑定类的
1)绑定方法使用示例
class Foo:
    @classmethod
    def f1(cls): #cls=Foo
        print('自动传入的是类:',cls)

    def f2(self):
        print('自动传入的是对象:',self)

print(Foo.f1)
print(Foo.f2)
print(Foo)
Foo.f1()
2)绑定类方法常用示例
配置文件中获取ip和端口连接
HOST='127.0.0.1'
PORT=3306
类方法使用
import settings
class MySQL:
    def __init__(self,host,port):
        self.host = host
        self.port = port

    @classmethod
    def from_conf(cls):
        return cls(settings.HOST, settings.PORT)

conn=MySQL.from_conf()  # 利用类方法,从配置文件获取到的连接
print(conn.host,conn.port)

conn1=MySQL('1.1.1.1',3306)  # 传值获取的连接
print(conn.host,conn.port)
3)非绑定办法。既不与类绑定也不与对象绑定,没有任何自动传值的效果,因为函数体根本也不需要
示例:
import settings
import hashlib
import time

class MySQL:
    def __init__(self,host,port):
        self.host=host
        self.port=port

    @classmethod
    def from_conf(cls):
        return cls(settings.HOST,settings.PORT)

    @staticmethod
    def create_id():
        m=hashlib.md5()
        m.update(str(time.clock()).encode('utf-8'))
        return m.hexdigest()

obj=MySQL('1.1.1.1',3306)

print(MySQL.create_id())
print(obj.create_id())
七、类的内置函数
1)isinstance和issubclass。判断是否是它的类
class Foo:
    pass

obj=Foo()

print(isinstance(obj,Foo))
print(isinstance([],list))
print(type(obj) is Foo)
print(type([1,2]) is list)
print(issubclass(Foo,object))
2)字符串的改造方法:hasattr和getattr和setattr和delattr
hasattr   # 判断字符串是否在类里面的方法
getattr   # 找到类里面的字符串
setattr   # 新增一个属性
delattr   # 删除属性
1)使用示例
class People:
    country='China'
    def __init__(self,name):
        self.name=name

#涉及四个内置函数
# hasattr   # 判断字符串是否在类里面的方法
print('country' in People.__dict__)
print(hasattr(People,'country'))

# getattr  # 找到类里面的字符串
print(People.__dict__['country'])
print(getattr(People,'country'))
print(getattr(People,'country1111',None))   # 找不到,也不报错

# setattr # 新增一个属性
setattr(People,'x',111)
print(People.__dict__)
print(getattr(People,'x'))

# delattr   # 删除属性
delattr(People,'country')
print(getattr(People,'country',None))
2)利用字符串的改造方法输入执行相应的技能
class Ftp:
    def get(self):
        print('get...')
    def put(self):
        print('put...')
    def auth(self):
        print('auth...')
    def run(self):
        while True:
            cmd=input('>>: ').strip() #cmd='get'
            if hasattr(self,cmd):
                method=getattr(self,cmd)
                method()
            else:
                print('输入的方法不存在')

obj=Ftp()
obj.run()
八、类的内置方法
1)__str__,用在类中,实印例化对象后,自动触发,返回值必须是字符串格式的类型
class People:
    def __init__(self,name,age,sex):
        self.name=name
        self.age=age
        self.sex=sex

    # 该方法会在对象被打印时自动触发,
    def __str__(self):
        # print('=====run=====')
        return '["%s",%s,"%s"]' %(self.name,self.age,self.sex)

obj=People('egon',18,'male')
print(obj) # print(obj.__str__())
2)__del__,会在对象被删除前自动触发。适用于回收机制。
# 伪代码,
# 因connect连接涉及到了2方面的资源。所有需要在程序结束时,自动触发回收机制
class Mysql:
    def __init__(self,host,port):
        self.host=host
        self.port=port
        self.conn=connect(host,port)

    def __del__(self):
        self.conn.close()

obj=Mysql('1.1.1.1',3306)
3)__call__,调用对象的时候触发
class Foo:
    def __init__(self):     # 对象实例化的时候触发
        pass
    def __str__(self):      # 打印对象的时候触发
        pass
    def __del__(self):      # 删除对象的时候触发
        pass
    def __call__(self, *args, **kwargs):    # 调用对象的时候触发
        print("__call__")
obj = Foo()
obj()   # 自动触发 __call__ 这个方法
九、元类方法(了解)
1)exec的使用。把字符串产生的名字丢在名称空间里面
code="""
x=0
y=2
"""
local_dic={}
exec(code,{},local_dic)     #  第二个放全局的名称空间。第三个局部的名称空间
print(local_dic)
exec的作用:自己定义全局名称空间的名字和局部名称空间的名字。函数也可以
code="""
global x
x=0
y=2
def f1(self,a,b):
    pass
"""
global_dic = {"x":100}
local_dic={}
exec(code,global_dic,local_dic)     #  第二个放全局的名称空间。第三个局部的名称空间
print(global_dic)
print(local_dic)
2)对象的产生过程
class Chinese:
    country="China"

    def __init__(self,name,age,sex):
        self.name=name
        self.age=age
        self.sex=sex

    def speak(self):
        print('%s speak Chinese' %self.name)

print(Chinese)
print(type(Chinese))    # 元类:类的类就是元类,
p=Chinese('egon',18,'male')
print(type(p))  # 我们用class定义的类使用来产生我们自己的对象的
# 内置元类type是用来专门产生class定义的类的
# 相当于 type 实例化 class,class 再实例化成对象
3)exec 方法 创建类(class)的第二种方式,也是类创建的原理
class_name='Chinese'
class_bases=(object,)
class_body="""
country="China"
def __init__(self,name,age,sex):
    self.name=name
    self.age=age
    self.sex=sex
def speak(self):
    print('%s speak Chinese' %self.name)
"""
class_dic={}
exec(class_body,{},class_dic)
# 类的三大要素
print(class_name,class_bases,class_dic)
Chinese=type(class_name,class_bases,class_dic)
print(Chinese)
p=Chinese('egon',18,'male')
print(p.name,p.age,p.sex)
4)自定义类的创建规范
class Mymeta(type):
    def __init__(self,class_name,class_bases,class_dic):
        if not class_name.istitle():
            raise TypeError('类名的首字母必须大写')
        if not class_dic.get('__doc__'):
            raise TypeError('类中必须写好文档注释')
        super(Mymeta, self).__init__(class_name, class_bases, class_dic)    # 重用父类的功能

# 类 Foo的首字母必须大写,必须有注释。
class Foo(object,metaclass=Mymeta):
    '''
    管理员类
    '''
    pass
5)自定义控制类的调用
class Mymeta(type):
    # 控制类的Foo的创建
    def __init__(self,class_name,class_bases,class_dic):
        if not class_name.istitle():
            raise TypeError('类名的首字母必须大写')
        if not class_dic.get('__doc__'):
            raise TypeError('类中必须写好文档注释')
        super(Mymeta, self).__init__(class_name, class_bases, class_dic)    # 重用父类的功能
    # 控制类Foo的调用,即控制实例化Foo的过程
    def __call__(self, *args, **kwargs):
        obj = object.__new__(self)
        self.__init__(obj, *args, **kwargs)
        return obj

class Foo(object,metaclass=Mymeta):
    """
    文档注释
    """
    x=1
    def __init__(self,y):
        self.y=y
    def f1(self):
        print('from f1')

obj=Foo(1111) #Foo.__call__()
print(obj.y)
print(obj.__dict__)
6)单实例模式。共用资源,不重复创建
import settings

class MySQL:
    __instance=None
    def __init__(self,ip,port):
        self.ip=ip
        self.port=port

    @classmethod
    def singleton(cls):
        if not cls.__instance:
            obj=cls(settings.IP, settings.PORT)
            cls.__instance=obj
        return cls.__instance
obj1=MySQL('1.1.1.2',3306)
obj2=MySQL('1.1.1.3',3307)
obj3=MySQL('1.1.1.4',3308)
# 单实例模式,ip和端口也一样
obj4=MySQL.singleton()
obj5=MySQL.singleton()
obj6=MySQL.singleton()

print(obj4 is obj5 is obj6)
原文链接:
http://www.cnblogs.com/linhaifeng/articles/7340153.html
http://www.cnblogs.com/linhaifeng/articles/6204014.html

 浙公网安备 33010602011771号