


自定义频率、自动生成文档、JWT
目录
自定义频率、自动生成文档、JWT
自定义频率
#自定义频率需要写两个方法
	#判断是否限次,没有限次True,否则False
	def allow_request(self,request,view):
	#限次后,返回等待的时间
	def wait(self):
#my_ipthrottle.py
	import time
    class IPThrottle():
        VISIT_DIC = {}
        def __init__(self):
            self.history_list = []
        def allow_request(self,request,view):
            ip = request.META.get('REMOTE_ADDR')
            ctime = time.time()
            if ip not in self.VISIT_DIC:
                self.VISIT_DIC[ip] = [ctime,]
                return True
            self.history_list=self.VISIT_DIC[ip] #当前访问者时间列表拿出来
            while True:
                if ctime-self.history_list[-1] > 60:
                    self.history_list.pop()# 把最后一个移除
                else:
                    break
            if len(self.history_list) < 3:
                self.history_list.insert(0,ctime)
                return True
            else:
                return False

        def wait(self):
            ctime = time.time()
            return 60-(ctime-self.history_list[-1])
#views.py
    from rest_framework.views import APIView
    from rest_framework.response import Response
    class TestAPIView(APIView):
        def get(self,request,*args,**kwargs):
            return Response({'status':100,'msg':'请求成功'})
#全局配置
    REST_FRAMEWORK = {
        'DEFAULT_THROTTLE_CLASSES': (
            'app01.utils.my_ipthrottle.IPThrottle',
        ),
        'DEFAULT_THROTTLE_RATES': {
            'luffy': '3/m'  # key要跟类中的scop对应
        },
    }
#局部配置
	#views.py
    	from rest_framework.views import APIView
        from rest_framework.response import Response
        from app01.utils.my_ipthrottle import IPThrottle
        class TestAPIView(APIView):
            throttle_classes = [IPThrottle,]
            def get(self,request,*args,**kwargs):
                return Response({'status':100,'msg':'请求成功'})
	#settings.py
        REST_FRAMEWORK = {
        'DEFAULT_THROTTLE_RATES': {
            'luffy': '3/m'  # key要跟类中的scop对应
        },
    }
自动生成接口文档
1 安装 pip3 install coreapi
2 路由中配置,根据已有的路由生成接口文档
	from rest_framework.documentation import include_docs_urls
    urlpatterns = [
        path('admin/', admin.site.urls),
        path('test2/',views.Test2APIView.as_view()),
        #自动生成文档路由
        path('docs/',include_docs_urls(title='luffy'))#title自定义的站点标题
    ]
3 继承自APIView及其子类可以自动生成文档,效果图看图1
    from rest_framework.views import APIView
    from rest_framework.response import Response
    class Test2APIView(APIView):
        """
        get:
        获取图书信息.
        post:
        增加图书
        put:
        修改图书信息
        delete:
        删除图书信息
        """
        def get(self,request,*args,**kwargs):
            return Response({'status':100,'msg':'请求成功'})
        def post(self,request,*args,**kwargs):
            ...
        def put(self,request,*args,**kwargs):
            ...
        def delete(self,request,*args,**kwargs):
            ...
#继承视图集的,效果图看图2
	from rest_framework.viewsets import GenericViewSet
    from rest_framework import mixins

    from app01.models import Book
    from app01.ser import BookModelSerializer
    class BookInfoViewSet(mixins.ListModelMixin, mixins.RetrieveModelMixin, GenericViewSet,mixins.DestroyModelMixin):
        """
        list:
        返回图书列表数据
        retrieve:
        返回图书详情数据
        latest:
        返回最新的图书数据
        read:
        修改图书的阅读量
        """
        queryset = Book
        serializer_class = BookModelSerializer
#如果遇到报错,AttributeError: 'AutoSchema' object has no attribute 'get_link',配置下面这句加入即可
    REST_FRAMEWORK = {
     'DEFAULT_SCHEMA_CLASS': 'rest_framework.schemas.coreapi.AutoSchema',
        # 新版drf schema_class默认用的是rest_framework.schemas.openapi.AutoSchema}
图1

图2

Json Web Token(jwt)简单使用
#原理
1 jwt分三段式:头(head)、体(payload)、签名(sgin)
2 头和体是可逆加密,让服务器可以反解除user对象,签名不可逆加密,保证整个token的安全性
3 这3部分都是采用json格式的字符串,进行加密,可逆加密采用base64,不可逆采用hash(md5)
4 头包含的是基本信息:如公司信息,项目组信息
5 体包含的是关键信息:用户主键,用户名,签发时客户端信息(设备号、地址),过期时间
6 签名包含的是安全信息:加密过的头和加密过的体加服务器不对外公开的安全码,之后经过hash(md5)加密
#效验
1 将token按.拆分为三段字符串,第一段是头加密结果,不用做人去处理
2 第二段是体加密结果,反解出用户主键,通过主键从user表获得当前登录用户,过期时间和设备信息都是安全信息,确保token没过期,切是同一设备
3 再用 第一段和第二段加服务器安全码 不可逆hash(md5)加密,与第三段签名,进行碰撞效验,通过后才能代表第二段效验得到的user对象就是合法的登录用户
#drf项目的jwt认证完整使用(重点)
1 用账号密码访问登录接口,登录接口逻辑中调用token算法,得到token,返回给客户端,客户端自动存到cookies
2 效验token的算法应该写认证类中(在认证类中调用),全局配置认证组件,所有视图都会经过认证类,请求带了token就可以反解出user对象,在视图中就能request.user获取到登录用户
#登录接口需要认证类和权限类禁用
#简单实用
1 安装 pip install djangorestframework-jwt
2 新建一个User表,继承AbstractUser
#models.py
from django.contrib.auth.models import AbstractUser
class UserInfo(AbstractUser):
mobilephone = models.CharField(max_length=11)
3 创建超级用户
PyCharm终端python3 manage.py createsuperuser
4 urls.py中加入路由
from rest_framework_jwt.views import obtain_jwt_token
path('login/', obtain_jwt_token),
#全局配置
REST_FRAMEWORK = {
# 认证模块
'DEFAULT_AUTHENTICATION_CLASSES': (
'rest_framework_jwt.authentication.JSONWebTokenAuthentication',),}
#局部配置,视图类里加上authentication_classes
from rest_framework.views import APIView
from rest_framework.response import Response
from rest_framework_jwt.authentication import JSONWebTokenAuthentication
class TestAPIView(APIView):
# authentication_classes = [JSONWebTokenAuthentication,]
def get(self,request,*args,**kwargs):
return Response('ok')
#app中一定要注册
INSTALLED_APPS = [
'rest_framework_jwt',
'rest_framework',]
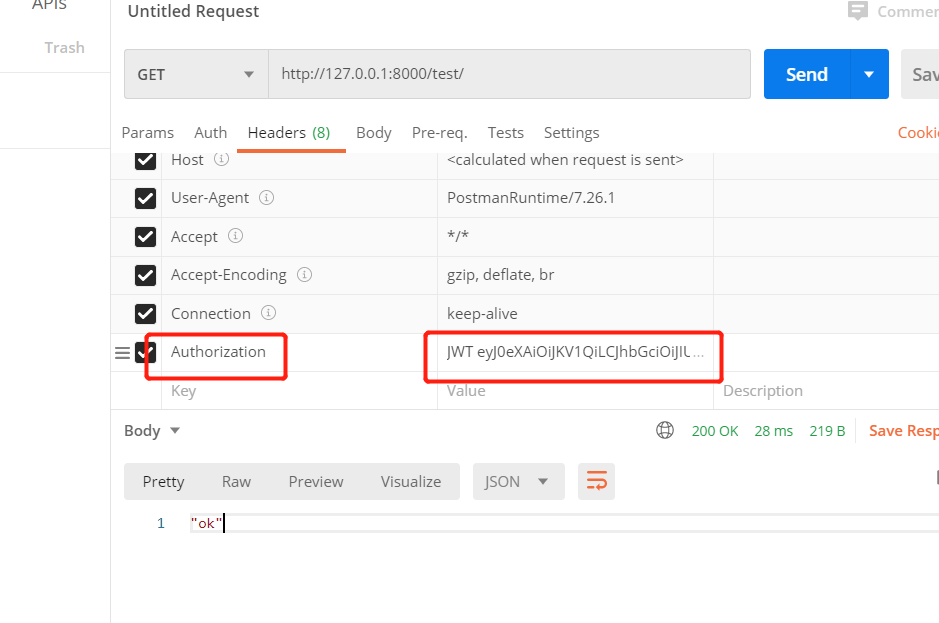
#携带token注意事项,JWT空格再加token看图1 ,
#简单使用jwt是内置的不带Authorization也可以通过,之后需要自定义JWT认证
图1
自定义JWT认证
from rest_framework_jwt.authentication import BaseJSONWebTokenAuthentication
from rest_framework_jwt.authentication import jwt_decode_handler
from rest_framework import exceptions
class MyAuthentication(BaseJSONWebTokenAuthentication):
def authenticate(self, request):
jwt_value = str(request.META.get('HTTP_AUTHORIZATION'))
#认证
try:
payload = jwt_decode_handler(jwt_value)
except Exception:
raise exceptions.AuthenticationFailed("认证失败")
user = self.authenticate_credentials(payload)
return user,None
#全局配置
REST_FRAMEWORK = {
'DEFAULT_AUTHENTICATION_CLASSES': ('app01.utils.authenticate.MyAuthentication',),}
#局部配置
from rest_framework.views import APIView
from rest_framework.response import Response
#自定义jwt认证
from app01.utils.authenticate import MyAuthentication
class TestAPIView(APIView):
authentication_classes = [MyAuthentication,]
def get(self,request,*args,**kwargs):
return Response('ok')
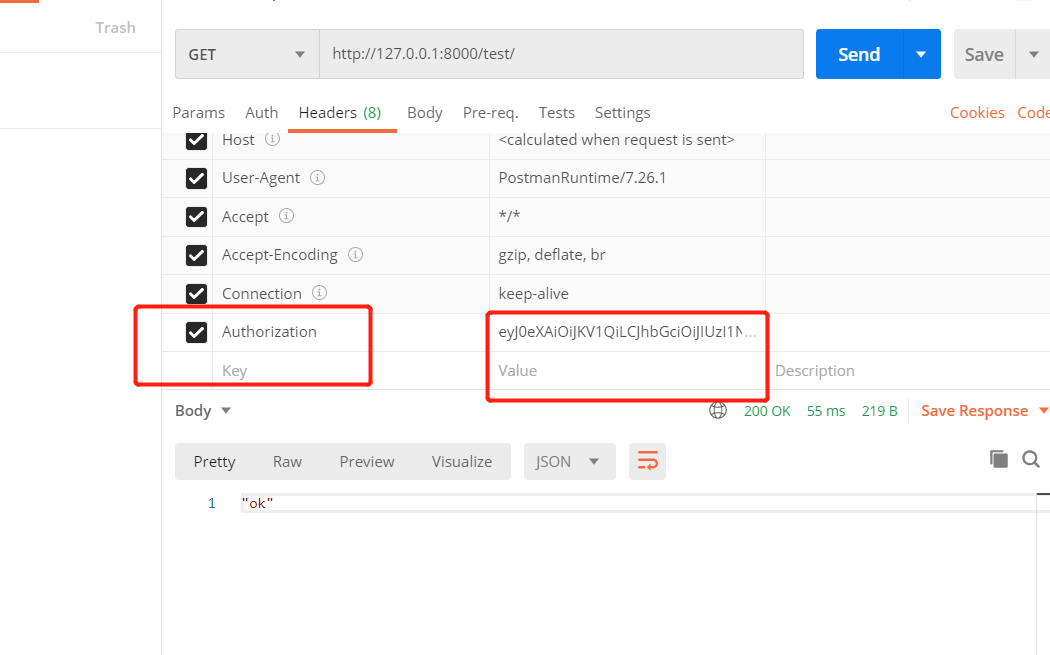
#使用方式不需要JWT加空格了看下图,其他配置跟上面简单使用一致
控制用户登录才能访问
#用户通过内置的jwt认证获得token,permission_classes就能获取到登录用户,否则不登录就无法访问
from rest_framework_jwt.authentication import JSONWebTokenAuthentication
    from rest_framework.permissions import IsAuthenticated
    from rest_framework.views import APIView
    from rest_framework.response import Response
    class TestAPIView(APIView):
        authentication_classes = [JSONWebTokenAuthentication,]
        permission_classes = [IsAuthenticated, ]
        def get(self,request,*args,**kwargs):
            return Response('ok')
控制登录接口返回的数据格式
#第一种方案
	自己写登录接口
#第二种方案,控制内置的登录接口返回的数据格式
	#还是采用内置的jwt认证,所以携带token还是得JWT空格token的方式,不然不会给你认证
	#app01\utils\jwt_response.py
        def jwt_response_payload_handler(token, user=None, request=None):
            return {
                'status':100,
                'msg':'登录成功',
                'username':user.username,
                'token': token,
            }
    #settins.py
        JWT_AUTH = {
        'JWT_RESPONSE_PAYLOAD_HANDLER':'app01.utils.jwt_response.jwt_response_payload_handler',
'JWT_EXPIRATION_DELTA': datetime.timedelta(days=7), # token过期时间,手动配置
    }
自定义基于JWT权限类
#app01\utils\myjwt.py
    import jwt
    from rest_framework.authentication import BaseAuthentication
    from rest_framework_jwt.authentication import BaseJSONWebTokenAuthentication
    from rest_framework.exceptions import AuthenticationFailed
    from rest_framework_jwt.utils import jwt_decode_handler
    from app01 import models

    #第一种
    class MyJwtAuthentication(BaseAuthentication):
        def authenticate(self, request):
            jwt_value=request.META.get('HTTP_AUTHORIZATION')
            if jwt_value:
                try:
                    payload = jwt_decode_handler(jwt_value)
                except jwt.ExpiredSignature:
                    raise AuthenticationFailed('签名过期')
                except jwt.InvalidTokenError:
                    raise AuthenticationFailed('用户非法')
                except Exception as e:
                    raise AuthenticationFailed(str(e))
                #第一张获取用户名方式,数据库查
                # user = models.User.objects.get(pk=payload.get('user_id'))
                #第二种,不查库
                user = models.User(id=payload.get('user_id'),username=payload.get('username'))
                return user,jwt_value
            raise AuthenticationFailed('你没有携带认证信息')


    #第二种
    class MyJwtAuthentication2(BaseJSONWebTokenAuthentication):
        def authenticate(self, request):
            jwt_value = request.META.get('HTTP_AUTHORIZATION')
            if jwt_value:
                try:
                    payload = jwt_decode_handler(jwt_value)
                except jwt.ExpiredSignature:
                    raise AuthenticationFailed('签名过期')
                except jwt.InvalidTokenError:
                    raise AuthenticationFailed('用户非法')
                except Exception as e:
                    raise AuthenticationFailed(str(e))
                user = self.authenticate_credentials(payload)
                return user, jwt_value
            raise AuthenticationFailed('你没携带认证信息')
#全局配置
    REST_FRAMEWORK = {
        "DEFAULT_AUTHENTICATION_CLASSES": ['app01.utils.myjwt.MyJwtAuthentication2']
    }
#局部配置
    from rest_framework.permissions import IsAuthenticated
    from rest_framework.views import APIView
    from rest_framework.response import Response

    from app01.utils.myjwt import MyJwtAuthentication
    class TestAPIView(APIView):
    	#局部认证
        authentication_classes = [MyJwtAuthentication,]
        permission_classes = [IsAuthenticated, ]
        def get(self,request,*args,**kwargs):
            return Response('ok')
手动签发token(多方式登录)
#使用用户名,手机号,邮箱都可以登录
#前端需要传的格式
	{
	"username":"用户名或手机号或邮箱",
	"password":"密码"
	}
#views.py
    from rest_framework.viewsets import ViewSet

    from app01.utils.ser import LoginModelSerializer
    class Login2View(ViewSet):  # 跟上面完全一样
        authentication_classes = []
        def login(self, request, *args, **kwargs):
            # 1 需要 有个序列化的类
            login_ser = LoginModelSerializer(data=request.data,context={'request':request})
            # 2 生成序列化类对象
            # 3 调用序列号对象的is_validad
            login_ser.is_valid(raise_exception=True)
            token=login_ser.context.get('token')
            # 4 return
            return Response({'status':100,'msg':'登录成功','token':token,'username':login_ser.context.get('username')})
#app01\utils\ser.py
    from rest_framework import serializers
    from app01 import models
    import re
    from rest_framework.exceptions import ValidationError

    from rest_framework_jwt.utils import jwt_encode_handler,jwt_payload_handler
    class LoginModelSerializer(serializers.ModelSerializer):
        username=serializers.CharField()  # 重新覆盖username字段,数据中它是unique,post,认为你保存数据,自己有校验没过
        class Meta:
            model=models.User
            fields=['username','password']

        def validate(self, attrs):

            print(self.context)

            # 在这写逻辑
            username=attrs.get('username') # 用户名有三种方式
            password=attrs.get('password')
            # 通过判断,username数据不同,查询字段不一样
            # 正则匹配,如果是手机号
            if re.match('^1[3-9][0-9]{9}$',username):
                user=models.User.objects.filter(mobile=username).first()
            elif re.match('^.+@.+$',username):# 邮箱
                user=models.User.objects.filter(email=username).first()
            else:
                user=models.User.objects.filter(username=username).first()
            if user: # 存在用户
                # 校验密码,因为是密文,要用check_password
                if user.check_password(password):
                    # 签发token
                    payload = jwt_payload_handler(user)  # 把user传入,得到payload
                    token = jwt_encode_handler(payload)  # 把payload传入,得到token
                    self.context['token']=token
                    self.context['username']=user.username
                    return attrs
                else:
                    raise ValidationError('密码错误')
            else:
                raise ValidationError('用户不存在')
JWT配置参数
#settings.py
    import datetime
    JWT_AUTH = {
        'JWT_RESPONSE_PAYLOAD_HANDLER':'app01.utils.jwt_response.jwt_response_payload_handler',
        'JWT_EXPIRATION_DELTA': datetime.timedelta(days=7), # 过期时间,手动配置
    }
基于角色的权限控制(Django内置的的auth体系)
#Role-Based Access Control(RBAC)是基于角色的访问控制,用于公司内部系统
#Django的auth就是一套基于RBAC的权限系统
#django中,
	user表
	permission表
	group表
	user_groups表是user和group的中间表
	group_permissions表是group和permission中间表
	user_permissions表是user和permission中间表
	#后端,需要三大认证(认证,权限,频率)
Django缓存
# 前端混合开发缓存的使用
	-缓存的位置,通过配置文件来操作(以文件为例)
    -缓存的粒度:
    	-全站缓存
        	中间件
            MIDDLEWARE = [
                'django.middleware.cache.UpdateCacheMiddleware',
                。。。。
                'django.middleware.cache.FetchFromCacheMiddleware',
            ]
            CACHE_MIDDLEWARE_SECONDS=10  # 全站缓存时间
        -单页面缓存
        	在视图函数上加装饰器
            from django.views.decorators.cache import cache_page
            @cache_page(5)  # 缓存5s钟
            def test_cache(request):
                import time
                ctime=time.time()
                return render(request,'index.html',context={'ctime':ctime})

        -页面局部缓存
        	{% load cache %}
            {% cache 5 'name' %}  # 5表示5s钟,name是唯一key值
             {{ ctime }}
            {% endcache %}


# 前后端分离缓存的使用
	- 如何使用
        from django.core.cache import cache
        cache.set('key',value可以是任意数据类型)
        cache.get('key')
    -应用场景:
    	-第一次查询所有图书,你通过多表联查序列化之后的数据,直接缓存起来
        -后续,先去缓存查,如果有直接返回,没有,去连表查,返回之前再缓存
base64使用
#base64编码和解码,base63可变长,可反解,hash(md5)固定长度,不可逆加密
#base64编码
	import base64
	import json
	dic = {'name':'joab','age':18,'sex':'男'}
	dic_str = json.dumps(dic)

	ret = base64.b64encode(dic_str.encode('utf-8'))
#base64解码
	ret2 = base64.b64decode(ret)

 浙公网安备 33010602011771号