Flutter Apps CI/CD using AppCenter
Although there are already several articles about continuous deployment via AppCenter for flutter. Some of them outdated or they have missed some details. So I decided to write my own article after connecting two flutter apps to AppCenter. At least it may help you to solve your current problem by just looking through it find out which part were you missed.
Right after you sing up you will see this windows, here click button “Add new organization”

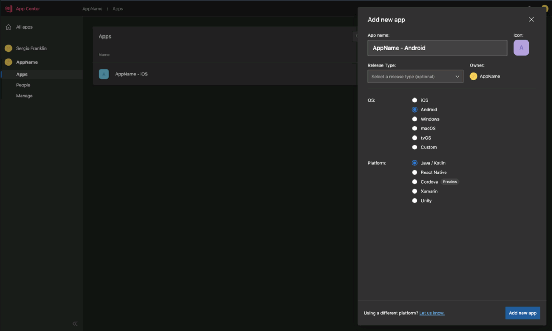
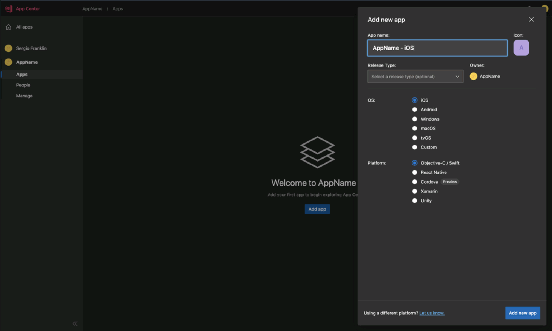
Then click “Add new app” button in the center and then choose Android or iOS configuration. I have chose a name “AppName - iOS” and for android app “AppName - Android”
Then click just created app and now you should connect one of your Git repository hosting service in which your app is located. After logging in to your account you can choose your repository there
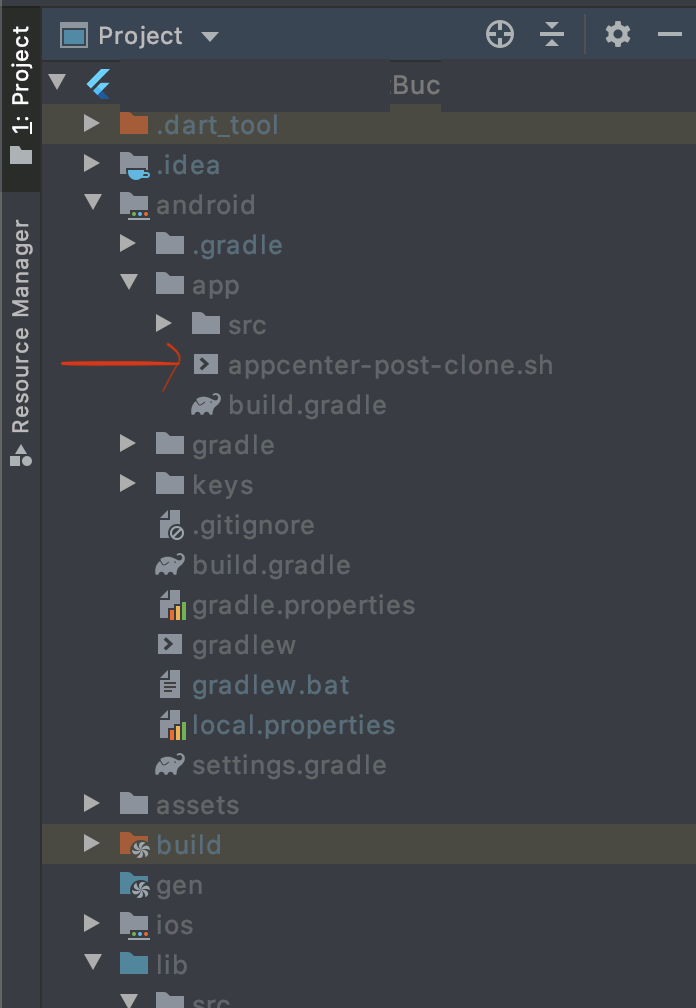
Firstly, you have to create a file called appcenter-post-clone.sh and put it into android/app/ path. Copy content for this file from here: https://github.com/microsoft/appcenter/blob/master/sample-build-scripts/flutter/android-build/appcenter-post-clone.sh
NOTE: If you want to publish android app bundle (.aab file). Instead of file in the given link above, you should copy code below to your appcenter-post-clone.sh file in the path android/app/
#!/usr/bin/env bash
#Place this script in project/android/app/cd ..# fail if any command fails
set -e
# debug log
set -xcd ..
git clone -b beta https://github.com/flutter/flutter.git
export PATH=`pwd`/flutter/bin:$PATHflutter channel stable
flutter doctor echo “Installed flutter to `pwd`/flutter”# build APK
flutter build apk — release# if you need build bundle (AAB) in addition to your APK, uncomment line below and last line of this script.
flutter build appbundle# copy the APK where AppCenter will find it
mkdir -p android/app/build/outputs/apk/;
mv build/app/outputs/apk/release/app-release.apk $_# copy the AAB where AppCenter will find it
mkdir -p android/app/build/outputs/bundle/;
mv build/app/outputs/bundle/release/app-release.aab $_
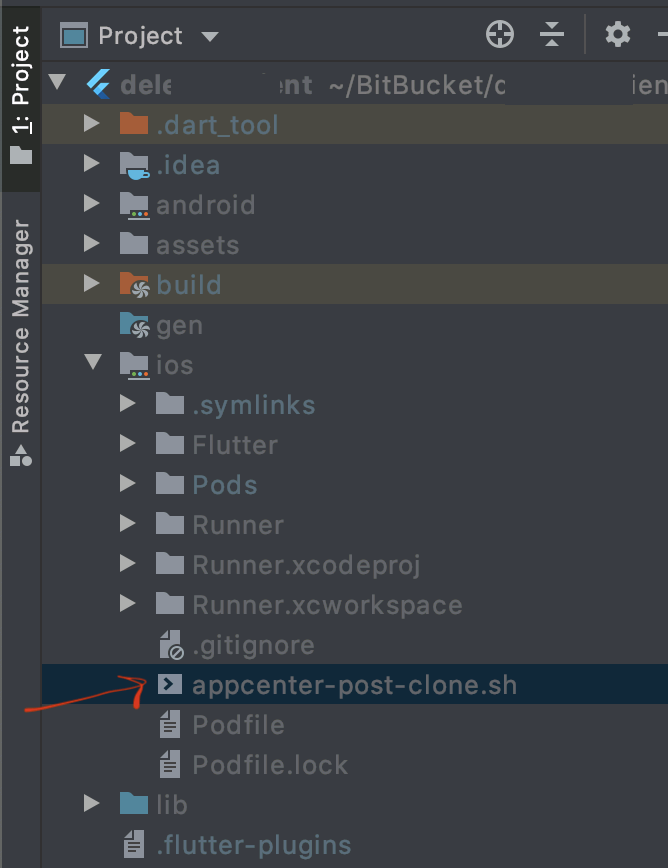
Also you have to create such file inside ios/ folder and copy its content from here: https://github.com/microsoft/appcenter/blob/master/sample-build-scripts/flutter/ios-build/appcenter-post-clone.sh
Then change .gitignore file inside your project which is located here:
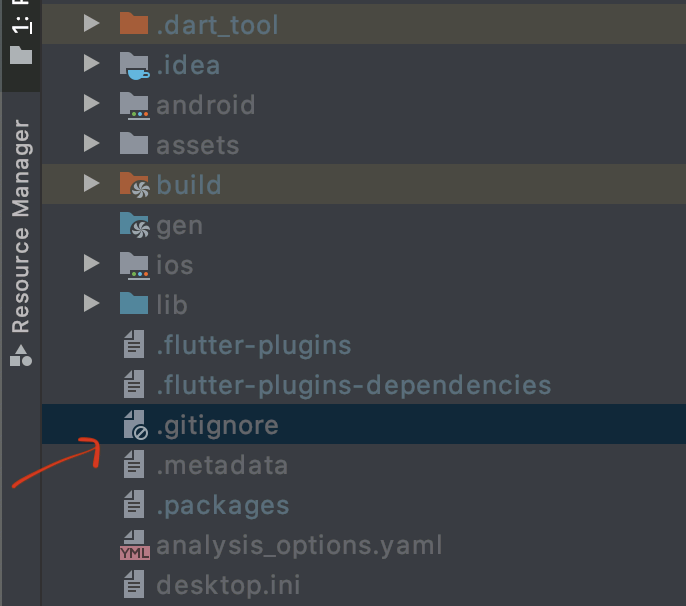
Copy the content of gitignore I provided below and paste it to your project’s .gitignore file (NOTE: You should replace content of your .gitignore file fully i.e. first remove everything there and copy paste what is given below)
# Miscellaneous
*.class
*.log
*.pyc
*.swp
.DS_Store
.atom/
.buildlog/
.history
.svn/
*.bat

# IntelliJ related
*.iml
*.ipr
*.iws
.idea/

# The .vscode folder contains launch configuration and tasks you configure in
# VS Code which you may wish to be included in version control, so this line
# is commented out by default.
.vscode/

# Flutter/Dart/Pub related
**/doc/api/
.dart_tool/
.flutter-plugins
.flutter-plugins-dependencies
.packages
.pub-cache/
.pub/
/build/

# Web related
lib/generated_plugin_registrant.dart

# Symbolication related
app.*.symbols

# Obfuscation related
app.*.map.json

# Exceptions to above rules.
!/packages/flutter_tools/test/data/dart_dependencies_test/**/.packages

# Android related
**/android/**/gradle-wrapper.jar
**/android/.gradle
**/android/captures/
**/android/local.properties
**/android/**/GeneratedPluginRegistrant.java

# iOS/XCode related
**/ios/**/*.mode1v3
**/ios/**/*.mode2v3
**/ios/**/*.moved-aside
**/ios/**/*.pbxuser
**/ios/**/*.perspectivev3
**/ios/**/*sync/
**/ios/**/.sconsign.dblite
**/ios/**/.tags*
**/ios/**/.vagrant/
**/ios/**/DerivedData/
**/ios/**/Icon?
**/ios/**/Pods/
**/ios/**/.symlinks/
**/ios/**/profile
**/ios/**/xcuserdata
**/ios/.generated/
**/ios/Flutter/App.framework
**/ios/Flutter/Flutter.framework
**/ios/Flutter/Generated.xcconfig
**/ios/Flutter/app.flx
**/ios/Flutter/app.zip
**/ios/Flutter/flutter_assets/
**/ios/ServiceDefinitions.json
**/ios/Runner/GeneratedPluginRegistrant.*

# Exceptions to above rules.
!**/ios/**/default.mode1v3
!**/ios/**/default.mode2v3
!**/ios/**/default.pbxuser
!**/ios/**/default.perspectivev3
Next, you should change .gitignore file inside the android/ folder.
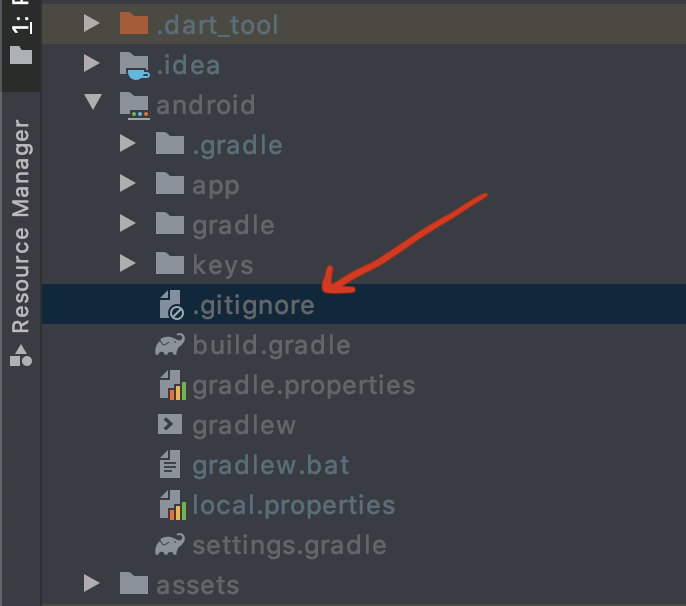
Now it should look like this:
/.gradle
/captures/
/local.properties
GeneratedPluginRegistrant.java
The next step is we will use flutter_appcenter_bundle package:
After adding this package to your pubspec.yaml file and getting dependencies.
Open your terminal (in project root directory) and type:
cd iospub update
If you get error this error:
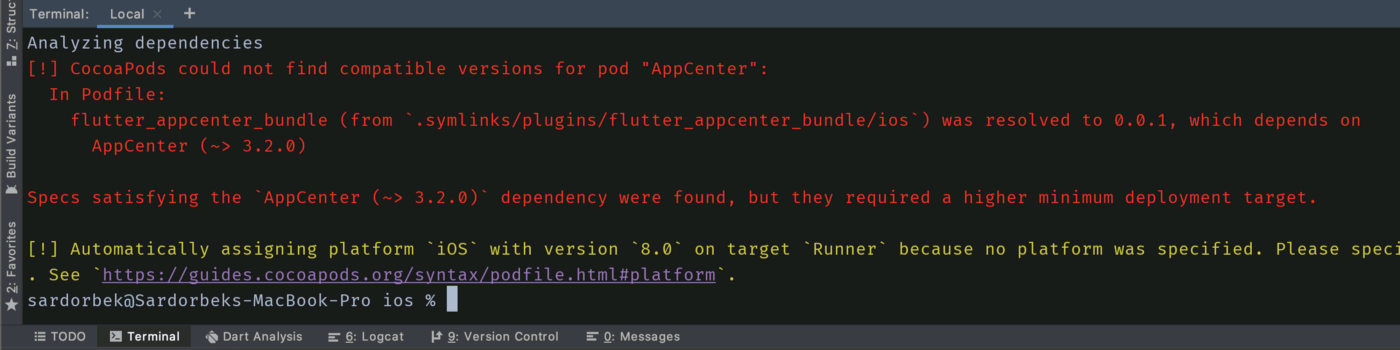
Go to ios folder inside your project and open Runner.xcworkspace file and change iOS version from 8.0 to 9.0

Now type pod update again in your terminal, error should disappear. Of course there may be warnings but they are not critical.
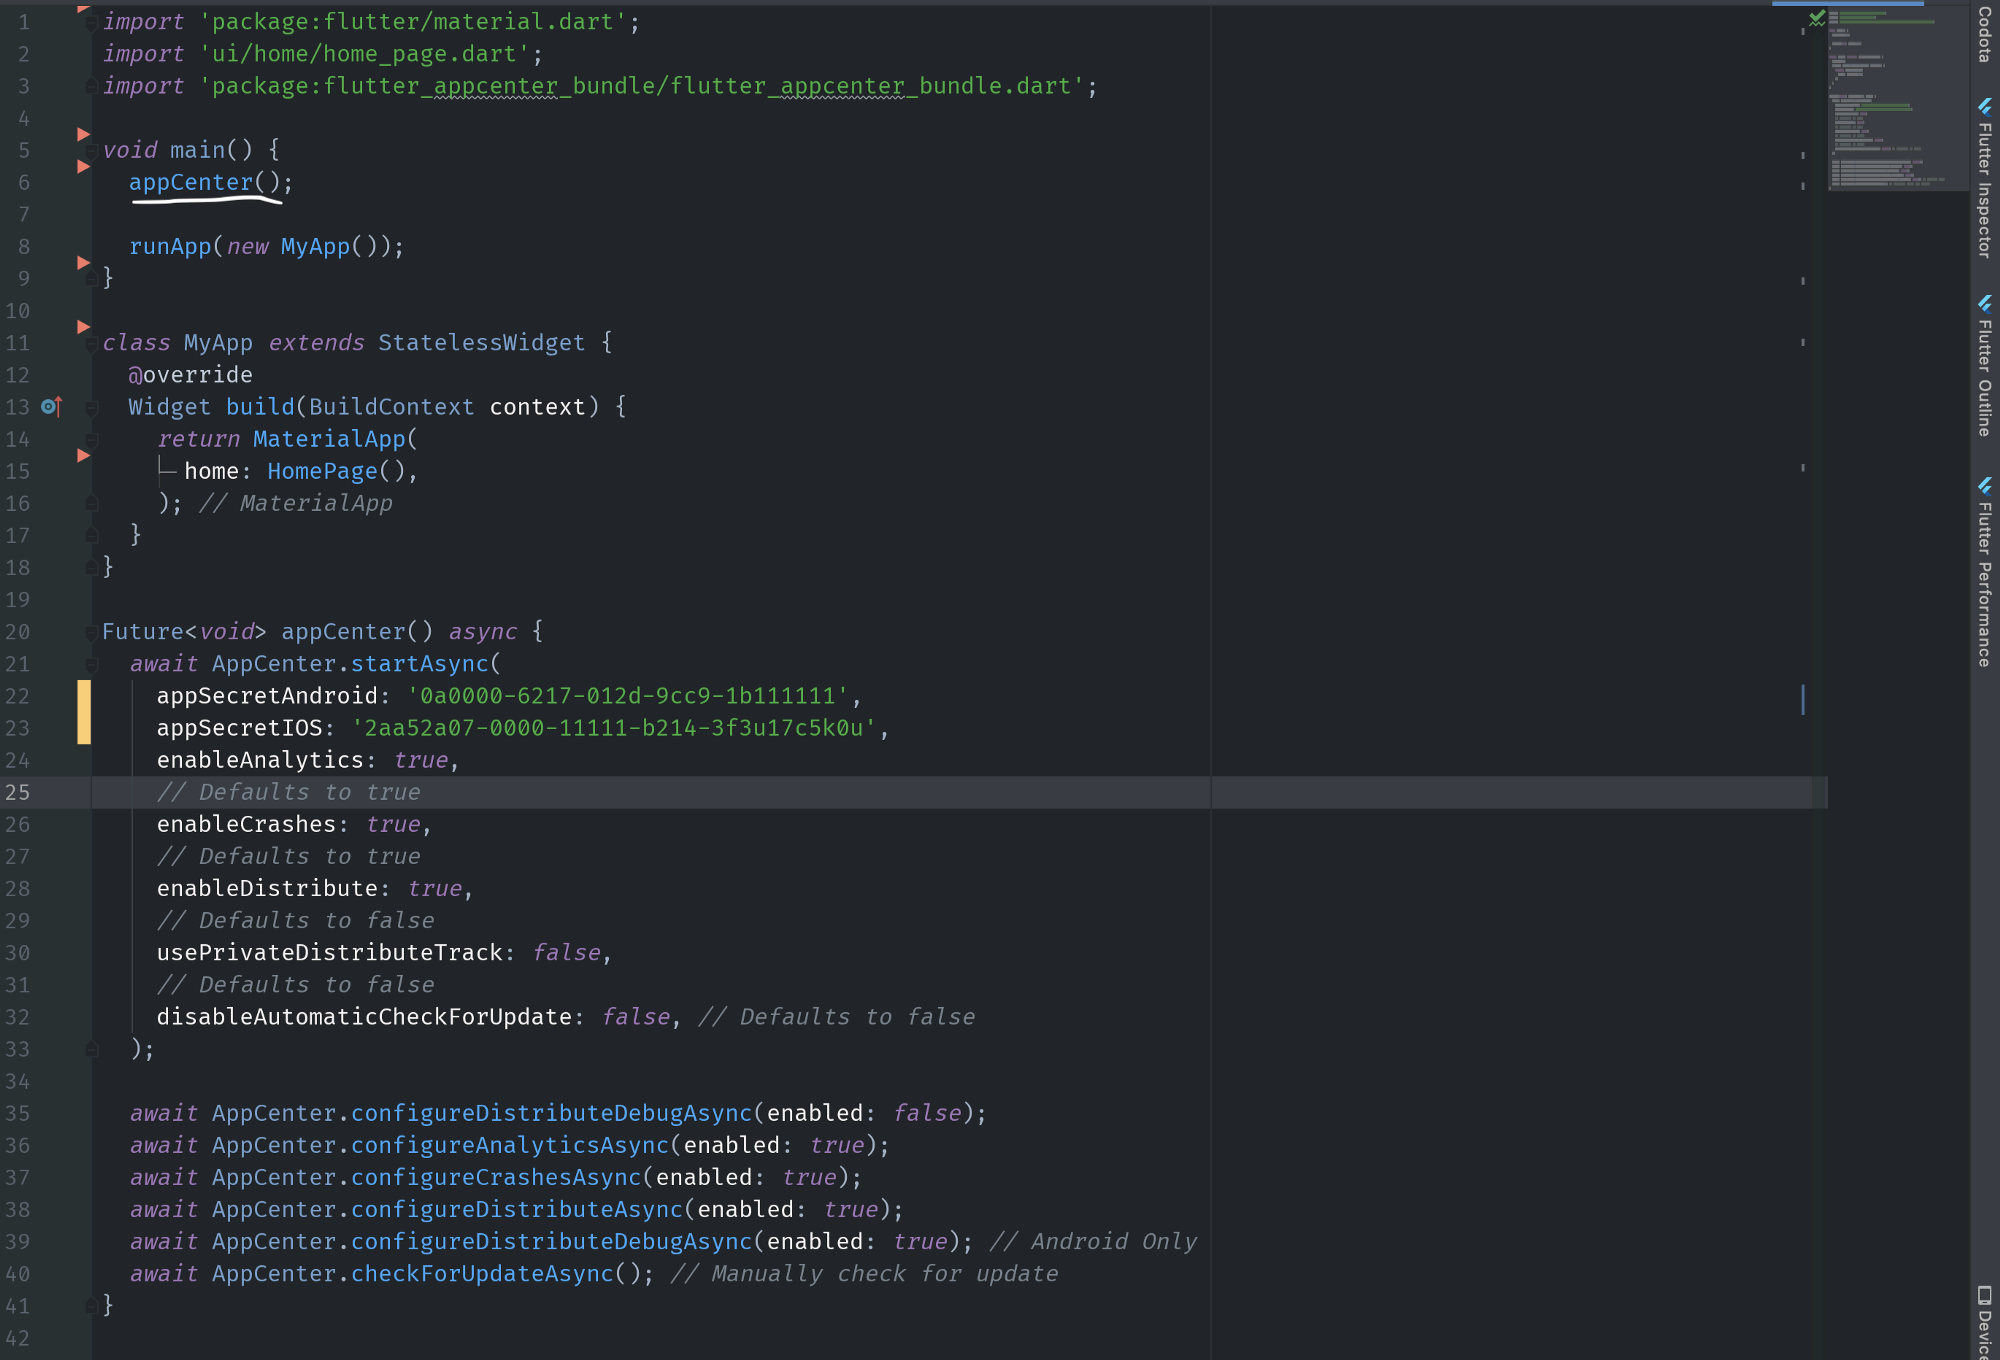
Following this open your main.dart file and this function (it’s also given in package example section).
Future<void> appCenter() async {
  await AppCenter.startAsync(
    appSecretAndroid: '********', //YOUR android APPSECRET CODE
    appSecretIOS: '********', //YOUR iOS APPSECRET CODE
    enableAnalytics: true,
    // Defaults to true
    enableCrashes: true,
    // Defaults to true
    enableDistribute: true,
    // Defaults to false
    usePrivateDistributeTrack: false,
    // Defaults to false
    disableAutomaticCheckForUpdate: false, // Defaults to false
  );

  await AppCenter.configureDistributeDebugAsync(enabled: false);
  await AppCenter.configureAnalyticsAsync(enabled: true);
  await AppCenter.configureCrashesAsync(enabled: true);
  await AppCenter.configureDistributeAsync(enabled: true);
  await AppCenter.configureDistributeDebugAsync(enabled: true);
  // Android Only
  await AppCenter.checkForUpdateAsync(); // Manually check for update
}
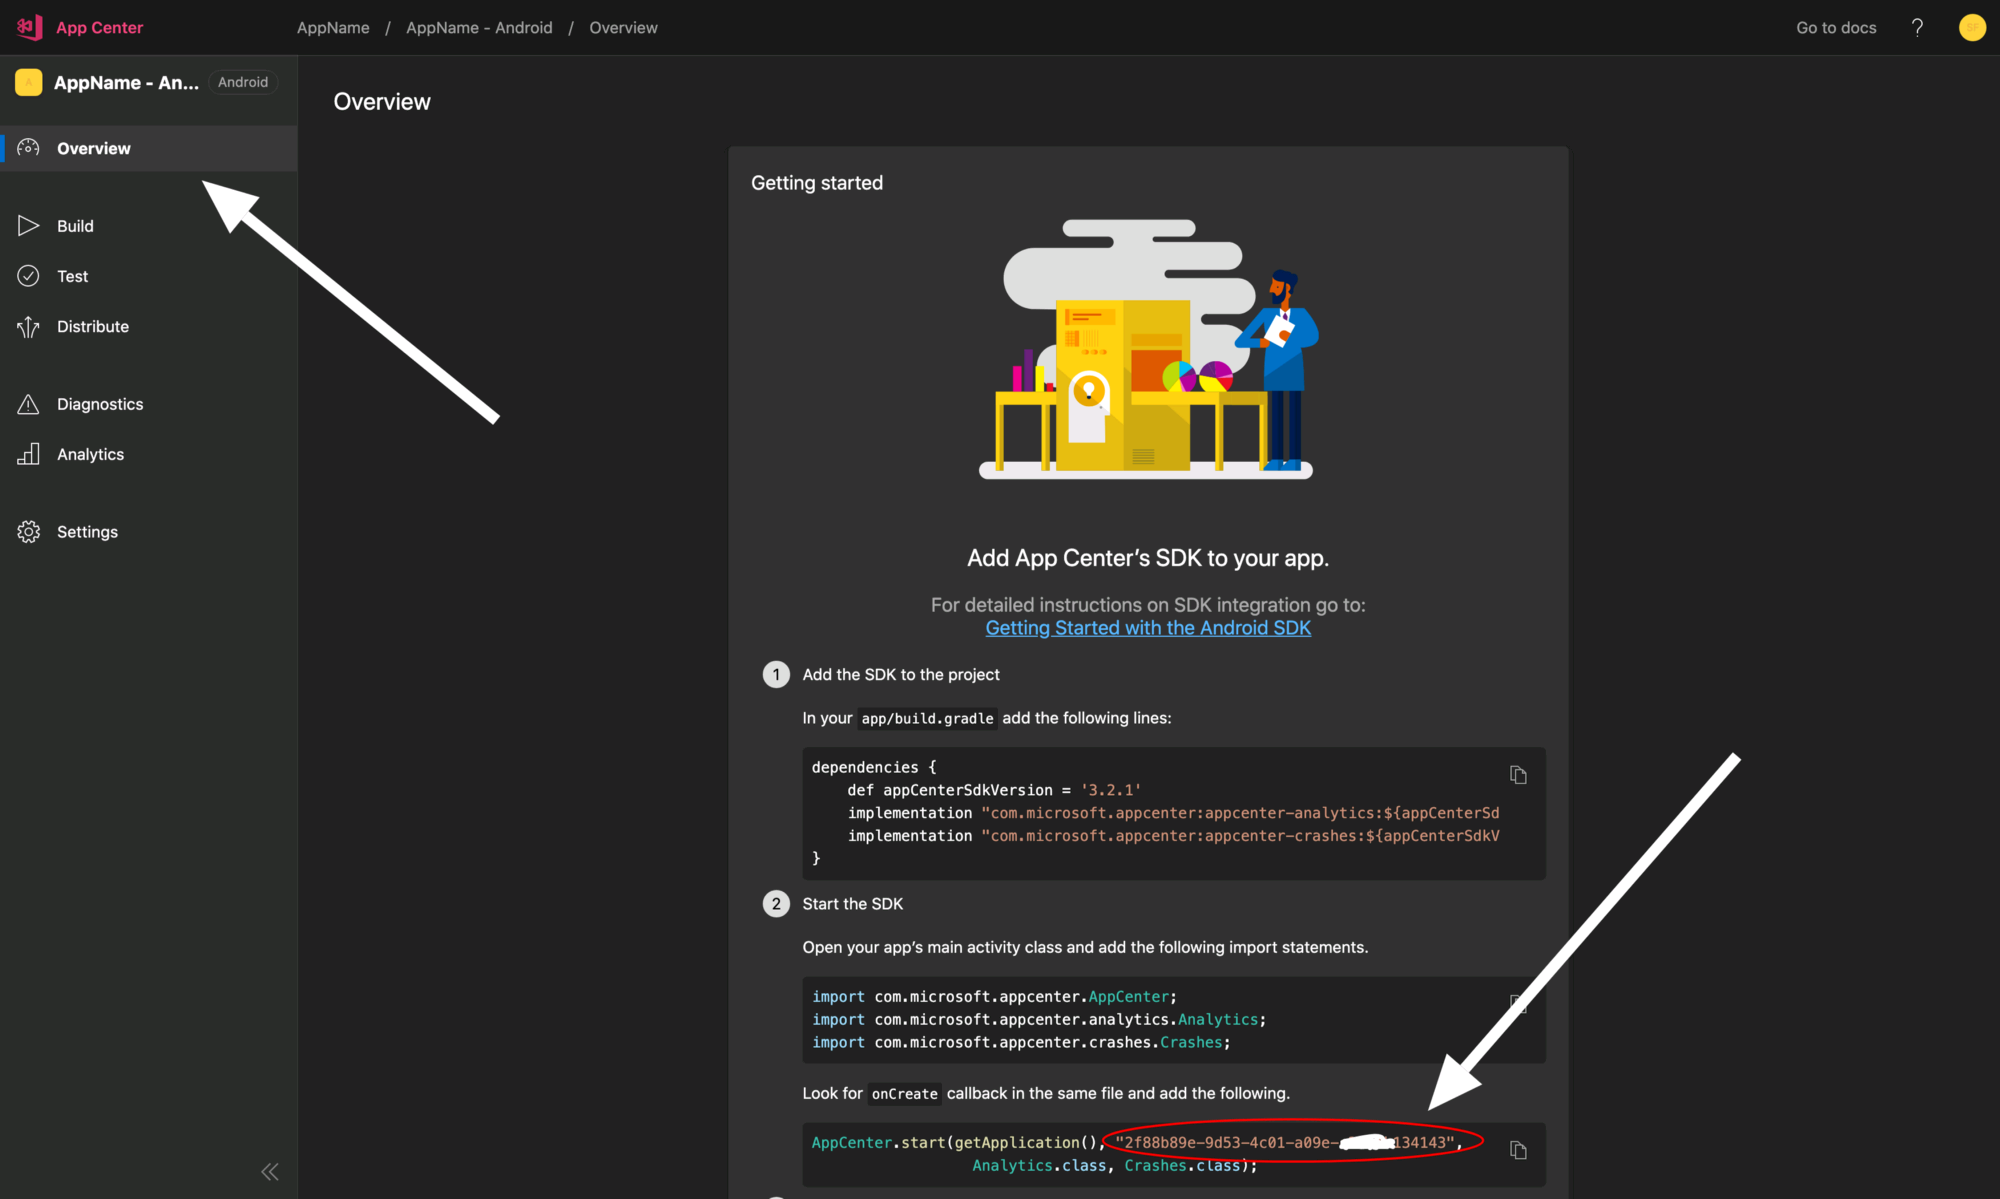
You can get android and iOS appsecret code from AppCenter inside your app in overview section.
There will be different secret code for your android and iOS app in appcenter
You should call this function in your main() function, here is example how my main.dart file looks after this process:
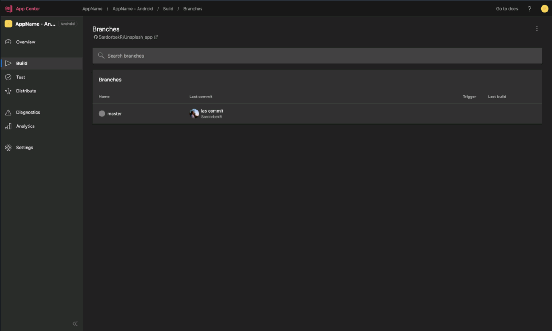
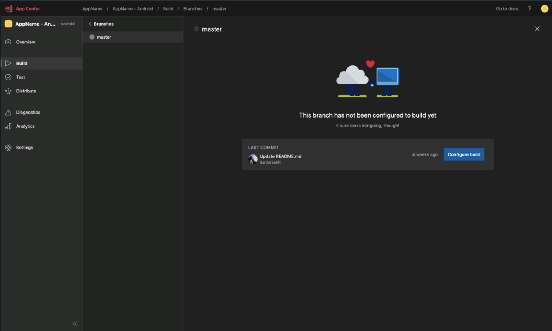
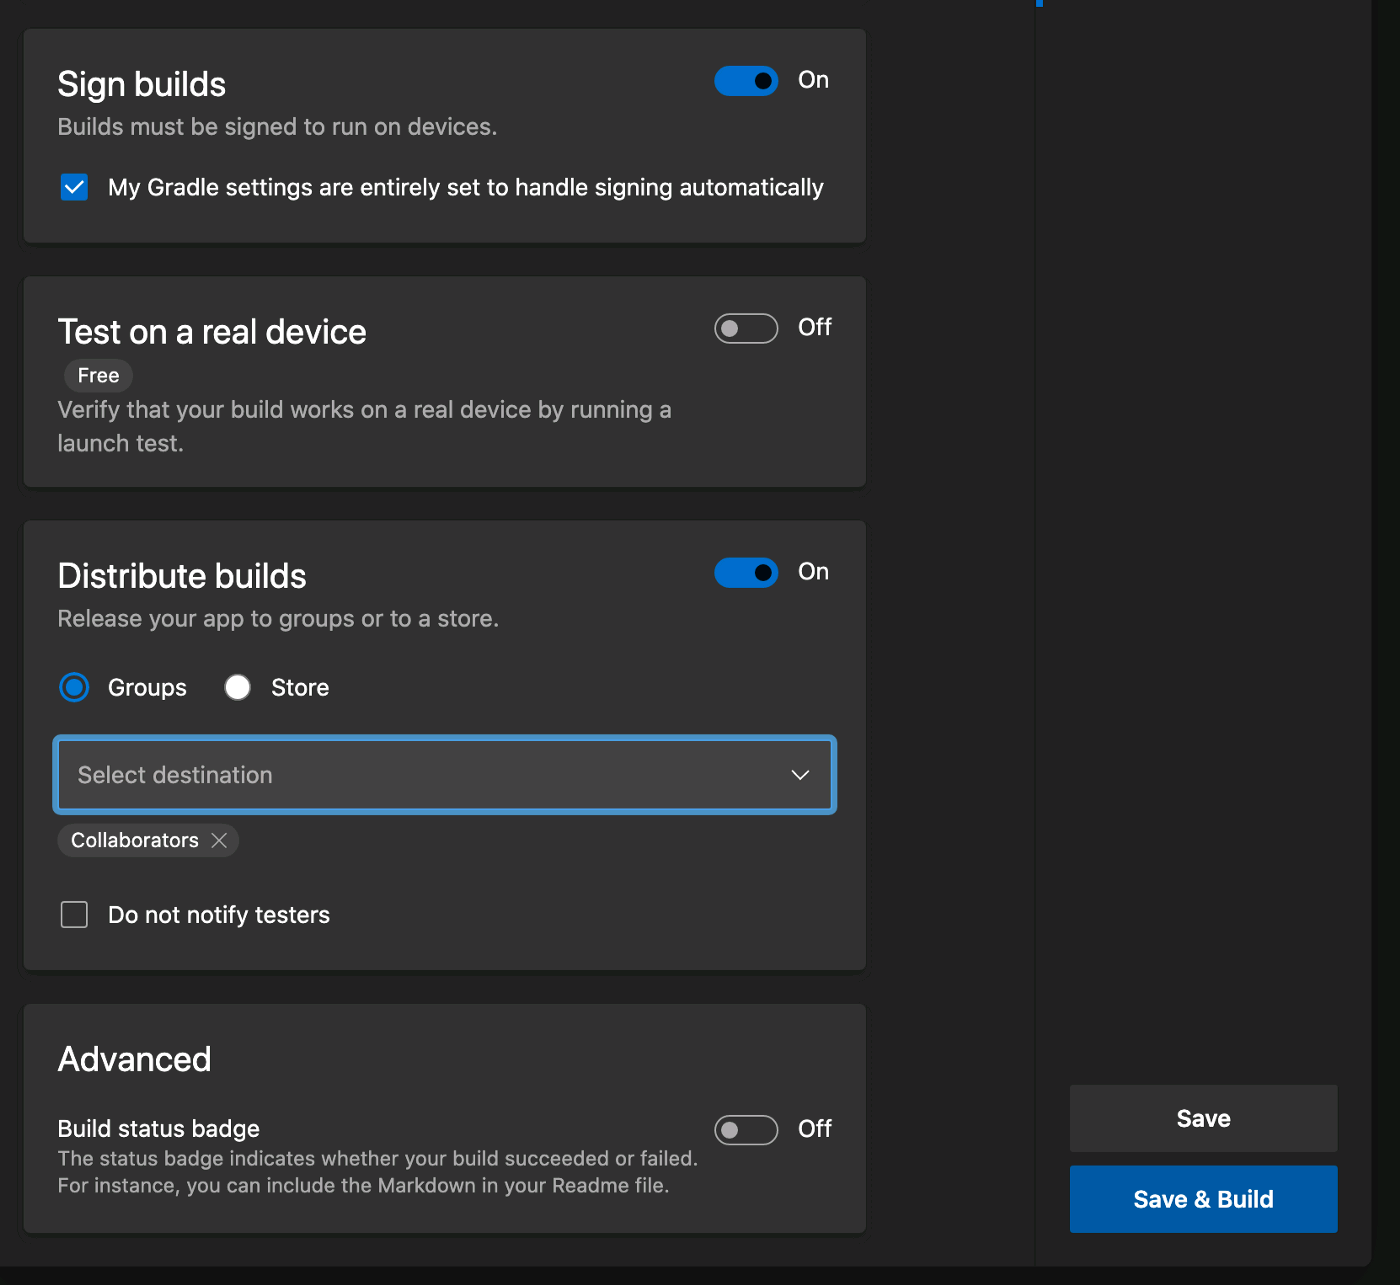
Now let’s go back to AppCenter, click build section and then you see your branches. In my case there’s only master branch, but if you have more branches you can configure any of them depending on which of them you need. Click one of branches then you should click “Configure build” button there.
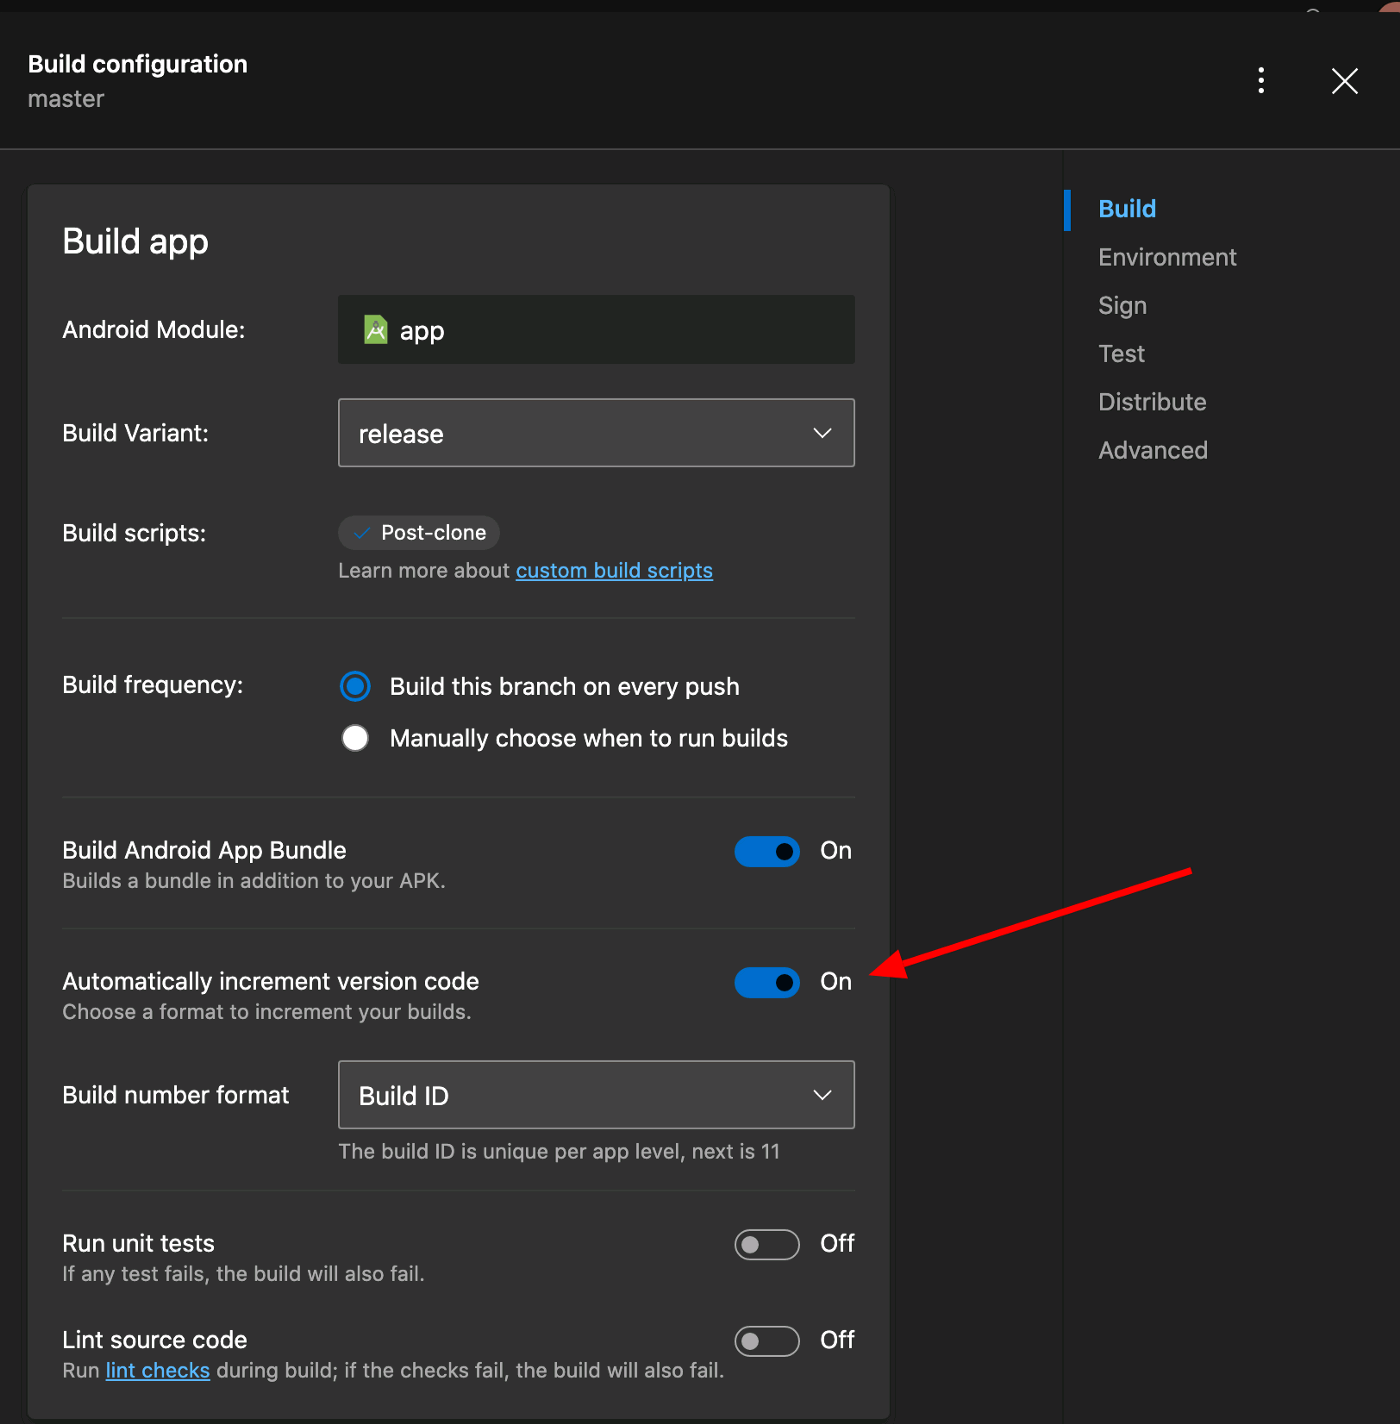
If you turned on automatically increment version code. You should make a little change inside your android/app/build.gradle file. (scroll down I’ve provided example for this)
Here is how it looks. If you run this project in your computer, it will not run. But when you upload this project to your github account and build it in appcenter, it will work.

Also if you want to increase your build time in AppCenter you should turn off Test on real device.

 浙公网安备 33010602011771号