
Power Apps with Ribbon button
Adding Buttons to Ribbons
I recently inserted a button into a ribbon bar for a customer, it had been quite a while since I’d played with the Ribbon Bar. Previously I’d used a program that ran from my desktop to amend the buttons. But that has all changed now! So I thought I’d do a quick post giving some details on how to achieve this.
Once you understand the sequence of the steps then this a pretty straight forward change.
- Download and install Ribbon Workbench.
- Select a suitable ICON for your button.
- Create a solution.
- Edit the button in Ribbon Workbench.
- Publish and test.
Step One – Download and install Ribbon Workbench.
 If you haven’t got it already you’ll need to download and install Ribbon Workbench. Download it from here.
Once it is download, simply go to solutions in the customizations area of settings. Then import the zip file solution that will have been downloaded.
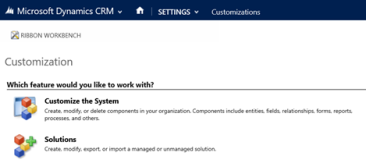
Now when you navigate to the customizations page in CRM you’ll have a new option. (See my RIBBON WORKBENCH button below.)
Step Two – Select a suitable ICON for your button.
There are lots of sources for ICONs or you can create your own.
Failing that, download the CRM2015 SDK. As you can then find and use all of the ICONS provided with CRM.
….\CRM2015 SDK\CRM SDK\SDK\Resources\Images\Ribbon
Typically you’ll need two image, one which is 16×16 and another which is 32×32. (You’ll generally fins both in the SDK, making life easy.)
In this random example I’m going to use an icon called “AlternateKey_16” ![]() and “AlternateKey_32”.
and “AlternateKey_32”. ![]()
Step Three – Create a solution
 Create a new solution and add just the items you are going to work with. (You can use a larger solution but it will take ages to load.) You’ll be creating this solution simply to support the amending of the ribbon buttons, you can always remove it afterwards.
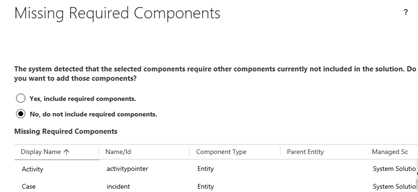
When you add the entity you want to change into the solution you will be prompted to add other components, make sure you click NO.
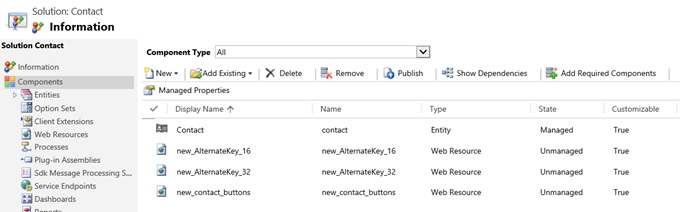
Now add web resources you want to use as icons (example below) …..


Create a new (or use existing) Web Resource for the JavaScript you want to create. I am going to simply add a new Web Resource and then use the text editor to insert the following code;
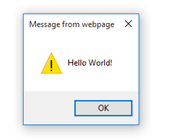
function contact_hello_button() {
alert(“Hello World!”);
}
Coding doesn’t get much simpler than this!
Finally, I had a solution that looks like this;
Step Four – Edit the button in Ribbon Workbench.
Note:
I have tried this using the Edge Browser and Google Chrome. Both had problems, you might be best sticking with Internet Explorer at this point.
Now go to your customizations area and select the ribbon workbench icon, first thing that will happen is you’ll be promoted for a solution name. So enter the details for the solution you just created. There will then be a short pause whilst work bench loads the solution.
Eventually you will be presented with a screen like the one below. You can make all sorts of changes in here. But in my example we are simply going to add a button to the contact form.

 First off we are going to add in the javascript you created as a new command, select the Commands option in the Solution Elements tab. Then right click and select “Add New”.
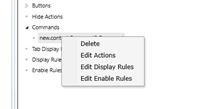
Now right click on the command created and select to edit the actions.
 Next click to add an action and select that you want to add a Javascript function action. (you can also add an open url action). You’ll next key in the name of the function you want to trigger for this command. And select the library that holds the function. (This will be the javascript Web Resource you’ve already added to the project.)

Next go to the button TOOLBOX and simply drag a new button onto the FORM toolbar. Mine ended up looking like this.
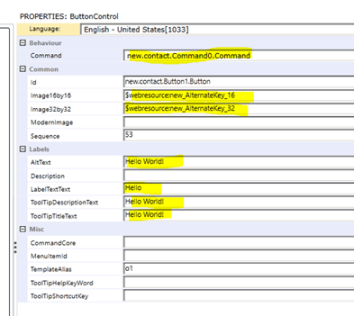
You can now set the required properties for the button.
In my example, I’ve selected the command we’ve just created.
Then I have added the two images we’ve already added to the solution.
And I’ve set the button labels as shown.
Step Five – Publish and Test.
 Now publish and test your change. To publish simply click the “Publish” option in the top of the work bench ribbon. If you have any warning messages they may display in the main panel of work bench. If you have no messages, you are ready to test the change.
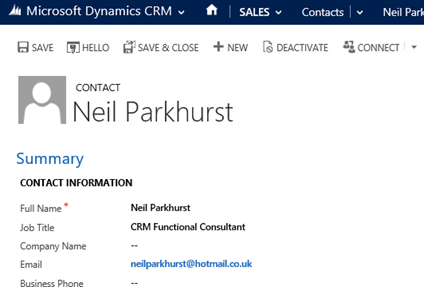
Here you can see that I now have a “random” HELLO button in the ribbon bar for my contact.
And clicking the button will give a comforting pop message!
posted on 2020-12-13 14:32 lingdanglfw 阅读(253) 评论(0) 收藏 举报

 浙公网安备 33010602011771号