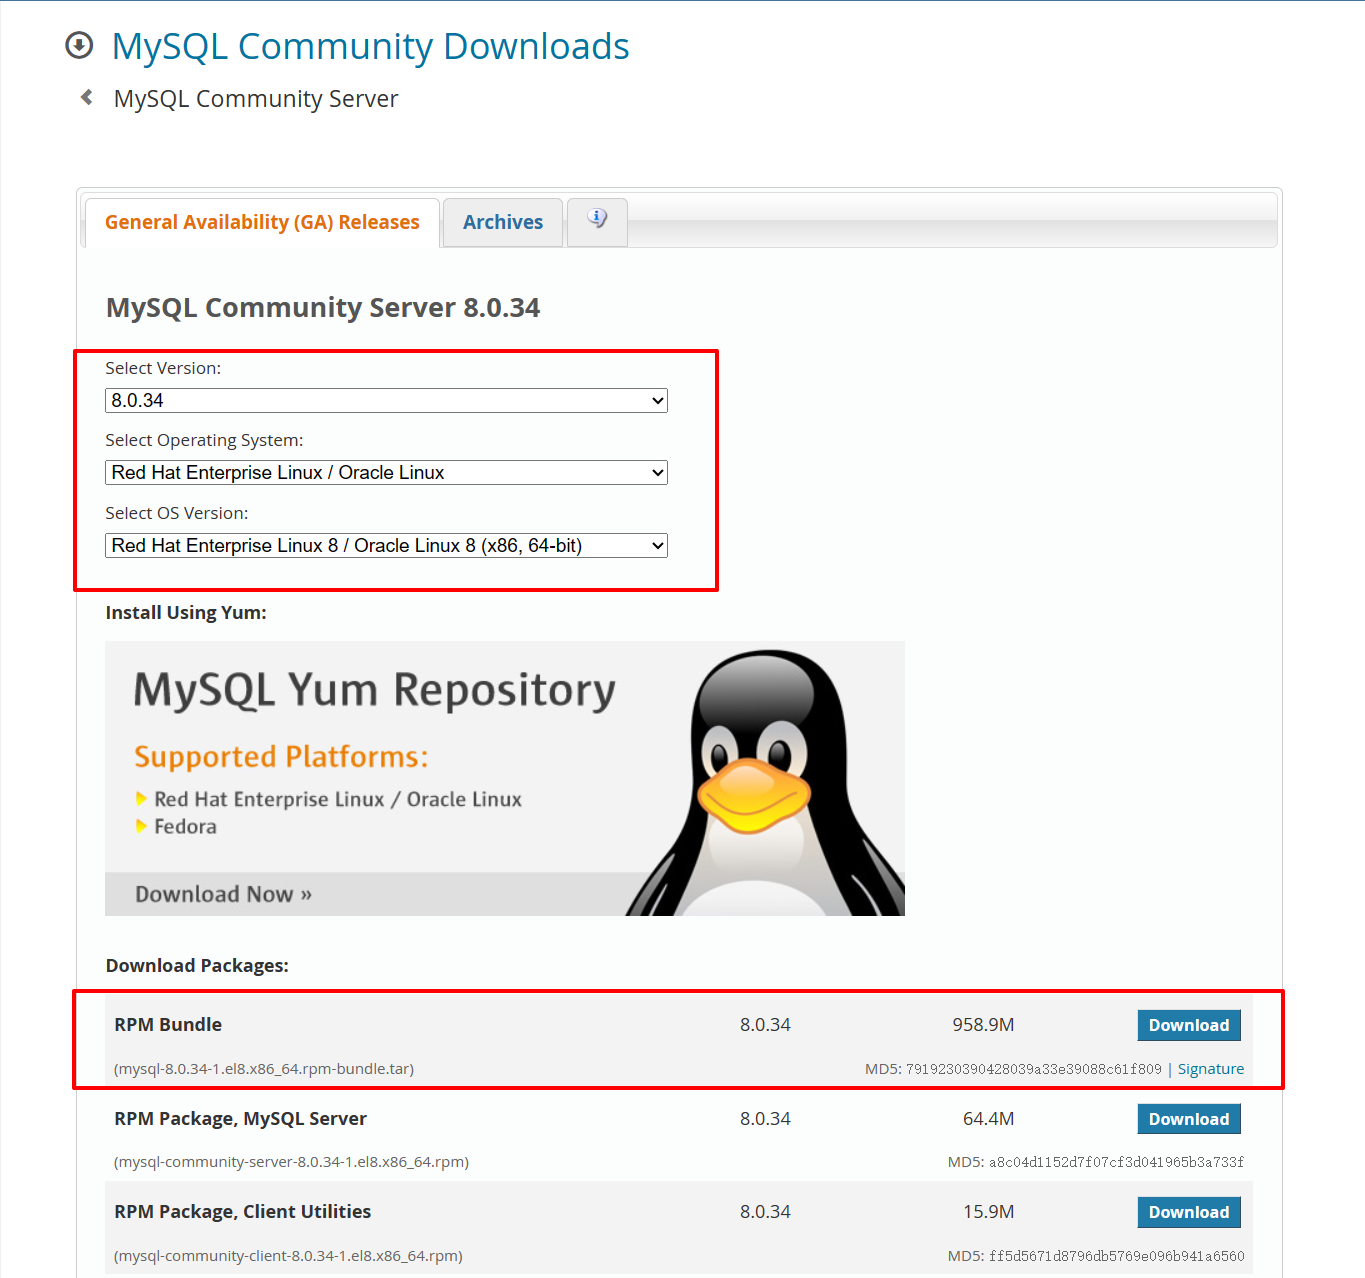
一.下载MySQL8.0社区版:
二.安装 MySQL8.0
1. 第一件事,虚拟机根目录下新建目录
mkdir /usr/local/mysql
mkdir -p /usr/local/mysql/data /usr/local/mysql/log
2. 下载软件包到本地计算机后,再将软件包上传到虚拟机,这里提供两个方法
2.1 直接从本地拖到编辑器可视化界面的目标文件夹
2.2 不支持可视化的远程终端登录界面可以使用scp命令行传输
 scp -r -v /drives/d/Download/mysql-8.0.34-1.el8.x86_64.rpm-bundle.tar root@192.168.91.128:/usr/local/mysql/packages
 # 从本地的 /drives/d/Download 下, copy文件到虚拟机, ip 为 192.168.91.128 的目录 /usr/local/mysql 下
2.3 解压软件包到 /usr/local/mysql/packages 下
2.4 遇到的问题:解压缩文件 出现 Error
  tar -zxvf mysql-8.1.0-linux-glibc2.17-x86_64.tar
  tar: Error is not recoverable: exiting now
2.5 去除-z参数,解压成功

3.安装软件
3.1. rpm 命令依次安装下列软件包
  rpm -ivh mysql-community-common-8.0.34-1.el8.x86_64.rpm
  rpm -ivh mysql-community-client-plugins-8.0.34-1.el8.x86_64.rpm
  rpm -ivh mysql-community-client-8.0.34-1.el8.x86_64.rpm
  rpm -ivh mysql-community-libs-8.0.34-1.el8.x86_64.rpm
  rpm -ivh mysql-community-icu-data-files-8.0.34-1.el8.x86_64.rpm
  rpm -ivh mysql-community-server-8.0.34-1.el8.x86_64.rpm
3.2. 查询 mysqld 的状态,并停止mysqld服务, 初始化 root
  systemctl status mysqld
  service mysqld stop
3.3. mysql数据库的系统初始化
  mysqld --initialize –console      //mysql数据目录为:/var/lib/mysql
  chmod -R 777 /var/lib/mysql      //开放777权限
3.4. mysql的设置文件: cat /etc/my.cnf 可以看到相关设置如下。
  [root@localhost lib]# cat /etc/my.cnf
  # For advice on how to change settings please see
  # http://dev.mysql.com/doc/refman/8.0/en/server-configuration-defaults.html
  [mysqld]
  #
  # Remove leading # and set to the amount of RAM for the most important data
  # cache in MySQL. Start at 70% of total RAM for dedicated server, else 10%.
  # innodb_buffer_pool_size = 128M
  #
  # Remove the leading "# " to disable binary logging
  # Binary logging captures changes between backups and is enabled by
  # default. It's default setting is log_bin=binlog
  # disable_log_bin
  #
  # Remove leading # to set options mainly useful for reporting servers.
  # The server defaults are faster for transactions and fast SELECTs.
  # Adjust sizes as needed, experiment to find the optimal values.
  # join_buffer_size = 128M
  # sort_buffer_size = 2M
  # read_rnd_buffer_size = 2M
  #
  # Remove leading # to revert to previous value for default_authentication_plugin,
  # this will increase compatibility with older clients. For background, see:
  # https://dev.mysql.com/doc/refman/8.0/en/server-system-variables.html#sysvar_default_authentication_plugin
  # default-authentication-plugin=mysql_native_password

  datadir=/var/lib/mysql
  socket=/var/lib/mysql/mysql.sock

  log-error=/var/log/mysqld.log
  pid-file=/var/run/mysqld/mysqld.pid
3.5. mysql数据库的密码初始化
查看初始密码
cat /var/log/mysql/mysqld.log

启动mysql服务
   systemctl start mysqld
   mysql -u root –p

   [root@localhost mysql]# service mysqld start
   Redirecting to /bin/systemctl start mysqld.service

   [root@localhost mysql]# mysql -u root -p
   Enter password:
   Welcome to the MySQL monitor.  Commands end with ; or \g.
   Your MySQL connection id is 8
   Server version: 8.0.34 MySQL Community Server - GPL

   Copyright (c) 2000, 2023, Oracle and/or its affiliates.

   Oracle is a registered trademark of Oracle Corporation and/or its
   affiliates. Other names may be trademarks of their respective
   owners.

   Type 'help;' or '\h' for help. Type '\c' to clear the current input statement.

   mysql>
mysql数据库的密码初始化
alter user 'root'@'localhost' identified by '123456’
出现错误异常
首先,修改validate_password_policy参数的值
   mysql> set global validate_password_policy=0;
   Query OK, 0 rows affected (0.00 sec)
validate_password_length(密码长度)参数默认为8,我们修改为1
   mysql> set global validate_password_length=1;
   Query OK, 0 rows affected (0.00 sec)
完成之后再次执行修改密码语句即可成功
   mysql> alter user 'root'@'localhost' identified by '123456';
   Query OK, 0 rows affected (0.00 sec)
3.6 授权远程连接
    show databases;

    use mysql;

    select host, user from user;

    update user set host="%" where user='root’;

    select host, user from user;

    flush privileges;

 浙公网安备 33010602011771号