Day5
一、Link——链接外部样式的文件
实例:
<head>
<link rel="stylesheet" type="text/css" href="theme.css">
</head>
标签定义及使用说明
<link> 标签定义文档与外部资源的关系。
<link> 标签最常见的用途是链接样式表。
注意: link 元素是空元素,它仅包含属性。
注意: 此元素只能存在于 head 部分,不过它可出现任何次数。
属性
New:HTML5 新属性。
| 属性 | 值 | 描述 |
|---|---|---|
| charset | char_encoding | HTML5 不支持该属性。 定义被链接文档的字符编码方式。 |
| href | URL | 定义被链接文档的位置。 |
| hreflang | language_code | 定义被链接文档中文本的语言。 |
| media | media_query | 规定被链接文档将显示在什么设备上。 |
| rel | alternate archives author bookmark external first help icon last license next nofollow noreferrer pingback prefetch prev search sidebar stylesheet tag up |
必需。定义当前文档与被链接文档之间的关系。rel 是 relationship的英文缩写。 |
| rev | reversed relationship | HTML5 不支持该属性。 定义被链接文档与当前文档之间的关系。 |
| sizesNew | HeightxWidth any |
定义了链接属性大小,只对属性 rel="icon" 起作用。 |
| target | _blank _self _top _parent frame_name |
HTML5 不支持该属性。 定义在何处加载被链接文档。 |
| type | MIME_type | 规定被链接文档的 MIME 类型。 |
二、Include JavaScript Code in HTML——在HTML里面包含JS代码
1、Handling disabled Javascript——处理禁用的Javascript
代码:
<script>
 document.write("Hello, world!");
</script>
<noscript>This browser does not support Javascript.</noscript>
实例:
2、Including a JavaScript fifile executing asynchronously——执行一个异步的js文件
代码:
<script type="text/javascript" src="URL" async></script>
三、 Using HTML with CSS
1、External Stylesheet Use——外部样式表
代码:
<head>
 <link rel="stylesheet" type="text/css" href="stylesheet.css">
</head>
2、Internal Stylesheet——内部样式表
代码:
<style type="text/css">
 body {
 background-color: gray;
 }
 </style>
 <style type="text/css">
 p {
 background-color: blue;
 }
 </style>
实现:
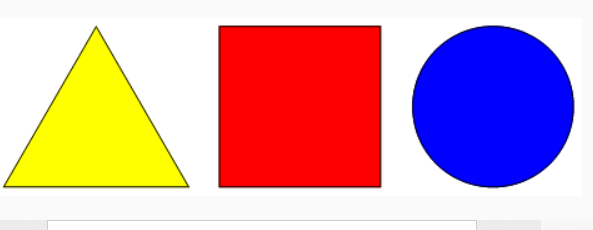
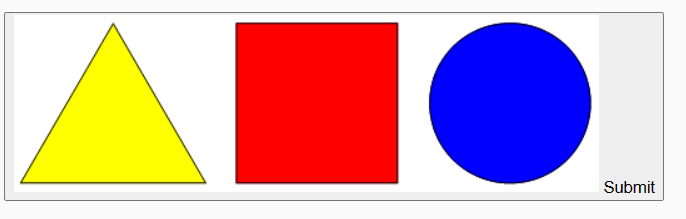
四、Image Maps—— 图像映射
1、Introduction to Image Maps——图像地图简洁
图像映射是一种具有可单击区域的图像,通常作为超链接。图像由<img>标签定义,地图由<地图>标签定义,<区域>标签表示每个可点击的区域。使用usemap和名称属性来绑定图像和映射。
代码:
<img src="http://jaced.com/blogpix/2007/trisquarecircle/002.gif" usemap="#shapes">
<map name="shapes">
 <area shape="polygon" coords="79,6,5,134,153,134">
 <area shape="rectangle" coords="177,6,306,134">
 <area shape="circle" coords="397,71,65">
</map>
实现:
五、Input Control Elemnts——输入控制元件
1、Text——文本
代码:
此处的size指的是文本框的大小。
<input type="text" size="50">
实现:

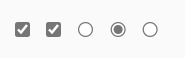
2、Checkbox and Radio Buttons——复选框和无限按钮
<input type="checkbox">  // 方框
<input type="radio">   //圆形
代码:
<input type="checkbox" name="color" id="red" value="#F00">
<input type="checkbox" name="color" id="yellow" value="#0F0">
<input type="radio" name="color" id="red" value="#F00">
<input type="radio" name="color" id="green" value="#0F0">
<input type="radio" name="color" id="blue" value="#00F">
实现:
CheckBox可以选择多个,但是radio只能选择一个。
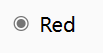
<label>
        <input type="radio" name="color" value="#F00">
        Red  //按钮名称
</label>
// 或者下面的代码实现功能是一样的
<input type="checkbox" name="color" value="#F00" id="red">
<label for="red">Red</label>
代码:
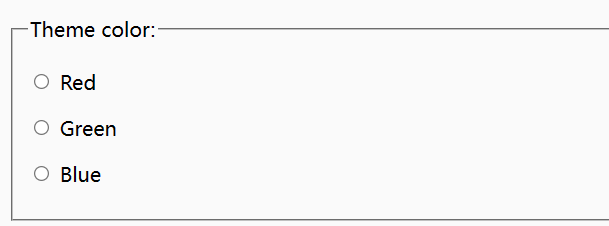
<fieldset>
        <legend>Theme color:</legend>
        <p>
            <input type="radio" name="color" id="red" value="#F00">
            <label for="red">Red</label>
        </p>
        <p>
            <input type="radio" name="color" id="green" value="#0F0">
            <label for="green">Green</label>
        </p>
        <p>
            <input type="radio" name="color" id="blue" value="#00F">
            <label for="blue">Blue</label>
        </p>
</fieldset>
实现:
3、输入确定
代码:
Marks:<input type="number" size="6" name="marks" min="0" max="100" />
Subject Feedback:<input type="range" size="2" name="feedback" min="1" max="5" />
实现:

代码:
<form>
 <input type="text" name="name" required>
 <input type="email" name="email" required>
 <input pattern="\d*" name="number" required>
 <input type="submit" value="Publish"> <!-- form will be validated -->
 <input type="submit" value="Save" formnovalidate> <!-- form will NOT be validated -->
</form>
实现:

六、color
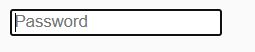
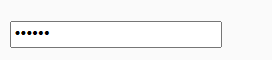
1、password
代码:
<input type="password" name="password" placeholder="Password">
实现:
2、submit
代码:
<button type ="submit">
    <img src="http://jaced.com/blogpix/2007/trisquarecircle/002.gif"/> Submit
</button>
实现:
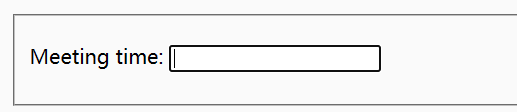
代码:
<fieldset>
 <p><label>Meeting time: <input type=datetime name="meeting.start"></label>
</fieldset>
实现:
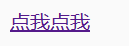
代码:
<a href="http://www.baidu.com" target="_blank">点我点我</a>
实现:
2、分组输入几个字段
代码:
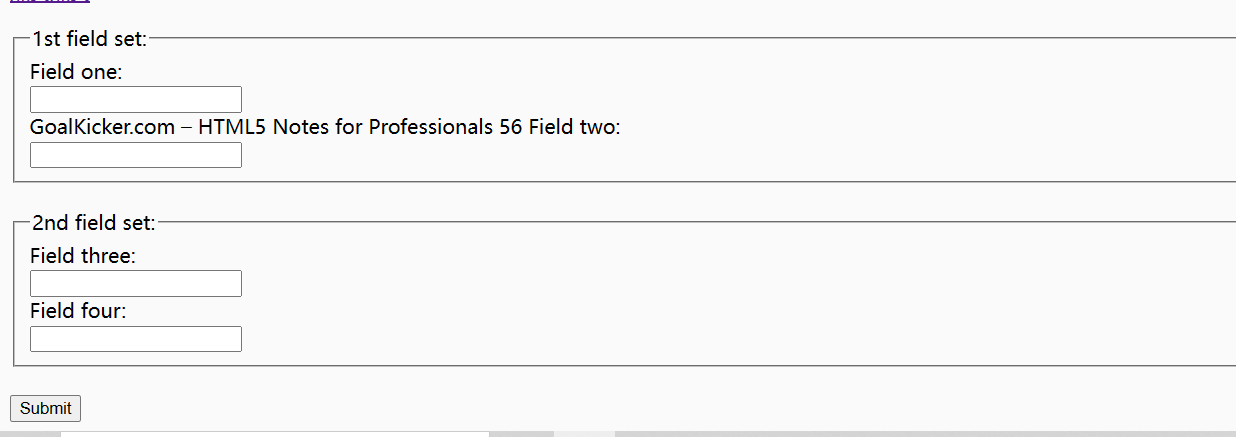
<form>
 <fieldset>
 <legend>1st field set:</legend>
 Field one:<br>
 <input type="text"><br>
GoalKicker.com – HTML5 Notes for Professionals 56
 Field two:<br>
 <input type="text"><br>
 </fieldset><br>
 <fieldset>
 <legend>2nd field set:</legend>
 Field three:<br>
 <input type="text"><br>
 Field four:<br>
 <input type="text"><br>
 </fieldset><br>
 <input type="submit" value="Submit">
</form>
实现:
七、 Div Element
1、嵌套
代码:
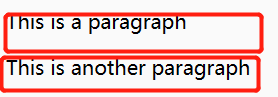
<div class="outer-div">
 <div class="inner-div">
 <p>This is a paragraph</p>
 </div>
 <div class="inner-div">
 <p>This is another paragraph</p>
 </div>
</div>
实现:
八、分段要素
1、nav
代码:
<nav role="navigation">
 <ul>
 <li><a href="https://google.com">Google</a></li>
 <li><a href="https://www.yahoo.com">Yahoo!</a></li>
 <li><a href="https://www.bing.com">Bing</a></li>
 </ul>
</nav>
2、main
代码:
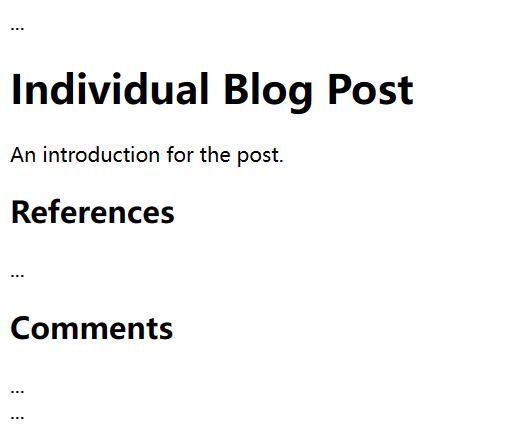
<body>
 <header>
 <nav>...</nav>
 </header>
 <main>
 <h1>Individual Blog Post</h1>
 <p>An introduction for the post.</p>
 <article>
 <h2>References</h2>
 <p>...</p>
 </article>
 <article>
GoalKicker.com – HTML5 Notes for Professionals 62
 <h2>Comments</h2> ...
 </article>
 </main>
 <footer>...</footer>
</body>
实现:
3、Section
代码:
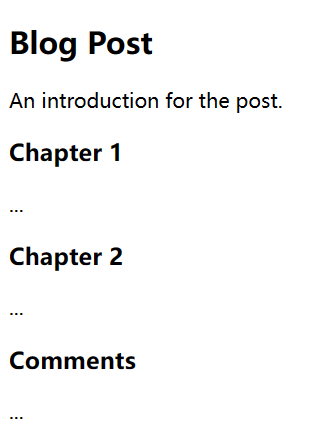
<article>
 <header>
 <h2>Blog Post</h2>
 </header>
 <p>An introduction for the post.</p>
 <section>
 <h3>Chapter 1</h3>
 <p>...</p>
 </section>
 <section>
 <h3>Chapter 2</h3>
 <p>...</p>
 </section>
 <section>
 <h3>Comments</h3> ...
 </section>
</article>
实现:
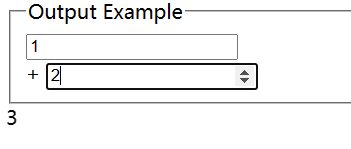
九、Output Element
1、Output Element Using For and Form Attributes——输出元素使用的属性和表单属性
代码:
<form id="form1" name="form1" oninput="out1.value = parseInt(in1.value, 10) + parseInt(in2.value,
10)">
 <fieldset>
 <legend>Output Example</legend>
 <input type="number" id="in1" name="in1" value="0">
 <br/>
 +
 <input type="number" id="in2" name="in2" value="0">
 </fieldset>
</form>
<output name="out1" for="in1 in2" form="form1">0</output>
实现:
注意:
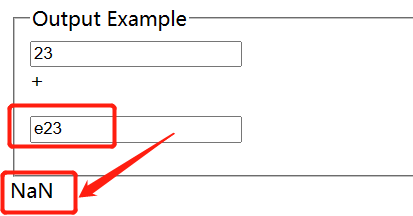
因为代码里面强转数字的函数是parseint,当输入的不是数字的时候,会出现NaN(Not a Number,非数)。
(老实说看见的第一反应是,氮化钠?!觉得又离谱又好玩,后面发现是我太离谱了)
十、Media
1、 Video
实例:
<video width="500" height="700" controls>
 <source src="video.mp4" type="video/mp4">
Your browser does not support the video tag.
</video>
2、audio
<audio controls>
 <source src="file.mp3" type="audio/mpeg">
Your browser does not support the audio element.
</audio>
3、Using `<video>` and `<audio>` element to display audio/video content——使用`<视频>`和`<音频>`元素来显示音频/视频内容
video tag example:
<video src="videofile.webm" autoplay poster="posterimage.jpg">
 Sorry, your browser doesn't support embedded videos,
 but don't worry, you can <a href="videofile.webm">download it</a>
 and watch it with your favorite video player!
</video>
<!-- Video with subtitles -->
<video src="foo.webm">
 <track kind="subtitles" src="foo.en.vtt" srclang="en" label="English">
 <track kind="subtitles" src="foo.sv.vtt" srclang="sv" label="Svenska">
GoalKicker.com – HTML5 Notes for Professionals 70
</video>
<!-- Simple video example -->
<video width="480" controls poster="https://archive.org/download/WebmVp8Vorbis/webmvp8.gif" >
 <source src="https://archive.org/download/WebmVp8Vorbis/webmvp8.webm" type="video/webm">
 <source src="https://archive.org/download/WebmVp8Vorbis/webmvp8_512kb.mp4" type="video/mp4">
 <source src="https://archive.org/download/WebmVp8Vorbis/webmvp8.ogv" type="video/ogg">
 Your browser doesn't support HTML5 video tag.
</video>
Audio tag example:
 Your browser does not support the <code>audio</code> element.
</audio>
<!-- Audio playback with captions -->
<audio src="foo.ogg">
 <track kind="captions" src="foo.en.vtt" srclang="en" label="English">
 <track kind="captions" src="foo.sv.vtt" srclang="sv" label="Svenska">
</audio>
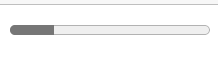
十一、Progress
1、progress
代码:
<progress value="22" max="100"></progress>
实现:
这就创建了一个填充了22%的条形图
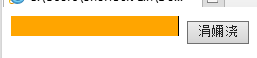
2、Changing the color of a progress bar——改变进度条的颜色
progress[value] {
 width: 250px;
 height: 20px;
}
代码:
模拟下载时的进度条
<head>
    <style>
        progress
        {
            color: orange;
            border: none;
            background: #d7d7d7;
        }
        progress::-webkit-progress-bar
        {
            background:  #d7d7d7;
        }
        progress::-webkit-progress-bar,
        progress::-moz-progress-bar
        {
            background: orange;
        }
    </style>
</head>

<body>
    <progress id='progress1' value="0" max="100">
    </progress>
    <button onclick="start_run(100)">下载</button>
    <script>
        function start_run(n) {
            if (n == 0) { alert("下载完成") }
            var progress1 = document.getElementById("progress1")
            n = n - 1
            cur_task = 100 - n
            progress1.value = cur_task
            setTimeout("start_run(" + n + ")", 100)
        }
    </script>
</body>
实现:
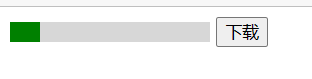
此处的,color显示绿色,为浏览器兼容问题。当将浏览器切换为ie浏览器时,进度条的颜色就会变成用户设置的颜色。

 浙公网安备 33010602011771号