单行纯文本框QLineEdit

继承 QWidget
#单行纯文本框QLineEdit
import sys
from PyQt5.QtWidgets import QApplication, QWidget,QLineEdit,QPushButton,QAction,QCompleter
from PyQt5.QtGui import QIcon

class Demo(QWidget):
    def __init__(self):
        super().__init__()
        self.resize(300,300)
        button=QPushButton('按钮',self)
        button.move(120,250)

        #控件的创建
        #QLineEdit(parent: QWidget = None)
        #QLineEdit(str, parent: QWidget = None)
        t1=QLineEdit('我是李明',self)  #创建单行纯文本框实例
        t1.move(100,20)
        t1.setText('我是物理教师')    #设置文本
        s=t1.text()  #返回真实文本内容
        button.clicked.connect(lambda: t1.insert(',我也喜欢python'))
        # 在光标处插入文本

        t2 = QLineEdit(self)
        t2.move(100,70)
        t2.setEchoMode(QLineEdit.Password)  # 显示模式
        # QLineEdit.Normal = 0    正常输出-默认
        # QLineEdit.NoEcho = 1   不输出-内容还是存在的
        # QLineEdit.Password = 2  密文形式
        # QLineEdit.PasswordEchoOnEdit = 3   编辑时明文, 结束后密文
        #echoMode() -> QLineEdit.EchoMode  返回显示模式
        t3 = QLineEdit(self)
        t3.move(100, 120)
        t3.setEchoMode(QLineEdit.PasswordEchoOnEdit)

        t2.setText('我是密文')
        s=t2.displayText()  #获取用户能看到的内容文本-能看到的符号

        t3.setPlaceholderText('请输入密码')  #设置无文本时的提示文本
        s=t3.placeholderText()   #返回提示文本

        t2.setClearButtonEnabled(True)  #清空按钮是否有效
        #True 有效  会出现一个清空按钮
        s=t2.isClearButtonEnabled() #返回清空按钮是否有效

        #用户自定义明文还是密文:
        action=QAction(t2)  #创建行为
        action.setIcon(QIcon('眼睛关闭.png'))
        t2.addAction(action,QLineEdit.TrailingPosition)  #添加行为按钮-添加用户自定义按钮
        #参数1  行为
        #参数2 位置  QLineEdit.TrailingPosition-尾部    QLineEdit.LeadingPosition-前面
        def A():
            if t2.echoMode() == QLineEdit.Password :  #如果是密文
                t2.setEchoMode(QLineEdit.Normal)
                action.setIcon(QIcon('眼睛睁开.png'))
            else:#如果是明文
                t2.setEchoMode(QLineEdit.Password)
                action.setIcon(QIcon('眼睛关闭.png'))
        action.triggered.connect(A)  #点击行为时连接的槽函数

        #自动补全:根据用户已输入的字符串, 快速联想补全
        completer = QCompleter(['lixueqian','liming','lixiuyan'],t1)  #设置匹配候选项
        t1.setCompleter(completer)   #设置自动补全功能

        #输入限制:
        t3.setMaxLength(5)  #设置最大字符数
        s = t3.maxLength()  #返回允许输入的最大字符数
        t1.setReadOnly(True)  #设置 只读,用户不能输入
        #但可以通过 setText()输入
        s = t1.isReadOnly()   #返回是否只读

        print(s)

if __name__ == '__main__':
    app = QApplication(sys.argv)
    demo = Demo()
    demo.show()
    sys.exit(app.exec_())
验证器的使用-数据验证方法一
#验证器的使用
import sys
from PyQt5.QtWidgets import QApplication, QWidget,QLineEdit
from PyQt5.QtGui import QValidator

class Validator(QValidator):#验证器类QValidator是抽象类,必须子类化
    def validate(self, input_str, pos) :   #文本框每次输入字符都会调用此函数-判断是否有效
        #参数input_str  输入的字符串-文本框原有内容+输入后的内容
        # pos光标的位置-以字符为单位-输入字符后的位置
        print(input_str,pos)
        try:
            s=int(input_str)
        except:
            return (QValidator.Invalid, '', 0)  #如果输入的不是纯数字就返回验证不通过
        if 18<=int(input_str)<=180:  #如果是18-180就返回验证通过
            return (QValidator.Acceptable,input_str,pos)  #返回验证是否通过-必须有的-元组
        #QValidator.Acceptable   验证通过
        #QValidator.Intermediate   暂不作判定是否通过验证
        #QValidator.Invalid     验证不通过
        #返回的input_str就是显示在文本框的内容
        #返回的pos就是光标定位的位置
        elif 1<=int(input_str)<=17:#如果是1-17就返回 暂不作判定是否通过验证
            return (QValidator.Intermediate, input_str, pos)
        else:#返回 验证不通过
            return (QValidator.Invalid, input_str, pos)#返回无效时,input_str, pos不会传递给文本框

    def fixup(self, str):#修复函数
        #文本框结束编辑时,会再次调用validate函数,如果返回验证通过,就不会调用修复函数,如果返回验证不通过,就会调用修复函数,把修复函数的返回值给validate函数的input_str参数再执行一次validate函数
        print('-----',str)
        if int(str)<18:
            return '18'  #返回值必须是字符串-返回值就是放入文本框的内容


class Demo(QWidget):
    def __init__(self):
        super().__init__()
        self.resize(300,300)
        t1 = QLineEdit(self)
        t1.move(100,20)
        validator = Validator()   #实例化验证器
        t1.setValidator(validator)  #设置验证器

        t2 = QLineEdit(self)
        t2.move(100, 60)

if __name__ == '__main__':
    app = QApplication(sys.argv)
    demo = Demo()
    demo.show()
    sys.exit(app.exec_())
验证器的使用-数据验证方法二
#验证器的使用
import sys
from PyQt5.QtWidgets import QApplication, QWidget,QLineEdit
from PyQt5.QtGui import QIntValidator

class IntValidator(QIntValidator):
    def fixup(self, str):#结束输入时,文本框的内容如果是无效的,就会执行一次这个修复函数
        print('----',str)
        if len(str) == 0 or int(str)<18:
            return '18'   #返回值必须是字符串-返回值就是放入文本框的内容


class Demo(QWidget):
    def __init__(self):
        super().__init__()
        self.resize(300,300)
        t1 = QLineEdit(self)
        t1.move(100,20)
        validator = IntValidator(18,180)   #实例化验证器-限制整型数据范围
        #QIntValidator  系统提供的验证器子类;缺陷:结束输入时没有处理-不进行修复
        #为了处理这个缺陷,子类化一个类IntValidator,在里面实现修复函数
        #QDoubleValidator  浮点类型数据限制范围:经测试,无效,需要手动实现-就是方法一
        #QRegExpValidator  通过正则表达式限定

        t1.setValidator(validator)  #设置验证器

        t2 = QLineEdit(self)
        t2.move(100, 60)

if __name__ == '__main__':
    app = QApplication(sys.argv)
    demo = Demo()
    demo.show()
    sys.exit(app.exec_())
验证器的使用-掩码验证
掩码可以指定固定位置的固定数据类型, 达到一个格式上的限制
掩码由一串掩码字符和分隔符组成
掩码字符含义
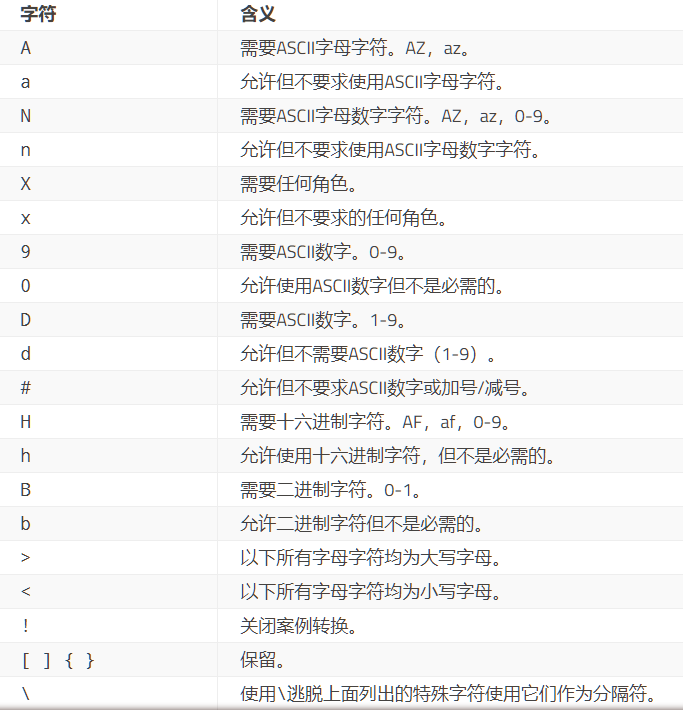
#验证器的使用-掩码
import sys
from PyQt5.QtWidgets import QApplication, QWidget,QLineEdit

class Demo(QWidget):
    def __init__(self):
        super().__init__()
        self.resize(300,300)
        t1 = QLineEdit(self)
        t1.move(100,20)

        #总共5位,左边2位大写字母,右边2位数字,中间分隔符-
        t1.setInputMask('>AA-99;*')  #设置掩码格式
        #;后面是占位符

if __name__ == '__main__':
    app = QApplication(sys.argv)
    demo = Demo()
    demo.show()
    sys.exit(app.exec_())
是否编辑状态
import sys
from PyQt5.QtWidgets import QApplication, QWidget,QLineEdit,QPushButton

class Demo(QWidget):
    def __init__(self):
        super().__init__()
        self.resize(300,300)
        t1 = QLineEdit(self)
        t1.move(100,20)
        t2 = QLineEdit(self)
        t2.move(100, 60)
        button=QPushButton('按钮',self)
        button.move(100,250)
        def A():
            print(t1.isModified())  #返回是否处于编辑状态-是否被修改过
            t1.setModified(False)    #设置是否编辑状态
        button.clicked.connect(A)

if __name__ == '__main__':
    app = QApplication(sys.argv)
    demo = Demo()
    demo.show()
    sys.exit(app.exec_())
光标位置控制
#光标控制
import sys
from PyQt5.QtWidgets import QApplication, QWidget,QLineEdit,QPushButton
from PyQt5.QtCore import QPoint

class Demo(QWidget):
    def __init__(self):
        super().__init__()
        self.resize(300,300)
        t1 = QLineEdit(self)
        t1.move(100,20)
        t1.resize(150,30)
        t2 = QLineEdit(self)
        t2.move(100, 60)
        button=QPushButton('按钮',self)
        button.move(100,250)
        t1.setText('我是李明,我爱学习python')
        def A():
            t1.cursorBackward(False,8)  #向左移动光标
            #参数1  True 带选中效果;False 不带选中效果
            #参数2 移动的字符数

            t1.cursorForward(True,4) #向右移动光标
            #cursorWordBackward(bool mark)   向后(左)移动一个单词长度
            #cursorWordForward(bool mark)   向前(右)移动一个单词长度

            t1.home(False)  #移动到行首
            #end(bool)   end(bool)
            #参数  True  带选中

            #t1.setCursorPosition(2)  #设置光标位置
            s=t1.cursorPosition()    #获取光标位置
            t1.setFocus()
            s=t1.cursorPositionAt(QPoint(60,5))  #获取指定坐标位置对应文本光标位置
            #参数坐标 相对于控件;返回的光标位置只要取决于x位置
            print(s)

        button.clicked.connect(A)

if __name__ == '__main__':
    app = QApplication(sys.argv)
    demo = Demo()
    demo.show()
    sys.exit(app.exec_())
文本边距设置:
import sys
from PyQt5.QtWidgets import QApplication, QWidget,QLineEdit,QPushButton
from PyQt5.QtCore import QPoint

class Demo(QWidget):
    def __init__(self):
        super().__init__()
        self.resize(300,300)
        t1 = QLineEdit(self)
        t1.move(50,20)
        t1.resize(200,150)
        button=QPushButton('按钮',self)
        button.move(100,250)
        t1.setText('我是李明')
        def A():
            t1.setTextMargins(50,80,0,0)  #设置文本边距
            #参数1 文本离左边的距离
            #参数2  文本到顶部距离增加50-下移50
            s=t1.getTextMargins()  #获取文本边距
            #(50, 80, 0, 0)

            print(s)

        button.clicked.connect(A)

if __name__ == '__main__':
    app = QApplication(sys.argv)
    demo = Demo()
    demo.show()
    sys.exit(app.exec_())
对齐方式:
import sys
from PyQt5.QtWidgets import QApplication, QWidget,QLineEdit,QPushButton
from PyQt5.QtCore import Qt

class Demo(QWidget):
    def __init__(self):
        super().__init__()
        self.resize(300,300)
        t1 = QLineEdit(self)
        t1.move(50,20)
        t1.resize(200,150)
        button=QPushButton('按钮',self)
        button.move(100,250)
        t1.setText('我是李明')
        def A():
            t1.setAlignment(Qt.AlignRight)  #设置文本对齐方式
            #Qt.AlignRight   水平靠右
            #Qt.AlignLeft    水平靠左
            #Qt.AlignHCenter   居中
            #Qt.AlignJustify
            #Qt.AlignTop   垂直顶部
            #Qt.AlignBottom   垂直底部
            #Qt.AlignVCenter   垂直居中
            #Qt.AlignBaseline
            #Qt.AlignCenter=Qt.AlignHCenter | Qt.AlignVCenter

        button.clicked.connect(A)

if __name__ == '__main__':
    app = QApplication(sys.argv)
    demo = Demo()
    demo.show()
    sys.exit(app.exec_())
常用编辑功能:
#常用编辑功能
import sys
from PyQt5.QtWidgets import QApplication, QWidget,QLineEdit,QPushButton

class Demo(QWidget):
    def __init__(self):
        super().__init__()
        self.resize(300,300)
        t1 = QLineEdit(self)
        t1.move(50,20)
        t1.resize(200,50)
        t2 = QLineEdit(self)
        t2.move(50, 80)
        t2.resize(200, 50)
        button1=QPushButton('按钮1',self)
        button1.move(100,200)
        t1.setText('我是李明')
        button2 = QPushButton('按钮2', self)
        button2.move(100, 250)
        def A():
            #注意:用户用鼠标选中时,要注意焦点;代码选中不需要焦点
            #t1.backspace()   #删除光标左侧一个字符;删除选中文本-要注意焦点
            #t1.del_()   #删除光标右侧一个字符;删除选中文本
            #t1.clear()  #删除文本框所有内容

            #t1.cursorBackward(True, 2)  # 向左移动光标,并选中
            #t1.copy()   #把选中的文本复制到剪贴板
            #t1.cut()  #剪切
            #t1.undo()  #撤销
            #print(t1.isUndoAvailable())  #返回撤销是否可用
            #t1.setDragEnabled(True)   #是否允许拖拽

            #文本的选中
            #t1.setSelection(0, 3)  #选中指定区间的文本
            #参数1  起始位置      参数2 需要选中的字符数
            t1.selectAll()   #选中所有文本
            s=t1.selectedText() #获取选中的文本
            s=t1.selectionStart()  #返回选中的开始位置
            s=t1.selectionEnd()   #选中的结束位置
            s=t1.selectionLength() #选中的长度

            print(s)


        def B():
            #t2.paste()  #粘贴剪贴板的文本
            #t1.redo()  #重做-撤销前的动作
            #print(t1.isRedoAvailable())  #返回重做是否可用
            #t1.deselect()  #取消选中已选择文本
            print(t1.hasSelectedText())  #返回是否有选中的文本


        button1.clicked.connect(A)
        button2.clicked.connect(B)

if __name__ == '__main__':
    app = QApplication(sys.argv)
    demo = Demo()
    demo.show()
    sys.exit(app.exec_())
信号:
import sys
from PyQt5.QtWidgets import QApplication, QWidget,QLineEdit

class Demo(QWidget):
    def __init__(self):
        super().__init__()
        self.resize(300,300)
        t1 = QLineEdit(self)
        t1.move(50,20)
        t1.resize(200,50)
        t2 = QLineEdit(self)
        t2.move(50, 80)
        t2.resize(200, 50)
        t1.setText('我是李明')

        def AC():
            print('按下了回车键')
            t1.setFocus()
        def AA(t):
            print('正在编辑文本',t)

        def AB(t):
            print('文本内容改变了', t)
        def AD():
            print('结束编辑le')
        def AE(old,new):
            print('光标位置改变了',old,new)
        def AF():
            print('选中的文本发生改变')
        t2.textEdited.connect(AA)  #用户文本编辑时发射的信号
        #代码改变文本时不会发出信号(setText)
        #会传递文本框中的内容
        t2.textChanged.connect(AB)  #文本发生改变时发出的信号
        #代码改变文本时会发出信号(setText)
        #会传递文本框中的内容
        t2.returnPressed.connect(AC)  #按下回车键时发出的信号
        t2.editingFinished.connect(AD)   #结束编辑时发出的信号
        t1.cursorPositionChanged.connect(AE)  #光标位置发生改变时发出的信号
        #会传递两个参数,old=原来的位置,new=新的光标位置
        t1.selectionChanged.connect(AF)  #选中的文本发生改变时发出的信号

if __name__ == '__main__':
    app = QApplication(sys.argv)
    demo = Demo()
    demo.show()
    sys.exit(app.exec_())


 浙公网安备 33010602011771号