
暑期培训第三周SDN总结
第三周学习的内容主要有:
1.安装ubuntu、mininet、floodlight、wireshark
2.工具Xshell(终端模拟)、Xming(图形界面显示)、WinSCP(文件传输)、Tmux(终端复用)、VIM(文本编辑器,无图形化界面)、Sublime Text3(文本编辑器,有图形化界面)。
3.OpenFlow协议
4.LLDP协议
5.SDN网络的交互式控制(REST API)
推荐网站:
http://mininet.org/walkthrough/
https://github.com/mininet/mininet/wiki/Introduction-to-Mininet
2.Floodlight:
https://floodlight.atlassian.net/wiki/spaces/floodlightcontroller/pages/1343539/Floodlight+REST+API
3.Ubuntu镜像下载:
4.VIM配置:
https://blog.csdn.net/dongfang1984/article/details/53152754
https://blog.csdn.net/sloanqin/article/details/47445629
5.Tmux使用:
https://blog.csdn.net/robertbaker/article/details/42172203
Mininet安装过程:
(1)首先更新: sudo apt-get update
然后从github上下载mininet: git clone git://github.com/mininet/mininet
(2)进入mininet/util 目录: cd mininet/util
最后选择安装完整版的mininet: ./install.sh -a
安装完后,可以发现与mininet同级的目录中出现了很多东西:openflow、pox等等。截图如下:

Floodlight安装过程:
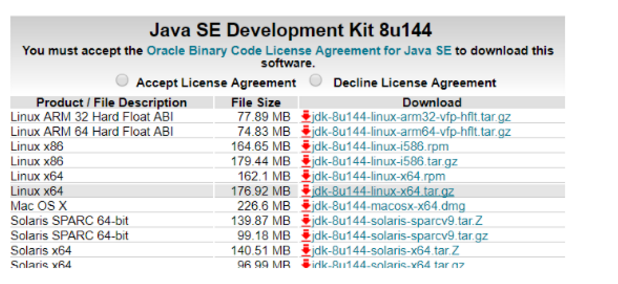
(1)首先下载jdk1.8,直接去java官网下载64位的java8版本。
(2)配置java环境变量:见 https://blog.csdn.net/pxmxx/article/details/80106239
注:网站上的第4步,不要加sudo
4、生效~/.bashrc文件 : source ~/.bashrc
5、测试是否安装成功: java -version (注:是-version,一个-)

(3)安装floodlight:去github上安装,直接下载下来。
主要有两个:floodlight和floodlight-webui
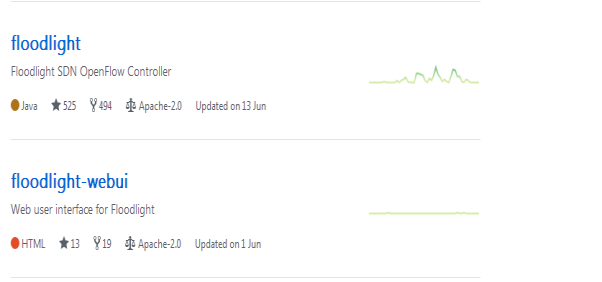
命令为: git clone https://github.com/floodlight/floodlight.git
注意:本来师兄的视频中是需要将floodlight-webui文件夹中的所有东西放到floodlight/src/main/resources/web中,因为这样才有floodlight的图形化界面。但是现在的Github上,web文件夹已经放好了floodlight-webui中的东西,所以我们直接下载floodlight就能用了。
(4)下载好floodlight,进入floodlight目录: cd floodlight
然后运行:ant (注:ubuntu18没有自带ant,需要自己下载: sudo apt-get install ant)
Mininet+Floodlight联合运行测试:
1.打开mininet: sudo mn --controller=remote,ip=127.0.0.1,port=6653
2.打开floodlight:cd floodlight
java -jar target/floodlight.jar
3.然后打开浏览器: localhost:8080/ui/index.html
SDN网络的交互式控制(REST API)总结:
第一题:
- 运行floodlight,禁用forwarding模块(注:该路径是floodlight/target,no.properties中去除了默认配置中的forwarding模块)
java -jar floodlight.jar -cf no.properties
- 构造网络,使用floodlight作为控制器
sudo mn --topo single,2 --switch ovsk --controller remote,ip=127.0.0.1,port=6653
- Mininet尝试h1 ping h2,ping不通
h1 ping –c3 h2
h2 ping –c3 h1
- 为交换机s1添加两个流表项,使得来自端口1的流量可转发到端口2,反之亦然。
curl -d '{"switch":"00:00:00:00:00:00:00:01","name":"flow-mod-1","priority":"32768","in_port":"1","active":"true","actions":"output=2"}' http://127.0.0.1:8080/wm/staticflowpusher/json
curl -d '{"switch":"00:00:00:00:00:00:00:01","name":"flow-mod-2","priority":"32768","in_port":"2","active":"true","actions":"output=1"}' http://127.0.0.1:8080/wm/staticflowpusher/json
- 此时再ping,可以ping通
- 再删除流表
curl -X DELETE -d '{"name":"flow-mod-1"}' http://127.0.0.1:8080/wm/staticflowpusher/json
curl -X DELETE -d '{"name":"flow-mod-2"}' http://127.0.0.1:8080/wm/staticflowpusher/json
第二题:
1.运行floodlight,启用forwarding模块
java -jar floodlight.jar
2.构造网络,并使用floodlight作为控制器
sudo mn --custom project.py --topo project --controller=remote,ip=127.0.0.1,port=6653 --mac
3.ping,h1、h2、h3可以两两互通
pingall
4.阻断h1与h2之间的通信,下发流表,流表之间没有action属性,说明没有动作。
curl -d '{"switch":"00:00:00:00:00:00:00:01","name":"f6","eth_type":"0x0800","in_port":"1","active":"true","ipv4_src":"10.0.0.1","ipv4_dst":"10.0.0.2"}' http://127.0.0.1:8080/wm/staticflowpusher/json
curl -d '{"switch":"00:00:00:00:00:00:00:01","name":"f7","eth_type":"0x0800","in_port":"2","active":"true","ipv4_src":"10.0.0.2","ipv4_dst":"10.0.0.1"}' http://127.0.0.1:8080/wm/staticflowpusher/json
5.再次测试ping
pingall
第三题:
1.构造网络,并使用floodlight作为控制器(整个拓扑结构是主机h1、h2、h3连接一个交换机s1)
sudo mn --custom project.py --topo project --controller=remote,ip=127.0.0.1,port=6653 --mac
2.将h1和h2作为web服务器
在mininet>提示符下使用如下命令分别进入到h1、h2、h3的控制台。
xterm h1 h2 h3
从h2进入到自己的web服务器根目录:mn-web/h2,可见内含主页文件index.html(目录和文件均手动创建)。然后启动python的SimpleHTTPServer模块,使其成为一台web服务器,
先进入h2里面的目录,cd mn-web/h2
再让和h2开启web服务:
python –m SimpleHTTPServer 80 &
同理,开启h1的web服务。
(注:html文件的内容可以很简单,但是h1和h2目录对应的显示效果应该不同,否则无法区分打开的网页是属于h1还是h2。)
3.通过控制器建立资源池,实现负载均衡。利用命令行设置。(注:h1、h2作为web服务器,其ip分别是10.0.0.1和10.0.0.2)
首先建立虚拟IP地址:10.0.0.100
curl -X POST -d '{"id":"1","name":"vip1","protocol":"tcp","address":"10.0.0.100","port":"80"}' http://127.0.0.1:8080/quantum/v1.0/vips/
其次建立资源池pool1
curl -X POST -d '{"id":"1","name":"pool1","protocol":"tcp","vip_id":"1"}' http://127.0.0.1:8080/quantum/v1.0/pools/
然后将h1和h2放入资源池pool1中
curl -X POST -d '{"id":"1","address":"10.0.0.1","port":"80","pool_id":"1"}' http://127.0.0.1:8080/quantum/v1.0/members/
curl -X POST -d '{"id":"2","address":"10.0.0.2","port":"80","pool_id":"1"}' http://127.0.0.1:8080/quantum/v1.0/members/
4.验证负载均衡
由于上述操作使用的均为私有IP地址,只在mininet内的虚拟网络有效,因此须从mininet虚拟机内部验证。方式如下:使用h3的浏览器,如firefox,多次访问10.0.0.100虚拟IP地址,若h1和h2的index.html交替出现,则表明负载均衡,从h3的xterm终端中运行firefox命令。
多次访问ip地址:10.0.0.100,看是否h1、h2界面交替出现。
第三周碰到的问题汇总:
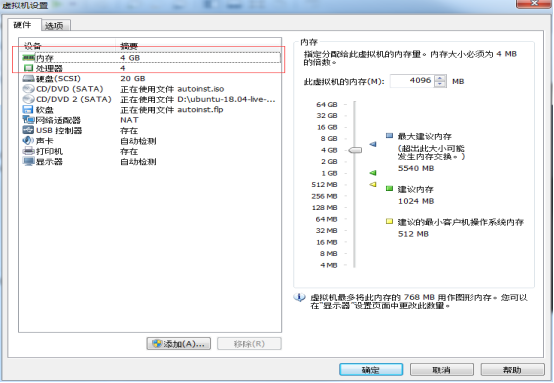
1.虚拟机VMware中安装的系统运行起来很慢:
解决方法:
I.对虚拟机进行设置,主要是红色圈的地方设置大一点。
2.ubuntu Server版自带的wireshark在命令行中无法正常启动:
解决方法:
I.需要安装wireshark-gtk: sudo apt-get install wireshark-gtk
II.然后输入: wireshark-gtk
3.安装的Floodlight,进入网站 localhost:8080/ui/index.html 时没有UI界面。
解决方法:
I.将floodlight-webui中的所有内容拷贝到floodlight/src/main/resources/web文件夹中。
详见Floodlight安装第(3)步。
4.如果先开floodlight,再开mininet,floodlight控制器上面的页面:localhost:8080/ui/index.html上的拓扑和主机数总是多一个(注:ubuntu16及以上的版本不会出现)。但是,如果保持floodlight开启状态,只退出mininet再重开mininet,主机数会一直增加(注:所有版本都会出现)。
出现原因:OVS的一个local port会去发现外部网络的拓扑,导致floodlight UI界面显示不对。见http://www.itkeyword.com/doc/504151289862358323/ui-host-SDNfloodlightweb 。
解决方法:
I.上面那个网址说了几种解决方法。我试验了一种,没有问题:
先开mininet,再开floodlight。 每次当退出mininet重开时,就再重开floodlight。
5.当floodlight控制器开启的时候,如果使用自定义的mininet拓扑脚本,mininet会无法正常运行。其中该脚本中没有写控制器的连接命令。
启动自定义拓扑脚本的命令如下 :
sudo mn --custom ~/mininet/custom/topo-2sw-2host.py --topo mytopo
其中,~/mininet/custom/topo-2sw-2host.py 是topo-2sw-2host.py 文件的路径。
解决方法:
I.将控制器关闭,重新运行自定义拓扑。
注:当需要控制器开启的时候,而且所有的交换机连接到该控制器上,可以输入如下命令:
sudo mn --custom ~/mininet/custom/topo-2sw-2host.py --topo mytopo --controller=remote,ip=127.0.0.1,port=6653
这样就可以先启动floodlight,再输入上面的命令启动mininet,让自定义的交换机都连接到floodlight上。
6.Firefox只能在普通用户账户下运行,无法在root权限下运行。这样就导致SDN网络的负载均衡实验无法验证。
解决方法:
I.直接输入curl 10.0.0.100进行验证
curl可以获取网页内容,直接看显示的内容正确与否进行判断。
7.安装vmware workstation后输入注册码总是失败,创建新的虚拟机来安装系统镜像在点击完成的时候报错。
解决方法:
I.针对第一个问题,安装VMware的时候,需要点击右键以管理员身份运行。
II.针对第二个问题,打开VMware的时候,也是需要点击右键以管理员身份运行。

 浙公网安备 33010602011771号