
extract digits subordinary image from original image with OpenCV
背景
从图片中提取文字或者数字子图,是图像处理的必备能力。
虽然tesseract可以支持从图片中一次性提取所有的信息, 但是此处为了学习的目的,让我们进行一次图像预处理的深度旅行。
参考:
http://icodeit.org/2013/01/basic-digits-recognization/
素材 -- 原图
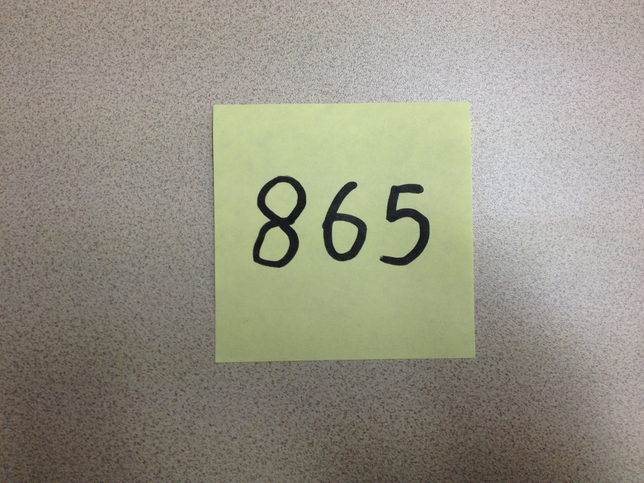
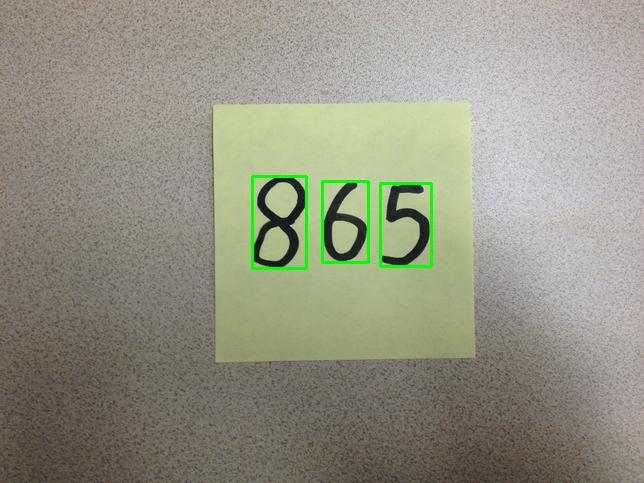
目标,从图中扣取 8 6 5 三个数字的子图
预备
import cv2 as cv
import numpy as np
import imutils
from imutils.contours import sort_contours
步骤1 -- 灰度处理
屏蔽色彩非重要因素,提取图片中最主要色的强弱特征。
通常的彩色图形由3个(RGB)或者4个(RGBA)通道组成,在计算机看来,一个彩色的图片是由3/4个矩阵组成,每个矩阵中包含若干个点(比如1024x768),如果每个通道都参与运算的话,会引入太多的计算量,因此通常的做法是将彩色图像转换为灰度图,在opencv中,这一步非常容易:
    img = cv.imread('865.origin.png')  # get grayscale image
    gray = cv.cvtColor(img, cv.COLOR_BGR2GRAY)
    cv.imshow('Gray', gray)
步骤2 - 降噪处理
模糊化,以突出主要特征。
    blur = cv.GaussianBlur(gray, (5, 5), cv.BORDER_DEFAULT)
    cv.imshow('Blur', blur)

步骤3 - 提取藤蔓
藤蔓,表示图片中的主要的线条,非枝枝叶叶。
    canny = cv.Canny(blur, 125, 175)
    cv.imshow('Canny Edges', canny)

步骤4 - 获取康拓图
康拓图,表示了 大的图片中, 含有的子图片的轮廓。也叫轮廓图。
    contours, hierarchies = cv.findContours(canny, cv.RETR_EXTERNAL, cv.CHAIN_APPROX_SIMPLE)
    print(f'{len(contours)} contour(s) found!')

    blank = np.zeros(img.shape)
    cv.drawContours(blank, contours, -1, (0,0,255), 1)
    cv.imshow('Contours Drawn', blank)

步骤5 - 对轮廓排序
识别出的子轮廓图,是无序的, 可以使用 imutils工具进行排序。
    # cnts = imutils.grab_contours(contours)
    cnts = sort_contours(contours, method="left-to-right")[0]
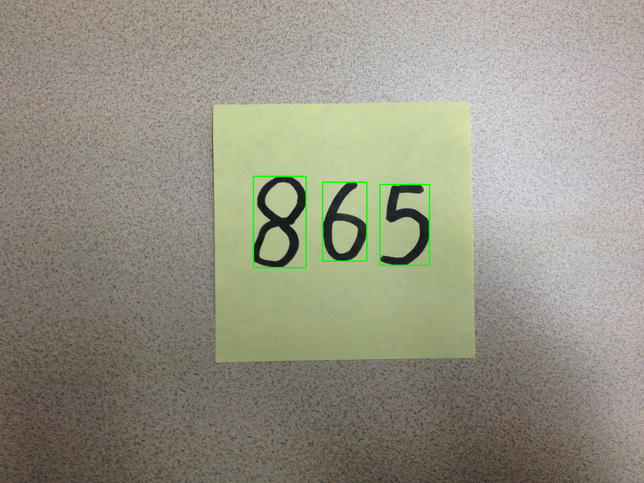
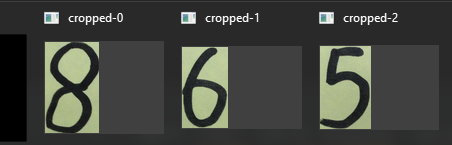
步骤6 - 截取子图
boundingRect获取子轮廓的对应原图片中的位置和大小信息。

cv.rectangle 将子轮廓矩形区域在原图中绘制出来。
img[y:y+h, x:x+w] 在原图中截取含有数字信息的子图。
    img_cpy = img.copy()

    count = 0
    for cnt in cnts:
        x, y, w, h = cv.boundingRect(cnt)

        rect = cv.rectangle(img_cpy, (x, y), (x+w, y+h), (0, 255, 0), 2)

        cropped = img[y:y+h, x:x+w]
        cv.imshow(f"cropped-{count}", cropped)
        count = count + 1

    cv.imshow("captured image", img_cpy)

    cv.waitKey(0)
完整代码
import cv2 as cv
import numpy as np
import imutils
from imutils.contours import sort_contours

def grayify(image):
    return cv.cvtColor(image, cv.COLOR_BGR2GRAY)


def thresholding_inv(image):
    gray = cv.cvtColor(image, cv.COLOR_BGR2GRAY)

    ret, bin = cv.threshold(gray, 48, 255, cv.THRESH_BINARY_INV)
    bin = cv.medianBlur(bin, 3)

    return bin


if __name__ == "__main__":
    img = cv.imread('865.origin.png')  # get grayscale image

    # binary_img = thresholding_inv(img)
    # cv.imshow("binary img", binary_img)
    # cv.waitKey(0)

    gray = cv.cvtColor(img, cv.COLOR_BGR2GRAY)
    cv.imshow('Gray', gray)

    blur = cv.GaussianBlur(gray, (5, 5), cv.BORDER_DEFAULT)
    cv.imshow('Blur', blur)

    canny = cv.Canny(blur, 125, 175)
    cv.imshow('Canny Edges', canny)

    contours, hierarchies = cv.findContours(canny, cv.RETR_EXTERNAL, cv.CHAIN_APPROX_SIMPLE)
    print(f'{len(contours)} contour(s) found!')

    blank = np.zeros(img.shape)
    cv.drawContours(blank, contours, -1, (0,0,255), 1)
    cv.imshow('Contours Drawn', blank)

    # cnts = imutils.grab_contours(contours)
    cnts = sort_contours(contours, method="left-to-right")[0]

    img_cpy = img.copy()

    count = 0
    for cnt in cnts:
        x, y, w, h = cv.boundingRect(cnt)

        rect = cv.rectangle(img_cpy, (x, y), (x+w, y+h), (0, 255, 0), 2)

        cropped = img[y:y+h, x:x+w]
        cv.imshow(f"cropped-{count}", cropped)
        count = count + 1

    cv.imshow("captured image", img_cpy)

    cv.waitKey(0)

在二值图中提取轮廓
http://icodeit.org/2013/01/basic-digits-recognization/
此文中对于轮廓检测,使用二值图,可以实现相同效果。
灰度图较之原始图片,将三个维度的矩阵变成了一个维度,已经做了部分简化,但是算法来说,噪音并未消除,灰度图中,每个点仍然有8位来表示,每个点可能的灰度为0-255,二值图即将灰度图转换成黑白图,每个点只有两种可能:非黑即白,这样将大大简化计算。
opencv提供了阈值调节的API,可以将灰度图转换为二值图:高于某一个阈值的点被认为是白色,反之为黑色:
1
2
3
4
5
6
7
def thresholding_inv(image): gray = cv2.cvtColor(image, cv2.COLOR_BGR2GRAY) ret, bin = cv2.threshold(gray, 48, 255, cv.CV_THRESH_BINARY_INV) bin = cv2.medianBlur(bin, 3) return bin上面的代码中,48即为阈值,如果灰度高于48,那么改点会被认为是255,否则为0。效果如下:
由于轮廓检测算法需要从黑色的背景中搜索白色的轮廓,所有此处的
threshold最后一项参数为cv.CV_THRESH_BINARY_INV,即反转黑白色。

提取子轮廓图后,获取位置和大小
https://www.geeksforgeeks.org/text-detection-and-extraction-using-opencv-and-ocr/
# Appplying dilation on the threshold image
dilation = cv2.dilate(thresh1, rect_kernel, iterations = 1)
特征线很细的时候,可以使用dilate来膨胀特征。
# Finding contours
contours, hierarchy = cv2.findContours(dilation, cv2.RETR_EXTERNAL,
                                                 cv2.CHAIN_APPROX_NONE)

# Creating a copy of image
im2 = img.copy()

# Looping through the identified contours
# Then rectangular part is cropped and passed on
# to pytesseract for extracting text from it
# Extracted text is then written into the text file
for cnt in contours:
    x, y, w, h = cv2.boundingRect(cnt)

    # Drawing a rectangle on copied image
    rect = cv2.rectangle(im2, (x, y), (x + w, y + h), (0, 255, 0), 2)

    # Cropping the text block for giving input to OCR
    cropped = im2[y:y + h, x:x + w]
对康拓图进行排序 - sort_contours
https://www.pyimagesearch.com/2020/08/24/ocr-handwriting-recognition-with-opencv-keras-and-tensorflow/
To locate the contours for each character we apply contour detection (Lines 30 and 31). In order to conveniently sort the contours from
"left-to-right"(Line 33), we use my
sort_contoursmethod.
# load the input image from disk, convert it to grayscale, and blur
# it to reduce noise
image = cv2.imread(args["image"])
gray = cv2.cvtColor(image, cv2.COLOR_BGR2GRAY)
blurred = cv2.GaussianBlur(gray, (5, 5), 0)
# perform edge detection, find contours in the edge map, and sort the
# resulting contours from left-to-right
edged = cv2.Canny(blurred, 30, 150)
cnts = cv2.findContours(edged.copy(), cv2.RETR_EXTERNAL,
    cv2.CHAIN_APPROX_SIMPLE)
cnts = imutils.grab_contours(cnts)
cnts = sort_contours(cnts, method="left-to-right")[0]
# initialize the list of contour bounding boxes and associated
# characters that we'll be OCR'ing
chars = []
依赖库
https://pypi.org/project/imutils/
是opencv库的封装,更容易使用。
A series of convenience functions to make basic image processing functions such as translation, rotation, resizing, skeletonization, displaying Matplotlib images, sorting contours, detecting edges, and much more easier with OpenCV and both Python 2.7 and Python 3.
pip install imutils
图片预处理
https://opencv-python-tutroals.readthedocs.io/en/latest/py_tutorials/py_imgproc/py_table_of_contents_imgproc/py_table_of_contents_imgproc.html
下一步
对于提取的子图进行预测。
- opencv自身提供的KNN,训练模型,进行预测。
https://docs.opencv.org/master/d8/d4b/tutorial_py_knn_opencv.html
- 使用其它平台训练模型进行预测, 例如sklearn keras

 浙公网安备 33010602011771号