Integrating OpenCV python tool into one SKlearn MNIST example for supporting prediction
背景
https://www.cnblogs.com/lightsong/p/14469252.html
如上博客对应进展是, 集成hub数据,基于MNIST数据构建手写数字识别模型, 得到逻辑回归模型的预测准确度。
如上模型,仅仅是训练出来,但是如何应用此模型进行预测, 还需要引入工具,对任意手写图像进行处理,规整化为MNIST数据标准格式,
从网站上看到标准数据格式为:
- shape为(28, 28)
- 灰度表示
- 背景为纯黑, 书写痕迹为白向
通过学习OpenCV接口,实现这种图像处理功能。
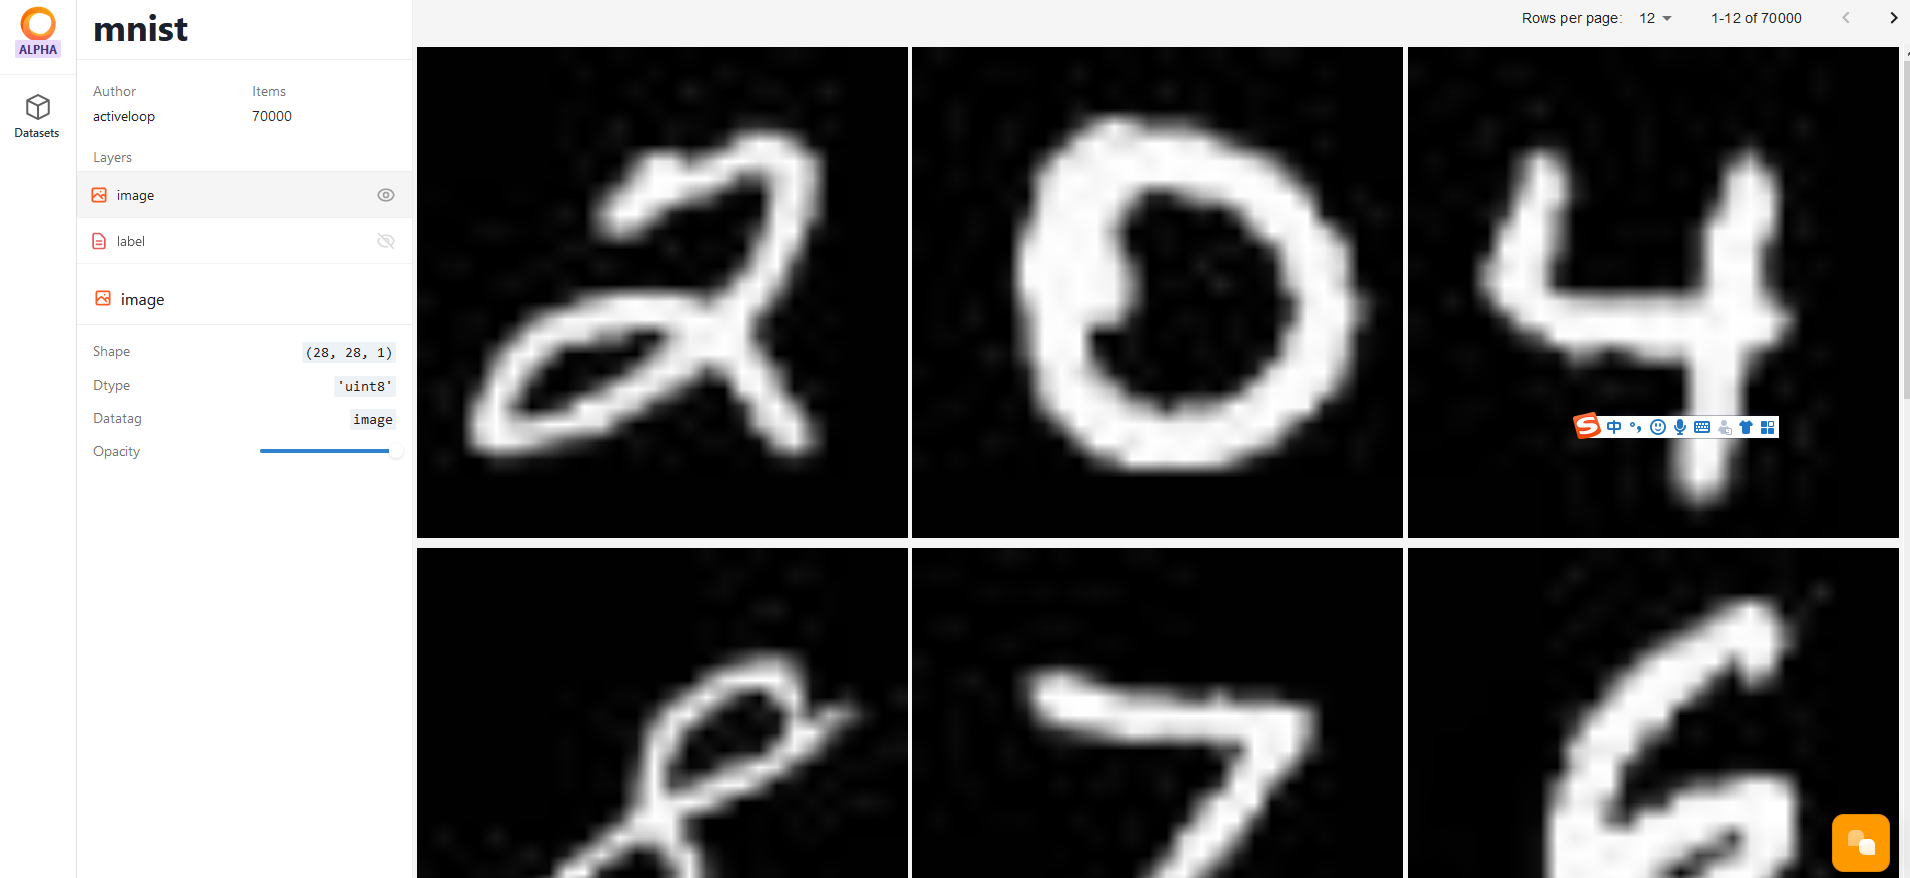
https://app.activeloop.ai/datasets/popular
数据源名称为 activeloop/mnist
OpenCV
http://www.opencv.org.cn/opencvdoc/2.3.2/html/doc/tutorials/tutorials.html
https://docs.opencv.org/master/d1/dfb/intro.html
OpenCV 是一种开源的库, 包括数百种计算机视觉算法。
包括以下模块:
- 核心模块 - 定义基本的数据结构 和 基本的函数, 被所有的上层模块使用。
- 图像处理 - 图像过滤 和 几何图像变换, 色彩空间转换。
- 视频分析 - 移动估计,背景提取,目标检测。
- 。。。
OpenCV (Open Source Computer Vision Library: http://opencv.org) is an open-source library that includes several hundreds of computer vision algorithms. The document describes the so-called OpenCV 2.x API, which is essentially a C++ API, as opposed to the C-based OpenCV 1.x API (C API is deprecated and not tested with "C" compiler since OpenCV 2.4 releases)
OpenCV has a modular structure, which means that the package includes several shared or static libraries. The following modules are available:
- Core functionality (core) - a compact module defining basic data structures, including the dense multi-dimensional array Mat and basic functions used by all other modules.
- Image Processing (imgproc) - an image processing module that includes linear and non-linear image filtering, geometrical image transformations (resize, affine and perspective warping, generic table-based remapping), color space conversion, histograms, and so on.
- Video Analysis (video) - a video analysis module that includes motion estimation, background subtraction, and object tracking algorithms.
- Camera Calibration and 3D Reconstruction (calib3d) - basic multiple-view geometry algorithms, single and stereo camera calibration, object pose estimation, stereo correspondence algorithms, and elements of 3D reconstruction.
- 2D Features Framework (features2d) - salient feature detectors, descriptors, and descriptor matchers.
- Object Detection (objdetect) - detection of objects and instances of the predefined classes (for example, faces, eyes, mugs, people, cars, and so on).
- High-level GUI (highgui) - an easy-to-use interface to simple UI capabilities.
- Video I/O (videoio) - an easy-to-use interface to video capturing and video codecs.
- ... some other helper modules, such as FLANN and Google test wrappers, Python bindings, and others.
The further chapters of the document describe functionality of each module. But first, make sure to get familiar with the common API concepts used thoroughly in the library.
python wrapper for OpenCV
https://docs.opencv.org/master/d6/d00/tutorial_py_root.html
此工具核心实现是C++, 为扩大应用场景, 开放了若干种语言API, python是其中之一。
如下为 python API支持的所有功能。
涵盖了 主页上 列举的所有库提供的功能。
同时我们发现有趣的功能, 此库还提供了 机器学习算法, 包括以下三种模型。
Learn to use kNN for classification Plus learn about handwritten digit recognition using kNN
Understand concepts of SVM
Learn to use K-Means Clustering to group data to a number of clusters. Plus learn to do color quantization using K-Means Clustering
python API介绍
Learn how to setup OpenCV-Python on your computer!
Here you will learn how to display and save images and videos, control mouse events and create trackbar.
In this section you will learn basic operations on image like pixel editing, geometric transformations, code optimization, some mathematical tools etc.
In this section you will learn different image processing functions inside OpenCV.
Feature Detection and Description
In this section you will learn about feature detectors and descriptors
In this section you will learn different techniques to work with videos like object tracking etc.
Camera Calibration and 3D Reconstruction
In this section we will learn about camera calibration, stereo imaging etc.
In this section you will learn different image processing functions inside OpenCV.
In this section you will learn different computational photography techniques like image denoising etc.
Object Detection (objdetect module)
In this section you will learn object detection techniques like face detection etc.
In this section, we will see how OpenCV-Python bindings are generated
Image Processing in OpenCV
https://docs.opencv.org/master/d2/d96/tutorial_py_table_of_contents_imgproc.html
我们的问题面向图片的特征预处理, 所以我们聚焦在图像处理章节。
- 需求的第一点,将彩色转换为灰度图片, 需要用到第一个点 改变色彩空间(Changing Colorspaces)
- 缩放图片大小, 需要用到 第二点, 几何变换 (Geometric Transformations of Images)
Learn to change images between different color spaces. Plus learn to track a colored object in a video.
Geometric Transformations of Images
Learn to apply different geometric transformations to images like rotation, translation etc.
Learn to convert images to binary images using global thresholding, Adaptive thresholding, Otsu's binarization etc
Learn to blur the images, filter the images with custom kernels etc.
Learn about morphological transformations like Erosion, Dilation, Opening, Closing etc
Learn to find image gradients, edges etc.
Learn to find edges with Canny Edge Detection
Learn about image pyramids and how to use them for image blending
All about Contours in OpenCV
All about histograms in OpenCV
Meet different Image Transforms in OpenCV like Fourier Transform, Cosine Transform etc.
Learn to search for an object in an image using Template Matching
Learn to detect lines in an image
Learn to detect circles in an image
Image Segmentation with Watershed Algorithm
Learn to segment images with watershed segmentation
Interactive Foreground Extraction using GrabCut Algorithm
Learn to extract foreground with GrabCut algorithm
图片数字特征 -- 补充知识
https://zhuanlan.zhihu.com/p/267130193
我们需要的是灰度图, 图片每一个像素点, 只含有一个维度的特征, 0 -255, 表示像素点的明暗特征, 即白和黑,以及介于黑白之间的色, 不能表示彩色。
彩色图是三通道的, 即图片每一个像素点,都含有三个维度的 特征 RGB
图像分为二值图,灰度图,伪彩色图,真彩色图。
二值图:图像的像素只有 0 和 1。0 位黑色,1 为白色。
灰度图:图像的像素值有256种(0 - 255)。这种图像的RGB(红绿蓝),对应的值是相等的。
伪彩色图:RGB对应有256种颜色的索引,通过对应的颜色板去确定颜色的深浅。
真彩色图:对应的RGB颜色直接取对应的值,即为真彩色图。
https://zhuanlan.zhihu.com/p/36592188
此文中对MNIST数据的探索,表明像素点是 灰度数据,非二值数据。
Changing Colorspaces
https://docs.opencv.org/master/df/d9d/tutorial_py_colorspaces.html
Changing Color-space
There are more than 150 color-space conversion methods available in OpenCV. But we will look into only two, which are most widely used ones: BGR ↔ Gray and BGR ↔ HSV.
For color conversion, we use the function cv.cvtColor(input_image, flag) where flag determines the type of conversion.
For BGR → Gray conversion, we use the flag cv.COLOR_BGR2GRAY. Similarly for BGR → HSV, we use the flag cv.COLOR_BGR2HSV. To get other flags, just run following commands in your Python terminal:
Geometric Transformations of Images
https://docs.opencv.org/master/da/d6e/tutorial_py_geometric_transformations.html
对图像进行缩放, 插值选取有讲究。 缩小 使用 INTER_AREA , 放大 使用 INTER_CUBIC
Scaling
Scaling is just resizing of the image. OpenCV comes with a function cv.resize() for this purpose. The size of the image can be specified manually, or you can specify the scaling factor. Different interpolation methods are used. Preferable interpolation methods are cv.INTER_AREA for shrinking and cv.INTER_CUBIC (slow) & cv.INTER_LINEAR for zooming. By default, the interpolation method cv.INTER_LINEAR is used for all resizing purposes. You can resize an input image with either of following methods:
Lenna show -- 图像处理demo
https://zhuanlan.zhihu.com/p/49957946
安装
OpenCV 的安装,不同平台不同版本会有一些差异。安装前需要装好 numpy,强烈建议先安装好 Anaconda,然后直接通过命令安装:
pip install opencv-python如果你运气好,代码里运行
import cv2没报错就是成功了。但大多数时候可能不行。你可以考虑去这里下载安装文件:
https://www.lfd.uci.edu/~gohlke/pythonlibs/#opencv
然后通过命令从本地安装:
pip install opencv_python‑3.4.3‑cp37‑cp37m‑win_amd64.whl这里下载的安装文件版本号务必要和你本机的 Python 版本和位数相对应。
如果安装时还有其他问题,可在网上直接搜索报错,通常都会有解决方案,这里不一一赘述。
图像处理 -- 读写
cv读取出来的数据是以 numpy对象存储, 可以借助其能力对图像做切割等处理。
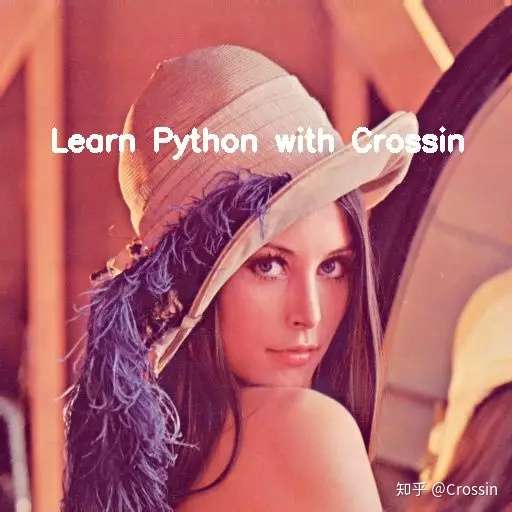
我们用图像处理的经典范例 Lenna 来做测试
可自行搜索这幅图像的来头
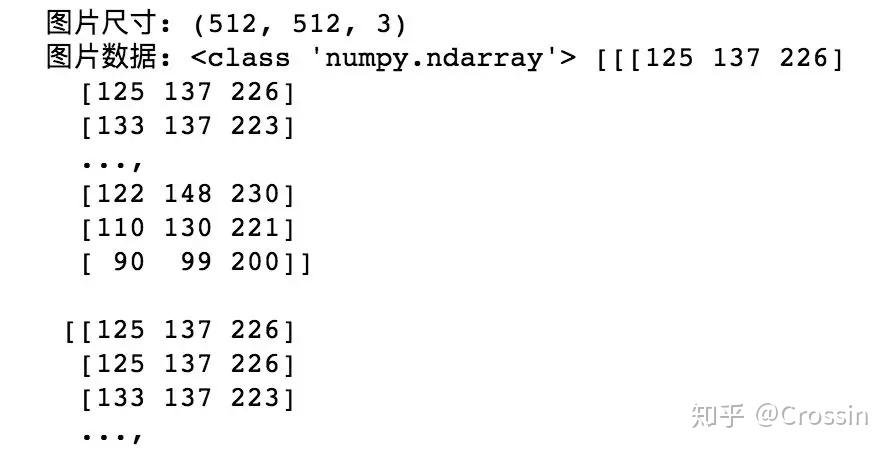
import cv2 as cv
# 读图片
img = cv.imread('img/Lenna.png')
# 图片信息
print('图片尺寸:', img.shape)
print('图片数据:', type(img), img)
# 显示图片
cv.imshow('pic title', img)
cv.waitKey(0)
# 添加文字
cv.putText(img, 'Learn Python with Crossin', (50, 150), cv.FONT_HERSHEY_SIMPLEX, 1, (255, 255, 255), 4)
# 保存图片
cv.imwrite('img/Lenna_new.png', img)
OpenCV-Python 中的图像数据使用了 numpy 库的 ndarray 类型进行管理,便于进行各种数值计算和转换。
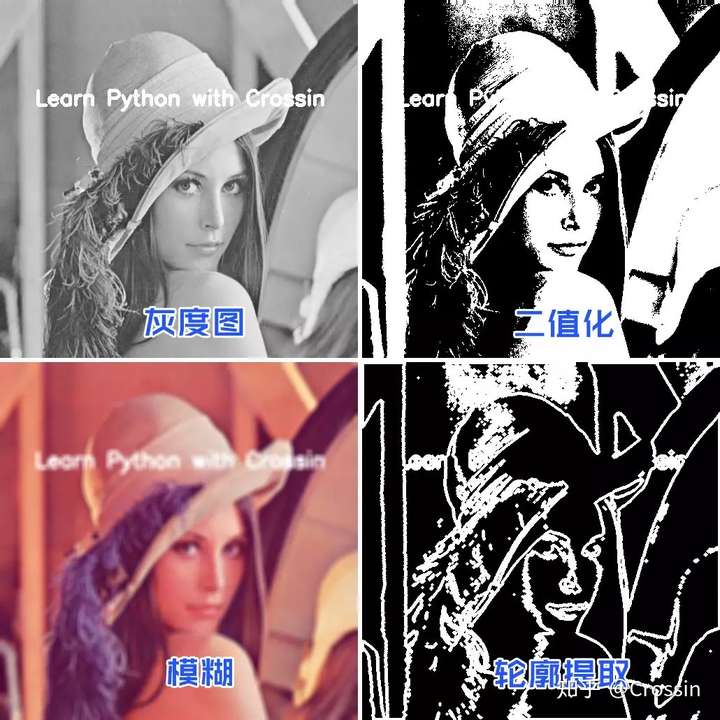
图像处理 -- 色彩转换
常见的图像处理:
import numpy as np
# 灰度图
img_gray = cv.cvtColor(img, cv.COLOR_BGR2GRAY)
cv.imwrite('img/Lenna_gray.png', img_gray)
# 二值化
_, img_bin = cv.threshold(img_gray, 127, 255, cv.THRESH_BINARY)
cv.imwrite('img/Lenna_bin.png', img_bin)
# 平滑
img_blur = cv.blur(img, (5, 5))
cv.imwrite('img/Lenna_blur.png', img_blur)
# 边缘提取
_, contours, _ = cv.findContours(img_bin, cv.RETR_TREE, cv.CHAIN_APPROX_SIMPLE)
img_cont = np.zeros(img_bin.shape, np.uint8)
cv.drawContours(img_cont, contours, -1, 255, 3)
cv.imwrite('img/Lenna_cont.png', img_cont)
这几种都属于数字图像处理的常用方法。OpenCV-Python 基本都封装好的接口,只需一两行代码就能完成,在实际项目开发中非常方便。
改造成果
数据处理
数据准备, 提供彩色的输入 3
https://github.com/fanqingsong/code_snippet/blob/master/machine_learning/hub/images/three.png

经过处理后,得到符合 MNIST 标准的图像
https://github.com/fanqingsong/code_snippet/blob/master/machine_learning/hub/images/three_normal.jpg

Code
https://github.com/fanqingsong/code_snippet/blob/master/machine_learning/hub/mnist_sklearn.py
其中最后几行包含了图像预处理
# 读图片
img = cv.imread('images/three.png')
# 灰度图
img_gray = cv.cvtColor(img, cv.COLOR_BGR2GRAY)
# 二值化
_, img_bin = cv.threshold(img_gray, 127, 255, cv.THRESH_BINARY)
# Resize
img_resized = cv.resize(img_bin, (28,28), interpolation=cv.INTER_AREA)
img_normal = 255 - img_resized
# 保存图片
cv.imwrite('images/three_normal.jpg', img_normal)

# flat to one dimension
one_digit_features = img_normal.reshape((-1))
完整code
"""
Test mnist learning on sklearn with hub data
"""

import numpy as np
from sklearn.linear_model import LogisticRegression
from sklearn.model_selection import train_test_split
from sklearn.preprocessing import StandardScaler
from sklearn.utils import check_random_state

from hub import Dataset
import cv2 as cv


print(__doc__)

# Author: Arthur Mensch <arthur.mensch@m4x.org>
# License: BSD 3 clause

# Turn down for faster convergence
train_samples = 5000

print("loading mnist data from hub...")
mnist = Dataset("activeloop/mnist")  # loading the MNIST data lazily

X = mnist["image"].compute()
y = mnist["label"].compute()

print("------- X.shape", X.shape)
print("------- y.shape", y.shape)


print("now train mnist model...")

random_state = check_random_state(0)
permutation = random_state.permutation(X.shape[0])

print("---------- permutation")
print(permutation)

X = X[permutation]
y = y[permutation]

print("------- X.shape", X.shape)
print("------- y.shape", y.shape)

X = X.reshape((X.shape[0], -1))

print("------- X.shape", X.shape)

X_train, X_test, y_train, y_test = train_test_split(
    X, y, train_size=train_samples, test_size=10000)

scaler = StandardScaler()
X_train = scaler.fit_transform(X_train)
X_test = scaler.transform(X_test)

# Turn up tolerance for faster convergence
clf = LogisticRegression(
    C=50. / train_samples, penalty='l1', solver='saga', tol=0.1
)
clf.fit(X_train, y_train)

sparsity = np.mean(clf.coef_ == 0) * 100
score = clf.score(X_test, y_test)

# print('Best C % .4f' % clf.C_)
print("Sparsity with L1 penalty: %.2f%%" % sparsity)
print("Test score with L1 penalty: %.4f" % score)

# now enter predicting part
# 读图片
img = cv.imread('images/three.png')
# 灰度图
img_gray = cv.cvtColor(img, cv.COLOR_BGR2GRAY)
# 二值化
_, img_bin = cv.threshold(img_gray, 127, 255, cv.THRESH_BINARY)
# Resize
img_resized = cv.resize(img_bin, (28,28), interpolation=cv.INTER_AREA)
img_normal = 255 - img_resized
# 保存图片
cv.imwrite('images/three_normal.jpg', img_normal)

# flat to one dimension
one_digit_features = img_normal.reshape((-1))

result = clf.predict([one_digit_features])
print("------ for three digit picture, the predicted result is ", result)
输出
从最后一行的输出,可以看出,确实预测正确,为3
root@xxx:~/win10/mine/code-snippet/machine_learning/hub# python mnist_sklearn.py
Test mnist learning on sklearn with hub data
loading mnist data from hub...
------- X.shape (70000, 28, 28, 1)
------- y.shape (70000,)
now train mnist model...
---------- permutation
[10840 56267 14849 ... 42613 43567 68268]
------- X.shape (70000, 28, 28, 1)
------- y.shape (70000,)
------- X.shape (70000, 784)
Sparsity with L1 penalty: 68.89%
Test score with L1 penalty: 0.8389
------ for three digit picture, the predicted result is [3]

 浙公网安备 33010602011771号