
1 分布式配置中心的搭建
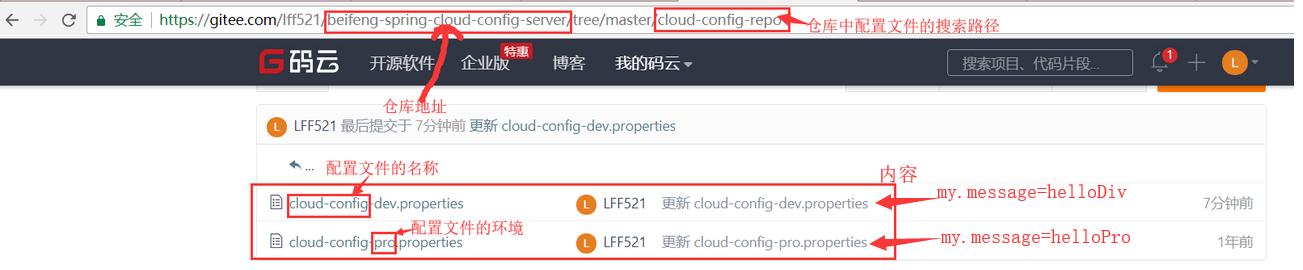
1.1 在git仓库中创建配置文件
1.2 创建springboot项目引入相应jar依赖
<project xmlns="http://maven.apache.org/POM/4.0.0" xmlns:xsi="http://www.w3.org/2001/XMLSchema-instance"
    xsi:schemaLocation="http://maven.apache.org/POM/4.0.0 http://maven.apache.org/xsd/maven-4.0.0.xsd">
    <modelVersion>4.0.0</modelVersion>

    <groupId>com.ibeifeng.hadoop</groupId>
    <artifactId>beifeng-spring-cloud-config-server</artifactId>
    <version>0.0.1-SNAPSHOT</version>
    <packaging>jar</packaging>

    <name>beifeng-spring-cloud-config-server</name>
    <url>http://maven.apache.org</url>

    <parent>
        <groupId>org.springframework.boot</groupId>
        <artifactId>spring-boot-starter-parent</artifactId>
        <version>1.5.2.RELEASE</version>
        <relativePath />
    </parent>

    <properties>
        <project.build.sourceEncoding>UTF-8</project.build.sourceEncoding>
        <java.version>1.8</java.version>
    </properties>

    <dependencyManagement>
        <dependencies>
            <dependency>
                <groupId>org.springframework.cloud</groupId>
                <artifactId>spring-cloud-dependencies</artifactId>
                <version>Dalston.RC1</version>
                <type>pom</type>
                <scope>import</scope>
            </dependency>
        </dependencies>
    </dependencyManagement>

    <dependencies>
        <dependency>
            <groupId>org.springframework.boot</groupId>
            <artifactId>spring-boot-starter-test</artifactId>
            <scope>test</scope>
        </dependency>

        <!-- 声明为web项目 -->
        <dependency>
            <groupId>org.springframework.boot</groupId>
            <artifactId>spring-boot-starter-web</artifactId>
        </dependency>

        <!--配置config-server -->
        <dependency>
            <groupId>org.springframework.cloud</groupId>
            <artifactId>spring-cloud-config-server</artifactId>
        </dependency>
    </dependencies>

    <build>
        <plugins>
            <plugin>
                <groupId>org.springframework.boot</groupId>
                <artifactId>spring-boot-maven-plugin</artifactId>
            </plugin>
        </plugins>
    </build>

    <repositories>
        <repository>
            <id>spring-milestones</id>
            <name>Spring Milestones</name>
            <url>https://repo.spring.io/milestone</url>
            <snapshots>
                <enabled>false</enabled>
            </snapshots>
        </repository>
    </repositories>
</project>
1.3 配置分布式配置中心
server:
 port: 8767
spring:
 application:
  name: cloud-config-server
 cloud:
  config:
   server:
    git:
     uri: https://gitee.com/lff521/beifeng-spring-cloud-config-server #配置git仓库地址
     searchPaths: cloud-config-repo #配置仓库路径
     #username: your username #用户名
     #password: your password #密码
    label: master #配置仓库的分支
1.4 在启动类中声明为配置服务中心
@SpringBootApplication  //相当于@Configuration、@EnableAutoConfiguration和 @ComponentScan
@EnableConfigServer //激活该应用为配置文件服务器
public class SpringCloudConfigServer {

    public static void main(String[] args) {
        SpringApplication.run(SpringCloudConfigServer.class, args);
    }
}
1.5 启动查看效果
![]()
2 使用配置中心的配置搭建项目
2.1 创建springboot项目,引入jar依赖
<!-- 配置文件服务器客户端所需要的依赖  -->
<dependency>
    <groupId>org.springframework.cloud</groupId>
    <artifactId>spring-cloud-config-client</artifactId>
</dependency>
2.2 配置读取配置的配置中心(配置文件的名称必须为bootstrap,不能使用application)
server:
 port: 8768
spring:
 application:
  name: cloud-config-client
 cloud:
  config:
   label: master #配置git上的分支
   name: cloud-config
   uri: http://localhost:8767 #配置服务器地址
   profile: dev #配置文件 dev开发,pro生产,test测试
2.3 在项目中直接使用配置中心的配置
@SpringBootApplication
@RestController
public class SpringCloudConfigClient {

    //将配置服务器端的 my.message=hellowordPro信息注入到ConfigUrl变量中
    @Value("${my.message}")
    private String ConfigUrl;

    @RequestMapping("/info")
    String hello(){
        return "hello :"+ConfigUrl;
    }

    public static void main(String[] args) {
        SpringApplication.run(SpringCloudConfigClient.class, args);
    }
}
2.4 启动查看效果

3 配置中心集群的搭建和使用(使用eureka实现)
3.1 搭建配置中的的集群
3.1.1 引入依赖
<!-- 配置eureka -->
<dependency>
    <groupId>org.springframework.cloud</groupId>
    <artifactId>spring-cloud-starter-eureka</artifactId>
</dependency>
3.1.2 在配置文件中指定注册中心地址
eureka:
 client:
  serviceUrl:
   defaultZone: http://localhost:8761/eureka/ #注册服务器地址
3.1.3 在启动类中声明使用eureka
@EnableEurekaClient
3.2 客户端使用配置中心集群
3.2.1 引入依赖
<!-- 配置eureka -->
<dependency>
    <groupId>org.springframework.cloud</groupId>
    <artifactId>spring-cloud-starter-eureka</artifactId>
</dependency>
3.2.2 指定注册中心地址和配置中心集群地址
server:
 port: 8768
spring:
 application:
  name: cloud-config-client
 cloud:
  config:
   label: master #配置git上的分支
   name: cloud-config
   #uri: http://localhost:8767 #配置服务器地址
   profile: dev #配置文件 dev开发,pro生产,test测试
   discovery:
    enabled: true #从配置中心读取文件
    serviceId: cloud-config-server #配置中心服务名称
eureka:
 client:
  serviceUrl:
   defaultZone: http://localhost:8761/eureka/ #注册服务器地址
3.2.3 在启动类中声明使用eureka
@EnableEurekaClient

 浙公网安备 33010602011771号