
Netty核心模块组件
一、代码示例
下面是简单的Netty代码示例代码示例,核心模块在其中均有体现,后续的模块组件都以该代码作为示例。
1、Server
public class NettyServer {
    public static void main(String[] args) {
        //创建BossGroup 和 WorkerGroup
        //说明
        //1. 创建两个线程组 bossGroup 和 workerGroup
        //2. bossGroup 只是处理连接请求 , 真正的和客户端业务处理,会交给 workerGroup完成
        //3. 两个都是无限循环
        //4. bossGroup 和 workerGroup 含有的子线程(NioEventLoop)的个数
        //   默认实际 cpu核数 * 2
        EventLoopGroup bossGroup = new NioEventLoopGroup(1);
        EventLoopGroup workerGroup = new NioEventLoopGroup(); //8
        try {
            //创建服务器端的启动对象,配置参数
            ServerBootstrap bootstrap = new ServerBootstrap();
            //使用链式编程来进行设置
            bootstrap.group(bossGroup, workerGroup) //设置两个线程组
                    .channel(NioServerSocketChannel.class) //使用NioSocketChannel 作为服务器的通道实现
                    .option(ChannelOption.SO_BACKLOG, 128) // 设置线程队列得到连接个数
                    .childOption(ChannelOption.SO_KEEPALIVE, true) //设置保持活动连接状态
                    // .handler(null) // 该 handler对应 bossGroup , childHandler 对应 workerGroup
                    .childHandler(new ChannelInitializer<SocketChannel>() {//创建一个通道初始化对象(匿名对象)
                        //给pipeline 设置处理器
                        @Override
                        protected void initChannel(SocketChannel ch) throws Exception {
                            System.out.println("客户socketchannel hashcode=" + ch.hashCode()); //可以使用一个集合管理 SocketChannel, 再推送消息时,可以将业务加入到各个channel 对应的 NIOEventLoop 的 taskQueue 或者 scheduleTaskQueue
                            ch.pipeline().addLast(new NettyServerHandler());
                        }
                    }); // 给我们的workerGroup 的 EventLoop 对应的管道设置处理器

            System.out.println(".....服务器 is ready...");
            //绑定一个端口并且同步, 生成了一个 ChannelFuture 对象
            //启动服务器(并绑定端口)
            ChannelFuture cf = bootstrap.bind(6668).sync();
            //给cf 注册监听器,监控我们关心的事件
            cf.addListener(new ChannelFutureListener() {
                @Override
                public void operationComplete(ChannelFuture future) throws Exception {
                    if (cf.isSuccess()) {
                        System.out.println("监听端口 6668 成功");
                    } else {
                        System.out.println("监听端口 6668 失败");
                    }
                }
            });
        //对关闭通道进行监听
          cf.channel().closeFuture().sync();
        } catch (InterruptedException e) {
            e.printStackTrace();
        } finally {
            bossGroup.shutdownGracefully();
            workerGroup.shutdownGracefully();
        }
    }
}
2、ServerHandler
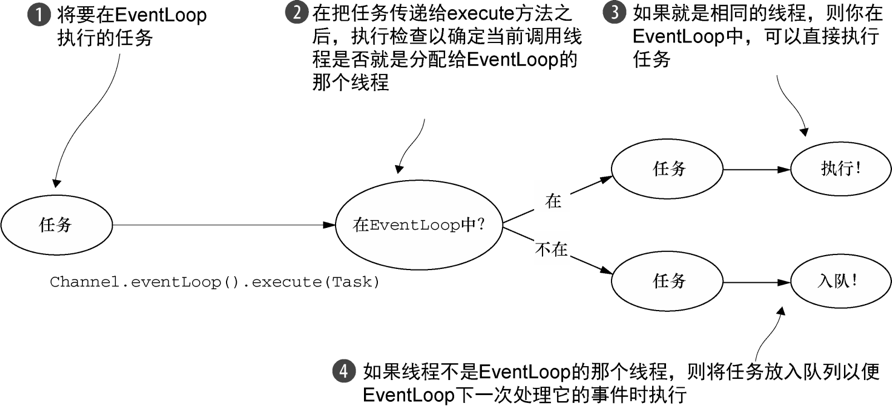
public class NettyServerHandler extends ChannelInboundHandlerAdapter {
    //读取数据实际(这里我们可以读取客户端发送的消息)
    /**
     * 1. ChannelHandlerContext ctx:上下文对象, 含有 管道pipeline , 通道channel, 地址
     * 2. Object msg: 就是客户端发送的数据 默认Object
     */
    @Override
    public void channelRead(ChannelHandlerContext ctx, Object msg) throws Exception {
        // 比如这里我们有一个非常耗时长的业务-> 异步执行 -> 提交该channel 对应的
        // NIOEventLoop 的 taskQueue中,
        // 解决方案1 用户程序自定义的普通任务
        ctx.channel().eventLoop().execute(new Runnable() {
            @Override
            public void run() {
                try {
                    Thread.sleep(5 * 1000);
                    ctx.writeAndFlush(Unpooled.copiedBuffer("hello, 客户端~(>^ω^<)喵2", CharsetUtil.UTF_8));
                    System.out.println("channel code=" + ctx.channel().hashCode());
                } catch (Exception ex) {
                    System.out.println("发生异常" + ex.getMessage());
                }
            }
        });
        ctx.channel().eventLoop().execute(new Runnable() {
            @Override
            public void run() {
                try {
                    Thread.sleep(5 * 1000);
                    ctx.writeAndFlush(Unpooled.copiedBuffer("hello, 客户端~(>^ω^<)喵3", CharsetUtil.UTF_8));
                    System.out.println("channel code=" + ctx.channel().hashCode());
                } catch (Exception ex) {
                    System.out.println("发生异常" + ex.getMessage());
                }
            }
        });
        //解决方案2 : 用户自定义定时任务 -》 该任务是提交到 scheduleTaskQueue中
        ctx.channel().eventLoop().schedule(new Runnable() {
            @Override
            public void run() {

                try {
                    Thread.sleep(5 * 1000);
                    ctx.writeAndFlush(Unpooled.copiedBuffer("hello, 客户端~(>^ω^<)喵4", CharsetUtil.UTF_8));
                    System.out.println("channel code=" + ctx.channel().hashCode());
                } catch (Exception ex) {
                    System.out.println("发生异常" + ex.getMessage());
                }
            }
        }, 5, TimeUnit.SECONDS);

        System.out.println("go on ...");
//        System.out.println("服务器读取线程 " + Thread.currentThread().getName() + " channle =" + ctx.channel());
//        System.out.println("server ctx =" + ctx);
//        System.out.println("看看channel 和 pipeline的关系");
//        Channel channel = ctx.channel();
//        ChannelPipeline pipeline = ctx.pipeline(); //本质是一个双向链接, 出站入站
//
//        //将 msg 转成一个 ByteBuf
//        //ByteBuf 是 Netty 提供的,不是 NIO 的 ByteBuffer.
//        ByteBuf buf = (ByteBuf) msg;
//        System.out.println("客户端发送消息是:" + buf.toString(CharsetUtil.UTF_8));
//        System.out.println("客户端地址:" + channel.remoteAddress());
    }
    public void channelRead2(ChannelHandlerContext ctx, Object msg) throws Exception {
        System.out.println("服务器读取线程 " + Thread.currentThread().getName() + " channle =" + ctx.channel());
        System.out.println("server ctx =" + ctx);
        System.out.println("看看channel 和 pipeline的关系");
        Channel channel = ctx.channel();
        ChannelPipeline pipeline = ctx.pipeline(); //本质是一个双向链接, 出站入站

        //将 msg 转成一个 ByteBuf
        //ByteBuf 是 Netty 提供的,不是 NIO 的 ByteBuffer.
        ByteBuf buf = (ByteBuf) msg;
        System.out.println("客户端发送消息是:" + buf.toString(CharsetUtil.UTF_8));
        System.out.println("客户端地址:" + channel.remoteAddress());
    }
    //数据读取完毕
    @Override
    public void channelReadComplete(ChannelHandlerContext ctx) throws Exception {
        //writeAndFlush 是 write + flush
        //将数据写入到缓存,并刷新
        //一般讲,我们对这个发送的数据进行编码
        ctx.writeAndFlush(Unpooled.copiedBuffer("hello, 客户端~(>^ω^<)喵1", CharsetUtil.UTF_8));
    }
    //处理异常, 一般是需要关闭通道
    @Override
    public void exceptionCaught(ChannelHandlerContext ctx, Throwable cause) throws Exception {
        ctx.close();
    }
}
3、Client
public class NettyClient {
    public static void main(String[] args) {
        //客户端需要一个事件循环组
        EventLoopGroup group = new NioEventLoopGroup();
        //创建客户端启动对象
        //注意客户端使用的不是 ServerBootstrap 而是 Bootstrap
        Bootstrap bootstrap = new Bootstrap();
        try{
            //设置相关参数
            bootstrap.group(group) //设置线程组
                    .channel(NioSocketChannel.class) // 设置客户端通道的实现类(反射)
                    .handler(new ChannelInitializer<SocketChannel>() {
                        @Override
                        protected void initChannel(SocketChannel ch) throws Exception {
                            ch.pipeline().addLast(new NettyClientHandler()); //加入自己的处理器
                        }
                    });
            System.out.println("客户端 ok..");
            //启动客户端去连接服务器端
            //关于 ChannelFuture 要分析,涉及到netty的异步模型
            ChannelFuture channelFuture = null;
            try {
                channelFuture = bootstrap.connect("127.0.0.1", 6668).sync();
            } catch (InterruptedException e) {
                e.printStackTrace();
            }
            //给关闭通道进行监听
            channelFuture.channel().closeFuture().sync();
        } catch (InterruptedException e) {
            e.printStackTrace();
        } finally {
            group.shutdownGracefully();
        }
    }
}
4、ClientHandler
public class NettyClientHandler extends ChannelInboundHandlerAdapter {
    //当通道就绪就会触发该方法
    @Override
    public void channelActive(ChannelHandlerContext ctx) throws Exception {
        System.out.println("client " + ctx);
        ctx.writeAndFlush(Unpooled.copiedBuffer("hello, server: (>^ω^<)喵", CharsetUtil.UTF_8));
    }
    //当通道有读取事件时,会触发
    @Override
    public void channelRead(ChannelHandlerContext ctx, Object msg) throws Exception {
        ByteBuf buf = (ByteBuf) msg;
        System.out.println("服务器回复的消息:" + buf.toString(CharsetUtil.UTF_8));
        System.out.println("服务器的地址: " + ctx.channel().remoteAddress());
    }
    @Override
    public void exceptionCaught(ChannelHandlerContext ctx, Throwable cause) throws Exception {
        cause.printStackTrace();
        ctx.close();
    }
}
二、Bootstrap、ServerBootstrap
Bootstrap意思是引导,⼀个Netty应⽤通常由⼀个Bootstrap开始,主要作⽤是配置整个Netty程序,串联各个组件。
1、Bootstrap类是客户端程序的启动引导类
Bootstrap ⽤于启动⼀个 Netty TCP 客户端,或者 UDP 的⼀端。通常使⽤ #connet(...) ⽅法连接到远程的主机和端⼝,作为⼀个 Netty TCP 客户端。也可以通过 #bind(...) ⽅法绑定本地的⼀个端⼝,作为 UDP 的⼀端。仅仅需要使⽤⼀个 EventLoopGroup,也就是workerGroup。
代码样例:
       Bootstrap bootstrap = new Bootstrap();
            //设置相关参数
            bootstrap.group(group) //设置线程组,只需要一个group
                    .channel(NioSocketChannel.class) // 设置客户端通道的实现类(反射)
                    .handler(new ChannelInitializer<SocketChannel>() {
                        @Override
                        protected void initChannel(SocketChannel ch) throws Exception {
                            ch.pipeline().addLast(new NettyClientHandler()); //加入自己的处理器
                        }
                    });//启动客户端去连接服务器端
            ChannelFuture channelFuture = null;
            try {
                channelFuture = bootstrap.connect("127.0.0.1", 6668).sync();
            } catch (InterruptedException e) {
                e.printStackTrace();
            }
2、ServerBootstrap是服务端启动引导类
ServerBootstrap 往往是⽤于启动⼀个 Netty 服务端。通常使⽤ #bind(...) ⽅法绑定本地的端⼝上,然后等待客户端的连接。使⽤两个 EventLoopGroup 对象( 当然这个对象可以引⽤同⼀个对象 ):bossGroup 只是处理连接请求 , 真正的和客户端业务处理,会交给 workerGroup完成。
代码样例:
     EventLoopGroup bossGroup = new NioEventLoopGroup(1);
        EventLoopGroup workerGroup = new NioEventLoopGroup();
        try {
            //创建服务器端的启动对象,配置参数
            ServerBootstrap bootstrap = new ServerBootstrap();
            //使用链式编程来进行设置
            bootstrap.group(bossGroup, workerGroup) //设置两个线程组
                    .channel(NioServerSocketChannel.class) //使用NioSocketChannel 作为服务器的通道实现
                    .option(ChannelOption.SO_BACKLOG, 128) // 设置线程队列得到连接个数
                    .childOption(ChannelOption.SO_KEEPALIVE, true) //设置保持活动连接状态
                    //          .handler(null) // 该 handler对应 bossGroup , childHandler 对应 workerGroup
                    .childHandler(new ChannelInitializer<SocketChannel>() {//创建一个通道初始化对象(匿名对象)
                        //给pipeline 设置处理器
                        @Override
                        protected void initChannel(SocketChannel ch) throws Exception {
                            System.out.println("客户socketchannel hashcode=" + ch.hashCode()); //可以使用一个集合管理 SocketChannel, 再推送消息时,可以将业务加入到各个channel 对应的 NIOEventLoop 的 taskQueue 或者 scheduleTaskQueue
                            ch.pipeline().addLast(new NettyServerHandler());
                        }
                    }); // 给我们的workerGroup 的 EventLoop 对应的管道设置处理器
            System.out.println(".....服务器 is ready...");
            //绑定一个端口并且同步, 生成了一个 ChannelFuture 对象
            //启动服务器(并绑定端口)
            ChannelFuture cf = bootstrap.bind(6668).sync();
3、常用方法
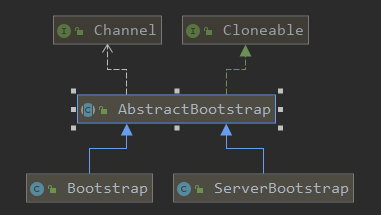
这两个类都继承了AbstractBootstrap,因此它们有很多相同的⽅法和职责。它们都是启动器,能够帮助 Netty 使⽤者更加⽅便地组装和配置 Netty ,也可以更⽅便地启动 Netty 应⽤程序。相⽐使⽤者⾃⼰从头去将 Netty 的各部分组装起来要⽅便得多,降低了使⽤者的学习和使⽤成本。它们是我们使⽤ Netty 的⼊⼝和最重要的 API ,可以通过它来连接到⼀个主机和端⼝上,也可以通过它来绑定到⼀个本地的端⼝上。总的来说,它们两者之间相同之处要⼤于不同。
Bootstrap & ServerBootstrap 对于 Netty ,就相当于 Spring Boot 是 Spring 的启动器。它们和其它组件之间的关系是它们将 Netty 的其它组件进⾏组装和配置,所以它们会组合和直接或间接依赖其它的类。
常见方法(这些方法在示例代码中都可以找到):
public ServerBootstrap group(EventLoopGroup parentGroup, EventLoopGroup childGroup)  //该⽅法⽤于服务器端,⽤来设置两个 EventLoop
public B group(EventLoopGroup group) //该⽅法⽤于客户端,⽤来设置⼀个 EventLoop
public B channel(Class<? extends C> channelClass) //该⽅法⽤来设置⼀个服务器端的通道实现
public <T> B option(ChannelOption<T> option, T value) //⽤来给 ServerChannel 添加配置
public <T> ServerBootstrap childOption(ChannelOption<T> childOption, T value) //⽤来给接收到的通道添加配置
xxx.handler(null) // 该 handler对应 bossGroup , childHandler 对应 workerGroup
public ServerBootstrap childHandler(ChannelHandler childHandler) //childHandler 对应 workerGroup,该⽅法⽤来设置业务处理类(⾃定义的 handler)
public ChannelFuture bind(int inetPort) //该⽅法⽤于服务器端,⽤来设置占⽤的端⼝号 public ChannelFuture connect(String inetHost, int inetPort) //该⽅法⽤于客户端,⽤来连接服务器端
三、ChannelFuture
//b为ServerBootstrap实例
ChannelFuture f = b.bind().sync();
Channel channel() //返回当前正在进⾏ IO 操作的通道
ChannelFuture sync() //等待异步操作执⾏完毕
这也是Netty异步模型的具体体现。
代码示例:
            //绑定一个端口并且同步, 生成了一个 ChannelFuture 对象
            //启动服务器(并绑定端口)
            ChannelFuture cf = bootstrap.bind(6668).sync();
            //给cf 注册监听器,监控我们关心的事件
            cf.addListener(new ChannelFutureListener() {
                @Override
                public void operationComplete(ChannelFuture future) throws Exception {
                    if (cf.isSuccess()) {
                        System.out.println("监听端口 6668 成功");
                    } else {
                        System.out.println("监听端口 6668 失败");
                    }
                }
            });

          //对关闭通道进行监听
            cf.channel().closeFuture().sync();
四、Selector
Netty基于java.nio.channels.Selector对象实现IO多路复⽤,通过Selector⼀个线程可以监听多个连接的Channel事件。当向⼀个Selector中注册Channel后,Selector内部的机制就可以⾃动不断的Select这些注册的Channel是否有就绪的IO事件(可读、可写、⽹络连接完成等)。
⼀个NioEventLoop中会有⼀个线程以及⼀个Selector, 这个线程就是我们所说的I/O线程。
五、Channel家族
Netty跟Channel相关的组件有Channel、ChannelHandler、ChannelContext、ChannelPipeline、ChannelOption,其中:
Channel是网络操作的抽象类,使用外观模式对外统一提供一组操作
ChannelHandler是实际的操作处理类
ChannelHandlerContext是保存ChannelHandler上下文信息的
ChannelPipeline是一组ChannelHandler的集合,用于拦截出入站的操作,使用责任链模式交给各个Handler处理。
ChannelOption是Channel的配置类。
(一)Channel
Channel 是 Netty ⽹络操作抽象类,使⽤了Facade 模式(外观模式)聚合了⼀组功能,除了包括基本的 I/O 操作,如 bind、connect、read、write 之外,还包括了 Netty 框架相关的⼀些功能,如获取该 Channel的 EventLoop 。
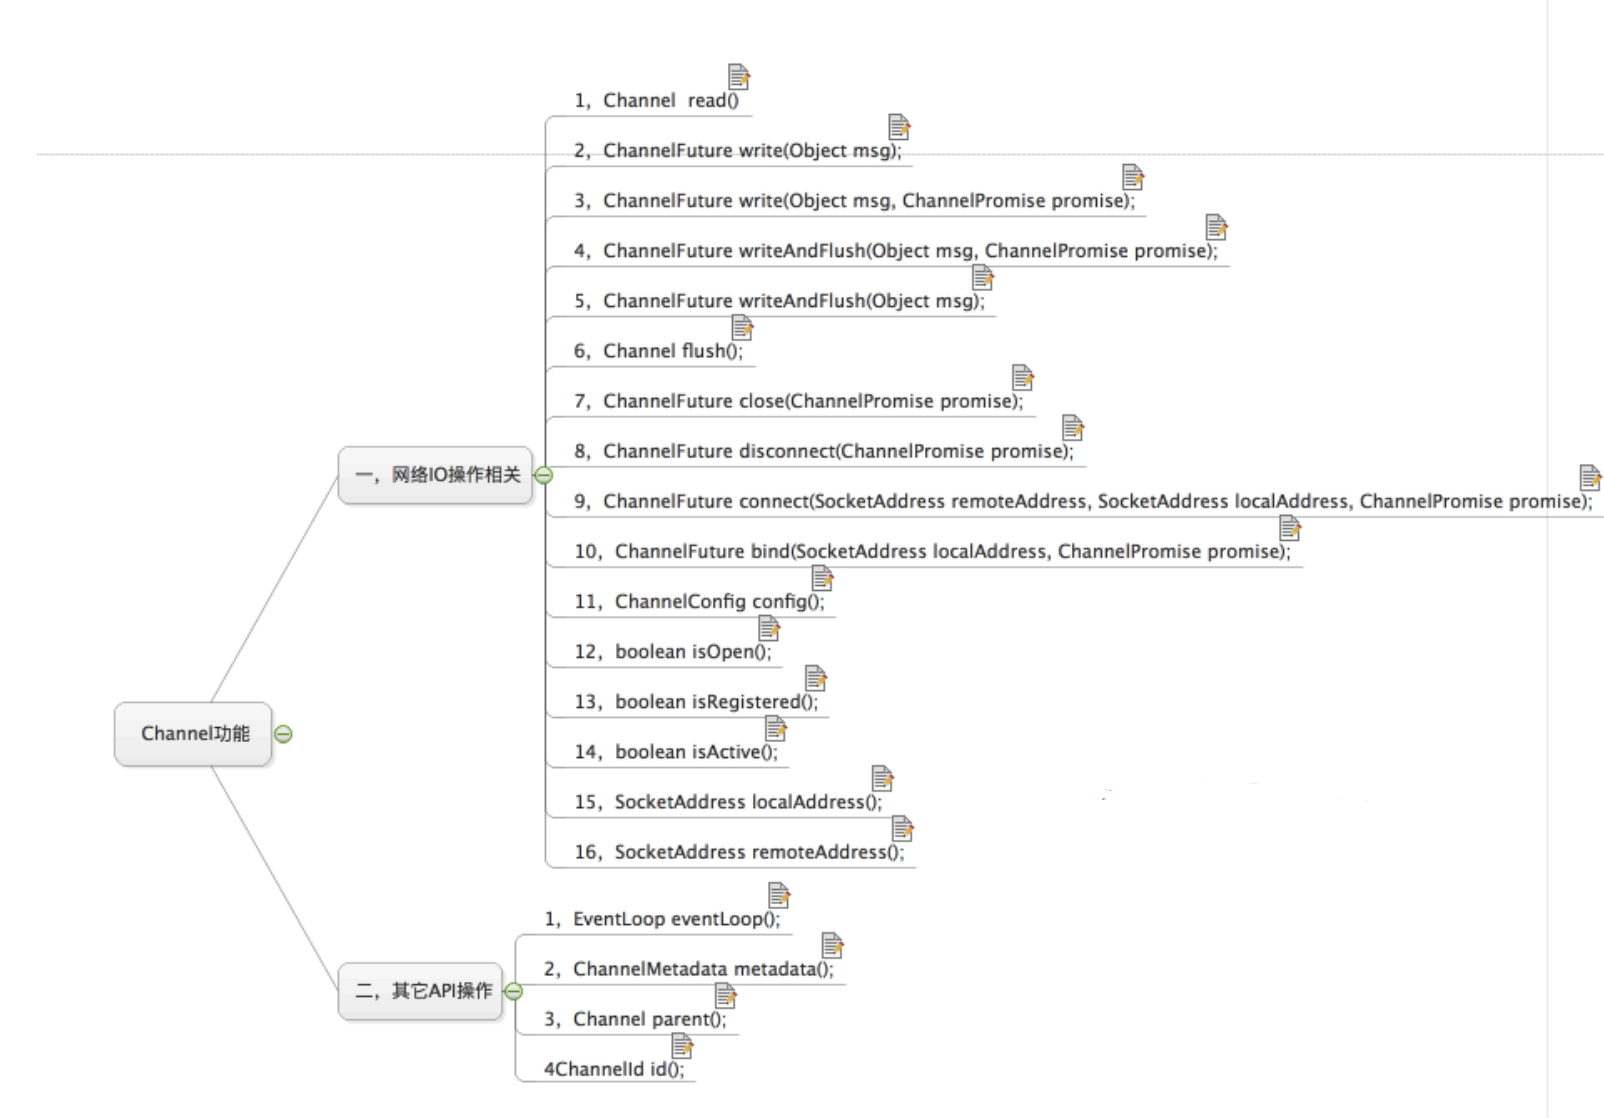
1、Channel主要功能:
⽹络的读写
客户端发起连接、主动关闭连接
链路关闭
获取通信双⽅的⽹络地址
2、Channel设计理念:
在Channel 接⼝层,采⽤ Facade 模式进⾏统⼀封装,将⽹络I/O 操作、⽹络I/O 相关联的其他操作封装起来,统⼀对外提供。
Channel 接⼝的定义:⼤⽽全,为SocketChannel 和ServerSocketChannel 提供统⼀试图,由不同⼦类现实不同的功能,公共功能在抽象⽗类中实现,最⼤程度地实现功能和接⼝的重⽤。
具体实现采⽤聚合模式⽽⾮组合模式,将相关的功能类聚合在Channel中,由Channel 统⼀负责分配和调度,功能实现更加灵活。
3、不同协议、不同的阻塞类型的连接都有不同的 Channel 类型与之对应,常⽤的 Channel 类型:

NioSocketChannel:异步的客户端 TCP Socket 连接。NioServerSocketChannel是异步的服务器端 TCP Socket 连接。NioDatagramChannel是异步的 UDP 连接。NioSctpChannel是异步的客户端 Sctp 连接。NioSctpServerChannel是异步的 Sctp 服务器端连接,这些通道涵盖了UDP 和 TCP ⽹络 IO 以及⽂件 IO。
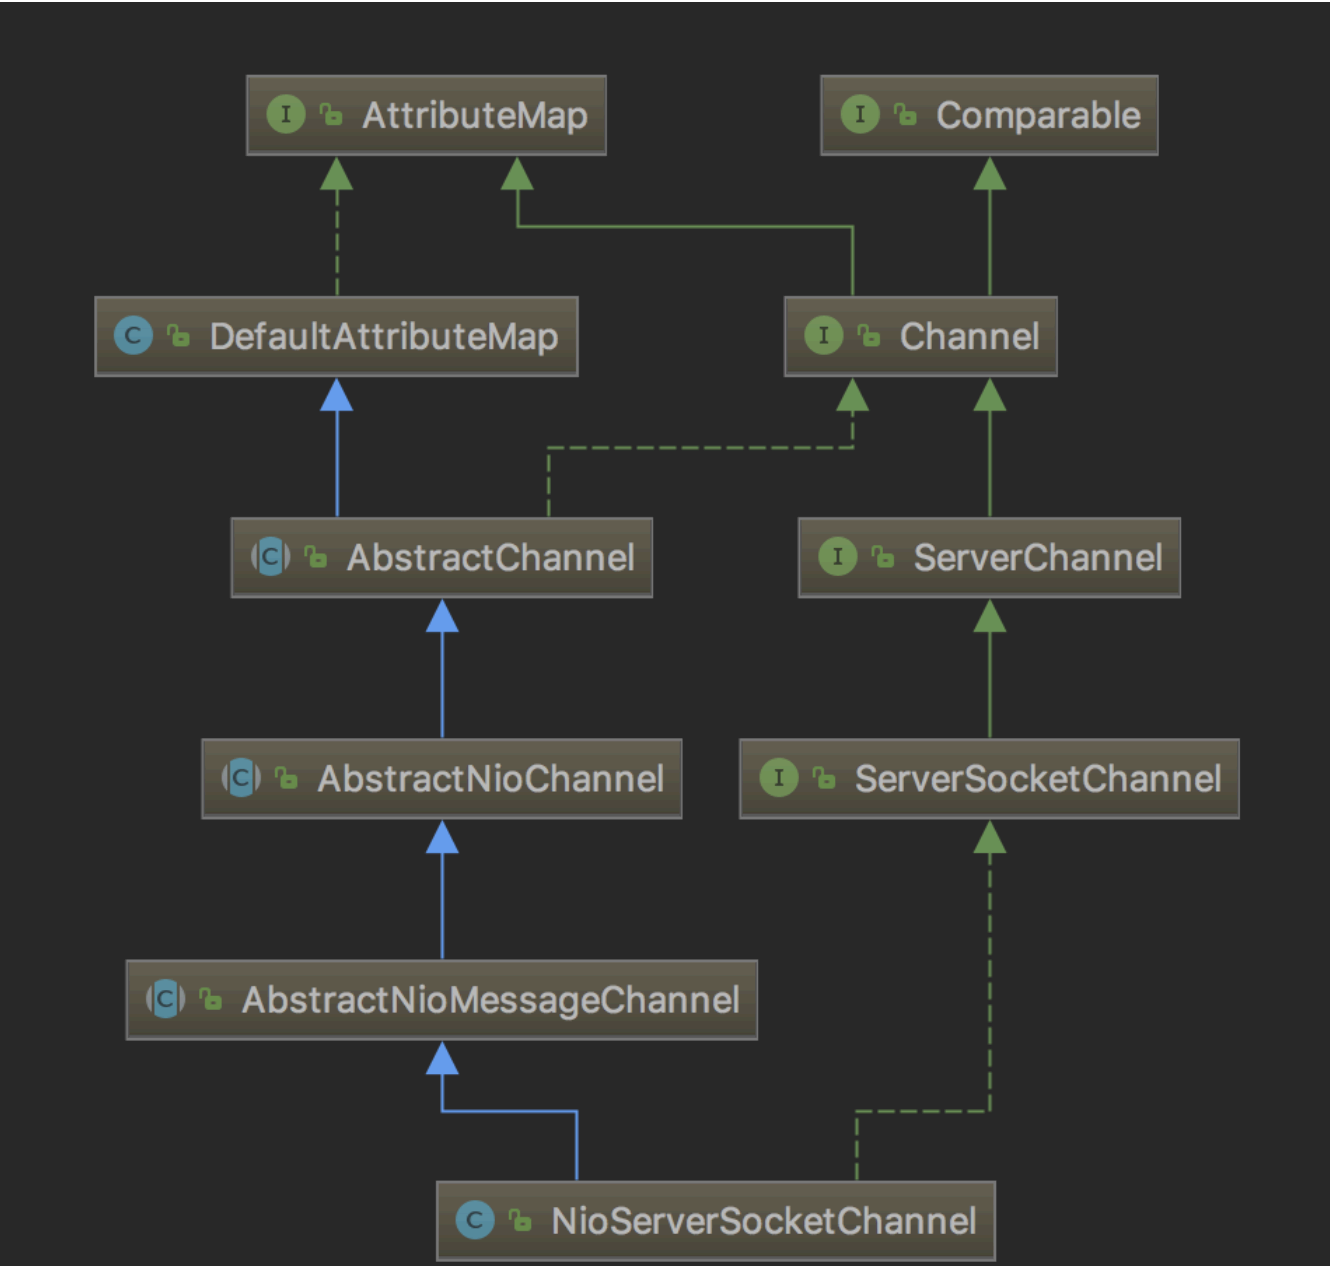
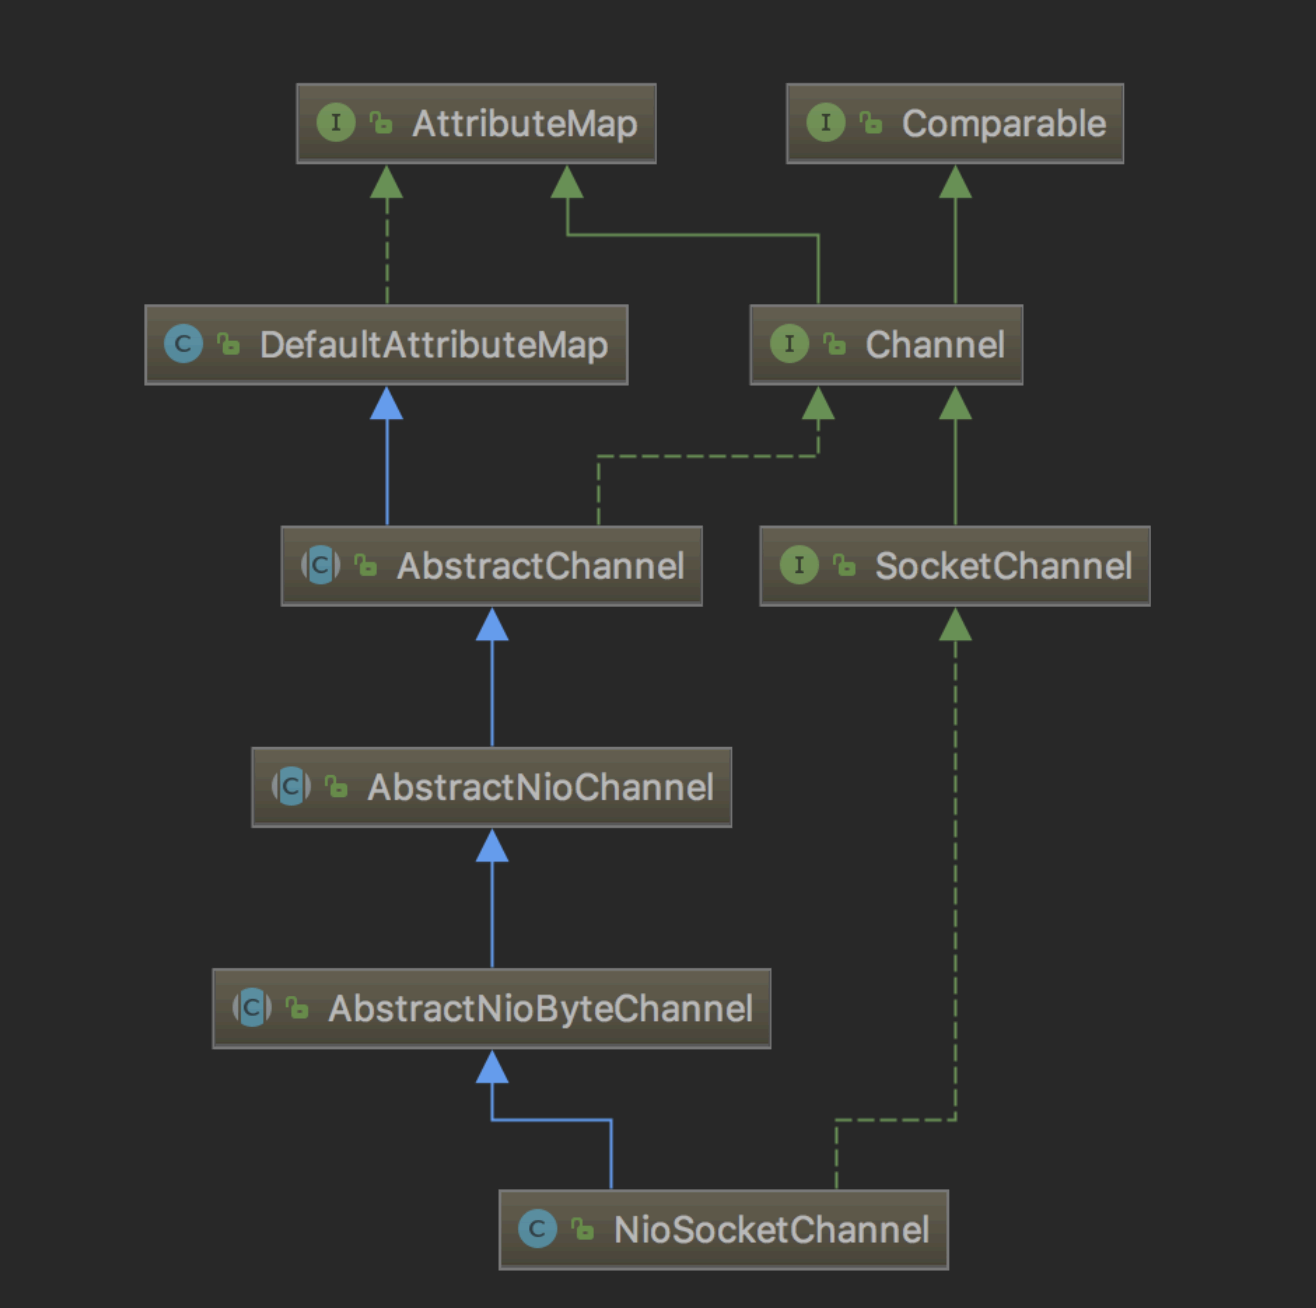
4、Channel继承关系
server端 & 客户端
5、外观模式
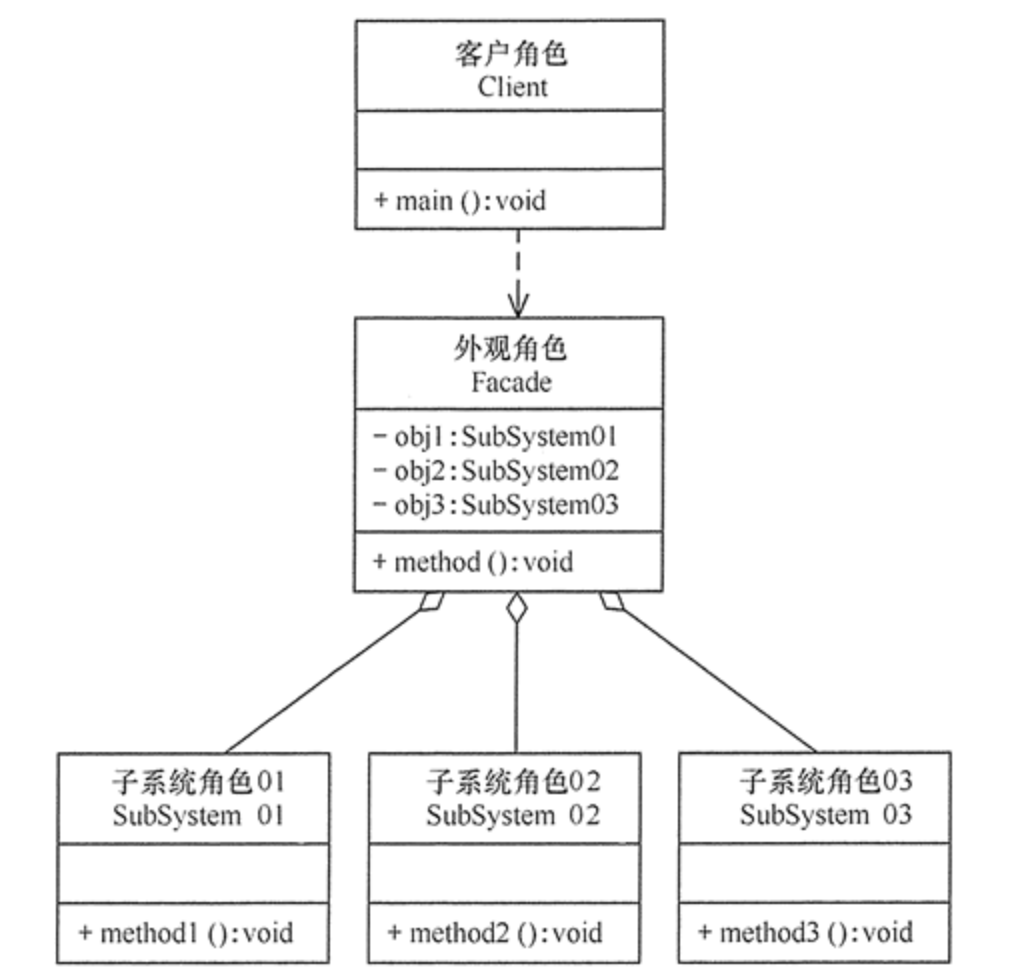
这里提一下外观模式,外观模式,⼜叫⻔⾯模式,是⼀种通过为多个复杂的⼦系统提供⼀个⼀致的接⼝,⽽使这些⼦系统更加容易被访问的模式。该模式对外有⼀个统⼀接⼝,外部应⽤程序不⽤关⼼内部⼦系统的具体的细节,这样会⼤⼤降低应⽤程序的复杂度,提⾼了程序的可维护性。
外观(Facade)模式的结构⽐较简单,主要是定义了⼀个⾼层接⼝。它包含了对各个⼦系统的引⽤,客户端可以通过它访问各个⼦系统的功能。现在来分析其基本结构和实现⽅法。
外观(Facade)模式包含以下主要⻆⾊。
外观(Facade)⻆⾊:为多个⼦系统对外提供⼀个共同的接⼝。
⼦系统(Sub System)⻆⾊:实现系统的部分功能,客户可以通过外观⻆⾊访问它。
客户(Client)⻆⾊:通过外观⻆⾊访问各个⼦系统的功能。
(二)ChannelHandler
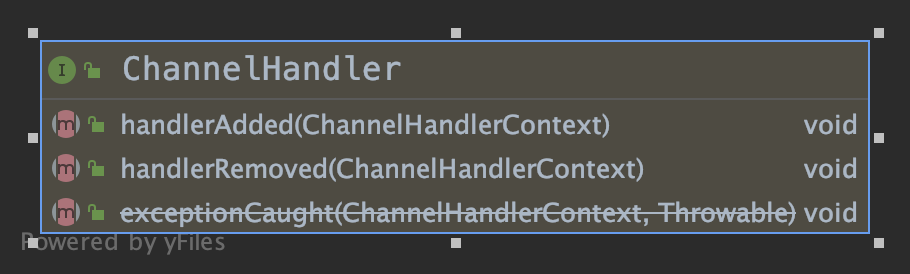
ChannelHandler属于业务的核⼼接⼝,处理 I/O 事件或拦截 I/O 操作,并将其转发到其hannelPipeline(业务处理链)。ChannelHandler 本身并没有提供很多⽅法,因为这个接⼝有许多的⽅法需要实现,⽅便使⽤期间,可以继承它的⼦类。
ChannelHandler 及其实现类⼀览图
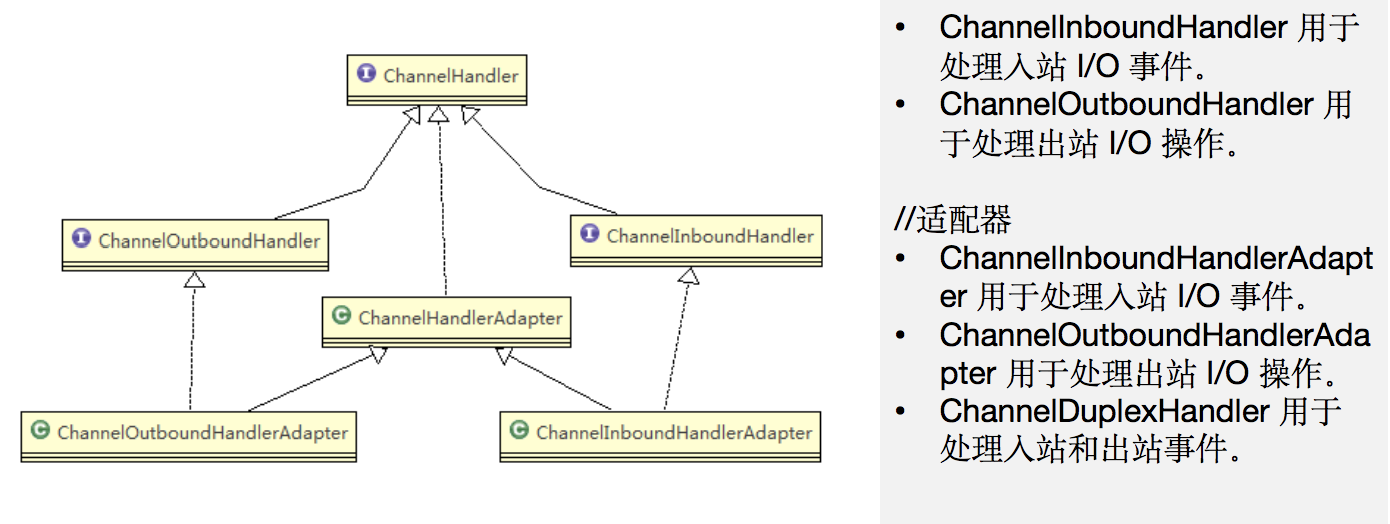
ChannelHandler⾥⾯定义三个⽣命周期⽅法,分别会在当前ChannelHander加⼊ChannelHandlerContext、从ChannelHandlerContext中移除、以及ChannelHandler回调⽅法出现异常时被回调。
主要实现它的⼦接⼝有两个ChannelInboundHandler和ChannelOutboundHandler。为了便利,框架提供了ChannelInboundHandlerAdapter,ChannelOutboundHandlerAdapter和ChannelDuplexHandler这三个适配类提供⼀些默认实现,在使⽤的时候只需要实现关注的⽅法即可。
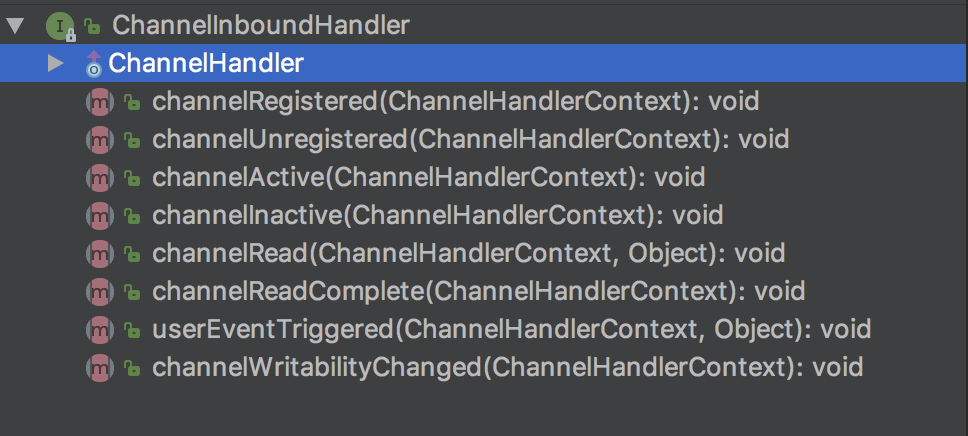
介绍⼀下这些回调⽅法被触发的时机:
channelRegistered:当前channel注册到EventLoop
channelUnregistered:当前channel从EventLoop取消注册
channelActive:当前channel活跃的时候
channelInactive:当前channel不活跃的时候,也就是当前channel到了它⽣命周期末
channelRead:当前channel从远端读取到数据
channelReadComplete:channel read消费完读取的数据的时候被触发
userEventTriggered:⽤户事件触发的时候
channelWritabilityChanged:channel的写状态变化的时候触发
可以注意到每个⽅法都带了ChannelHandlerContext作为参数,具体作⽤是,在每个回调事件⾥⾯,处理完成之后,使⽤ChannelHandlerContext的fireChannelXXX⽅法来传递给下个ChannelHandler,netty的codec模块和业务处理代码分离就⽤到了这个链路处理
2、ChannelOutboundHandler
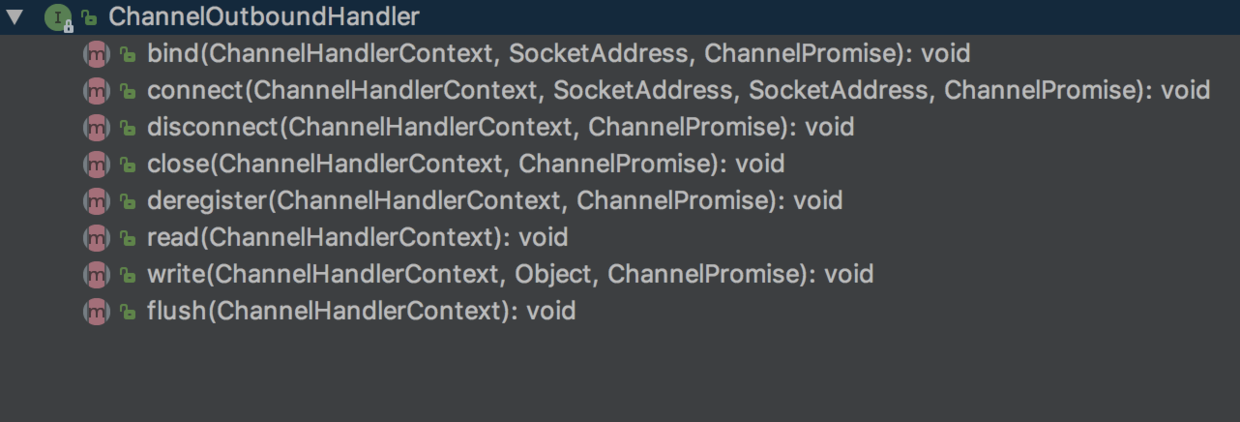
被触发的时机:
bind:bind操作执⾏前触发
connect:connect 操作执⾏前触发
disconnect:disconnect 操作执⾏前触发
close:close操作执⾏前触发
deregister:deregister操作执⾏前触发
read: read操作执⾏前触发
write: write操作执⾏前触发
flush: flush操作执⾏前触发
注意到⼀些回调⽅法有ChannelPromise这个参数,我们可以调⽤它的addListener注册监听,当回调⽅法所对应的操作完成后,会触发这个监听 下⾯这个代码,会在写操作完成后触发,完成操作包括成功和失败
public void write(ChannelHandlerContext ctx, Object msg, ChannelPromise promise) throws Exception {
  ctx.write(msg,promise);
  System.out.println("out write");
  promise.addListener(new GenericFutureListener<Future<? super Void>>() {
    @Override
    public void operationComplete(Future<? super Void> future) throws Exception {
      if(future.isSuccess()){
        System.out.println("OK");
       }
     }
   });
}
3、ChannelInboundHandler和ChannelOutboundHandler的区别
ChannelInboundHandler的channelRead回调负责执⾏⼊栈数据的decode逻辑(解码),而ChannelOutboundHandler的write负责执⾏出站数据的encode⼯作(编码),其他回调⽅法和具体触发逻辑有关,和in与out⽆关。
4、代码示例
经常需要⾃定义⼀个 Handler 类去继承 ChannelInboundHandlerAdapter,然后通过重写相应⽅法实现业务逻辑。前面的代码示例中自定义的handler就继承了ChannelInboundHandlerAdapter,就用到了channelRead、channelReadComplete、execeptionCaught、channelActive这些方法。
(三) ChannelHandlerContext
保存 Channel 相关的所有上下⽂信息,同时关联⼀个 ChannelHandler 对象。即 ChannelHandlerContext 中包含⼀个具体的事件处理器 ChannelHandler,同时ChannelHandlerContext 中也绑定了对应的 pipeline 和 Channel 的信息,⽅便对 ChannelHandler 进⾏调⽤。
每个ChannelHandler通过add⽅法加⼊到ChannelPipeline中去的时候,会创建⼀个对应的ChannelHandlerContext,并且绑定,ChannelPipeline实际维护的是ChannelHandlerContext 的关系。每个ChannelHandlerContext之间形成双向链表。
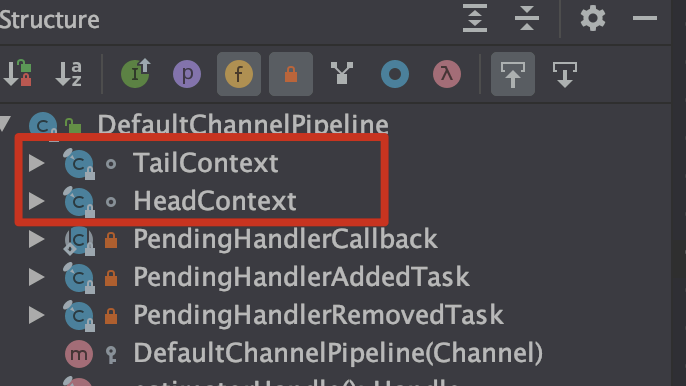
在DefaultChannelPipeline源码中可以看到会保存第⼀个ChannelHandlerContext以及最后⼀个ChannelHandlerContext的引⽤
public class DefaultChannelPipeline implements ChannelPipeline {
  .....
  final AbstractChannelHandlerContext head;
  final AbstractChannelHandlerContext tail;
  ....
}
⽽在AbstractChannelHandlerContext源码中可以看到
abstract class AbstractChannelHandlerContext implements ChannelHandlerContext, ResourceLeakHint {
  ...........
  volatile AbstractChannelHandlerContext next;
  volatile AbstractChannelHandlerContext prev;
  ....
}
也就是说,ChannelHandlerContext和ChannelPipeline是相互关联的,并且在自己中存储了对方的上一个节点和下一个节点。
ChannelHandlerContext中常⽤⽅法:

(四)ChannelPipeline
1、ChannelPipeline介绍
ChannelPipeline 是⼀个 Handler 的集合,它负责处理和拦截 inbound 或者 outbound 的事件和操作,相当于⼀个贯穿 Netty 的链。(也可以这样理解:ChannelPipeline 是保存ChannelHandler 的 List,⽤于处理或拦截 Channel 的⼊站事件和出站操作);ChannelPipeline 实现了⼀种⾼级形式的拦截过滤器模式,使⽤户可以完全控制事件的处理⽅式,以及 Channel 中各个的 ChannelHandler 如何相互交互;每个 Channel 都有且仅有⼀个 ChannelPipeline 与之对应, ⼀个 Channel 包含了⼀个ChannelPipeline,⽽ ChannelPipeline 中⼜维护了⼀个由 ChannelHandlerContext 组成的双向链表,并且每个 ChannelHandlerContext 中⼜关联着⼀个 ChannelHandler。
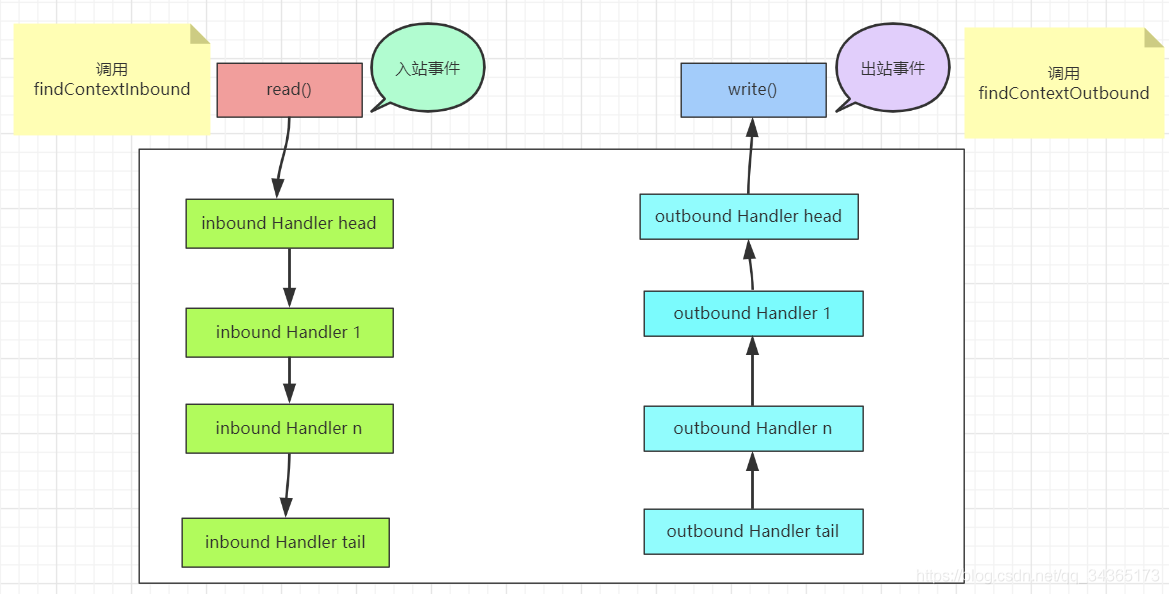
它们的组成关系如下:

⼊站事件和出站事件在⼀个双向链表中,⼊站事件会从链表head往后传递到最后⼀个⼊站的handler,出站事件会从链表tail往前传递到最前⼀个出站的handler,两种类型的handler互不⼲扰。
2、ChannelPipeline初始化

在Channel创建的时候,会同时创建ChannelPipeline
public abstract class AbstractChannel extends DefaultAttributeMap implements Channel {
   .....
  private final DefaultChannelPipeline pipeline;
   .....
  protected AbstractChannel(Channel parent) {
    this.parent = parent;
    id = newId();
    unsafe = newUnsafe();
    pipeline = newChannelPipeline();
   }
   ....
}
在ChannelPipeline中也会持有Channel的引⽤
public class DefaultChannelPipeline implements ChannelPipeline {
  ....
  private final Channel channel;
  ....
  protected DefaultChannelPipeline(Channel channel) {
    this.channel = ObjectUtil.checkNotNull(channel, "channel");
    succeededFuture = new SucceededChannelFuture(channel, null);
    voidPromise = new VoidChannelPromise(channel, true);
    tail = new TailContext(this);
    head = new HeadContext(this);
    head.next = tail;
    tail.prev = head;
   }
   ....
 }
ChannelPipeline会维护⼀个ChannelHandlerContext的双向链表
public class DefaultChannelPipeline implements ChannelPipeline {
  .....
    final AbstractChannelHandlerContext head;
  final AbstractChannelHandlerContext tail;
  ...
}
链表的头尾有默认实现
protected DefaultChannelPipeline(Channel channel) {
  this.channel = ObjectUtil.checkNotNull(channel, "channel");
  succeededFuture = new SucceededChannelFuture(channel, null);
  voidPromise = new VoidChannelPromise(channel, true);
  tail = new TailContext(this);
  head = new HeadContext(this);
  head.next = tail;
  tail.prev = head;
 }
3、⼊站事件和出站事件
pipeline保存了通道所有的处理器信息,在创建⼀个channel的时候,会创建⼀个这个channel专有的pipeline,⼊站事件和出站事件都会调⽤这个pipeline上⾯的处理器。
abstract class AbstractChannelHandlerContext implements ChannelHandlerContext, ResourceLeakHint {
  ..........
  private AbstractChannelHandlerContext findContextInbound(int mask) {
  AbstractChannelHandlerContext ctx = this;
  EventExecutor currentExecutor = executor();
  do {
    ctx = ctx.next;
   } while (skipContext(ctx, currentExecutor, mask, MASK_ONLY_INBOUND));
    return ctx;
   }
  private AbstractChannelHandlerContext findContextOutbound(int mask) {
  AbstractChannelHandlerContext ctx = this;
  EventExecutor currentExecutor = executor();
  do {
    ctx = ctx.prev;
   } while (skipContext(ctx, currentExecutor, mask, MASK_ONLY_OUTBOUND));
    return ctx;
   }
   ..........
上⾯两个⽅法的作⽤,是判断下⼀个context是不是⼊站或者出站事件,是的话才往下传递数据。
4、HeadContext
HeadContext实现了ChannelOutboundHandler,ChannelInboundHandler这两个接⼝:
final class HeadContext extends AbstractChannelHandlerContext implements ChannelOutboundHandler, ChannelInboundHandler {
因为在头部,所以说HeadContext中关于in和out的回调⽅法都会触发关于ChannelInboundHandler,HeadContext的作⽤是进⾏⼀些前置操作,以及把事件传递到下⼀个ChannelHandlerContext的ChannelInboundHandler中去。看下其中channelRegistered的实现
@Override
public void channelRegistered(ChannelHandlerContext ctx) {
  invokeHandlerAddedIfNeeded();
  ctx.fireChannelRegistered();
 }
从语义上可以看出来在把这个事件传递给下⼀个ChannelHandler之前会回调ChannelHandler的handlerAdded⽅法。
⽽有关ChannelOutboundHandler接⼝的实现,会在链路的最后执⾏,看下write⽅法的实现
public void write(ChannelHandlerContext ctx, Object msg, ChannelPromise promise) throws Exception {
  unsafe.write(msg, promise);
}
这边的unsafe接⼝封装了底层Channel的调⽤,之所以取名为unsafe,是不需要⽤户⼿动去调⽤这些⽅法。(这个和阻塞原语的unsafe不是同⼀个)
5、TailContext
TailContext实现了ChannelInboundHandler接⼝,会在ChannelInboundHandler调⽤链最后执⾏,只要是对调⽤链完成处理的情况进⾏处理,看下channelRead实现
final class TailContext extends AbstractChannelHandlerContext implements ChannelInboundHandler {
  public void channelRead(ChannelHandlerContext ctx, Object msg) throwsException {
    onUnhandledInboundMessage(msg);
  }
}
channelRead中的onUnhandledInboundMessage⽅法,会把msg资源回收,防⽌内存泄露
protected void onUnhandledInboundMessage(ChannelHandlerContext ctx, Object msg) {
  onUnhandledInboundMessage(msg);
  if (logger.isDebugEnabled()) {
    logger.debug("Discarded message pipeline : {}. Channel : {}.",
    ctx.pipeline().names(), ctx.channel());
   }
 }
protected void onUnhandledInboundMessage(Object msg) {
  try {
    logger.debug(
      "Discarded inbound message {} that reached at the tail of the pipeline. " + "Please check your pipeline configuration.", msg);
   } finally {
    ReferenceCountUtil.release(msg);
   }
 }
6、组件之间的关系

(1)每个Channel会绑定⼀个ChannelPipeline,每个ChannelPipeline会持有⼀个Channel,两者相互引用
(2)每个ChannelHandler对应⼀个ChannelHandlerContext,ChannelPipeline持有ChannelHandlerContext链表,也就相当于持有ChannelHandler链表
(3)ChannelHandlerContext作为上下⽂,持有ChannelPipeline和它对应ChannelHandler的引⽤,持有ChannelPipeline相当于间接持有Channel,同时持有它上/下⼀个ChannelHandlerContext的引⽤
7、责任链模式
ChannelPipeline使用的是责任链模式,顺序的执行链条上的每一个handler。
责任链模式为请求创建⼀个处理数据的链。 客户端发起的请求和具体处理请求的过程进⾏了解耦,责任链上的处理者负责处理请求,客户端只需要把请求发送到责任链就⾏了,不需要去关⼼具体的处理逻辑和处理请求在责任链中是怎样传递的。
1、处理器抽象类
2、处理器抽象类的具体实现类
3、保存和维护处理器信息的类
4、处理器执⾏的类
下⾯看⼀个简单的demo,基于责任链模式的思想:
public class PipelineDemo {
  //初始化链的头部
  public HandlerContext head = new HandlerContext(new AbstractHandler() {
    @Override
    void doHandler(HandlerContext context, Object arg) {
      context.runNext(arg);
     }
   });
  //开始执⾏
  public void request(Object arg) {
    this.head.handler(arg);
   }
  //添加节点到尾部
  public void addLast(AbstractHandler handler) {
    HandlerContext context = head;
    while (context.next != null) {
      context = context.next;
     }
    context.next = new HandlerContext(handler);
   }

  public static void main(String[] args) {
    PipelineDemo pipelineChainDemo = new PipelineDemo();
    pipelineChainDemo.addLast(new Handler2());
    pipelineChainDemo.addLast(new Handler1());
    pipelineChainDemo.addLast(new Handler1());
    pipelineChainDemo.addLast(new Handler2());
    // 发起请求
    pipelineChainDemo.request("⽕⻋呜呜呜~~");
   }
}


//处理器的信息,维护处理器
class HandlerContext {
  //下⼀个节点
  HandlerContext next;
  AbstractHandler handler;
  public HandlerContext(AbstractHandler handler) {
    this.handler = handler;
   }
  void handler(Object arg) {
    this.handler.doHandler(this, arg);
   }
  //执⾏下⼀个
  void runNext(Object arg) {
    if (this.next != null) {
      this.next.handler(arg);
     }
   }

//处理器抽象类
abstract class AbstractHandler {
  abstract void doHandler(HandlerContext context, Object arg);
}
//处理器的具体实现类
class Handler1 extends AbstractHandler {
  @Override
  void doHandler(HandlerContext context, Object arg) {
    arg = arg.toString() + "Handler1的⼩尾巴~~";
    System.out.println("Handler1的实例正在处理:" + arg);
    //执⾏下⼀个
    context.runNext(arg);
   }
}
//处理器的具体实现类
class Handler2 extends AbstractHandler {
  @Override
  void doHandler(HandlerContext context, Object arg) {
    arg = arg.toString() + "Handler2的⼩尾巴~~";
    System.out.println("Handler2的实例正在处理:" + arg);
    //执⾏下⼀个
    context.runNext(arg);
   }
}
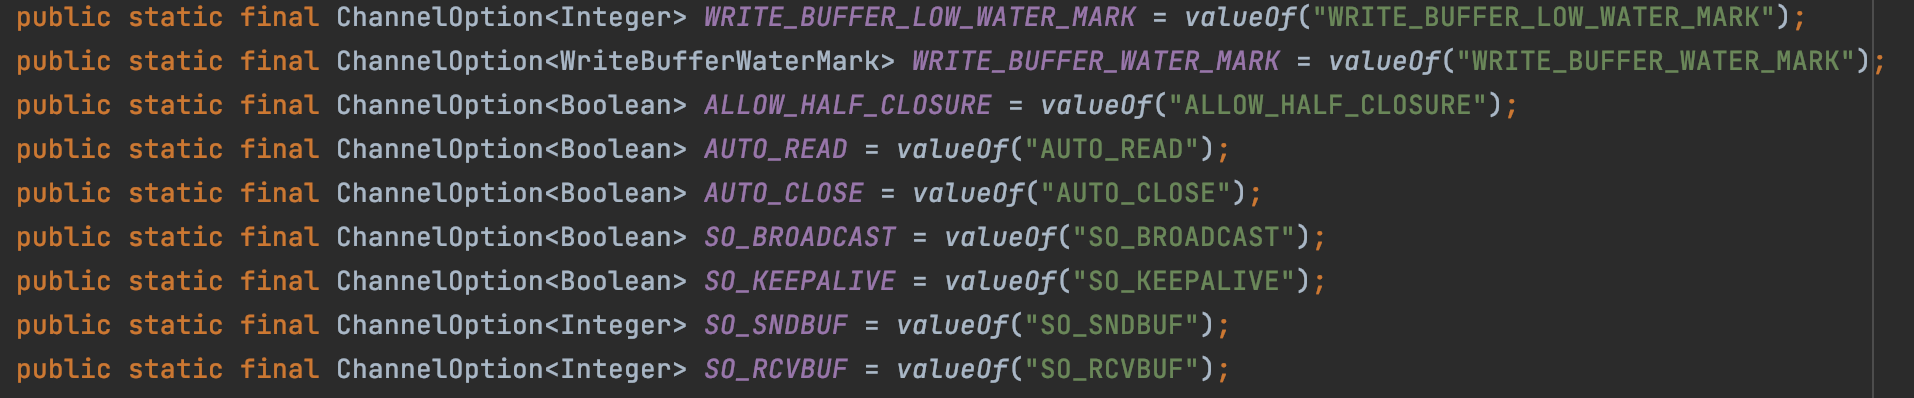
(五)ChannelOption
ChannelConfig是Channel的配置类, ⽽ChannelConfig内部各种配置选项依赖于ChannelOption类的实现,可以认为ChannelConfig中⽤了⼀个Map来保存参数,Map的key是ChannelOption,ChannelConfig 定义了相关⽅法来获取和修改Map中的值。
public interface ChannelConfig {
  ...
  Map<ChannelOption<?>, Object> getOptions();//获取所有参数
  boolean setOptions(Map<ChannelOption<?>, ?> options);//替换所有参数
  <T> T getOption(ChannelOption<T> option);//获取以某个ChannelOption为key的参数值
  <T> boolean setOption(ChannelOption<T> option, T value);//替换某个ChannelOption为key的参数值
  ....
}
ChannelOption定义了对⼀个Channel的各种属性配置选项,包括了各种底层连接的详细信息,如keep-alive或者超时属性以及缓冲区的设置等。
六、EventLoopGroup 和 NioEventLoopGroup
1、ServerSocketChannel 与 SocketChannel
EventLoopGroup 是⼀组 EventLoop 的抽象,Netty 为了更好的利⽤多核 CPU 资源,⼀般会有多个 EventLoop 同时⼯作,每个 EventLoop 维护着⼀个 Selector 实例。EventLoopGroup 提供 next 接⼝,可以从组⾥⾯按照⼀定规则获取其中⼀个 EventLoop 来处理任务。在 Netty 服务器端编程中,我们⼀般都需要提供两个 EventLoopGroup,例如:BossEventLoopGroup 和 WorkerEventLoopGroup。
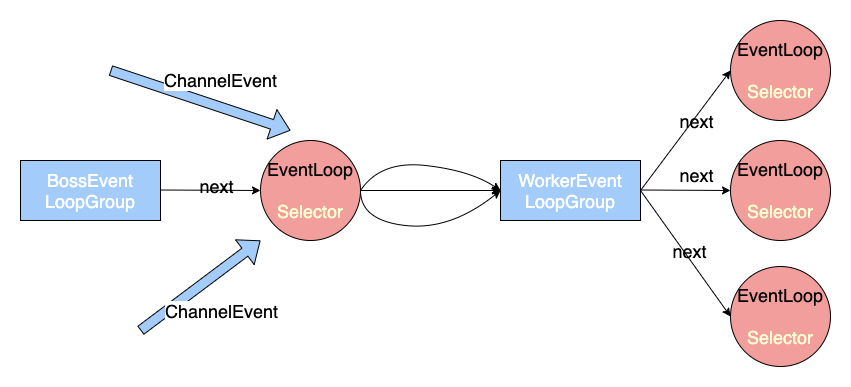
BossEventLoopGroup通常是⼀个单线程的EventLoop,EventLoop维护着⼀个注册了ServerSocketChannel的Selector实例。BossEventLoop不断轮询Selector将连接事件分离出来。通常是OP_ACCEPT事件,然后将受到SocketChannel交给WokerEventLoopGroup。WokerEventLoopGroup会有next选择其中⼀个EventLoop来将这个SocketChannel注册到其维护的Selector并对其后续的IO事件进⾏处理。
2、EventLoop与Channel
EventLoop进⾏的是Selector的维护。EventLoopGroup⽤于线程组维护,并发控制,任务处理。
3、任务执⾏
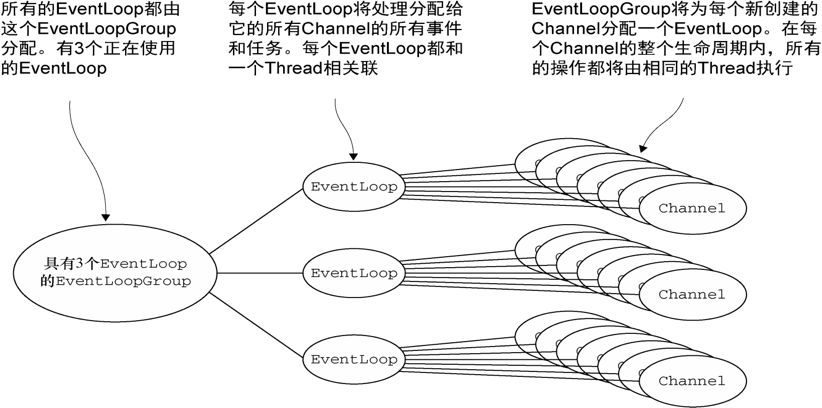
关于EventLoop以及EventLoopGroup的映射关系为:
⼀个EventLoopGroup 包含⼀个或者多个EventLoop;
⼀个EventLoop 在它的⽣命周期内只和⼀个Thread 绑定;
所有由EventLoop 处理的I/O 事件都将在它专有的Thread 上被处理;
⼀个Channel 在它的⽣命周期内只注册于⼀个EventLoop;
⼀个EventLoop 可能会被分配给⼀个或多个Channel。
Channel 为Netty ⽹络操作抽象类,EventLoop 主要是为Channel 处理 I/O 操作,两者配合参与I/O 操作。当⼀个连接到达时,Netty 就会注册⼀个 Channel,然后从 EventLoopGroup 中分配⼀个EventLoop 绑定到这个Channel上,在该Channel的整个⽣命周期中都是有这个绑定的 EventLoop 来服务的。
4、常⽤⽅法
public NioEventLoopGroup(),构造⽅法
public Future<?> shutdownGracefully(),断开连接,关闭线程
七、ByteBuf
1、Unpooled
Netty 提供⼀个专⻔⽤来操作缓冲区(即 Netty 的数据容器)的⼯具类Unpooled,常⽤⽅法
/**
通过给定的数据和字符编码返回⼀个ByteBuf 对象(类似NIO中的ByteBuffer,但是有区别)
**/
public static ByteBuf copiedBuffer(CharSequence string, Charset charset) {
  ObjectUtil.checkNotNull(string, "string");
  if (CharsetUtil.UTF_8.equals(charset)) {
    return copiedBufferUtf8(string);
   }
  if (CharsetUtil.US_ASCII.equals(charset)) {
    return copiedBufferAscii(string);
   }
  if (string instanceof CharBuffer) {
    return copiedBuffer((CharBuffer) string, charset);
   }
  return copiedBuffer(CharBuffer.wrap(string), charset);
 }
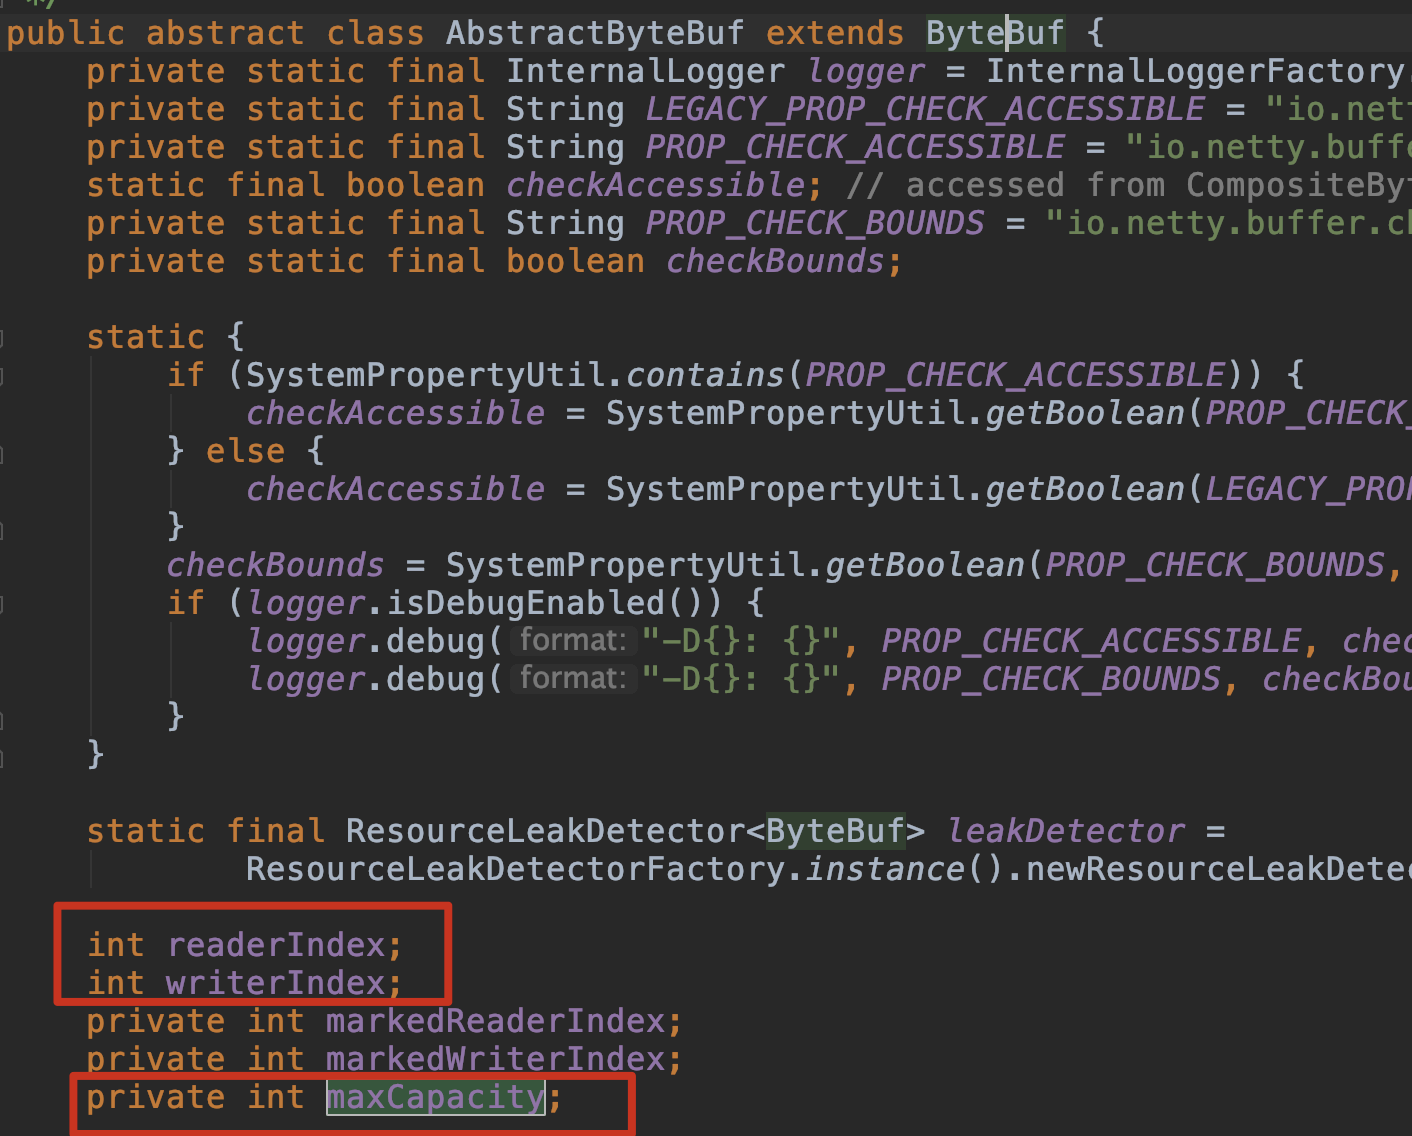
2、ByteBuf的三个指针分别是:readerIndex(读指针)、writerIndex(写指针)、maxCapacity(最⼤容量)
ByteBuf与NIO中原生的ByteBuffer的区别就是ByteBuf提供了读指针、写指针、最大容量三个指针,分别用来指定读的位置、写的位置、以及最大容量,这样在进行读写切换时就不需要类似NIO使用flip从写模式转换为读模式,position 被重新设置为 0了,而是可以直接使用相应的指针就可以了。
3、示例
示例一:
public class NettyByteBuf01 {
    public static void main(String[] args) {

        //创建一个ByteBuf
        //说明
        //1. 创建 对象,该对象包含一个数组arr , 是一个byte[10]
        //2. 在netty 的buffer中,不需要使用flip 进行反转
        //   底层维护了 readerindex 和 writerIndex
        //3. 通过 readerindex 和  writerIndex 和  capacity, 将buffer分成三个区域
        // 0---readerindex 已经读取的区域
        // readerindex---writerIndex , 可读的区域
        // writerIndex -- capacity, 可写的区域
        ByteBuf buffer = Unpooled.buffer(10);

        for (int i = 0; i < 10; i++) {
            buffer.writeByte(i);
        }

        System.out.println("capacity=" + buffer.capacity());//10
        //输出
//        for(int i = 0; i<buffer.capacity(); i++) {
//            System.out.println(buffer.getByte(i));
//        }
        for (int i = 0; i < buffer.capacity(); i++) {
            System.out.println(buffer.readByte());
        }
        System.out.println("执行完毕");
    }
}
示例二:
public class NettyByteBuf02 {
    public static void main(String[] args) {
        //创建ByteBuf
        ByteBuf byteBuf = Unpooled.copiedBuffer("hello,world!", Charset.forName("utf-8"));
        //使用相关的方法
        if (byteBuf.hasArray()) { // true
            byte[] content = byteBuf.array();
            //将 content 转成字符串
            System.out.println(new String(content, Charset.forName("utf-8")));
            System.out.println("byteBuf=" + byteBuf);
            System.out.println(byteBuf.arrayOffset()); // 0
            System.out.println(byteBuf.readerIndex()); // 0
            System.out.println(byteBuf.writerIndex()); // 12
            System.out.println(byteBuf.capacity()); // 64
            //System.out.println(byteBuf.readByte()); //
            System.out.println(byteBuf.getByte(0)); // 104
            int len = byteBuf.readableBytes(); //可读的字节数  12
            System.out.println("len=" + len);
            //使用for取出各个字节
            for (int i = 0; i < len; i++) {
                System.out.println((char) byteBuf.getByte(i));
            }
            //按照某个范围读取
            System.out.println(byteBuf.getCharSequence(0, 4, Charset.forName("utf-8")));
            System.out.println(byteBuf.getCharSequence(4, 6, Charset.forName("utf-8")));
        }
    }
}
4、discardReadBytes
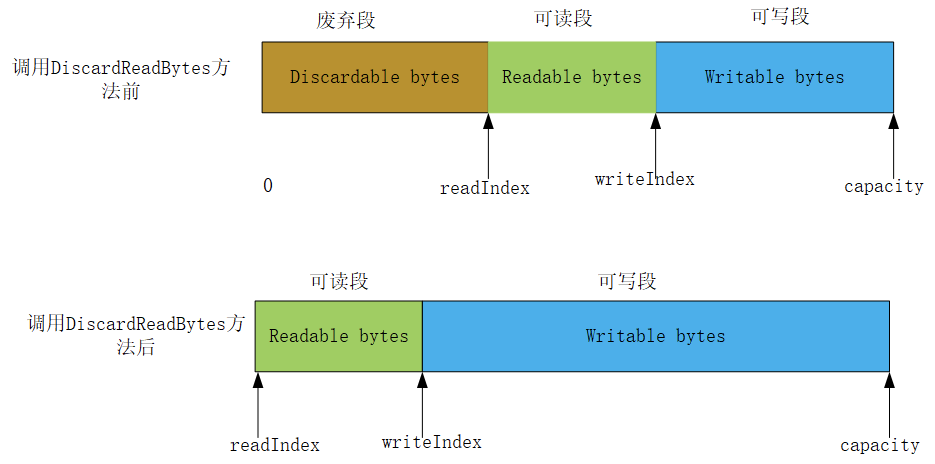
从上⾯的图中可以观察到,调⽤discardReadBytes⽅法后,readIndex置为0,writeIndex也往前移动了Discardable bytes⻓度的距离,扩⼤了可写区域。但是这种做法会严重影响效率,它进⾏了⼤量的拷⻉⼯作(将可读段往前复制、可写段往前复制)。
如果要进⾏数据的清除操作,建议使⽤clear⽅法。调⽤clear()⽅法将会将readIndex和writeIndex同时置为0,不会进⾏内存的拷⻉⼯作,同时要注意,clear⽅法不会清除内存中的内容,只是改变了索引位置⽽已。
-----------------------------------------------------------
---------------------------------------------
朦胧的夜 留笔~~

 浙公网安备 33010602011771号