安卓智能聊天机器人开发(二)
接上一篇文章《安卓智能聊天机器人开发(一)》,晚上继续写。
在上一篇文章中,已经实现了对网络数据的获取和处理封装,这篇文章来讲下如何嵌入到安卓应用中。
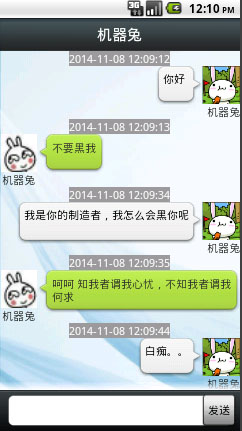
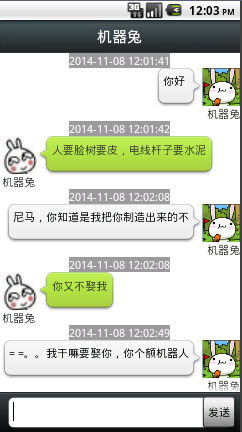
先看下效果图:


从上面两张图我们可以发现,这个聊天布局其实就是一个ListView,只不过它和传统的ListView有些区别,因为它使用了多Item样式布局
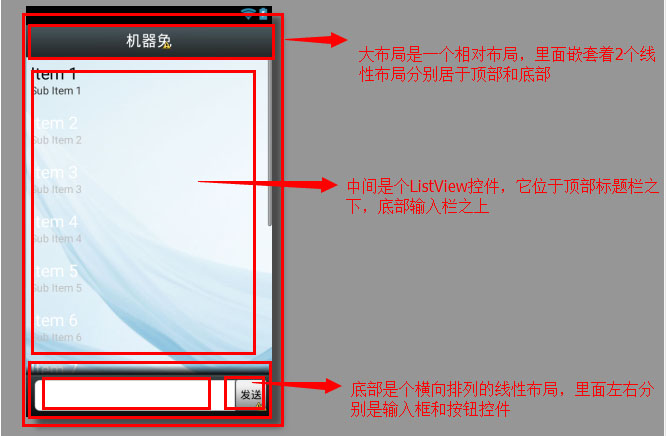
首先,先来分析下基础布局:
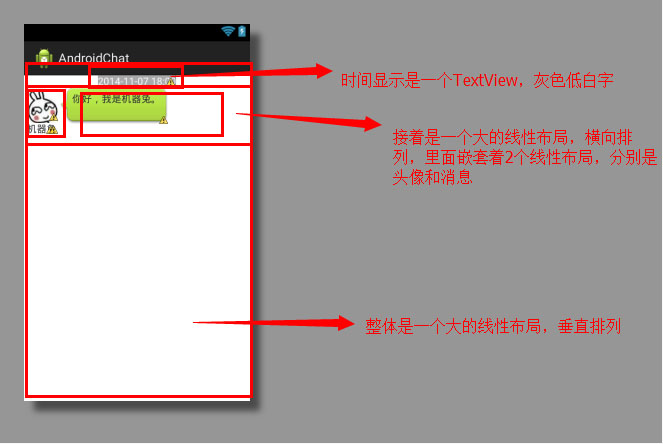
这个界面是由3个布局文件组成,分别是主布局,发送消息样式布局,接收消息样式布局
先来看下主布局:

这里是对应的主布局代码:
android:divider="@null" --去除ListView的Item分割线
 1 <RelativeLayout xmlns:android="http://schemas.android.com/apk/res/android"
 2     xmlns:tools="http://schemas.android.com/tools"
 3     android:layout_width="match_parent"
 4     android:layout_height="match_parent"
 5     android:background="@drawable/chat_bg_default" >
 6
 7     <LinearLayout
 8         android:id="@+id/title"
 9         android:layout_width="fill_parent"
10         android:layout_height="wrap_content"
11         android:layout_alignParentTop="true"
12         android:background="@drawable/title_bar"
13         android:gravity="center"
14         android:orientation="vertical" >
15
16         <TextView
17             android:layout_width="wrap_content"
18             android:layout_height="fill_parent"
19             android:layout_gravity="center"
20             android:text="机器兔"
21             android:textColor="@android:color/white"
22             android:textSize="20sp" />
23     </LinearLayout>
24
25     <RelativeLayout
26         android:id="@+id/bottom"
27         android:layout_width="fill_parent"
28         android:layout_height="55dp"
29         android:layout_alignParentBottom="true"
30         android:background="@drawable/bottom_bar"
31         android:padding="5dp" >
32
33         <EditText
34             android:id="@+id/send_message"
35             android:layout_width="fill_parent"
36             android:layout_height="wrap_content"
37             android:layout_alignParentLeft="true"
38             android:layout_centerVertical="true"
39             android:layout_marginLeft="5dp"
40             android:layout_marginRight="5dp"
41             android:background="@drawable/login_edit_normal" />
42
43         <Button
44             android:id="@+id/send_bt"
45             android:layout_width="wrap_content"
46             android:layout_height="fill_parent"
47             android:layout_alignParentRight="true"
48             android:layout_alignRight="@id/send_message"
49             android:background="@drawable/send_button_selector"
50             android:gravity="center_vertical"
51             android:text="发送" />
52     </RelativeLayout>
53
54     <ListView
55         android:id="@+id/chatlistview"
56         android:layout_width="fill_parent"
57         android:layout_height="fill_parent"
58         android:layout_above="@id/bottom"
59         android:layout_below="@id/title"
60         android:divider="@null" >
61     </ListView>
62
63 </RelativeLayout>
再来看下消息布局:(由于消息布局只是左右两边方向的不同,这里只给出其中一个)

这是2个消息布局的代码:
 1 <?xml version="1.0" encoding="utf-8"?>
 2 <LinearLayout xmlns:android="http://schemas.android.com/apk/res/android"
 3     android:layout_width="match_parent"
 4     android:layout_height="match_parent"
 5     android:orientation="vertical" >
 6
 7     <TextView
 8           android:id="@+id/sendtime"
 9         android:layout_width="wrap_content"
10         android:layout_height="wrap_content"
11         android:layout_gravity="center"
12         android:background="#999999"
13         android:text="2014-11-07 18:00"
14         android:textColor="@android:color/white" />
15
16     <LinearLayout
17         android:layout_width="match_parent"
18         android:layout_height="wrap_content"
19         android:orientation="horizontal" >
20
21         <LinearLayout
22             android:layout_width="wrap_content"
23             android:layout_height="wrap_content"
24             android:orientation="vertical" >
25
26             <!-- 头像昵称部分 -->
27
28             <ImageView
29                 android:layout_width="50dp"
30                 android:layout_height="50dp"
31                 android:src="@drawable/icon1" />
32
33             <TextView
34                 android:layout_width="wrap_content"
35                 android:layout_height="wrap_content"
36                 android:layout_gravity="center"
37                 android:text="机器兔" />
38         </LinearLayout>
39
40         <TextView
41             android:id="@+id/sendmsg"
42             android:layout_width="wrap_content"
43             android:layout_height="wrap_content"
44             android:background="@drawable/chatfrom_bg_normal"
45             android:text="你好,我是机器兔。" />
46     </LinearLayout>
47
48 </LinearLayout>
 1 <?xml version="1.0" encoding="utf-8"?>
 2 <LinearLayout xmlns:android="http://schemas.android.com/apk/res/android"
 3     android:layout_width="match_parent"
 4     android:layout_height="match_parent"
 5     android:orientation="vertical" >
 6
 7     <TextView
 8         android:id="@+id/receivetime"
 9         android:layout_width="wrap_content"
10         android:layout_height="wrap_content"
11         android:layout_gravity="center"
12         android:background="#999999"
13         android:text="2014-11-07 18:00"
14         android:textColor="@android:color/white" />
15
16     <LinearLayout
17         android:layout_width="fill_parent"
18         android:layout_height="wrap_content"
19         android:gravity="right"
20         android:orientation="horizontal" >
21
22         <TextView
23             android:id="@+id/receivemsg"
24             android:layout_width="wrap_content"
25             android:layout_height="wrap_content"
26             android:background="@drawable/chatto_bg_normal"
27             android:text="你好,我是机器兔。"
28             android:textColor="@android:color/black" />
29
30         <LinearLayout
31             android:layout_width="wrap_content"
32             android:layout_height="wrap_content"
33             android:orientation="vertical" >
34
35             <!-- 头像昵称部分 -->
36
37             <ImageView
38                 android:layout_width="50dp"
39                 android:layout_height="50dp"
40                 android:src="@drawable/icon" />
41
42             <TextView
43                 android:layout_width="wrap_content"
44                 android:layout_height="wrap_content"
45                 android:layout_gravity="right"
46                 android:text="我" />
47         </LinearLayout>
48     </LinearLayout>
49
50 </LinearLayout>
接下来看下关于ListView的自定义适配器,和往常一样自定义适配器需要继承BaseAdapter,并实现一些必须的方法
这里有个需要注意的是,因为传统的ListView是统一一个样式的,而这里的聊天布局是左右两边收发信息多Item样式
所以需要额外的多覆写2个方法:
1、getViewTypeCount --返回样式的种类数目
2、getItemViewType --给定类型标示符,便于在回调函数getView时让系统知道我们需要显示的哪个样式
代码里还提到了ViewHolder,这个是优化ListView加载速度的一种方法,关于这个知识点我整理一篇笔记《安卓开发笔记——ListView加载性能优化ViewHolder
》出来,不熟悉的朋友可以看看。
  1 package com.example.androidchat;
  2
  3 import java.text.SimpleDateFormat;
  4 import java.util.List;
  5
  6 import com.example.pojo.Msg;
  7 import com.example.pojo.Msg.Type;
  8
  9 import android.content.Context;
 10 import android.view.LayoutInflater;
 11 import android.view.View;
 12 import android.view.ViewGroup;
 13 import android.widget.BaseAdapter;
 14 import android.widget.TextView;
 15 /**
 16  *
 17  * ListView适配器
 18  *
 19  */
 20 public class ChatAdapter extends BaseAdapter {
 21
 22     private List<Msg> data;
 23     private LayoutInflater inflater;// 布局工厂,可以把res/layout的xml布局文件转换成view对象
 24
 25     public ChatAdapter(Context context, List<Msg> data) {
 26         inflater = LayoutInflater.from(context);
 27         this.data = data;
 28     }
 29
 30     @Override
 31     public int getCount() {
 32         return data.size();
 33     }
 34
 35     @Override
 36     public Object getItem(int position) {
 37         return data.get(position);
 38     }
 39
 40     @Override
 41     public long getItemId(int position) {
 42         return position;
 43     }
 44
 45     @Override
 46     public View getView(int position, View convertView, ViewGroup parent) {
 47         Msg message = data.get(position);
 48         ViewHolder viewHolder = null;
 49         if (convertView == null) {// 未加载布局文件对象
 50             // 可以通过getItemViewType所定义的标识来设定对应的item样式
 51             if (getItemViewType(position) == 0) {// 接收信息
 52                 viewHolder = new ViewHolder();
 53                 convertView = inflater.inflate(R.layout.send_msg, null);
 54                 viewHolder.time = (TextView) convertView
 55                         .findViewById(R.id.receivetime);
 56                 viewHolder.msg = (TextView) convertView
 57                         .findViewById(R.id.receivemsg);
 58             } else {
 59                 viewHolder = new ViewHolder();
 60                 convertView = inflater.inflate(R.layout.receive_msg, null);
 61                 viewHolder.time = (TextView) convertView
 62                         .findViewById(R.id.sendtime);
 63                 viewHolder.msg = (TextView) convertView
 64                         .findViewById(R.id.sendmsg);
 65             }
 66             convertView.setTag(viewHolder);
 67         } else {// 已经存在布局文件对象
 68             viewHolder = (ViewHolder) convertView.getTag();
 69         }
 70
 71         // 设置数据
 72         SimpleDateFormat dateFormat = new SimpleDateFormat(
 73                 "yyyy-MM-dd HH:mm:ss");
 74         viewHolder.time.setText(dateFormat.format(message.getTime()));
 75         viewHolder.msg.setText(message.getMsg());
 76         return convertView;
 77     }
 78
 79     /**
 80      * 由于此处我们要返回2种ListView的Item样式,需要再额外多覆写2个方法
 81      * (1)、getItemViewType(int position)给定类型标示符
 82      * (2)、getViewTypeCount() 类型数量
 83      */
 84     @Override
 85     public int getItemViewType(int position) {
 86         Msg message = data.get(position);
 87         if (message.getType() == Type.INCOME) {
 88             return 0;// 如果消息类型为接收,则值为0
 89         }
 90         return 1;// 如果消息类型为发送,则值为1
 91     }
 92
 93     @Override
 94     public int getViewTypeCount() {
 95         return 2;
 96     }
 97
 98     private final class ViewHolder {
 99         TextView time;// 消息时间
100         TextView msg;// 消息内容
101     }
102
103 }
然后就是主程序代码了:
这里就没什么好说的了,网络数据获取工具类包括ListView的适配器类在之前已经提过,这里就只剩下调用了。
注意点有3:
1、那就是在UI主线程里不能直接取获取网络数据,这里我们需要另开一个子线程去获取,然后在通过Handler去更新UI界面。
2、当数据源发生更新的时候,需要在UI主线程去操作,而不是子线程,还有就是不应该去重新设置Adapter,只需要去调用Adapter的notifyDataSetChanged()就行。
3、记得设置下ListView的setSelection选项,便于焦点自动往下拉。
不在UI主线程里做耗时操作,会使得UI现成阻塞。不在子线程里去更新UI界面,会导致应用程序无响应。
 1 package com.example.androidchat;
 2
 3 import java.util.ArrayList;
 4 import java.util.Date;
 5 import java.util.List;
 6
 7 import android.app.Activity;
 8 import android.os.Bundle;
 9 import android.os.Handler;
10 import android.os.Message;
11 import android.view.View;
12 import android.view.View.OnClickListener;
13 import android.widget.Button;
14 import android.widget.EditText;
15 import android.widget.ListView;
16
17 import com.example.pojo.Msg;
18 import com.example.pojo.Msg.Type;
19 import com.example.utils.GetDataUtils;
20
21 public class MainActivity extends Activity {
22
23
24     private ListView listview;
25     private EditText sendmsg;
26     private Button sendbt;
27     private ChatAdapter adapter;//ListView自定义适配器
28     private List<Msg> data;//数据源
29
30
31     private Handler handler=new Handler(){
32         public void handleMessage(Message msg) {
33                 Msg receiveMsg=(Msg) msg.obj;
34                 data.add(receiveMsg);
35                 adapter.notifyDataSetChanged();
36                 listview.setSelection(data.size()-1);//定位位置,自动下拉
37
38         };
39     };
40     @Override
41     protected void onCreate(Bundle savedInstanceState) {
42         super.onCreate(savedInstanceState);
43         setContentView(R.layout.activity_main);
44
45         initView();//初始化控件
46         initData();//初始化数据
47         initAction();//初始化事件
48     }
49
50     private void initAction() {
51         this.sendbt.setOnClickListener(new OnClickListener() {
52
53             @Override
54             public void onClick(View v) {
55                 /**
56                  * 点击发送按钮执行步骤
57                  * 1、获取用户输入的内容并显示到ListView(判断是否为空)
58                  * 2、发送用户输入的内容到服务端获取服务端返回内容并显示到ListView(注意线程处理)
59                  * 3、清空输入框
60                  */
61                 final String sendInfo=sendmsg.getText().toString();//获取用户输入数据(用于发送)
62                 data.add(new Msg("",sendInfo,new Date(),Type.INCOME));
63                 adapter.notifyDataSetChanged();//更新数据源
64                 listview.setSelection(data.size()-1);//定位位置,自动下拉
65                 sendmsg.setText("");
66
67
68                 //向服务端发送信息并接收返回信息,由于UI主线程不能执行网络获取操作,这里需要开一个子线程
69                 new Thread(){
70
71                     @Override
72                     public void run() {
73                         //执行网络操作
74                         GetDataUtils dataUtils=new GetDataUtils();
75                         Msg msg=dataUtils.getInfo(sendInfo);//获取到一个Msg对象,但由于子线程不能够更新UI,所以需要用到一个Handler
76                         Message message=Message.obtain();
77                         message.obj=msg;//封装信息
78                         handler.sendMessage(message);
79                     }
80
81                 }.start();
82             }
83         });
84     }
85
86 private void initData() {
87         data=new ArrayList<Msg>();
88         adapter=new ChatAdapter(MainActivity.this,data);//获取ListView适配器实例
89         listview.setAdapter(adapter);
90     }
91
92     private void initView() {
93         this.listview=(ListView) MainActivity.this.findViewById(R.id.chatlistview);
94         this.sendmsg=(EditText) findViewById(R.id.send_message);
95         this.sendbt=(Button) findViewById(R.id.send_bt);
96     }
97
98
99 }
好了,到此"安卓智能聊天机器人”就已经完成了,虽说这个机器人有点二,不过在无聊之余还是可以打发打发时间的哈~
作者:Balla_兔子
出处:http://www.cnblogs.com/lichenwei/
本文版权归作者和博客园共有,欢迎转载,但未经作者同意必须保留此段声明,且在文章页面明显位置给出原文链接。
正在看本人博客的这位童鞋,我看你气度不凡,谈吐间隐隐有王者之气,日后必有一番作为!旁边有“推荐”二字,你就顺手把它点了吧,相得准,我分文不收;相不准,你也好回来找我!


