集群管理-网站集群批量管理-密钥认证与 Ansible模块
1.集群批量管理-密钥认证
1.1.概述
-
管理更加轻松:两个节点,通过密钥形式进行访问,不需要输入密码,单向.
-
服务要求(应用场景):
- ⭐ ⭐ ⭐ ⭐ ⭐ 一些服务在使用前要求我们做秘钥认证.
- 手动写批量管理脚本.
-
名字: 密钥认证,免密码登录,双机互信
温馨提示: 密钥认证是单向
2.原理

秘钥对:
公钥: public key 一般以.pub结尾.
私钥: private key 没有特殊的结尾.
3.极速上手指南

3.1.基本检查
#ping
ping 172.16.1.xxx
#22端口 sshd服务开启或可以访问
nmap  -p22  172.16.1.31  172.16.1.7
3.2.创建密钥对
ssh-keygen -t rsa
#注意创建的啥时候也可以不加-t
通过rsa方法对数据进行加密.
3.3.分发公钥
ssh-copy-id -i /root/.ssh/id_rsa.pub root@10.0.0.41
3.4.连接测试
ssh root@10.0.0.41 hostname -I
温馨提示:
ssh-copy-id后公钥被存放在对方服务器的用户家目录下面的.ssh下面.
名字叫:authorized_keys
4. 自动化创建与分发密钥
阻碍:
1️⃣创建秘钥对
2️⃣分发公钥的时候:yes/no (yes后会把信息保存到.ssh/known_hosts)
3️⃣分发公钥的时候:输入密码
4.1.自动化创建密钥
ssh-keygen -f ~/.ssh/id_rsa   -P ''
ssh-keygen -t rsa  -f ~/.ssh/id_rsa   -P ''
-f用于指定私钥的位置
-P 密码短语 设置为空
4.2.自动化分发公钥
- 阻碍 : 密码
#安装密码提供密码
yum install -y sshpass
#sshpass命令基本使用
-p指定密码
先:
ssh 10.0.0.7 hostname -I 检查是否需要输入yes/no
然后使用:
sshpass -p1 ssh 10.0.0.7 hostname -I
10.0.0.7 172.16.1.7
#使用sshpass 与ssh-copy-id分发公钥
先:
ssh-copy-id    10.0.0.31 检查是否需要输入yes/no
然后使用:
sshpass -p1 ssh-copy-id    10.0.0.31
温馨提示: sshpass与ssh-copy-id的时候如果第1次连接,提示yes/no,sshpass失效了.
补充说明:
sshpass适用于给ssh相关的命令提供密码:ssh,scp,ssh-copy-id.
expect是一门语言,用于实现非交互式判断,认证相关的操作.
- 阻碍: 第1次连接的时候提示yes/no
温馨提示: 第1次远程的提示 yes/no,主机密钥信息检查,输入yes后存放到~/.ssh/known_hosts
解决思路: 临时取消即可,连接的时候不检查主机信息.
-o StrictHostKeyChecking=no 临时不检查主机信息.
4.3.自动化创建与分发脚本

自动化检查脚本
[root@m01 ~]# cat /server/scripts/check.sh
#!/bin/bash
# author: oldboylidao996
# desc: 批量在所有机器上执行命令
for   ip  in  10.0.0.7  10.0.0.31
do
    ssh  $ip   hostname
done
集群自动化维护-必备工具Ansible

1.Ansible概述
-
自动化运维: 批量管理,批量分发,批量执行,维护
-
Ansible是python写的.

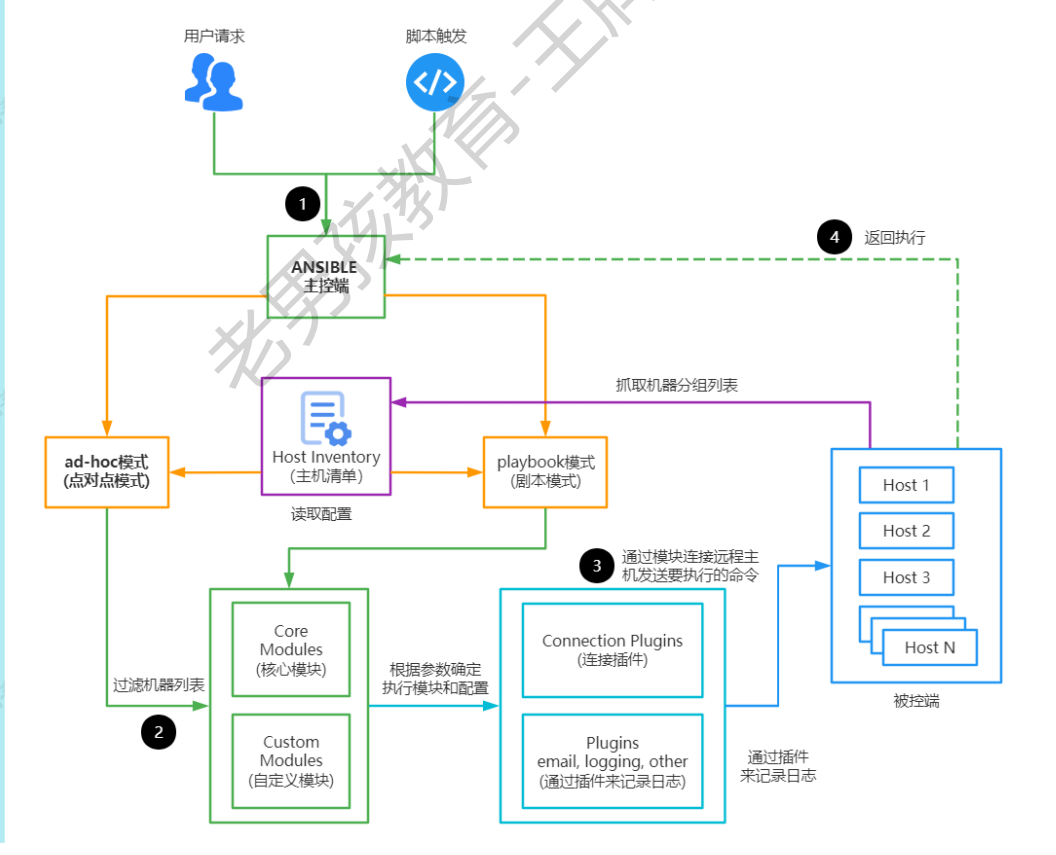
2.Ansible管理架构
- Inventory 主机清单:被管理主机的ip列表,分类.
- ad-hoc模式: 命令行批量管理(使用ans模块),临时任务.
- playbook 剧本模式: 类似于把操作写出脚本,可以重复运行这个脚本.
3.部署与配置
3.1.部署
yum install -y ansible
3.2.配置
修改配置文件关闭主机Host_key_checking .
修改配置文件开启日志功能.

[root@hadoop1 ~]# egrep -vn '^$|#' /etc/ansible/ansible.cfg
10:[defaults]
71:host_key_checking = False
111:log_path = /var/log/ansible.log
327:[inventory]
340:[privilege_escalation]
346:[paramiko_connection]
370:[ssh_connection]
431:[persistent_connection]
445:[accelerate]
460:[selinux]
469:[colors]
485:[diff]
3.3.Ans-inventory主机清单
- 什么是主机清单: 让ansible管理的节点的列表.
- ansible默认读取在/etc/ansible/hosts文件,并非/etc/hosts.
- 未来实际使用中一般我们会把主机清单文件存放在指定的目录中,运行ansible的时候通过-i选项指定主机清单文件即可.
4.主机清单必会格式 ⭐⭐⭐⭐⭐
主机清单格式:
[分类或分组的名字] #注意分类要体现出服务器的作用
ip地址或主机名或域名 #注意主机名要能解析才行
- 案例01-对主机分组并进行连接测试
[root@hadoop1 ~]# cat /etc/ansible/hosts
[web]
10.0.0.200
[root@m01 ~]# cat /etc/ansible/hosts
[web]
172.16.1.7
[backup]
172.16.1.41
[nfs]
172.16.1.31


[root@hadoop1 ~]# ansible all   -m ping
# 或者指定目标主机缺失 Python 3 导致的 Ansible 执行失败问题
[root@hadoop1 ~]# ansible all -m ping -e 'ansible_python_interpreter=/usr/bin/python3'
10.0.0.200 | SUCCESS => {
    "changed": false,
    "ping": "pong"
}

主机清单分组详解:
需要我们进行分组:按照层次进行分组,按照功能/业务.
ansible命令格式
ansible 主机ip或分组或all -m 指定使用的模块名字
这里的ping模块用于检查被管理端是否可以访问.
4.1.子组
- 案例02: 我希望对backup,nfs2个分组,再创建个分区叫data分组
创建新的分组data包含已有的分组backup和nfs
[root@m01 ~]# cat /etc/ansible/hosts
[web]
172.16.1.7
[backup]
172.16.1.41
[nfs]
172.16.1.31

[data:children]
backup
nfs
[root@m01 ~]# ansible data   -m ping
子组使用children关键词创建
格式:
[data:children] #组名字:children即可.
分组的名字.
4.2.指定用户,密码
- 不推荐,推荐先配置密钥认证,然后管理
- 案例03: 没有配置密钥认证,主机清单如何书写.
172.16.1.7 ansible_user=root ansible_password=1 ansible_port=22
错误提示记录
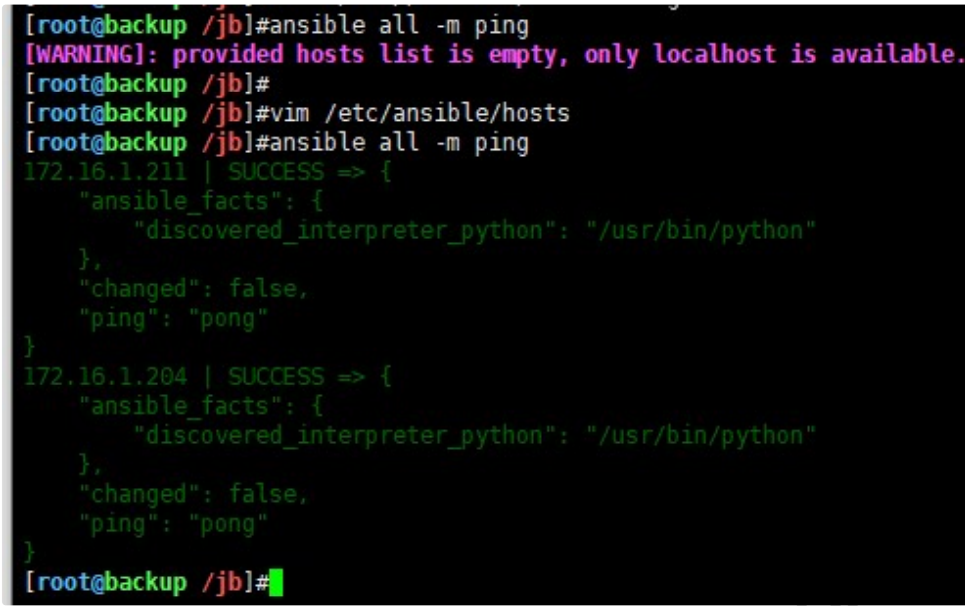
主机清单为空
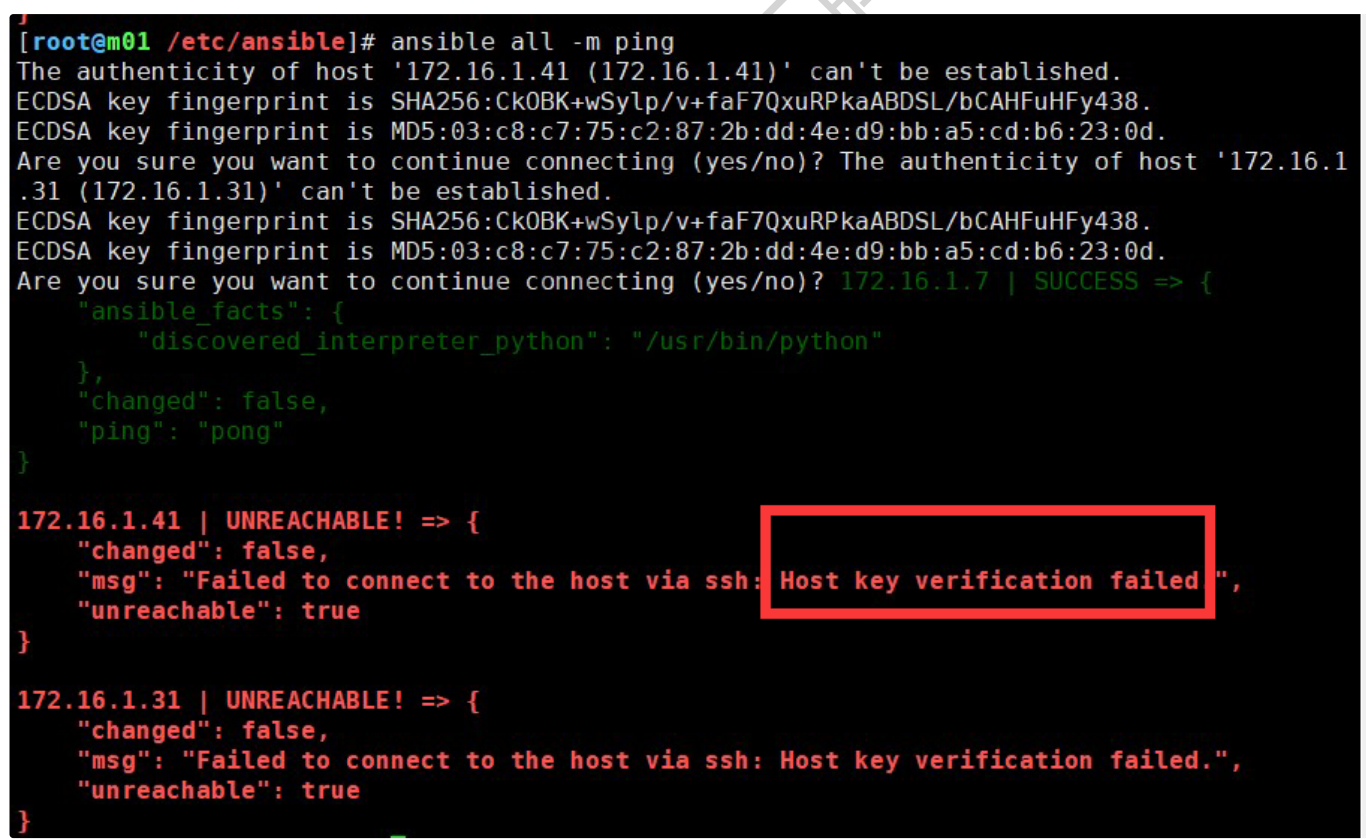
71:host_key_checking = False 这个配置没有关闭.关闭主机认证
5.Ansible必知必会模块
- Ansible模块 modules
- Ansible中通过各种模块实现批量管理.
- 一般来说这些模块对应着Linux里面的基本操作或服务管理.
- 找出Linux场景操作对应的模块即可.
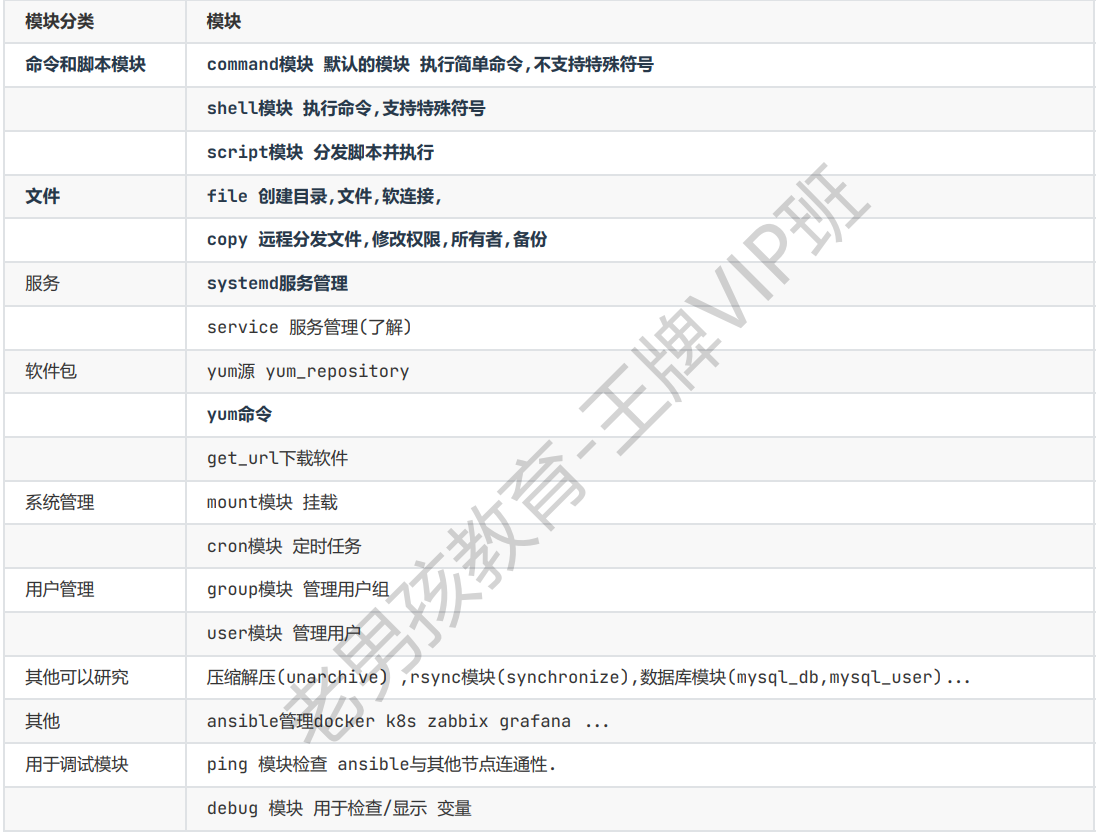

5.1.命令 与脚本类模块
5.1.1. command模块
- 是ans默认的模块,适用于执行简单的命令,不支持特殊符号
# 批量获取所有主机的主机名
ansible all   -m command  -a 'ip a s eth0'
ansible all     -a 'ip a s eth0'
5.1.2. shell模块
- 与command模块类似,但是shell支持特殊符号
# 获取ip地址
[root@hadoop1 ~]# ansible all -m shell -a "ip a s eth0 | awk -F'[ /]+' 'NR==3{print $3}'"
温馨提示:
shell模块不推荐执行较为复杂的指令,如果需要执行放在脚本中执行.
5.1.3. script模块
- 分发脚本(传输脚本)
- 运行脚本
5.2.文件相关模块
5.2.1.file模块
- 管理文件,管理目录,软连接
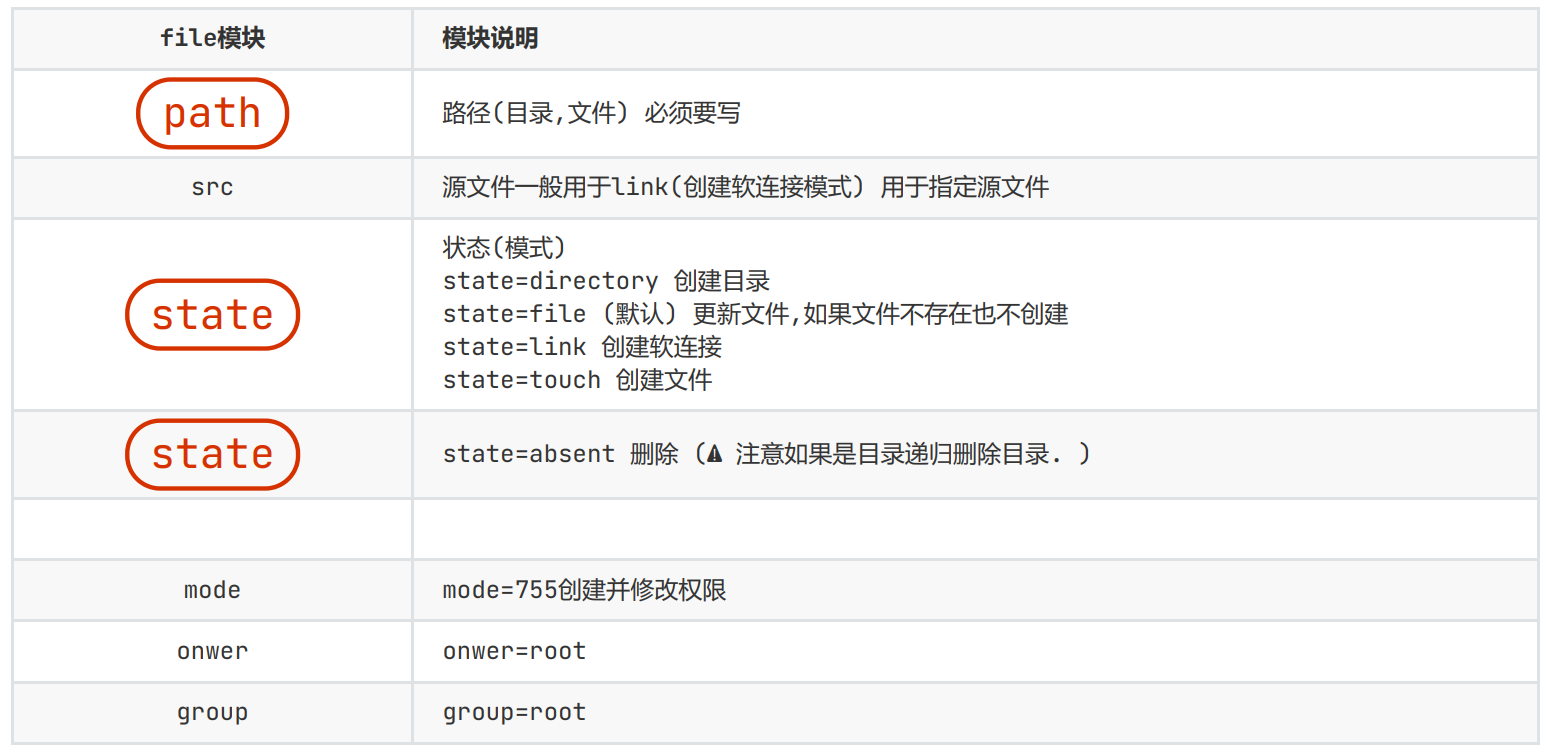
- 创建/opt/lidao.txt
ansible all -m file -a 'path=/opt/lidao.txt state=touch
- 创建目录/app/
ansible all -m file -a 'path=/app/a/b/c/d/e/g/ state=directory'
- 创建软连接 /etc/hosts创建软连接到/opt/下
ln -s /etc/hosts   /opt/hosts
ansible all  -m file -a ' src=/etc/hosts path=/opt/hosts state=link'
- 创建/ans-backup目录 所有者是oldboy
ansible all -m file -a 'path=/ans-backup/ owner=oldboy group=oldboy mode=700 state=directory'
- 删除
ansible all -m file -a 'path=/ans-backup/ state=absent'
5.2.2.copy模块
- 批量分发:scp

ansible all -m copy -a 'src=/etc/hosts dest=/etc/hosts backup=yes'
额外扩展:
copy是推送,批量推送.
fetch是拉取,批量拉取.使用较少.
5.3.服务管理-systemd
- systemd模块相当于是linux systemctl命令:
- 开启/关闭/重启服务
- 开机自启动
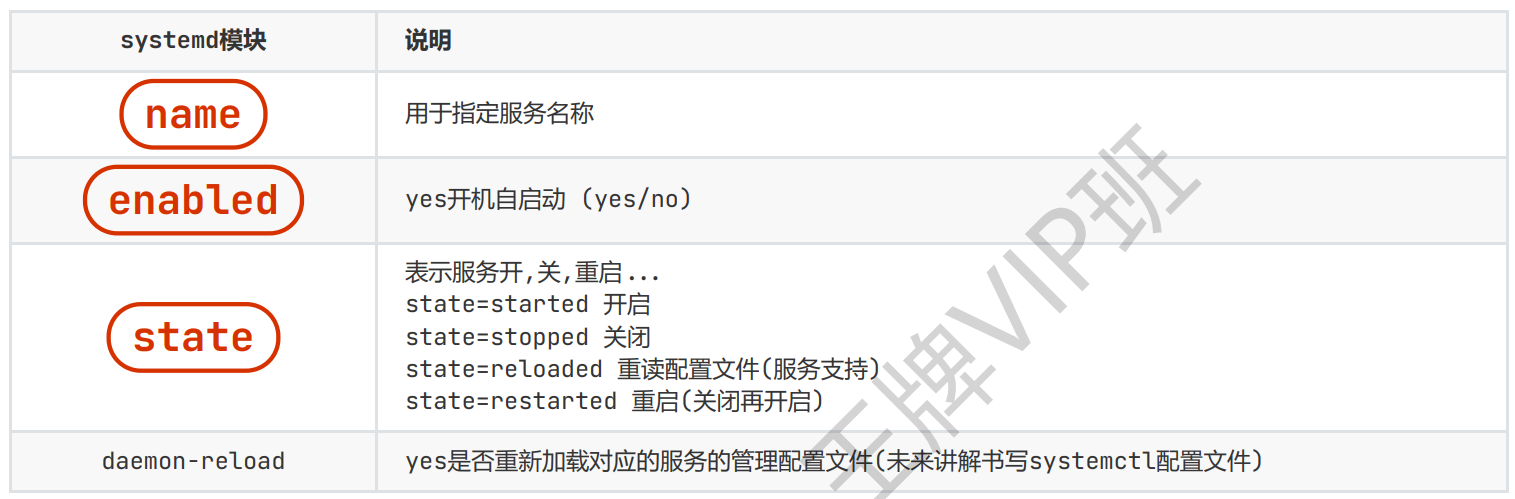
- 案例
- 开启crond服务并设置开机自启动.
- 关闭firewalld服务并不让开机自启动
5.4.软件管理
- yum模块
- get_url模块,wget命令
- yum_repository模块yum源配置模块,未来可以通过copy模块
5.4.1.yum模块
- yum模块并不只是yum命令,包含了yum/apt命令
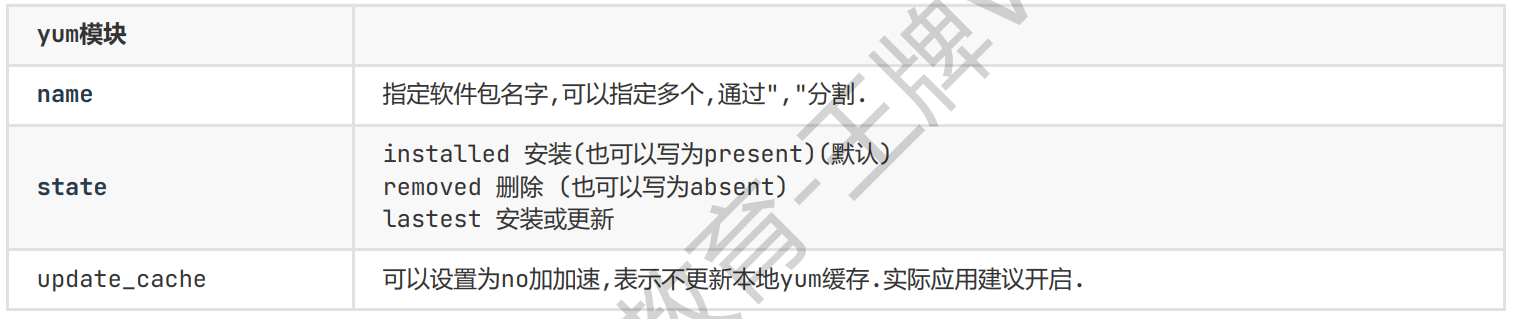
- 案例---安装常用的软件htop,tree,lrzsz,sshpass
ansible all -m yum -a 'name=htop,tree,lrzsz sshpass '
5.4.2.get_url模块
- 相当于是wget命令.所有主机能访问网络才行.
- 推荐在管理节点下载好,使用copy仅分发即可.

- 案例--下载zabbix-agent的软包到/app/tools下面
zabbix-agent地址
为:https:mirrors.aliyun.com/zabbix/zabbix/6.0/rhel/7/x86_64/zabbix-agent-6.0.13-release1.el7.x86_64.rpm

ansible all -m get_url -a 'url="https://mirrors.aliyun.com/zabbix/zabbix/6.0/rhel/7/x86_64/zabbix-agent-6.0.13-release1.el7.x86_64.rpm" dest=/app/tools/'

后续可以调用yum模块安装本地的软件
name=/app/tools/xxxxx.rpm即可
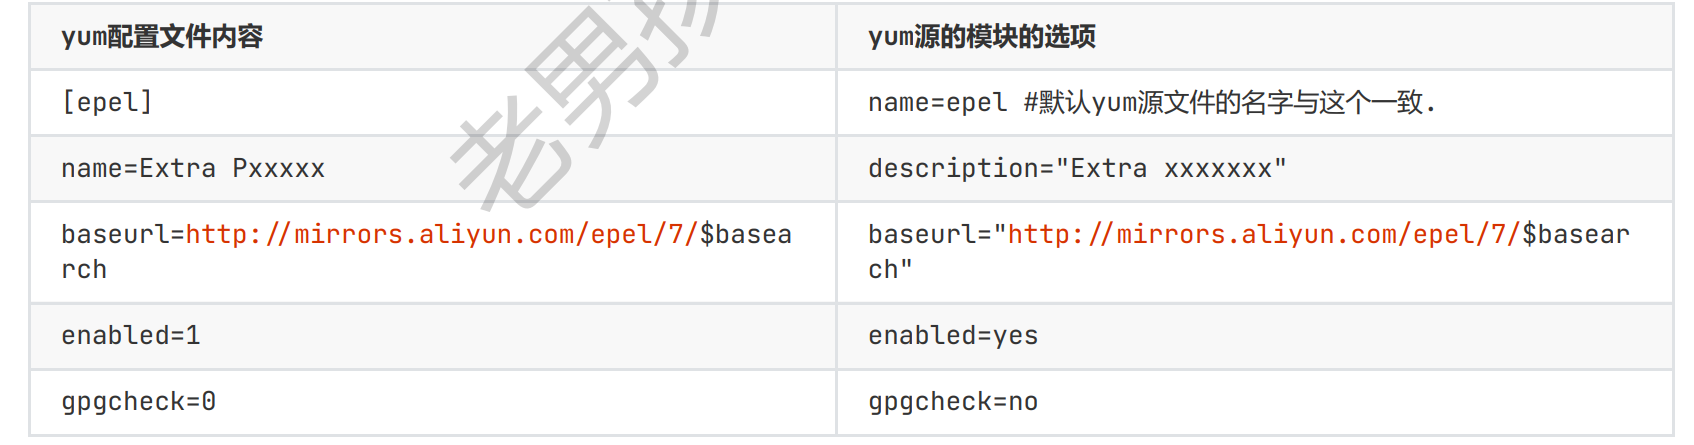
5.4.3.yum_repository模块
- 未来书写好yum配置文件,copy分发过去即可.

[root@hadoop1 ~]# cat /etc/yum.repos.d/epel.repo
[epel]
name=Extra Packages for Enterprise Linux 7 - $basearch
baseurl=https://mirrors.huaweicloud.com/epel/7/$basearch
failovermethod=priority
enabled=1
gpgcheck=0

-m yum_repository
-a 'name=epel description="Extra Packages for Enterprise Linux 7 - $basearch" 				baseurl="http://mirrors.aliyun.com/epel/7/$basearch"
	enabled=yes
	gpgcheck=no'
- 给web服务器配置nginx的yum源
nginx yum配置
[nginx-stable]
name=nginx stable repo
baseurl=http://nginx.org/packages/centos/$releasever/$basearch/
gpgcheck=1
enabled=1
gpgkey=https://nginx.org/keys/nginx_signing.key
module_hotfixes=true
nginx yum源的地址:
5.5.用户管理
5.5.1.user模块
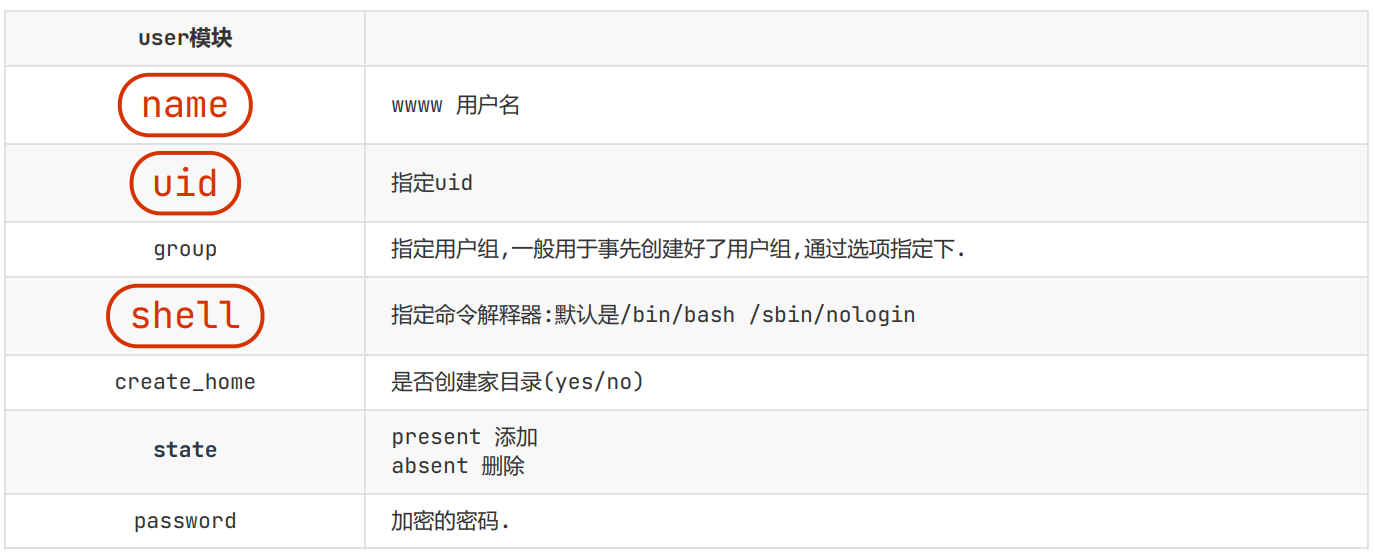
- 案例:创建www-ans用户uid 2000虚拟用户
[root@hadoop1 ~]# ansible all -m user -a 'name=www-ans uid=2000 shell=/sbin/nologin create_home=no state=present'
- 案例:批量更新密码
ansible all -i localhost, -m debug -a "msg={{'1'|password_hash('sha512', 'liao')}}"

下面命令可以更新密码,密码为1
ansible all -m user -a "name=liao996 password={{ '1' | password_hash('sha512', 'lidao') }} state=present"

ansible all -m shell -a 'echo 1 | passwd --stdin liao996'

# 官方文档
https://docs.ansible.com/ansible/latest/reference_appendices/faq.html#how-do-i-generate-encrypted-passwords-for-the-user-module
关于{{}}相关的解释
{{ '1' | password_hash('sha512', 'lidao') }}
表示1是密码,经过管道,传递给了password_hash()插件,sha512加密算法,lidao是随机字符用于生成随机加密后的密码。
5.5.2.group模块

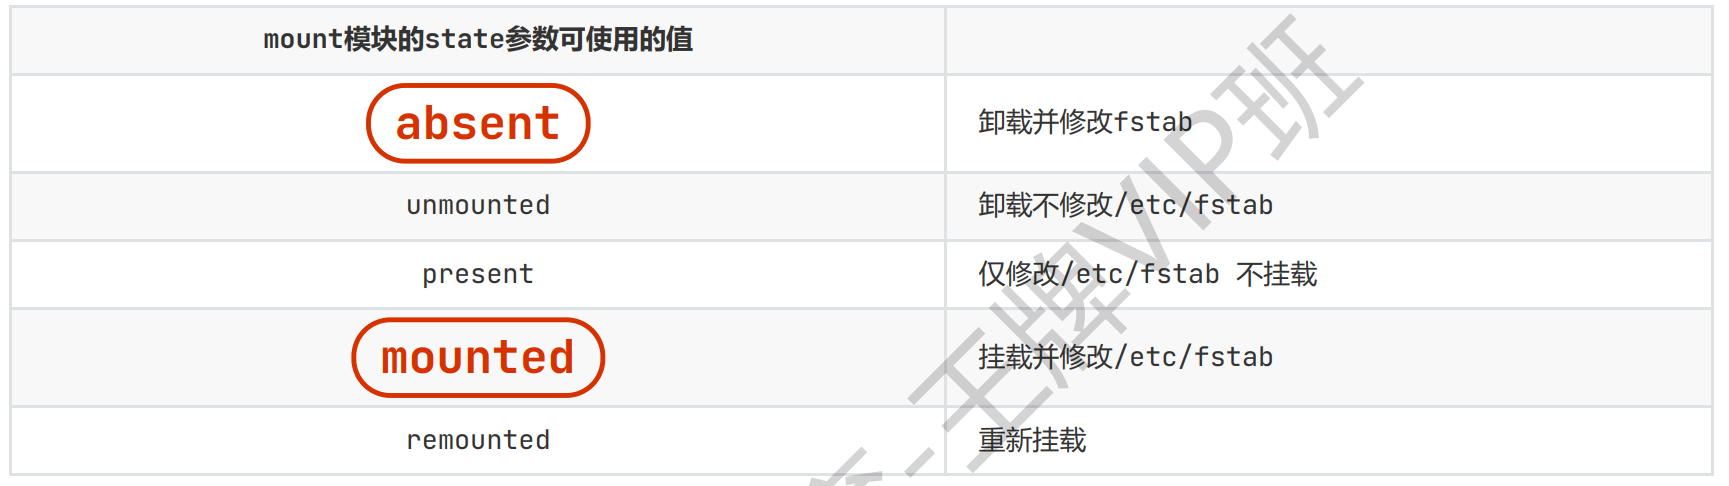
5.5.3.mount模块
- 实现mount命令进行挂载可以修改/etc/fstab实现永久挂载

- 案例:通过ans管理在web01上挂载nfs:/data挂载到web01的/ans-upload/
1. nfs 服务端配置,目录
2. web 是否安装nfs
3. web 创建挂载点
4. web 挂载
ans批量安装,挂载
#在web服务器上安装nfs
ansible web -m yum -a 'name=nfs-utils state=present'
#创建挂载点
ansible web -m file -a 'path=/ans-upload/ state=directory'
#挂载nfs
ansible web -m mount -a 'src=10.0.0.200:/data/ path=/ans-upload/ fstype=nfs state=mounted'
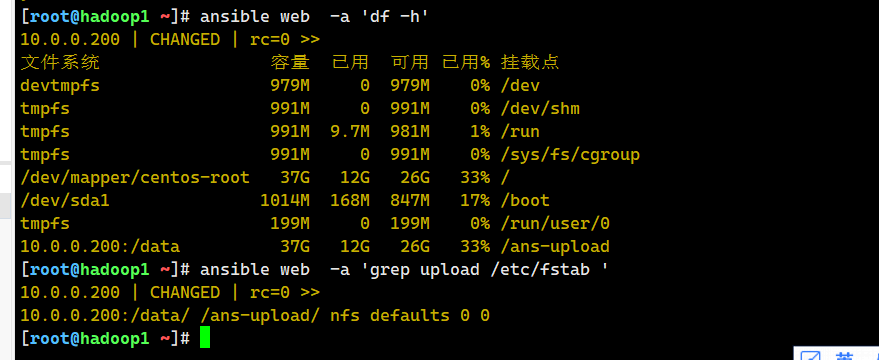
#检查
ansible web -a 'df -h'
ansible web -a 'grep upload /etc/fstab '

5.5.4.cron模块
- 用于管理系统的定时任务,替代了crontab -e功能
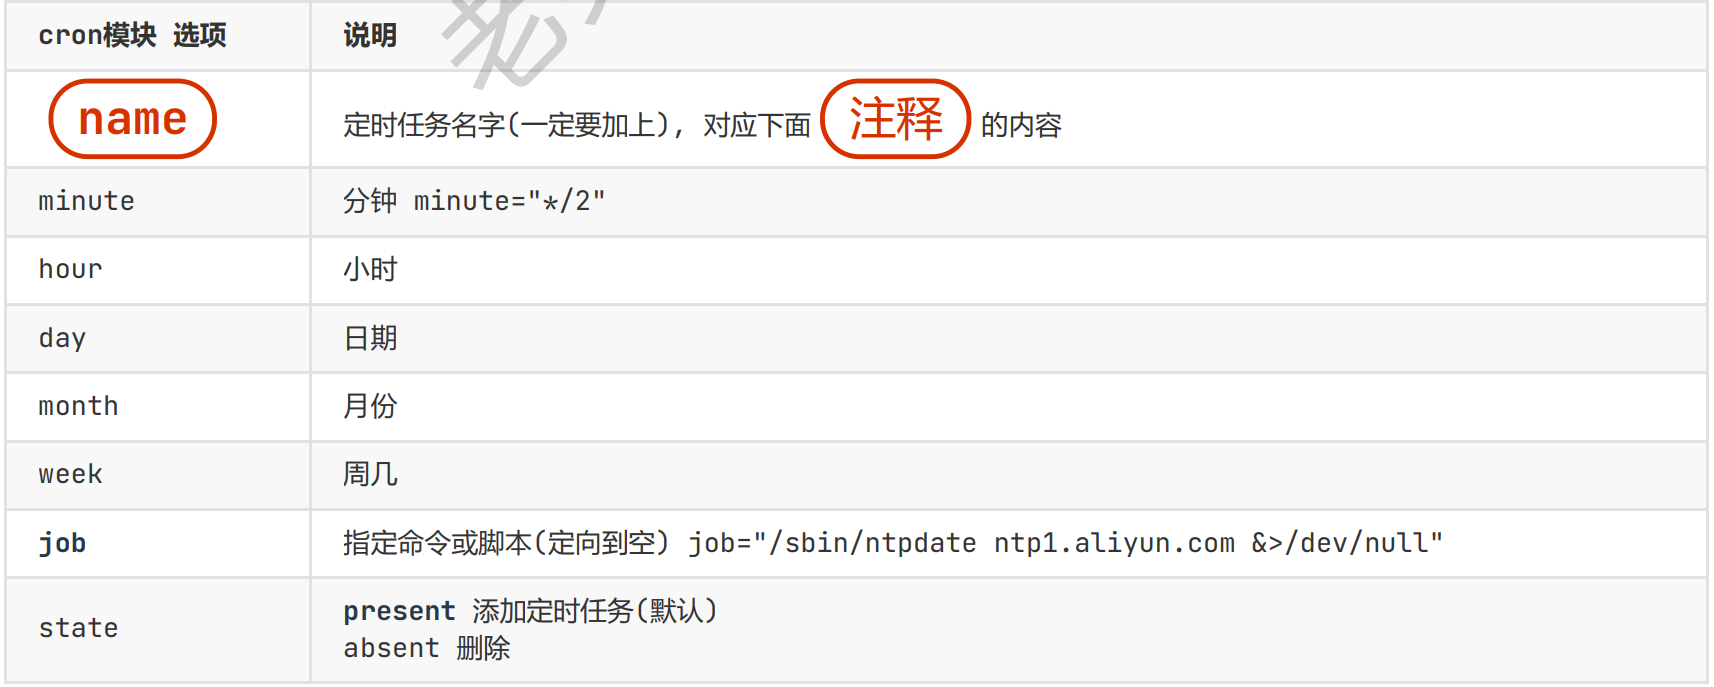
- 案例:每3分钟同步时间.
#1. sync time lidao996
*/3 * * * * /sbin/ntpdate ntp1.aliyun.com &>/dev/null
#清理已有的定时任务:
ansible all -a "sed -i '/ntpdate/d' /var/spool/cron/root"
- 创建定时任务
ansible all -m cron -a 'name="sync time by liao666" minute="*/3" job="/sbin/ntpdate ntp1.aliyun.com >/dev/null 2>&1" state=present '
- 删除定时任务
ansible all -m cron -a 'name="sync time by liao996" state=absent'

 浙公网安备 33010602011771号