
git&github 快速入门
github入门
简介:
很多人都知道,Linus在1991年创建了开源的Linux,从此,Linux系统不断发展,已经成为最大的服务器系统软件了。
Linus虽然创建了Linux,但Linux的壮大是靠全世界热心的志愿者参与的,这么多人在世界各地为Linux编写代码,那Linux的代码是如何管理的呢?
事实是,在2002年以前,世界各地的志愿者把源代码文件通过diff的方式发给Linus,然后由Linus本人通过手工方式合并代码!
你也许会想,为什么Linus不把Linux代码放到版本控制系统里呢?不是有CVS、SVN这些免费的版本控制系统吗?因为Linus坚定地反对CVS和SVN,这些集中式的版本控制系统不但速度慢,而且必须联网才能使用。有一些商用的版本控制系统,虽然比CVS、SVN好用,但那是付费的,和Linux的开源精神不符。
不过,到了2002年,Linux系统已经发展了十年了,代码库之大让Linus很难继续通过手工方式管理了,社区的弟兄们也对这种方式表达了强烈不满,于是Linus选择了一个商业的版本控制系统BitKeeper,BitKeeper的东家BitMover公司出于人道主义精神,授权Linux社区免费使用这个版本控制系统。
安定团结的大好局面在2005年就被打破了,原因是Linux社区牛人聚集,不免沾染了一些梁山好汉的江湖习气。开发Samba的Andrew试图破解BitKeeper的协议(这么干的其实也不只他一个),被BitMover公司发现了(监控工作做得不错!),于是BitMover公司怒了,要收回Linux社区的免费使用权。
Linus可以向BitMover公司道个歉,保证以后严格管教弟兄们,嗯,这是不可能的。实际情况是这样的:
Linus花了两周时间自己用C写了一个分布式版本控制系统,这就是Git!一个月之内,Linux系统的源码已经由Git管理了!牛是怎么定义的呢?大家可以体会一下。
Git迅速成为最流行的分布式版本控制系统,尤其是2008年,GitHub网站上线了(github是一个基于git的代码托管平台,付费用户可以建私人仓库,我们一般的免费用户只能使用公共仓库,也就是代码要公开。),它为开源项目免费提供Git存储,无数开源项目开始迁移至GitHub,包括jQuery,PHP,Ruby等等。
历史就是这么偶然,如果不是当年BitMover公司威胁Linux社区,可能现在我们就没有免费而超级好用的Git了。
今天,GitHub已是:
- 一个拥有143万开发者的社区。其中不乏Linux发明者Torvalds这样的顶级黑客,以及Rails创始人DHH这样的年轻极客。
- 这个星球上最流行的开源托管服务。目前已托管431万git项目,不仅越来越多知名开源项目迁入GitHub,比如Ruby on Rails、jQuery、Ruby、Erlang/OTP;近三年流行的开源库往往在GitHub首发,例如:BootStrap、Node.js、CoffeScript等。
- alexa全球排名414的网站。
1、密钥连接
首先申请github账号,由于你的本地Git仓库和GitHub仓库之间的传输是通过SSH加密的,所以,需要一点设置,在本地生成密钥对:
[root@localhost ~]# ssh-keygen -t rsa -C 'lianzhilei0711@163.com'
你需要把邮件地址换成你自己的邮件地址,然后一路回车,使用默认值即可,由于这个Key也不是用于军事目的,所以也无需设置密码。如果一切顺利的话,可以在用户主目录里找到.ssh目录,里面有id_rsa和id_rsa.pub两个文件,这两个就是SSH Key的秘钥对,id_rsa是私钥,不能泄露出去,id_rsa.pub是公钥,可以放心地告诉任何人。
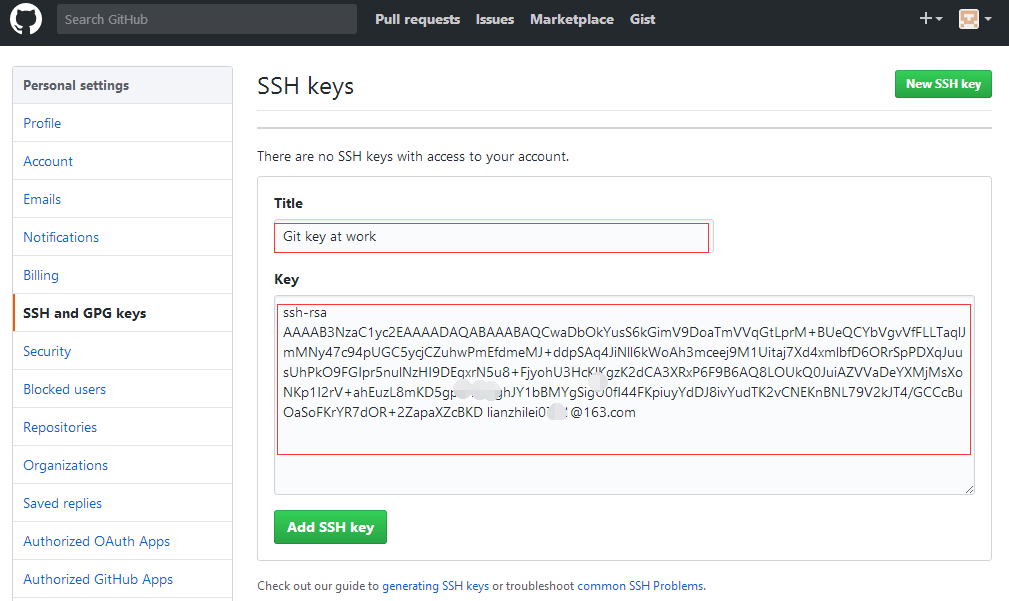
然后登陆GitHub,打开“Account settings”,“SSH Keys”页面。点“Add SSH Key”,填上任意Title,在Key文本框里粘贴id_rsa.pub文件的内容:
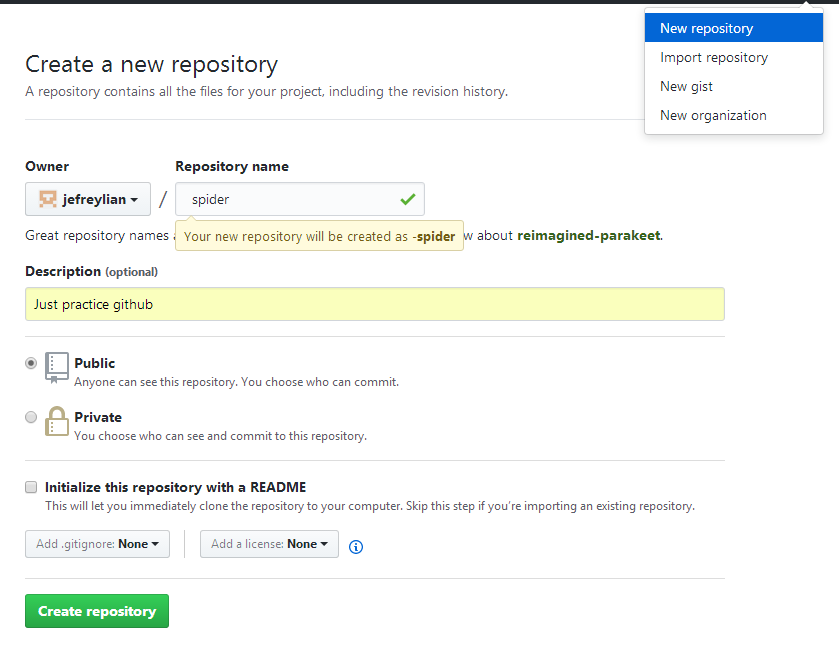
2、创建仓库
首先,登陆GitHub,然后,在右上角找到“New repository”按钮,创建一个新的仓库:
点击创建后跳转到仓库:

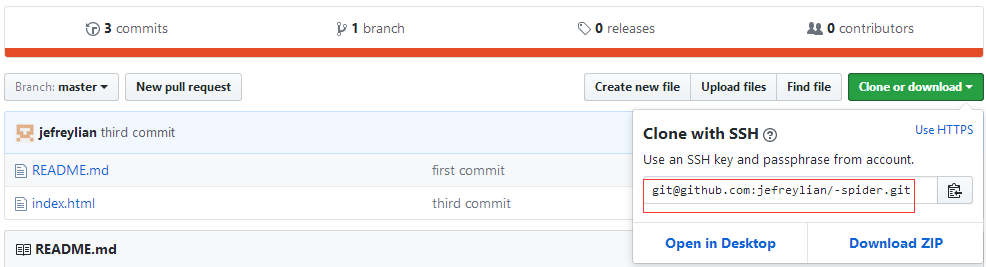
3、远程仓库
① 目前,在GitHub上的这个spider仓库还是空的,GitHub告诉我们,可以从这个仓库克隆出新的仓库,也可以把一个已有的本地仓库与之关联,然后,把本地仓库的内容推送到GitHub仓库,由于本地还从未进行过repository创建,所以先用第一种方式创建本地仓库,然后进行远程上传:
[root@localhost lzl]# mkdir spider
[root@localhost lzl]# cd spider
[root@localhost spider]# git init                   # 生成仓库
初始化空的 Git 版本库于 /lzl/spider/.git/
[root@localhost spider]# echo '# -spider' >>README.md     # 创建文件
[root@localhost spider]# git add README.md
[root@localhost spider]# git commit -m 'first commit'     # 提交
[master(根提交) 872c5e6] first commit
 1 file changed, 1 insertion(+)
 create mode 100644 README.md
[root@localhost spider]# git remote add origin git@github.com:jefreylian/-spider.git  # 远程连接
[root@localhost spider]# git push -u origin master       # 推送数据
The authenticity of host 'github.com (192.30.255.113)' can't be established.
RSA key fingerprint is 16:27:ac:a5:76:28:2d:36:63:1b:56:4d:eb:df:a6:48.
Are you sure you want to continue connecting (yes/no)? yes
Warning: Permanently added 'github.com,192.30.255.113' (RSA) to the list of known hosts.
Counting objects: 3, done.
Writing objects: 100% (3/3), 217 bytes | 0 bytes/s, done.
Total 3 (delta 0), reused 0 (delta 0)
To git@github.com:jefreylian/-spider.git
 * [new branch]      master -> master
分支 master 设置为跟踪来自 origin 的远程分支 master。       # 推送成功
此时刷新github下spider仓库,可以看到新上传的README.md文件已经上传
② 刚刚是先有本地库,后有远程库的时候,如何关联远程库。现在要做的是如何把远程库克隆到本地,然后再进行其他操作:
在本地找一个你想存放这个远程仓库的目录,然后在本地命令行用git clone 命令来克隆这个远程库
[root@localhost project]# git clone git@github.com:jefreylian/spider.git
正克隆到 '-spider'...
remote: Counting objects: 9, done.
remote: Compressing objects: 100% (5/5), done.
remote: Total 9 (delta 0), reused 9 (delta 0), pack-reused 0
接收对象中: 100% (9/9), done.

[root@localhost project]# cd spider/
[root@localhost spider]# ll
总用量 8
-rw-r--r-- 1 root root 27 7月   5 15:51 index.html
-rw-r--r-- 1 root root 10 7月   5 15:51 README.md
如果有多个人协作开发,那么每个人各自从远程克隆一份就可以了。
你也许还注意到,GitHub给出的地址不止一个,还可以用https://github.com/jefrey/spider.git 这样的地址。实际上,Git支持多种协议,默认的git://使用ssh,但也可以使用https等其他协议。
使用https除了速度慢以外,还有个最大的麻烦是每次推送都必须输入口令,但是在某些只开放http端口的公司内部就无法使用ssh协议而只能用https。
git精通
前言:
因为最初是从Linux起家的,非常依赖文件系统的一些特性,这些在 Linux 下表现的很好,而 Windows 下特别糟糕Git 中文教程
Git是一个开源的分布式版本控制系统,用以有效、高速的处理从很小到非常大的项目版本管理.
Git 是 Linus Torvalds 为了帮助管理 Linux 内核开发而开发的一个开放源码的版本控制软件。
Torvalds 开始着手开发 Git 是为了作为一种过渡方案来替代 BitKeeper,后者之前一直是 Linux 内核开发人员在全球使用的主要源代码工具。开放源码社区中的有些人觉得 BitKeeper 的许可证并不适合开放源码社区的工作,因此 Torvalds 决定着手研究许可证更为灵活的版本控制系统。尽管最初 Git 的开发是为了辅助 Linux 内核开发的过程,但是我们已经发现在很多其他自由软件项目中也使用了 Git。例如 最近就迁移到 Git 上来了,很多 Freedesktop 的项目也迁移到了 Git 上。
1、安装git:
最早Git是在Linux上开发的,很长一段时间内,Git也只能在Linux和Unix系统上跑。不过,慢慢地有人把它移植到了Windows上。现在,Git可以在Linux、Unix、Mac和Windows这几大平台上正常运行了。
linux系统下,你可以试着输入git,看看系统有没有安装Git:
[root@localhost lzl]# git
The program 'git' is currently not installed. You can install it by typing:
sudo apt-get install git
像上面的命令,有很多Linux会友好地告诉你Git没有安装,还会告诉你如何安装Git。
如果你碰巧用Debian或Ubuntu Linux,通过一条sudo apt-get install git就可以直接完成Git的安装,非常简单。
2、远程上传:
[root@localhost project]# git clone git@github.com:jefreylian/spider.git
[root@localhost project]# cd spider/
[root@localhost spider]# echo '#create new file' > new.py    # 创建新文件
[root@localhost spider]# git status                     # 查看状态
# 位于分支 master
# 未跟踪的文件:
#   (使用 "git add <file>..." 以包含要提交的内容)
#
#	new.py
提交为空,但是存在尚未跟踪的文件(使用 "git add" 建立跟踪)
[root@localhost spider]# git add new.py            # 文件由工作区提交到暂存区
[root@localhost spider]# git commit -m 'first commit'    # 加提交标识
[root@localhost spider]# git push -u origin master    # 把代码提交到仓库
补充:
[root@localhost spider]# git add new.py    # 添加new.py
[root@localhost spider]# git add .         # 添加所有
[root@localhost spider]# git config --global user.email "lianzhilei0711@163.com"     # 更改log显示名
[root@localhost spider]# git config --global user.name 'Jefrey'
[root@localhost spider]# vim .git/config     # 查看本地git设置
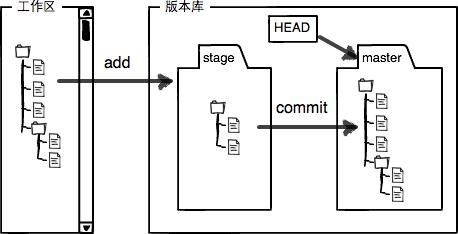
3、工作区和暂存区
Git和其他版本控制系统如SVN的一个不同之处就是有暂存区的概念。
先来看名词解释。
工作区(Working Directory)
就是你在电脑里能看到的目录,比如我的spider文件夹就是一个工作区:
[root@localhost spider]# ll
drwxr-xr-x 2 root root 20 7月   5 17:09 conf
-rw-r--r-- 1 root root 27 7月   5 15:51 index.html
-rw-r--r-- 1 root root 44 7月   5 17:31 new.py
-rw-r--r-- 1 root root 23 7月   5 15:57 README.md
版本库(Repository)
工作区有一个隐藏目录.git,这个不算工作区,而是Git的版本库。
Git的版本库里存了很多东西,其中最重要的就是称为stage(或者叫index)的暂存区,还有Git为我们自动创建的第一个分支master,以及指向master的一个指针叫HEAD。
分支和HEAD的概念我们以后再讲。
前面讲了我们把文件往Git版本库里添加的时候,是分两步执行的:
第一步是用git add把文件添加进去,实际上就是把文件修改添加到暂存区;
第二步是用git commit提交更改,实际上就是把暂存区的所有内容提交到当前分支。
因为我们创建Git版本库时,Git自动为我们创建了唯一一个master分支,所以,现在,git commit就是往master分支上提交更改。
你可以简单理解为,需要提交的文件修改通通放到暂存区,然后,一次性提交暂存区的所有修改。
4、本地回滚
现在,你已经学会了修改文件,然后把修改提交到Git版本库,假如要恢复到之前的代码也就是回滚,如何操作:
[root@localhost spider]# git log                # 查看提交记录
commit 1560f36d2ebb48a47c7db12cd0aedf88e3d2a0f9
Author: Jefrey <lianzhilei0711@163.com>
Date:   Wed Jul 5 16:43:16 2017 +0800
    conf commit
commit 81a32a17078f92d290ea29a7bbc928e1b30bf501
Author: Jefrey <lianzhilei0711@163.com>
Date:   Wed Jul 5 16:34:08 2017 +0800
    third commit
commit 40ac1cff6d9bc827c1c3d8dac2b3aa838e4dfe70
Author: lianzl <lianzl@commchina.net>
Date:   Wed Jul 5 16:29:56 2017 +0800
    second commit
commit daf94f4cf0919b0fbc86b4a0318568a19bceb307
Author: lianzl <lianzl@commchina.net>
Date:   Wed Jul 5 16:18:54 2017 +0800
    first commit
git log命令显示从最近到最远的提交日志,我们可以看到4次提交,最近的一次是conf commit,上一次是third commit,最早的一次是first commit。 如果嫌输出信息太多,看得眼花缭乱的,可以试试加上--pretty=oneline参数
[root@localhost spider]# git log --pretty=oneline
1560f36d2ebb48a47c7db12cd0aedf88e3d2a0f9 conf commit
81a32a17078f92d290ea29a7bbc928e1b30bf501 third commit
40ac1cff6d9bc827c1c3d8dac2b3aa838e4dfe70 second commit
daf94f4cf0919b0fbc86b4a0318568a19bceb307 first commit
① 回滚到上一次提交的代码:
[root@localhost spider]# git reset --hard HEAD^
HEAD 现在位于 81a32a1 third commit
[root@localhost spider]# git log --pretty=oneline
81a32a17078f92d290ea29a7bbc928e1b30bf501 third commit
40ac1cff6d9bc827c1c3d8dac2b3aa838e4dfe70 second commit
daf94f4cf0919b0fbc86b4a0318568a19bceb307 first commit
查看文件,发现现在已经回滚到上一次提交代码的状态
② 回滚到指定版本代码:
[root@localhost spider]# git reset --hard 40ac1cff        # 指定前7位即可
HEAD 现在位于 40ac1cf second commit
[root@localhost spider]# git log --pretty=oneline
40ac1cff6d9bc827c1c3d8dac2b3aa838e4dfe70 second commit
daf94f4cf0919b0fbc86b4a0318568a19bceb307 first commit
现在,你回退到了某个版本,关掉了电脑,第二天早上就后悔了,想恢复到新版本怎么办?找不到新版本的commit id怎么办?
在Git中,总是有后悔药可以吃的。当你用$ git reset --hard HEAD^回退到third commit版本时,再想恢复到最新conf commit的版本,就必须找到conf commit的commit id。Git提供了一个命令git reflog用来记录你的每一次命令:
[root@localhost spider]# git reflog
40ac1cf HEAD@{0}: reset: moving to 40ac1cff
81a32a1 HEAD@{1}: reset: moving to HEAD^
1560f36 HEAD@{2}: commit: conf commit
81a32a1 HEAD@{3}: commit: third commit
40ac1cf HEAD@{4}: commit: second commit
daf94f4 HEAD@{5}: commit: first commit
[root@localhost spider]# git reset --hard 1560f36   # 指定最新提交代码id
HEAD 现在位于 1560f36 conf commit
[root@localhost spider]# git log --pretty=oneline     # 恢复如初
1560f36d2ebb48a47c7db12cd0aedf88e3d2a0f9 conf commit
81a32a17078f92d290ea29a7bbc928e1b30bf501 third commit
40ac1cff6d9bc827c1c3d8dac2b3aa838e4dfe70 second commit
daf94f4cf0919b0fbc86b4a0318568a19bceb307 first commit
注:切记是本地代码回滚,不会影响到github上的仓库内容
5、撤销修改
① 未提交到暂存区撤销
假如现在在new.py文件中添加了两行代码:
#create new file
second commit
third commit
git is great
but my stupid boss still prefers SVN.
在你准备提交前,一杯咖啡起了作用,你猛然发现了“stupid boss”可能会让你丢掉这个月的奖金!
此时用git status查看一下:
[root@localhost spider]# git status
# 位于分支 master
# 尚未暂存以备提交的变更:
#   (使用 "git add <file>..." 更新要提交的内容)
#   (使用 "git checkout -- <file>..." 丢弃工作区的改动)
#
#	修改:      new.py
#
修改尚未加入提交(使用 "git add" 和/或 "git commit -a")
你可以发现,Git会告诉你,git checkout -- file可以丢弃工作区的修改:
[root@localhost spider]# git checkout -- new.py
[root@localhost spider]# more new.py
#create new file
second commit
third commit
好了,一切恢复如初,文件中修改的内容全部清除;new.py文件修改后还没有被放到暂存区,现在,撤销修改就回到和版本库一模一样的状态
new.py自修改后还没有被放到暂存区,现在,撤销修改就回到和版本库一模一样的状态;- new.py已经添加到暂存区后,又作了修改,现在,撤销修改就回到添加到暂存区后的状态;
② 已经提交到暂存区的文件撤销
不但修改了代码,而且还add存放到缓存区了:
[root@localhost spider]# more new.py
#create new file
second commit
third commit
Git tracks changes of files.
My stupid boss still prefers SVN.
[root@localhost spider]# git add new.py
庆幸的是,在commit之前,你发现了这个问题。用git status查看一下,修改只是添加到了暂存区,还没有提交:
[root@localhost spider]# git status
# 位于分支 master
# 要提交的变更:
#   (使用 "git reset HEAD <file>..." 撤出暂存区)
#
#	修改:      new.py
Git同样告诉我们,用命令git reset HEAD file可以把暂存区的修改撤销掉(unstage),重新放回工作区:
[root@localhost spider]#  git reset HEAD new.py
重置后撤出暂存区的变更:
M	new.py
[root@localhost spider]# git status
# 位于分支 master
# 尚未暂存以备提交的变更:
#   (使用 "git add <file>..." 更新要提交的内容)
#   (使用 "git checkout -- <file>..." 丢弃工作区的改动)
#
#	修改:      new.py
#
修改尚未加入提交(使用 "git add" 和/或 "git commit -a")
再次执行git checkout -- <file>,恢复到最初:
[root@localhost spider]# git checkout -- new.py
[root@localhost spider]# git status
# 位于分支 master
无文件要提交,干净的工作区
注:这里所有的撤销都是指代码未提交到仓库时的撤销
6、删除操作
在Git中,删除也是一个修改操作,我们实战一下,先添加一个新文件test.txt到Git并且提交:
$ git add .
$ git commit -m "add test.txt"
[master a8fa95a] add test.txt
 1 file changed, 0 insertions(+), 0 deletions(-)
 create mode 100644 test.txt
一般情况下,你通常直接在文件管理器中把没用的文件删了,或者用rm命令删了
[root@localhost spider]# rm test.txt
这个时候,Git知道你删除了文件,因此,工作区和版本库就不一致了,git status命令会立刻告诉你哪些文件被删除了:
$ git status
On branch master
Changes not staged for commit:
  (use "git add/rm <file>..." to update what will be committed)
  (use "git checkout -- <file>..." to discard changes in working directory)

    deleted:    test.txt

no changes added to commit (use "git add" and/or "git commit -a")
现在你有两个选择,一是确实要从版本库中删除该文件,那就用命令git rm删掉,并且git commit:
x$ git rm test.txt
rm 'test.txt'

$ git commit -m "remove test"
[master 03df00a] remove test
 1 file changed, 0 insertions(+), 0 deletions(-)
 delete mode 100644 test.txt
现在,文件就从版本库中被删除了。
另一种情况是删错了,因为版本库里还有呢,所以可以很轻松地把误删的文件恢复到最新版本:
[root@localhost spider]# git checkout -- test.txt
git checkout其实是用版本库里的版本替换工作区的版本,无论工作区是修改还是删除,都可以“一键还原”。
7、删除远程文件
假如远程文件index.html是多余文件,需要把他删除,如何做?
# 先把本地文件进行删除,查看git状态
[root@localhost spider]# rm index.html
rm:是否删除普通文件 "index.html"?y
[root@localhost spider]# git status
# 位于分支 master
# 尚未暂存以备提交的变更:
#   (使用 "git add/rm <file>..." 更新要提交的内容)
#   (使用 "git checkout -- <file>..." 丢弃工作区的改动)
#
#	删除:      index.html
#
修改尚未加入提交(使用 "git add" 和/或 "git commit -a")
用git rm清除刚刚删除的文件,上传更新:
[root@localhost spider]# git rm index.html
rm 'index.html'
[root@localhost spider]# git commit -m 'rm index.html'
[master c54c7fe] rm index.html
 1 file changed, 2 deletions(-)
 delete mode 100644 index.html
[root@localhost spider]# git push -u origin master
   bbaa116..99c5dfe  master -> master
查看远程代码库,文件index.html文件已经删除
8、忽略文件
有些时候,你必须把某些文件放到Git工作目录中,但又不能提交它们,比如保存了数据库密码的配置文件啦,等等,每次git status都会显示Untracked files ...,有强迫症的童鞋心里肯定不爽。好在Git考虑到了大家的感受,这个问题解决起来也很简单,在Git工作区的根目录下创建一个特殊的.gitignore文件,然后把要忽略的文件名填进去,Git就会自动忽略这些文件。不需要从头写.gitignore文件,GitHub已经为我们准备了各种配置文件,只需要组合一下就可以使用了。所有配置文件可以直接在线浏览:https://github.com/github/gitignore
忽略文件的原则是:
- 忽略操作系统自动生成的文件,比如缩略图等;
- 忽略编译生成的中间文件、可执行文件等,也就是如果一个文件是通过另一个文件自动生成的,那自动生成的文件就没必要放进版本库,比如Java编译产生的
.class文件; - 忽略你自己的带有敏感信息的配置文件,比如存放口令的配置文件;
编写忽略文件.gitignore:
# Python:
*.py[cod]
*.so
*.egg
*.egg-info
dist
build
编写new.pyc文件及func.py文件:
[root@localhost spider]# echo 'sssssss' >new.pyc
[root@localhost spider]# echo 'new file' >func.py

# 查看此时status
[root@localhost spider]# git status
# 位于分支 master
# 未跟踪的文件:
#   (使用 "git add <file>..." 以包含要提交的内容)
#
#	.gitignore
#	func.py
提交为空,但是存在尚未跟踪的文件(使用 "git add" 建立跟踪)
上传新增文件,.gitignore会被提交到git上去,new.pyc会被过滤掉,不会进行上传
如果你确实想添加该文件,可以用-f强制添加到Git:
[root@localhost spider]# git add -f new.pyc
[root@localhost spider]# git status
# 位于分支 master
# 要提交的变更:
#   (使用 "git reset HEAD <file>..." 撤出暂存区)
#
#	新文件:    new.pyc
或者你发现,可能是.gitignore写得有问题,需要找出来到底哪个规则写错了,可以用git check-ignore命令检查:
[root@localhost spider]# git check-ignore -v new.pyc
.gitignore:2:*.py[cod]	new.pyc
Git会告诉我们,.gitignore的第2行规则忽略了该文件,于是我们就可以知道应该修订哪个规则。
小结
-
忽略某些文件时,需要编写
.gitignore; -
.gitignore文件本身要放到版本库里,并且可以对.gitignore做版本管理!
9、强制覆盖本地代码
[root@localhost spider]# git reset --hard origin/master
HEAD 现在位于 3d64925 gitignore
分支
分支在实际中有什么用呢?假设你准备开发一个新功能,但是需要两周才能完成,第一周你写了50%的代码,如果立刻提交,由于代码还没写完,不完整的代码库会导致别人不能干活了。如果等代码全部写完再一次提交,又存在丢失每天进度的巨大风险。
现在有了分支,就不用怕了。你创建了一个属于你自己的分支,别人看不到,还继续在原来的分支上正常工作,而你在自己的分支上干活,想提交就提交,直到开发完毕后,再一次性合并到原来的分支上,这样,既安全,又不影响别人工作。
其他版本控制系统如SVN等都有分支管理,但是用过之后你会发现,这些版本控制系统创建和切换分支比蜗牛还慢,简直让人无法忍受,结果分支功能成了摆设,大家都不去用。
但Git的分支是与众不同的,无论创建、切换和删除分支,Git在1秒钟之内就能完成!无论你的版本库是1个文件还是1万个文件。
1、创建与合并分支
首先,我们创建dev分支,然后切换到dev分支:
[root@localhost spider]# git checkout -b dev
切换到一个新分支 'dev'
git checkout命令加上-b参数表示创建并切换,相当于以下两条命令:
[root@localhost spider]# git branch dev
[root@localhost spider]# git checkout dev
切换到一个新分支 'dev'
然后,用git branch命令查看当前分支:
[root@localhost spider]# git branch
* dev
  master
然后,我们就可以在dev分支上正常提交,比如对readme.txt做个修改,加上一行:
[root@localhost spider]# echo 'create a new branch' >> README.md
然后提交,在远程端生成dev分支:
[root@localhost spider]# git add README.md
[root@localhost spider]# git commit -m 'branch first'
[root@localhost spider]# git push -u origin dev
现在,dev分支的工作完成,我们就可以切换回master分支:
  master
[root@localhost spider]# git checkout master
切换到分支 'master'
[root@localhost spider]# git branch
  dev
* master
切换回master分支后,再查看一个readme.txt文件,刚才添加的内容不见了!因为那个提交是在dev分支上,而master分支此刻的提交点并没有变:

现在,我们把dev分支的工作成果合并到master分支上:
[root@localhost spider]# git merge dev
更新 3d64925..fbbba8c
Fast-forward
 README.md | 1 +
 1 file changed, 1 insertion(+)
git merge命令用于合并指定分支到当前分支。合并后,再查看readme.txt的内容,就可以看到,和dev分支的最新提交是完全一样的。
注意到上面的Fast-forward信息,Git告诉我们,这次合并是“快进模式”,也就是直接把master指向dev的当前提交,所以合并速度非常快。
当然,也不是每次合并都能Fast-forward,我们后面会讲其他方式的合并。
合并完成后,就可以放心地删除dev分支了:
[root@localhost spider]# git branch -d dev
已删除分支 dev(曾为 fbbba8c)。
[root@localhost spider]# git branch
* master
因为创建、合并和删除分支非常快,所以Git鼓励你使用分支完成某个任务,合并后再删掉分支,这和直接在master分支上工作效果是一样的,但过程更安全。
之前dev已经上传到远程仓库,但是本地已经删除了,怎么把远程端代码再拷贝到本地,so easy:
[root@localhost spider]# git checkout dev
分支 dev 设置为跟踪来自 origin 的远程分支 dev。
切换到一个新分支 'dev'
[root@localhost spider]# git branch
* dev
  master
自动连接远程分支代码,如果远程仓库dev有代码更新,git pull 更新本地代码
2、解决冲突
人生不如意之事十之八九,合并分支往往也不是一帆风顺的。
准备新的feature1分支,继续我们的新分支开发:
[root@localhost spider]# git checkout -b feature
切换到一个新分支 'feature'
修改README.md最后一行,改为:
[root@localhost spider]# echo 'added this line from branch feature' >> README.md
在feature分支上提交:
[root@localhost spider]# git add README.md
[root@localhost spider]# git commit -m 'add feature'
[feature 8880f27] add feature
 * [new branch]      feature -> feature
分支 feature 设置为跟踪来自 origin 的远程分支 feature。
切换到master分支:
[root@localhost spider]# git checkout master
切换到分支 'master'
您的分支领先 'origin/master' 共 2 个提交。
  (使用 "git push" 来发布您的本地提交)
Git还会自动提示我们当前master分支比远程的master分支要超前1个提交。
在master分支上把README.md文件的最后一行改为:
[root@localhost spider]# echo 'added this line from master' >> README.md
提交上传仓库:
[root@localhost spider]# git add README.md
[root@localhost spider]# git commit -m 'mASTER UPDATE'
[master d735926] mASTER UPDATE
 1 file changed, 1 insertion(+)
   e886050..d735926  master -> master
现在,master分支和feature1分支各自都分别有新的提交,变成了这样:
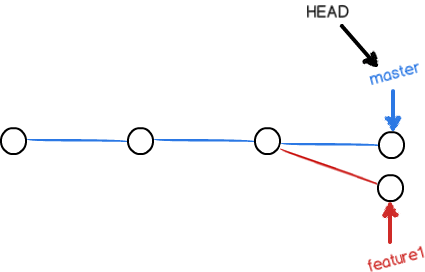
这种情况下,Git无法执行“快速合并”,只能试图把各自的修改合并起来,但这种合并就可能会有冲突,我们试试看:
[root@localhost spider]# git merge feature
error: 'merge' is not possible because you have unmerged files.
提示:请先在工作区改正文件,然后酌情使用
提示:'git add/rm <file>' 标记解决方案,
提示:或使用 'git commit -a'。
fatal: Exiting because of an unresolved conflict
果然冲突了!Git告诉我们,readme.txt文件存在冲突,必须手动解决冲突后再提交。git status也可以告诉我们冲突的文件:
[root@localhost spider]# git branch
  dev
  feature
* master
[root@localhost spider]# git status
# 位于分支 master
# 您有尚未合并的路径。
#   (解决冲突并运行 "git commit")
#
# 未合并的路径:
#   (使用 "git add <file>..." 标记解决方案)
#
#	双方修改:     README.md
#
修改尚未加入提交(使用 "git add" 和/或 "git commit -a")
我们可以直接查看README.md的内容:
# spider

forth commit
create a new branch
<<<<<<< HEAD
added this line from master
=======
added this line from branch feature
>>>>>>> feature
Git用<<<<<<<,=======,>>>>>>>标记出不同分支的内容,我们修改如下后保存:
# spider

forth commit
create a new branch
added this line from master
added this line from branch feature
再次提交:
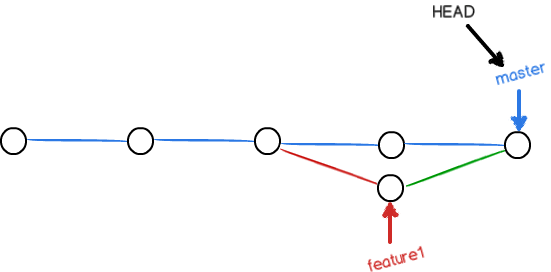
[root@localhost spider]# git add README.md
[root@localhost spider]# git commit -m 'conflict fixed'
[master 92fe979] conflict fixed
[root@localhost spider]# git push -u origin master
   d735926..92fe979  master -> master
分支 master 设置为跟踪来自 origin 的远程分支 master。
现在,master分支和feature分支变成了下图所示:
用带参数的git log也可以看到分支的合并情况:
[root@localhost spider]# git log --graph --pretty=oneline
*   92fe979409a534673f7f35c3613f65dcd8e9660b conflict fixed
|\
| * 8880f27f77477481232ab28fd1fe42cc87c33683 add feature
* | d73592620ebd7d368e0c4d7293ff228386fd243a mASTER UPDATE
|/
*   9182888e813b69bf08f9eff5cd899b6a07861507 Merge branch 'dev'
|\
| * 5a4ba4248b1b4982d48e570b1038c995e1e75ef0 Update README.md
* | e8860504de4b2975055943a353f6267d75984504 branch dev second
|/
* fbbba8c24902b2c4e52e693dc7503b400012fe76 branch first
* 3d649257c8778c5a40f52cfad9a6acfbc59d26dc gitignore
* 1560f36d2ebb48a47c7db12cd0aedf88e3d2a0f9 conf commit
* 81a32a17078f92d290ea29a7bbc928e1b30bf501 third commit
* 40ac1cff6d9bc827c1c3d8dac2b3aa838e4dfe70 second commit
* daf94f4cf0919b0fbc86b4a0318568a19bceb307 first commit
3、存储代码:
当前正在dev上进行的工作还没有提交,你接到一个修复一个代号101的bug的任务时,很自然地,你想创建一个分支issue-101来修复它;此时并不是你不想提交,而是工作只进行到一半,还没法提交,预计完成还需1天时间。但是,必须在两个小时内修复该bug,怎么办?
幸好,Git还提供了一个stash功能,可以把当前工作现场“储藏”起来,等以后恢复现场后继续工作:
[root@localhost spider]# echo 'create stash file' >> README.md
[root@localhost spider]# git stash
Saved working directory and index state WIP on dev: 5a4ba42 Update README.md
HEAD 现在位于 5a4ba42 Update README.md
[root@localhost spider]# git status
# 位于分支 dev
无文件要提交,干净的工作区
现在,用git status查看工作区,就是干净的(除非有没有被Git管理的文件),因此可以放心地创建分支来修复bug。
首先确定要在哪个分支上修复bug,假定需要在master分支上修复,就从master创建临时分支:
[root@localhost spider]# git checkout master
[root@localhost spider]# git checkout -b issue-101
[root@localhost spider]# echo 'fixed bug' >> README.md
[root@localhost spider]# git add README.md
[root@localhost spider]# git commit -m 'fixed bug 101'
[issue-101 80feda6] fixed bug 101
 1 file changed, 1 insertion(+)
[root@localhost spider]# git push -u origin master
修复完成后,切换到master分支,并完成合并,最后删除issue-101分支:
[root@localhost spider]# git checkout master
[root@localhost spider]# git merge issue-101
[root@localhost spider]# git branch -d issue-101
太棒了,原计划两个小时的bug修复只花了5分钟!现在,是时候接着回到dev分支干活了!用git stash list命令看看:
[root@localhost spider]# git checkout dev
切换到分支 'dev'
[root@localhost spider]# git status
# 位于分支 dev
无文件要提交,干净的工作区
[root@localhost spider]# git stash list
stash@{0}: WIP on dev: 5a4ba42 Update README.md
工作现场还在,Git把stash内容存在某个地方了,但是需要恢复一下,有两个办法:
一是用git stash apply恢复,但是恢复后,stash内容并不删除,你需要用git stash drop来删除;另一种方式是用git stash pop,恢复的同时把stash内容也删了;
[root@localhost spider]# git stash pop
# 位于分支 dev
# 尚未暂存以备提交的变更:
#   (使用 "git add <file>..." 更新要提交的内容)
#   (使用 "git checkout -- <file>..." 丢弃工作区的改动)
#
#	修改:      README.md
#
修改尚未加入提交(使用 "git add" 和/或 "git commit -a")
丢弃了 refs/stash@{0} (601f28699d51d05c9eec7d15ebaa8698287c3105)
再用git stash list查看,就看不到任何stash内容了:
[root@localhost spider]# git stash list
你可以多次stash,恢复的时候,先用git stash list查看,然后恢复指定的stash,用命令:
[root@localhost spider]# git stash apply stash@{0}

 浙公网安备 33010602011771号