

一、元注解
@Target:注解的作用目标
@Target(ElementType.TYPE)——接口、类、枚举、注解
@Target(ElementType.FIELD)——字段、枚举的常量
@Target(ElementType.METHOD)——方法
@Target(ElementType.PARAMETER)——方法参数
@Target(ElementType.CONSTRUCTOR) ——构造函数
@Target(ElementType.LOCAL_VARIABLE)——局部变量
@Target(ElementType.ANNOTATION_TYPE)——注解
@Target(ElementType.PACKAGE)——包
@Retention:注解的保留位置
RetentionPolicy.SOURCE:这种类型的Annotations只在源代码级别保留,编译时就会被忽略,在class字节码文件中不包含。
RetentionPolicy.CLASS:这种类型的Annotations编译时被保留,默认的保留策略,在class文件中存在,但JVM将会忽略,运行时无法获得。
RetentionPolicy.RUNTIME:这种类型的Annotations将被JVM保留,所以他们能在运行时被JVM或其他使用反射机制的代码所读取和使用。
@Document:说明该注解将被包含在javadoc中
@Inherited:说明子类可以继承父类中的该注解
场景与样例
此处对@Retention做特殊说明。
RetentionPolicy.SOURCE,编译后的class文件不包含@Retention注释,使用在编译阶段,主要是在编译时做一些操作,例如:@Override和@SuppressWarnings(@Override:改注解向编译器说明被注解元素是重写的父类的一个元素。在重写父类元素的时候此注解并非强制性的,不过可以在重写错误时帮助编译器产生错误以提醒我们。比如子类方法的参数和父类不匹配,或返回值类型不同;编译通过后,方法上不再有@Override注解;@SuppressWarnings:在编译时抑制编译报错)。
RetentionPolicy.CLASS,编译后在class文件中仍然存在,但是运行时不会被JVM调用,即使是使用反射也不无法调用该注解,但是要是具体说他与RetentionPolicy.SOURCE的区别,除了是否会存在于class文件上之外,还没有找到实质性的区别(很有可能的区别是:RetentionPolicy.SOURCE仅仅是给应用层开发人员用的,RetentionPolicy.CLASS 需要应用层和底层系统开发人员配合使用的,所以仅仅是应用层开发的我们是一脸懵逼)
二、其它注解解释
首先我们先来看 @SpringBootConfiguration,那我们点进来看
@Target(ElementType.TYPE)
@Retention(RetentionPolicy.RUNTIME)
@Documented
@Configuration
public @interface SpringBootConfiguration {

}
我们可以看到这个注解除了元注解以外,就只有一个@Configuration,那也就是说这个注解相当于@Configuration,所以这两个注解作用是一样的,那他是干嘛的呢,相信很多人都知道,它是让我们能够去注册一些额外的Bean,并且导入一些额外的配置。那@Configuration还有一个作用就是把该类变成一个配置类,不需要额外的XML进行配置。所以@SpringBootConfiguration就相当于@Configuration。
@EnableAutoConfiguration,
这个注解官网说是 让Spring自动去进行一些配置,那我们点进来看

@Target(ElementType.TYPE)
@Retention(RetentionPolicy.RUNTIME)
@Documented
@Inherited
@AutoConfigurationPackage
@Import(EnableAutoConfigurationImportSelector.class)
public @interface EnableAutoConfiguration {
}
可以看到它是由 @AutoConfigurationPackage,@Import(EnableAutoConfigurationImportSelector.class)这两个而组成的,我们先说@AutoConfigurationPackage,他是说:让包中的类以及子包中的类能够被自动扫描到spring容器中。 我们来看@Import(EnableAutoConfigurationImportSelector.class)这个是核心,之前我们说自动配置,那他到底帮我们配置了什么,怎么配置的?
就和@Import(EnableAutoConfigurationImportSelector.class)息息相关,程序中默认使用的类就自动帮我们找到。我们来看EnableAutoConfigurationImportSelector.class
public class EnableAutoConfigurationImportSelector
      extends AutoConfigurationImportSelector {

   @Override
   protected boolean isEnabled(AnnotationMetadata metadata) {
      if (getClass().equals(EnableAutoConfigurationImportSelector.class)) {
         return getEnvironment().getProperty(
               EnableAutoConfiguration.ENABLED_OVERRIDE_PROPERTY, Boolean.class,
               true);
      }
      return true;
   }

}
可以看到他继承了AutoConfigurationImportSelector我们继续来看AutoConfigurationImportSelector,这个类有一个方法
public String[] selectImports(AnnotationMetadata annotationMetadata) {
   if (!isEnabled(annotationMetadata)) {
      return NO_IMPORTS;
   }
   try {
      AutoConfigurationMetadata autoConfigurationMetadata = AutoConfigurationMetadataLoader
            .loadMetadata(this.beanClassLoader);
      AnnotationAttributes attributes = getAttributes(annotationMetadata);
      List<String> configurations = getCandidateConfigurations(annotationMetadata,
            attributes);
      configurations = removeDuplicates(configurations);
      configurations = sort(configurations, autoConfigurationMetadata);
      Set<String> exclusions = getExclusions(annotationMetadata, attributes);
      checkExcludedClasses(configurations, exclusions);
      configurations.removeAll(exclusions);
      configurations = filter(configurations, autoConfigurationMetadata);
      fireAutoConfigurationImportEvents(configurations, exclusions);
      return configurations.toArray(new String[configurations.size()]);
   }
   catch (IOException ex) {
      throw new IllegalStateException(ex);
   }
}
这个类会帮你扫描那些类自动去添加到程序当中。我们可以看到getCandidateConfigurations()这个方法,他的作用就是引入系统已经加载好的一些类,到底是那些类呢,我们点进去看一下
protected List<String> getCandidateConfigurations(AnnotationMetadata metadata,
      AnnotationAttributes attributes) {
   List<String> configurations = SpringFactoriesLoader.loadFactoryNames(
         getSpringFactoriesLoaderFactoryClass(), getBeanClassLoader());
   Assert.notEmpty(configurations,
         "No auto configuration classes found in META-INF/spring.factories. If you "
               + "are using a custom packaging, make sure that file is correct.");
   return configurations;
}
这个类回去寻找的一个目录为META-INF/spring.factories,也就是说他帮你加载让你去使用也就是在这个META-INF/spring.factories目录装配的,他在哪里?

我们点进spring.factories来看
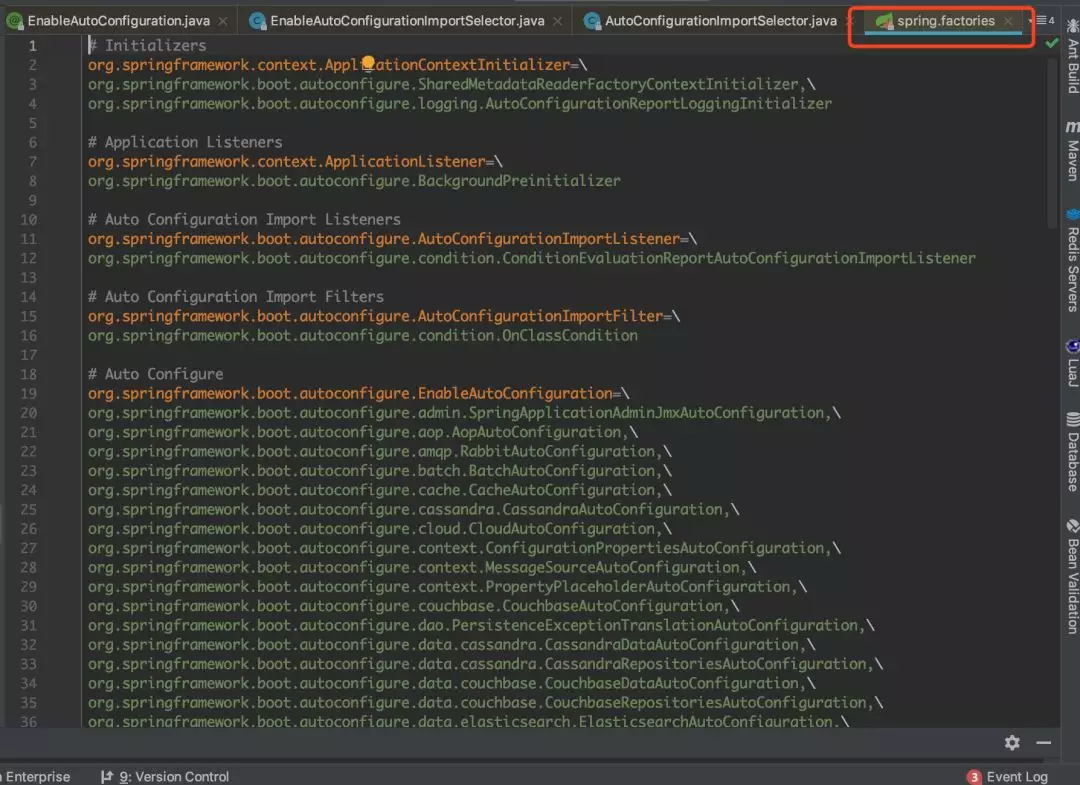
我们可以发现帮我们配置了很多类的全路径,比如你想整合activemq,或者说Servlet
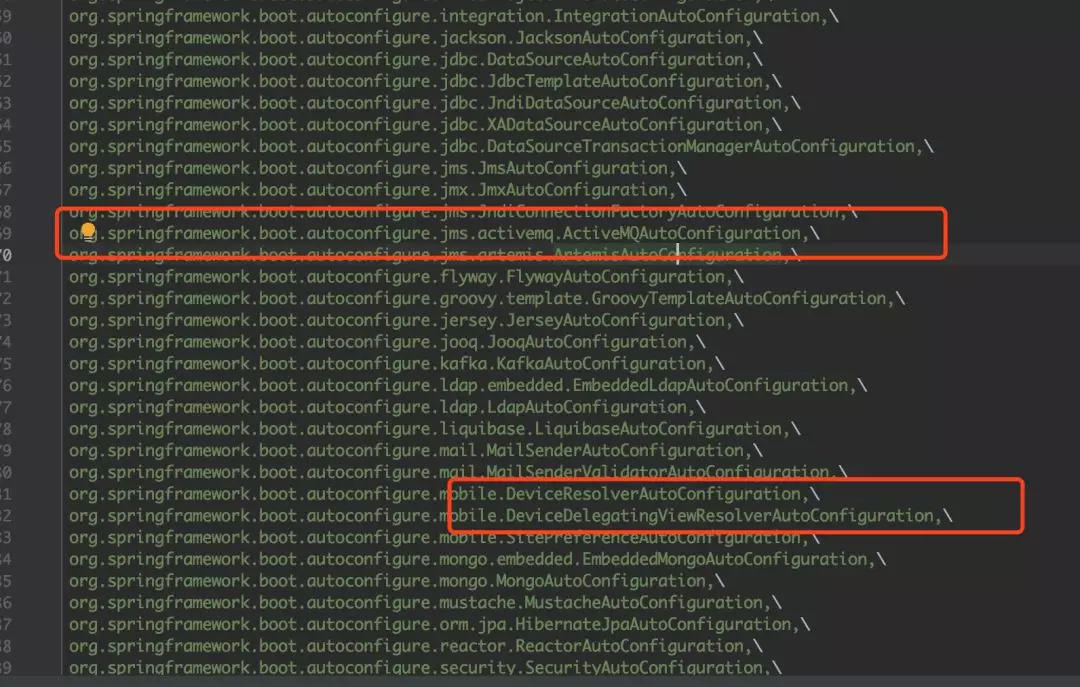
可以看到他都已经帮我们引入了进来,我看随便拿几个来看
org.springframework.boot.autoconfigure.security.SecurityAutoConfiguration,\
org.springframework.boot.autoconfigure.security.SecurityFilterAutoConfiguration,\
org.springframework.boot.autoconfigure.security.FallbackWebSecurityAutoConfiguration,\
org.springframework.boot.autoconfigure.security.oauth2.OAuth2AutoConfiguration,\
SpringBoot常用注解大全
一、注解(annotations)列表
@SpringBootApplication:
包含了@ComponentScan、@Configuration和@EnableAutoConfiguration注解。其中@ComponentScan让spring Boot扫描到Configuration类并把它加入到程序上下文。
@Configuration 等同于spring的XML配置文件;使用Java代码可以检查类型安全。
@EnableAutoConfiguration 自动配置。
@ComponentScan 组件扫描,可自动发现和装配一些Bean。
@Component可配合CommandLineRunner使用,在程序启动后执行一些基础任务。
@RestController注解是@Controller和@ResponseBody的合集,表示这是个控制器bean,并且是将函数的返回值直 接填入HTTP响应体中,是REST风格的控制器。
@Autowired自动导入。
@PathVariable获取参数。
@JsonBackReference解决嵌套外链问题。
@RepositoryRestResourcepublic配合spring-boot-starter-data-rest使用。
二、注解(annotations)详解
@SpringBootApplication:申明让spring boot自动给程序进行必要的配置,这个配置等同于:@Configuration ,@EnableAutoConfiguration 和 @ComponentScan 三个配置。
package com.example.myproject;
import org.springframework.boot.SpringApplication;
import org.springframework.boot.autoconfigure.SpringBootApplication;

@SpringBootApplication // same as @Configuration @EnableAutoConfiguration @ComponentScan
public class Application {
public static void main(String[] args) {
SpringApplication.run(Application.class, args);
}
}
@ResponseBody:表示该方法的返回结果直接写入HTTP response body中,一般在异步获取数据时使用,用于构建RESTful的api。在使用@RequestMapping后,返回值通常解析为跳转路径,加上@responsebody后返回结果不会被解析为跳转路径,而是直接写入HTTP response body中。比如异步获取json数据,加上@responsebody后,会直接返回json数据。该注解一般会配合@RequestMapping一起使用。示例代码:
@RequestMapping(“/test”)
@ResponseBody
public String test(){
return”ok”;
}
@Controller:用于定义控制器类,在spring 项目中由控制器负责将用户发来的URL请求转发到对应的服务接口(service层),一般这个注解在类中,通常方法需要配合注解@RequestMapping。示例代码:
@Controller
@RequestMapping(“/demoInfo”)
publicclass DemoController {
@Autowired
private DemoInfoService demoInfoService;

@RequestMapping("/hello")
public String hello(Map<String,Object> map){
   System.out.println("DemoController.hello()");
   map.put("hello","from TemplateController.helloHtml");
   //会使用hello.html或者hello.ftl模板进行渲染显示.
   return"/hello";
}
}
@RestController:用于标注控制层组件(如struts中的action),@ResponseBody和@Controller的合集。示例代码:
package com.kfit.demo.web;

import org.springframework.web.bind.annotation.RequestMapping;
import org.springframework.web.bind.annotation.RestController;


@RestController
@RequestMapping(“/demoInfo2”)
publicclass DemoController2 {

@RequestMapping("/test")
public String test(){
   return"ok";
}
}
@RequestMapping:提供路由信息,负责URL到Controller中的具体函数的映射。
@EnableAutoConfiguration:Spring Boot自动配置(auto-configuration):尝试根据你添加的jar依赖自动配置你的Spring应用。例如,如果你的classpath下存在HSQLDB,并且你没有手动配置任何数据库连接beans,那么我们将自动配置一个内存型(in-memory)数据库”。
你可以将@EnableAutoConfiguration或者@SpringBootApplication注解添加到一个@Configuration类上来选择自动配置。如果发现应用了你不想要的特定自动配置类,你可以使用@EnableAutoConfiguration注解的排除属性来禁用它们。
@ComponentScan:表示将该类自动发现扫描组件。个人理解相当于,如果扫描到有@Component、@Controller、@Service等这些注解的类,并注册为Bean,可以自动收集所有的Spring组件,包括@Configuration类。我们经常使用@ComponentScan注解搜索beans,并结合@Autowired注解导入。可以自动收集所有的Spring组件,包括@Configuration类。
我们经常使用@ComponentScan注解搜索beans,并结合@Autowired注解导入。如果没有配置的话,Spring Boot会扫描启动类所在包下以及子包下的使用了@Service,@Repository等注解的类。
@Configuration:相当于传统的xml配置文件,如果有些第三方库需要用到xml文件,建议仍然通过@Configuration类作为项目的配置主类——可以使用@ImportResource注解加载xml配置文件。
@Import:用来导入其他配置类。
@ImportResource:用来加载xml配置文件。
@Autowired:自动导入依赖的bean
@Service:一般用于修饰service层的组件
@Repository:使用@Repository注解可以确保DAO或者repositories提供异常转译,这个注解修饰的DAO或者repositories类会被ComponetScan发现并配置,同时也不需要为它们提供XML配置项。
@Bean:用@Bean标注方法等价于XML中配置的bean。
@Value:注入Spring boot application.properties配置的属性的值。示例代码:
@Value(value = “#{message}”)
private String message;
@Inject:等价于默认的@Autowired,只是没有required属性;
@Component:泛指组件,当组件不好归类的时候,我们可以使用这个注解进行标注。
@Bean:相当于XML中的,放在方法的上面,而不是类,意思是产生一个bean,并交给spring管理。
@AutoWired:自动导入依赖的bean。byType方式。把配置好的Bean拿来用,完成属性、方法的组装,它可以对类成员变量、方法及构造函数进行标注,完成自动装配的工作。当加上(required=false)时,就算找不到bean也不报错。
@Qualifier:当有多个同一类型的Bean时,可以用@Qualifier(“name”)来指定。与@Autowired配合使用。@Qualifier限定描述符除了能根据名字进行注入,但能进行更细粒度的控制如何选择候选者,具体使用方式如下:
@Autowired
@Qualifier(value = “demoInfoService”)
private DemoInfoService demoInfoService;
@Resource(name=”name”,type=”type”):没有括号内内容的话,默认byName。与@Autowired干类似的事。
三、JPA注解
@Entity:@Table(name=”“):表明这是一个实体类。一般用于jpa这两个注解一般一块使用,但是如果表名和实体类名相同的话,@Table可以省略
@MappedSuperClass:用在确定是父类的entity上。父类的属性子类可以继承。
@NoRepositoryBean:一般用作父类的repository,有这个注解,spring不会去实例化该repository。
@Column:如果字段名与列名相同,则可以省略。
@Id:表示该属性为主键。
@GeneratedValue(strategy = GenerationType.SEQUENCE,generator = “repair_seq”):表示主键生成策略是sequence(可以为Auto、IDENTITY、native等,Auto表示可在多个数据库间切换),指定sequence的名字是repair_seq。
@SequenceGeneretor(name = “repair_seq”, sequenceName = “seq_repair”, allocationSize = 1):name为sequence的名称,以便使用,sequenceName为数据库的sequence名称,两个名称可以一致。
@Transient:表示该属性并非一个到数据库表的字段的映射,ORM框架将忽略该属性。如果一个属性并非数据库表的字段映射,就务必将其标示为@Transient,否则,ORM框架默认其注解为@Basic。@Basic(fetch=FetchType.LAZY):标记可以指定实体属性的加载方式
@JsonIgnore:作用是json序列化时将Java bean中的一些属性忽略掉,序列化和反序列化都受影响。
@JoinColumn(name=”loginId”):一对一:本表中指向另一个表的外键。一对多:另一个表指向本表的外键。
@OneToOne、@OneToMany、@ManyToOne:对应hibernate配置文件中的一对一,一对多,多对一。
四、springMVC相关注解
@RequestMapping:@RequestMapping(“/path”)表示该控制器处理所有“/path”的UR L请求。RequestMapping是一个用来处理请求地址映射的注解,可用于类或方法上。
用于类上,表示类中的所有响应请求的方法都是以该地址作为父路径。
该注解有六个属性:
-
params:指定request中必须包含某些参数值是,才让该方法处理。
-
headers:指定request中必须包含某些指定的header值,才能让该方法处理请求。
-
value:指定请求的实际地址,指定的地址可以是URI Template 模式
-
method:指定请求的method类型, GET、POST、PUT、DELETE等
-
consumes:指定处理请求的提交内容类型(Content-Type),如application/json,text/html;
-
produces:指定返回的内容类型,仅当request请求头中的(Accept)类型中包含该指定类型才返回
@RequestParam:用在方法的参数前面。
@RequestParam
String a =request.getParameter(“a”)。
@PathVariable:路径变量。如
RequestMapping(“user/get/mac/{macAddress}”)
public String getByMacAddress(@PathVariable String macAddress){
//do something;
}
参数与大括号里的名字一样要相同。
五、全局异常处理
@ControllerAdvice:包含@Component。可以被扫描到。统一处理异常。
@ExceptionHandler(Exception.class):用在方法上面表示遇到这个异常就执行以下方法。
