nfs服务的讲解
第4章 nfs存储服务的搭建
4.1 nfs服务的介绍
4.1.1 nfs的作用
- nfs服务器是一种远程网络传输的共享文件系统
- 节省web服务器的本地存储空间
- 用户存储在web服务器上面的资源,会通过网络传输放入到nfs存储服务器的共享目录里面.不管以后用户访问哪台服务器,都可以读取到自己存放的内容,实现了服务器之间的共享数据信息
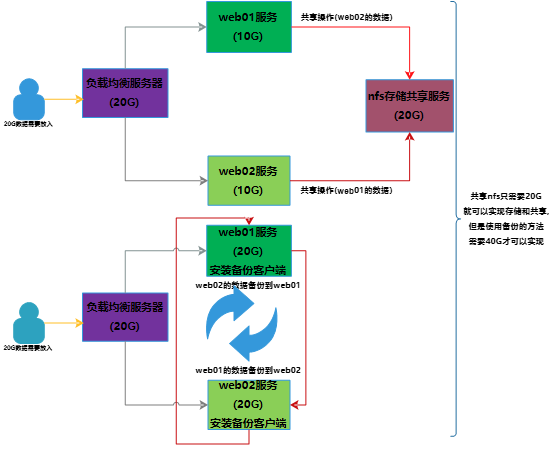
4.2 nfs存储相比备份服务的优点
4.3 nfs服务的部署
4.3.1 服务端的部署
4.3.1.1 查看服务端软件是否安装
[root@nfs01 scripts] # rpm -qa | grep rpcbind
rpcbind-0.2.0-48.el7.x86_64
[root@nfs01 scripts] # rpm -qa | grep nfs-utils
nfs-utils-1.3.0-0.65.el7.x86_64
[root@nfs01 scripts] #
- 注:没安装的话使用yum -y install nfs-utils即可
4.3.1.2 编辑配置文件
4.3.1.2.1 在man下面查找到需要配置文件参数
# sample /etc/exports file
/ master(rw) trusty(rw,no_root_squash)
/projects proj*.local.domain(rw)
/usr *.local.domain(ro) @trusted(rw)
/home/joe pc001(rw,all_squash,anonuid=150,anongid=100)
/pub *(ro,insecure,all_squash)
/srv/www -sync,rw server @trusted @external(ro)
/foo 2001:db8:9:e54::/64(rw) 192.0.2.0/24(rw)
/build buildhost[0-9].local.domain(rw)
4.3.1.2.2 在/etc/exports文件下面编写配置文件
[root@nfs01 scripts] # vim /etc/exports
/data01 172.16.1.0/24(rw)
01 02 03
01 存储目录
02 允许web服务器向存储服务器传访问的网段(可以是具体IP,用户名,网段信息)
03 存储数据的参数信息
注意:02和03配置中间不能出现空格
4.3.1.3 重启nfs和rpcbind服务
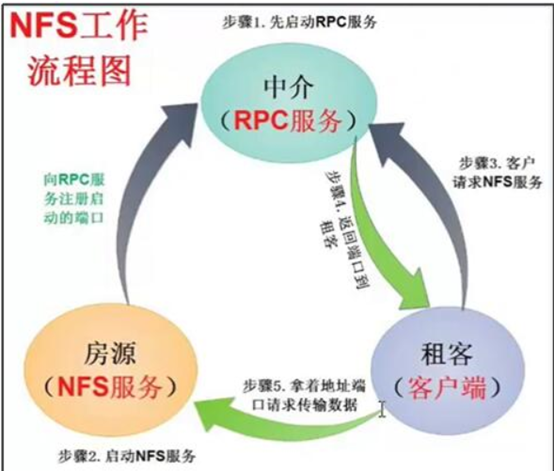
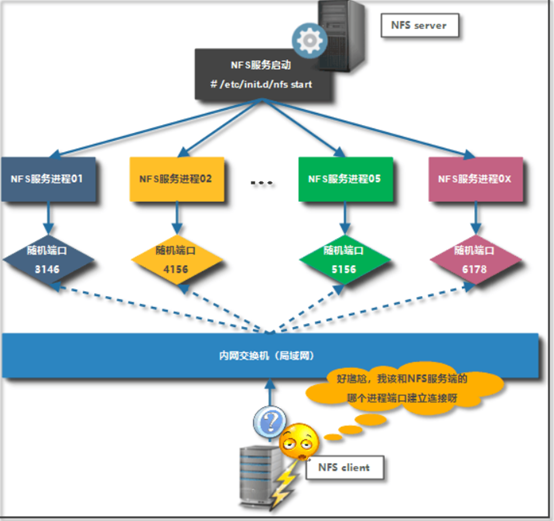
4.3.1.3.1 rpcbind是什么?为什么要启动
rpcbind就是当nfs客户端的端口号注册在了rpcbind服务上面一后,当客户端访问服务端的时候,负责将服务端的端口号发送给客户端
图示来理解为啥需要启动rpcbind

4.3.1.3.2 重启rpcbind和nfs
[root@nfs01 ~] # systemctl start rpcbind 启动rpcbind
[root@nfs01 ~] # systemctl start nfs 启动nfs
[root@nfs01 ~] # systemctl enable rpcbind 永久启动rpcbind
[root@nfs01 ~] # systemctl enable nfs 永久启动nfs
Created symlink from /etc/systemd/system/multi-user.target.wants/nfs-server.service to /usr/lib/systemd/system/nfs-server.service.
[root@nfs01 ~] # systemctl is-enabled nfs rpcbind 查看服务状态是否永久开启
enabled
enabled
[root@nfs01 ~] # systemctl is-active nfs rpcbind 查看服务状态是否开启
active
active
[root@nfs01 ~] #
4.3.1.4 将存储目录设置为默认虚拟用户nfsnobody
[root@nfs01 ~] # mkdir -p /data01 创建/data01目录
[root@nfs01 ~] # ll /data01 -d 查看属主和属是否是nfsnobody
drwxr-xr-x 2 root root 6 Oct 25 14:46 /data01
[root@nfs01 ~] # chown nfsnobody. /data01/ 修改属主属组权限
[root@nfs01 ~] # ll /data01 -d 再次查看发现已经改成自己需要的nfsnobody
drwxr-xr-x 2 nfsnobody nfsnobody 6 Oct 25 14:46 /data01
[root@nfs01 ~] #
4.3.2 客户端的部署
4.3.2.1 查看是否安装了nfs
[root@web01 ~] # rpm -qa | grep nfs-utils
nfs-utils-1.3.0-0.65.el7.x86_64
[root@web01 ~] #
4.3.2.2 挂载远程存储目录到/mnt目录下
4.3.2.2.1 临时挂载
[root@web01 ~] # mount -t nfs 172.16.1.31:/data01 /mnt 挂载远程目录到本地/mnt下
You have new mail in /var/spool/mail/root
[root@web01 ~] # df -h
Filesystem Size Used Avail Use% Mounted on
/dev/sda3 99G 5.3G 93G 6% /
devtmpfs 471M 0 471M 0% /dev
tmpfs 487M 0 487M 0% /dev/shm
tmpfs 487M 8.4M 478M 2% /run
tmpfs 487M 0 487M 0% /sys/fs/cgroup
/dev/sda1 197M 160M 37M 82% /boot
tmpfs 98M 12K 98M 1% /run/user/42
tmpfs 98M 0 98M 0% /run/user/0
172.16.1.31:/data01 99G 5.3G 94G 6% /mnt 挂载成功
[root@web01 ~] #
4.3.2.2.2 永久挂载
[root@web01 mnt] # vim /etc/fstab
#UUID=27104df9-3f54-4b94-acb7-0890b452e99f / xfs defaults 0 0
UUID=27114df9-3f54-4b94-acb7-0890b452e99f / xfs defaults 0 0
UUID=4260ed75-aad2-4389-b24a-2be6362c2597 /boot xfs defaults 0 0
UUID=8e7004ef-83c2-4b8d-b9db-b85768271eb2 swap swap defaults 0 0
172.16.1.31:/data01 /r nfs defaults 0 0
[root@web01 mnt] # mount -a 重新加载挂载设备
[root@web01 mnt] # df -h
Filesystem Size Used Avail Use% Mounted on
/dev/sda3 99G 5.3G 93G 6% /
devtmpfs 471M 0 471M 0% /dev
tmpfs 487M 0 487M 0% /dev/shm
tmpfs 487M 8.4M 478M 2% /run
tmpfs 487M 0 487M 0% /sys/fs/cgroup
/dev/sda1 197M 160M 37M 82% /boot
tmpfs 98M 12K 98M 1% /run/user/42
tmpfs 98M 0 98M 0% /run/user/0
172.16.1.31:/data01 99G 5.3G 94G 6% /r 挂载成功
[root@web01 mnt] #
4.3.2.2.3 永久挂载失败
[root@web01 mnt] # vim /etc/fstab
#UUID=27104df9-3f54-4b94-acb7-0890b452e99f / xfs defaults 0 0
UUID=27114df9-3f54-4b94-acb7-0890b452e99f / xfs defaults 0 0
UUID=4260ed75-aad2-4389-b24a-2be6362c2597 /boot xfs defaults 0 0
UUID=8e7004ef-83c2-4b8d-b9db-b85768271eb2 swap swap defaults 0 0
172.16.1.31:/data01 /r nfs defaults 0 0
[root@web01 mnt] # mount -a 重新加载挂载设备,发现没有挂载成功
[root@web01 mnt] # df -h
Filesystem Size Used Avail Use% Mounted on
/dev/sda3 99G 5.3G 93G 6% /
devtmpfs 471M 0 471M 0% /dev
tmpfs 487M 0 487M 0% /dev/shm
tmpfs 487M 8.4M 478M 2% /run
tmpfs 487M 0 487M 0% /sys/fs/cgroup
/dev/sda1 197M 160M 37M 82% /boot
tmpfs 98M 12K 98M 1% /run/user/42
tmpfs 98M 0 98M 0% /run/user/0
[root@web01 mnt] #
问题:影响挂载失败的原因?
centos6:查看服务netfs是否开启
centos7:查看服务remote-fs.target是否开启
4.3.2.2.4 网络挂载设备的时候原理过程
- 开机启动加载系统bios自检
- …..
- 加载系统挂载设备文件(由于这里没有网络,导致第一次挂载失败)
- 加载网络服务
- 启动开机自启服务(其中的remote-fs.target就是这里启动,这会重新加载挂载,这会就可以挂载成功)
- 注意:这也就是为什么挂载失败要首先查找这个服务是否开启
4.3.2.3 验证mnt目录下是否可以创建写入内容,并且远程/data01目录下是否有相同的文件
4.3.2.3.1 本地写入文件
[root@web01 ~] # cd /mnt/
ll[root@web01 mnt] # ll
total 0
[root@web01 mnt] # touch oldboy.txt
[root@web01 mnt] # mkdir -p oldboy/oldboy01
[root@web01 mnt] #
4.3.2.3.2 远程目录是否有文件
[root@nfs01 ~] # cd /data01/
[root@nfs01 data01] # ll
total 0
drwxr-xr-x 3 nfsnobody nfsnobody 22 Oct 25 14:54 oldboy
-rw-r--r-- 1 nfsnobody nfsnobody 0 Oct 25 14:54 oldboy.txt
[root@nfs01 data01] # tree
.
├── oldboy
│ └── oldboy01 本地创建的文件远程可以拥有
└── oldboy.txt
2 directories, 1 file
[root@nfs01 data01] #
4.5 nfs服务的常见参数
- rw 指定共享目录可以读也可以写
- ro 指定共享目录只拥有只读权限
- all_squash 所有普通用户都需要进行用户身份的转换
- no_all_squash 所有普通用户不需要进行身份的转换
- root_squash root用户需要进行身份的转换
- no_root_squash root用户不需要进行身份的转换
- sync 同步传输数据,直接传输到硬盘中,安全性高, 但是读写性能低
- async 异步传输数据,先将数据放入内存中,在定时定 量将数据放入硬盘,读写性能高,但是安全性低
注:/var./lib/nfs/etab:这里面有nfs服务配置的默认参数
4.5.1 all_squash和no_all_squash的演示
4.5.1.1 all_squash的演示
[root@nfs01 ~] # cat /etc/exports
/data01 172.16.1.0/24(rw,all_squash) 设置为all_squash
[root@nfs01 ~] #
[root@nfs01 ~] # exportfs -rv 平滑重启服务
exporting 172.16.1.0/24:/data01
[root@nfs01 ~] #
[root@backup ~] # mount -t nfs 172.16.1.31:/data01 /mnt 挂载
[root@backup ~] # df -h
Filesystem Size Used Avail Use% Mounted on
/dev/sda3 99G 5.3G 93G 6% /
devtmpfs 471M 0 471M 0% /dev
tmpfs 487M 0 487M 0% /dev/shm
tmpfs 487M 8.4M 478M 2% /run
tmpfs 487M 0 487M 0% /sys/fs/cgroup
/dev/sda1 197M 160M 37M 82% /boot
tmpfs 98M 8.0K 98M 1% /run/user/42
tmpfs 98M 0 98M 0% /run/user/0
172.16.1.31:/data01 99G 5.3G 93G 6% /mnt
[root@backup ~] # cd /mnt/
[root@backup mnt] # ll
total 0
[root@backup mnt] # touch aa.txt
[root@backup mnt] # ll aa.txt
-rw-r--r-- 1 nfsnobody nfsnobody 0 Oct 25 20:53 aa.txt 创建aa.txt,发现身份是nfsnobody
[root@backup mnt] #
[root@nfs01 ~] # cd /data01/
[root@nfs01 data01] # ll
total 0
-rw-r--r-- 1 nfsnobody nfsnobody 0 Oct 25 20:53 aa.txt 创建的存储目录身份也是nfsnobody
[root@nfs01 data01] #
4.5.1.2 no_all_squash的演示
[root@nfs01 ~] # vim /etc/exports 设置为no_all_squash
/data01 172.16.1.0/24(rw,no_all_squash)
[root@nfs01 ~] # exportfs -rv 平滑重启
exporting 172.16.1.0/24:/data01
[root@nfs01 ~] #
[root@backup ~] # mount -t nfs 172.16.1.31:/data01 /mnt 网络挂载
[root@backup ~] # df -h
Filesystem Size Used Avail Use% Mounted on
/dev/sda3 99G 5.3G 93G 6% /
devtmpfs 471M 0 471M 0% /dev
tmpfs 487M 0 487M 0% /dev/shm
tmpfs 487M 8.4M 478M 2% /run
tmpfs 487M 0 487M 0% /sys/fs/cgroup
/dev/sda1 197M 160M 37M 82% /boot
tmpfs 98M 12K 98M 1% /run/user/42
tmpfs 98M 0 98M 0% /run/user/0
172.16.1.31:/data01 99G 5.3G 93G 6% /mnt 挂载成功
[root@backup mnt] # su - oldboy01 切换成普通用户
Last login: Mon Oct 21 14:31:22 CST 2019 on pts/0
[oldboy01@backup ~] $ cd /mnt/ 切换到挂载目录
[oldboy01@backup mnt] $ ll
total 0
[oldboy01@backup mnt] $ touch aa.txt 创建aa.txt权限拒绝
touch: cannot touch 'aa.txt': Permission denied
[oldboy01@backup mnt] $ ll
total 0
4.5.1.3 root_squash的演示
和all_squash一样,见all_squash
4.5.1.4 no_root_squash的演示
[root@nfs01 ~] # vim /etc/exports 设置no_root_squash
/data01 172.16.1.0/24(rw,no_root_squash)
[root@nfs01 ~] # exportfs -rv 平滑重启
exporting 172.16.1.0/24:/data01
[root@backup mnt] # mount -t nfs 172.16.1.31:/data01 /mnt 挂载目录
[root@backup mnt] # df -h
Filesystem Size Used Avail Use% Mounted on
/dev/sda3 99G 5.3G 93G 6% /
devtmpfs 471M 0 471M 0% /dev
tmpfs 487M 0 487M 0% /dev/shm
tmpfs 487M 15M 472M 3% /run
tmpfs 487M 0 487M 0% /sys/fs/cgroup
/dev/sda1 197M 160M 37M 82% /boot
tmpfs 98M 12K 98M 1% /run/user/42
tmpfs 98M 0 98M 0% /run/user/0
172.16.1.31:/data01 99G 5.3G 93G 6% /mnt 挂载成功
[root@backup mnt] # cd /mnt/
[root@backup mnt] # ll
total 0
[root@backup mnt] # touch aa.txt
[root@backup mnt] # ll
total 0
-rw-r--r-- 1 root root 0 Oct 25 21:53 aa.txt 用户没有改变
[root@backup mnt] #
[root@nfs01 ~] # cd /data01/
[root@nfs01 data01] # ll
total 0
-rw-r--r-- 1 root root 0 Oct 25 21:53 aa.txt 用户没有改变
问题:为什么no_root_squash可以正常写入数据
因为root用户在没有权限的时候都可以对文件进行读取和写入数据,所以root用户可以在没有切换身份都可以写入数据
4.6 nfs服务常见的命令和文件
-
rpcinfo -p localhost 查看nfs是否向rpc服务注册端口信息
确认nfs是否启动
- shutdown -e localhost 查看nfs服务有哪些可以挂载的目录
- exportfs -rv 平滑重启
- exportfs -a 全部挂载
- exportfs -u 卸载
- exportfs -o rw,async 172.16.1.31:/data01 /mnt 临时创建存储目录
- /etc/exports nfs的配置文件
- /var/lib/nfs/etab 存储服务默认配置记录文件(这里是默认的,不可修改)
4.7 客户端mount挂载常用的参数和文件
4.7.1 参数
- fg 当客户端挂载目录的时候,会默认在前台运行
- bg 当客户端挂载目录的时候,会默认在后台运行
- soft 服务端服务停止以后,客户端挂载会出现一直连接 挂载的情况,soft可以进行时间的设定,长时间不行 就会自动断开连接
- hard 服务端服务停止以后,客户端挂载会出现一直连接 挂载的情况,服务端服务不启动,会一直请求连接
- rsize 读取内存空间大小,(用户在读取数据的时候,在客 户端内存会分配出一块大小给存放数据,如果没有 在读取存储服务器数据)
- wsize 设置内存空间大小,(用户在写入数据的时候,在客 户端内存会分配出一块大小给用户写入数据,在定 时将数据放入到存储服务器
- rw 拥有读写权限
- ro 只拥有读权限
- suid 允许获取默认支持特殊权限位(suid)
- nosuid 不允许获取默认支持特殊权限位(suid)
- exec 允许文件进行执行
- noexec 不允许文件进行执行
- async 异步存储数据(安全性低,效率高)
- sync 同步存储数据(安全性高,效率低)
- noauto 当使用mount-a的时候默认不自动更新 挂载
- auto 当使用mount-a的时候默认自动更新 挂载
- user 允许普通用户挂载
- nouser 普通用户无法挂载
4.7.2 文件
- /etc/fstab 永久挂载设备的配置文件
- /proc/mounts 存储客户端默认挂载参数的信息
4.8 影响数据存储的原因
- 服务端配置文件的参数信息有关系
- 服务端的存储目录的属主权限有关系
- 在配置文件里面,默认子级目录会继承父级目录的一些参数配置的
- 在客户端挂载的参数设置也会造成数据存储失败
4.8.1 演示配置文件有子级和父级目录的时候出现的问题
4.8.1.1 写文件的配置
4.8.1.1.1 服务端的配置
[root@nfs01 data01] # cat /etc/exports
/data01 172.16.1.0/24(rw,no_all_squash,anonuid=1012,anongid=1015)
/data01/w 172.16.1.0/24(rw,all_squash) 配置存储目录是/data01/w目录
[root@nfs01 data01] # exportfs -rv 平滑重启nfs服务
exporting 172.16.1.0/24:/data01/w
exporting 172.16.1.0/24:/data01
[root@nfs01 ~] # mkdir -p /data01/w 创建存储目录
[root@nfs01 ~] # ll /data01
total 0
-rw-r--r-- 1 root root 0 Oct 25 21:53 aa.txt
drwxr-xr-x 2 root root 6 Oct 26 12:21 r
drwxr-xr-x 2 root root 6 Oct 26 12:21 w 存储目录创建成功
[root@nfs01 data01] # chown nfsnobody. r w
[root@nfs01 data01] # ll
total 0
-rw-r--r-- 1 root root 0 Oct 25 21:53 aa.txt
drwxr-xr-x 2 nfsnobody nfsnobody 6 Oct 26 12:21 w 将权限修改为nfsnobody
4.8.1.1.2 客户端的配置
[root@web01 mnt] # mount -t nfs 172.16.1.31:/data01/w /mnt 远程网络挂载/data01/w目录
[root@web01 mnt] # cd /mnt/
[root@web01 mnt] # ll
total 0
[root@web01 mnt] # touch aa.txt 创建一个目录发现权限拒绝
touch: cannot touch 'aa.txt': Permission denied
[root@web01 mnt] # ll -d /mnt/
drwxr-xr-x 2 nfsnobody nfsnobody 6 Oct 26 12:21 /mnt/ 发现属主也是nfsnobody,但是就是权限拒绝
[root@web01 mnt] # ll
total 0
[root@web01 mnt] #
4.8.1.2 读文件的配置
4.8.1.2.1 服务端配置
[root@nfs01 data01] # cat /etc/exports
/data01 172.16.1.0/24(rw,no_all_squash,anonuid=1012,anongid=1015)
/data01/w 172.16.1.0/24(ro) 配置存储目录是/data01/r目录
[root@nfs01 data01] # exportfs -rv 平滑重启nfs服务
exporting 172.16.1.0/24:/data01/w
exporting 172.16.1.0/24:/data01
[root@nfs01 ~] # mkdir -p /data01/r 创建存储目录
[root@nfs01 ~] # ll /data01
total 0
-rw-r--r-- 1 root root 0 Oct 25 21:53 aa.txt
drwxr-xr-x 2 root root 6 Oct 26 12:21 w
drwxr-xr-x 2 root root 6 Oct 26 12:21 r 存储目录创建成功
[root@nfs01 data01] # chown nfsnobody. r w
[root@nfs01 data01] # ll
total 0
-rw-r--r-- 1 root root 0 Oct 25 21:53 aa.txt
drwxr-xr-x 2 nfsnobody nfsnobody 6 Oct 26 12:21 w 将权限修改为nfsnobody
4.8.1.2.2 客户端的配置
[root@backup /] # mount -t nfs 10.0.0.31:/data01/r /mnt 挂载成功
[root@backup mnt] # su - oldboy01 切换到普通用户
Last login: Sat Oct 26 13:11:29 CST 2019 on pts/0
[oldboy01@backup ~] $ cd /mnt/
[oldboy01@backup mnt] $ ll
total 0
drwxr-xr-x 2 root root 6 Sep 20 11:26 hgfs
[oldboy01@backup mnt] $ touch aa.txt 创建发现权限拒绝
touch: cannot touch 'aa.txt': Permission denied
[oldboy01@backup mnt] $
4.8.1.3 为啥会出现权限拒绝
子级会继承父级的权限的,父级权限是1012,oldboy01,所以子级默认目录权限也是oldboy01,而不是nfsnobody,所以在配置存储目录的时候,不要指定有上下级目录的
4.9 nfs服务的问题
4.9.1 clnt_create: RPC: Port mapper failure - Unable to receive: errno 113 (No route to host)
[root@backup ~] # showmount -e 172.16.1.31
clnt_create: RPC: Port mapper failure - Unable to receive: errno 113 (No route to host)
[root@backup ~] #
原因:
- 这个是因为服务端的网络不通造成的
解决办法:
- ping 172.16.1.31看是否通
4.9.2 The rpcbind failure error
nfs mount: server1:: RPC: Rpcbind failure
RPC: Timed Out
nfs mount: retrying: /mntpoint
原因:
- 可能因为客户机的hosts文件中存在错误的ip地址、主机名或节点名组合;
- 服务器因为过载而暂时停止服务。
4.9.3 The server not responding error
NFS server server2 not responding, still trying
原因:
- 网络不通,用ping命令检测一下。
- 服务器关机。
4.9.4 The NFS client fails a reboot error
启动客户机后停住了,不断显示如下提示信息:
Setting default interface for multicast: add net 224.0.0.0: gateway:
client_node_name.
原因:
- 在etc/vfstab的mount选项中使用了fg而又无法成功mount服务器上的资源,改成bg或将该行注释掉,直到服务器可用为止。
4.9.5 The service not responding error
nfs mount: dbserver: NFS: Service not responding
nfs mount: retrying: /mntpoint
原因:
- 当前级别不是级别3,用who -r查看,用init 3切换。
- NFS Server守护进程不存在,用ps -ef | grep nfs检查,用/etc/init.d/nfs start启动。
4.9.6 The program not registered error
nfs mount: dbserver: RPC: Program not registered
nfs mount: retrying: /mntpoint
原因:
- 前级别不是级别3。
- mountd守护进程没有启动,用/etc/init.d/nfs脚本启动NFS守护进程。
- 看/etc/dfs/dfstab中的条目是否正常。
4.9.7 The stale file handle error
stale NFS file handle
原因:
- 服务器上的共享资源移动位置了,在客户端使用umount和mount重新挂接就可以了。
4.9.8 The unknown host error
nfs mount: sserver1:: RPC: Unknown host
原因:
- hosts文件中的内容不正确。
4.9.9 The mount point error
mount: mount-point /DS9 does not exist.
原因:
- 该挂接点在客户机上不存在,注意检查命令行或/etc/vfstab文件中相关条目的拼写。
4.9.10 The no such file error
No such file or directory.
原因:
- 该挂接点在服务器上不存在,注意检查命令行或/etc/vfstab文件中相关条目的拼写。
4.9.11 No route to host
# mount 10.10.11.211:/opt/data/xmldb /c2c-web1/data/xmldb -t nfs -o rw
mount: mount to NFS server '172.16.1.31′ failed: System Error: No route to host.
原因:
- 防火墙被打开,关闭防火墙。
- 这个原因很多人都忽视了,如果开启了防火墙(包括iptables和硬件防火墙),NFS默认使用111端口,我们先要检测是否打开了这个端口,还要检查TCP_Wrappers的设定。
4.9.12 RPC: Program not registered & retrying (√)
fs mount: 10.10.2.3: : RPC: Program not registered
nfs mount: retrying: /data/data/resinfo2
原因:
- 没有启动NFS共享端服务。
4.9.13 can't contact rpcbind: RPC: Remote system error – Connection refused
exportfs -a 全部挂载
can't contact portmapper: RPC: Remote system error – Connection refused
原因:
- 出现这个错误信息是由于server端的rpcbind没有启动。
4.10 autofs的配置
4.10.1 安装autofs软件
yum -y install autofs
4.10.2 配置文件
[root@backup dev02] # vim /etc/auto.master
/nfs /etc/auto.nfs --timeout 20s 一级目录挂载点 子配置文件 超时秒数
/nfs_backup /etc/auto_backup.nfs --timeout 30s
4.10.3 配置子配置文件
[root@backup dev02] # vim /etc/auto_backup.nfs
dev02 -fstype=nfs 172.16.1.31:/data01子级挂载目录 类型 可以远程访问的服务器地址:/存储服务的目录
4.10.4 重启autofs
root@backup dev01] # systemctl restart autofs
4.10.5 开始挂载
[root@backup nfs_backup] # cd ../nfs
[root@backup nfs] # ll
total 0
[root@backup nfs] # cd dev01 切换到dev01里面则可以挂载
[root@backup dev01] # df -h
Filesystem Size Used Avail Use% Mounted on
/dev/sda3 99G 5.3G 93G 6% /
devtmpfs 471M 0 471M 0% /dev
tmpfs 487M 0 487M 0% /dev/shm
tmpfs 487M 21M 466M 5% /run
tmpfs 487M 0 487M 0% /sys/fs/cgroup
/dev/sda1 197M 160M 37M 82% /boot
tmpfs 98M 12K 98M 1% /run/user/42
tmpfs 98M 0 98M 0% /run/user/0
172.16.1.31:/data01 99G 5.3G 93G 6% /nfs/dev01
[root@backup dev01] #

 浙公网安备 33010602011771号